我的 React Native 技术栈(一年后)
我在 Dev.to 上的第一篇文章,想和大家分享我的 React Native 项目结构、配置以及一些技巧。文章包含了我在一年 React Native 开发过程中积累的大部分经验,涵盖了从项目创建到最终发布的各个环节。
我创建了一个名为typescript-react-native-starter的 GitHub 仓库,现在我所有的项目都使用它。
希望它能对其他 React Native 新手开发者有所帮助。欢迎提交 PR :D
特征
最近,在几个项目让我深刻体会到类型化变量的重要性之后,我开始使用 TypeScript。虽然一开始可能需要一些时间学习,但绝对值得。TypeScript 可以帮你节省数小时甚至数天的调试时间。
此外,它还能使你的代码具有自文档性,这对于有多名开发人员的项目至关重要。
-
TypeScript
-
通量状态管理
- Redux:可预测的状态容器
- Redux Persist:离线存储
- Redux Saga:Redux 的副作用模型
- typesafe-actions:轻松创建类型安全的操作
      import { action } from 'typesafe-actions';
      import * as types from './actionTypes';

      export const myAction = payload => action(types.MY_ACTION_TYPE, payload);
-
导航
- React Navigation:基于 Javascript 的易用型导航解决方案
-
单元测试
- 使用Jest、Enzyme和react-native-testing-library进行单元测试
- Codecov:覆盖率报告
-
CI/CD
-
绒毛
- Tslint 已配置 Airbnb 样式
- VS Code 与 Prettier 兼容
-
国际化和本地化
- react-native-localization:易于使用的 i18n 包
-
其他的
- Cocoapods:iOS 依赖项管理器
- jetifier :用于React Native 0.60 到 AndroidX 迁移的过渡工具
- autobind-decorator:使用装饰器轻松绑定组件的功能
// Before
handleClick()  {...}

<button onClick={ this.handleClick.bind(this) }></button>

// After
@boundMethod
handleClick() {...}

<button onClick={ this.handleClick }></button>
项目结构
我使用的文件结构借鉴了很多资料,所以你可能会觉得似曾相识。我喜欢按类别整理文件,但一些特殊类别除外App.tsx,例如store.ts……
该publishing文件夹还包含一些用于部署应用的实用占位图片。
例如,即使是内部测试,要将应用部署到 Google Play,也需要添加屏幕截图、功能图等。一开始还好,但做了几个项目之后就觉得很麻烦,所以我决定创建一些占位图片。
├── __tests__                            // Unit tests
│   ├── App.test.tsx                     // App component's tests
│   ├── components
│   │   └── MyComponent.test.txs
│   └── ...
├── android
├── app.json
├── assets                               // All assets: images, videos, ...
├── index.js
├── ios
├── publishing                           // Icon, screenshots, preview,... for App Store & Play Store
└── src
    ├── App.tsx
    ├── actions                          // Actions
    │   ├── actionTypes.ts               // Action types
    │   └── app.ts                       // appReducer's actions
    ├── components                       // Components
    │   └── MyComponent.tsx
    ├── constants                        // Colors, sizes, routes,...
    │   └── strings.ts                   // i18n
    ├── containers                       // Screens, pages,...
    ├── lib                              // Libraries, services,...
    ├── index.tsx                        // Root component
    ├── reducers                         // Reducers
    │   └── app.ts                       // appReducer
    ├── sagas                            // Redux sagas
    ├── store.ts
    ├── types                            // Type declarations
    │   └── index.d.ts
    └── utils                            // Utilities
实用技巧
本部分内容是一些完全随机但实用的小技巧,欢迎在评论区分享你的想法或提交 PR。
导航服务
您可以使用NavigationService实现无需 navigation 属性的导航。src/lib/NavigationService.ts
import NavigationService from '../lib/NavigationService';

//...

NavigationService.navigate('ChatScreen', { userName: 'Lucy' });
可可豆荚
当您运行程序react-native link且链接的库包含 podspec 文件时,链接将使用 Podfile。要禁用此功能,请移除相关配置。
# Add new pods below this line
从第 24 行开始ios/Podfile
静态包
每次以物理设备为目标时,即使在调试模式下,也会构建静态包。为了节省时间,调试模式下禁用了包生成。
react-native-screens
您可以将 react-native-screens 与 react-navigation 结合使用,以降低内存消耗。
-
安装并按照react-native-screens
Usage with react-navigation (without Expo)中的步骤操作 -
打开
./src/index.tsx并取消评论
// import { useScreens } from 'react-native-screens';
// useScreens();
响应能力
- 尽量避免使用“绝对”位置和硬数值(100、300、1680 等),尤其是对于较大的数值。
- 改用弹性盒子布局和百分比值
- 如果必须使用固定值,我有一个
normalize函数可以根据屏幕的宽度或高度自动调整这些固定值。我稍后可能会把它上传到代码仓库:
import { Dimensions, Platform, PixelRatio } from 'react-native';

export const { width: SCREEN_WIDTH, height: SCREEN_HEIGHT } = Dimensions.get(
  'window',
);

// based on iphone X's scale
const wscale = SCREEN_WIDTH / 375;
const hscale = SCREEN_HEIGHT / 812;

export function normalize(size, based = 'width') {
  const newSize = based === 'height' ? size * hscale : size * wscale;
  if (Platform.OS === 'ios') {
    return Math.round(PixelRatio.roundToNearestPixel(newSize));
  } else {
    return Math.round(PixelRatio.roundToNearestPixel(newSize)) - 2;
  }
}
现在我可以使用:
// iphone X
normalize(100) // = 100

// iphone 5s
normalize(100) // = maybe 80

// You can choose either "width" (default) or "height" depend on cases:
container = {
  width: normalize(100, "width"), // "width" is optional, it's default
  height: normalize(100, "height")
}
- 在正式发布之前,请在 3 个不同的模拟器上测试您的应用:iPhone 5s(小屏幕)、iPhone 8(中屏幕)和 iPhone Xs Max(大屏幕)。
使用 Fastlane 的 Beta 分布
- 安装fastlane
  # Using RubyGems
  sudo gem install fastlane -NV

  # Alternatively using Homebrew
  brew cask install fastlane
iOS
- 打开你的项目 Xcode 工作区并更新你的应用程序
Bundle Identifier和Team - 初始化快速通道
  cd <PROJECT_NAME>/ios
  fastlane init
- 分发您的应用
fastlane beta
安卓
- 收集您的 Google 凭据
- 使用 Android Studio 打开您的项目,并更新您的应用程序
applicationId文件build.gradle (Module: app)。 Generated Signed Bundle / APK...从Build菜单中选择Next然后,在……Create new...之下Key store pathNextFinish- 首次部署应用时,您必须手动将其上传到 Google Play 管理中心。Google 不允许在首次上传时使用其 API。
- 在Google Play 管理中心创建您的应用(与 iOS 不同,Fastlane 无法为您完成此操作)。
-
请确保这 4 个勾选图标均为绿色。
推荐顺序:
Pricing & distribution,,Content rating和Store listingApp releasesStore listing您可以在publishing/android文件夹中找到所需的资源。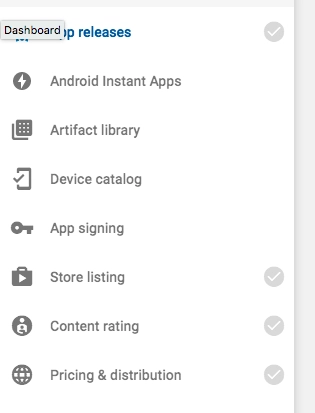
-
初始化快速通道

  cd <PROJECT_NAME>/android
  fastlane init
- 使用 Fastfile
publishing
cp publishing/android/fastlane/Fastfile android/fastlane
- 分发您的应用
fastlane beta
目前没有官方插件可以自动升级 Android 版本代码(与 iOS 版本不同)。
每次部署前,请务必手动升级versionCode其中的值android/app/build.gradle。
更多的
- 请查看Fastlane 的 Beta 版分发指南了解更多详情。
- Fastlane 的React Native文档
Apple Store Connect 缺少合规性
如果您不使用 Fastlane,并且不想每次推送都提供出口合规信息,那么请将此添加到您的设置中。Info.plist
<key>ITSAppUsesNonExemptEncryption</key>
<false/>

<true/>请注意,如果您的应用使用加密, 您可能需要进行相应设置。