使用 React、TypeScript 和 Tailwind 创建 VS Code 扩展
太长不看
本文还将介绍除 React、TypeScript 和 Tailwind CSS 之外的VS Code 扩展程序的基础知识。如果您想直接了解重点,请点击此处;否则,让我们深入了解一下。

目录
介绍
本文献给那些喜欢使用名为VS Code的代码编辑器的人们,这款编辑器一直以来都被低估和未得到充分利用。
代码编辑器内部有一个扩展程序部分,可以在编码时提供额外的帮助,例如代码片段(自动完成)、调试、主题等更多有用的扩展程序。
例如,Postman VS Code 扩展程序使您可以直接从 Visual Studio Code 中在 Postman 中开发和测试您的 API。

上述扩展程序中显示的界面位于 VS Code 内部,这得益于 Postman 的扩展程序。它看起来像是代码编辑器的一个组成部分,但可以肯定的是,它完全是用HTML、CSS和JavaScript编写的,任何人都可以轻松实现。
为了确保万无一失,只需按下Ctrl + Shift + P并选择Developer: Toggle Developer Tools在 VS Code 中显示开发者工具即可。

如上图所示,检查任何扩展程序就像检查任何网页一样简单。现在来说说重点,如何制作这样的扩展程序。
让我们从这里开始……
了解扩展创建
VS Code 使用名为Yeoman和代码生成器的命令行工具来创建扩展。
开始之前,你需要安装 npm 并具备 Node 的基本知识。
全局安装软件包
npm install --global yo generator-code
启动扩展程序安装
yo code
之后,您将看到 Yeomen 的扩展菜单。
     _-----_     ╭──────────────────────────╮
    |       |    │   Welcome to the Visual  │
    |--(o)--|    │   Studio Code Extension  │
   `---------´   │        generator!        │
    ( _´U`_ )    ╰──────────────────────────╯
    /___A___\   /
     |  ~  |
   __'.___.'__
 ´   `  |° ´ Y `

? What type of extension do you want to create? (Use arrow keys)
> New Extension (TypeScript)
  New Extension (JavaScript)
  New Color Theme
  New Language Support
  New Code Snippets
  New Keymap
  New Extension Pack
  New Language Pack (Localization)
  New Web Extension (TypeScript)
  New Notebook Renderer (TypeScript)
可以选择不同类型的扩展,但我们这里选择的是某些特定选项。
? What type of extension do you want to create? New Extension (TypeScript)
? Whats the name of your extension? HelloWorld
? Whats the identifier of your extension? helloworld
? Whats the description of your extension? LEAVE BLANK
? Initialize a git repository? Yes
? Bundle the source code with webpack? No
? Which package manager to use? npm

? Do you want to open the new folder with Visual Studio Code? Open with `code`
在编辑器中,打开src/extension.ts并按下F5。这将在新的“扩展开发主机”窗口中编译并运行扩展程序。
在新窗口中,Hello World从命令面板运行命令。Ctrl + Shift + P
输出结果将显示一条 VS Code 信息消息(默认):Hello World
你可以通过更改里面的内容来进行尝试src/extension.ts:
// The module 'vscode' contains the VS Code extensibility API
// Import the module and reference it with the alias vscode in your code below
import * as vscode from 'vscode';

// This method is called when your extension is activated
// Your extension is activated the very first time the command is executed
export function activate(context: vscode.ExtensionContext) {

    // Use the console to output diagnostic information (console.log) and errors (console.error)
    // This line of code will only be executed once when your extension is activated
    console.log('Congratulations, your extension "helloworld" is now active!');

    // The command has been defined in the package.json file
    // Now provide the implementation of the command with registerCommand
    // The commandId parameter must match the command field in package.json
    let disposable = vscode.commands.registerCommand('helloworld.helloWorld', () => {
        // The code you place here will be executed every time your command is executed
        // Display a message box to the user
        vscode.window.showInformationMessage('Hello World from Helloworld!');
    });

    context.subscriptions.push(disposable);
}

// This method is called when your extension is deactivated
export function deactivate() {}
此文件是扩展程序的基础。它包含两个重要方法:activate和deactivate。导入的vscode.command模块注册命令和上下文参数,请订阅它们。
在package.json
{
...,
  "activationEvents": [],
  "contributes": {
    "commands": [
      {
        "command": "helloworld.helloWorld",
        "title": "Hello World"
      }
    ]
  },
}
Contributes.command:帮助在命令面板中显示带有标题的命令,还包含视图等。
激活事件:在特定条件下自动触发已注册的命令
为了更清楚地了解情况,您可以访问VS Code 的“您的第一个扩展”页面。
但是,本文并非介绍普通的扩展程序。在用户界面部分,我们将使用VS Code 的WebViews。
用于 UI 的 Webview API
Webview 允许扩展程序在 Visual Studio Code 中创建完全可自定义的视图。要快速实现,请按照以下步骤操作:用以下代码
覆盖文件:src/extension.ts
import * as vscode from 'vscode';

export function activate(context: vscode.ExtensionContext) {

    console.log('Congratulations, your extension "Webview" is up and running now');

    let webview = vscode.commands.registerCommand('helloworld.webview', () => {

        let panel = vscode.window.createWebviewPanel("webview", "Web View", {
            viewColumn: vscode.ViewColumn.One,
        })

        // will set the html here
                 panel.webview.html = `<h1>This is Heading 1</h1>
    <h2>This is Heading 2</h2>
    <h3>This is Heading 3</h3>
    <h4>This is Heading 4</h4>
    <h5>This is Heading 5</h5>`

    });

    });

    context.subscriptions.push(webview);
}

export function deactivate() { }
需要注意的关键点:
-
要借助命令创建 Webview 面板
helloworld.webview,我们需要将其注册到其回调函数中。panel该回调函数用于将 html 内容设置到 Webview 中。 -
在回调函数中,
vscode.window.createWebviewPanel会调用一个接受四个参数的方法:viewType`titletitle`(WebView面板的标题)、showOption`column focus`(要聚焦的列)和options`value`(很重要,因为它处理安全性,例如脚本和面板资源的访问权限),并返回一个值。vscode.WebviewPanel -
重要步骤:如果您注册了新命令,请务必将其添加
package.json到contributes.commands
{
...,
"contributes": {
    "commands": [
      {
        "command": "helloworld.webview",
        "title": "Web View"
      }
    ]
  },
}
然后,运行该扩展程序F5,最终会打开另一个 VS Code 窗口Extension Development。接着按下 Ctrl+C ,在命令面板中Ctrl + Shift + P输入 on (或您在 package.json 中提到的命令标题)。Web View
出现的窗口必须看起来像这样

用户界面样式
样式设置与网页使用 CSS 的方式相同,但需要注意的是,如果您要从外部编写 CSS,则需要先允许该资源。
createWebviewPanel默认情况下,扩展位置和工作区内的所有本地资源均可访问。要控制它们,只需通过提供第四个参数来修改代码即可localResourceRoots。
// while creating panel allow the path you want to add
// in my case adding media as rootDir to localResources
let panel = vscode.window.createWebviewPanel("webview", "Web View", {
       viewColumn: vscode.ViewColumn.One
},{    localResourceRoots: [vscode.Uri.joinPath(context.extensionUri, "media")]
     })
下一步是media在扩展文件夹内的根目录中创建一个名为 的文件夹。
文件夹内可以放置所有样式文件,例如图片、svg、css 文件等。
在媒体文件夹内创建一个文件vscode.css(文件名可以随意命名)。添加以下内容。
:root {
  --container-paddding: 20px;
  --input-padding-vertical: 6px;
  --input-padding-horizontal: 4px;
  --input-margin-vertical: 4px;
  --input-margin-horizontal: 0;
}

html {
  box-sizing: border-box;
  font-size: 13px;
}

*,
*:before,
*:after {
  box-sizing: inherit;
}

body,
h1,
h2,
h3,
h4,
h5,
h6,
p,
ol,
ul {
  margin: 0;
  padding: 0;
  font-weight: normal;
}

img {
  max-width: 100%;
  height: auto;
}

body {
  padding: 0 var(--container-paddding);
  color: var(--vscode-foreground);
  font-size: var(--vscode-font-size);
  font-weight: var(--vscode-font-weight);
  font-family: var(--vscode-font-family);
  background-color: var(--vscode-editor-background);
}

ol,
ul {
  padding-left: var(--container-paddding);
}

body > *,
form > * {
  margin-block-start: var(--input-margin-vertical);
  margin-block-end: var(--input-margin-vertical);
}

*:focus {
  outline-color: var(--vscode-focusBorder) !important;
}

a {
  color: var(--vscode-textLink-foreground);
}

a:hover,
a:active {
  color: var(--vscode-textLink-activeForeground);
}

code {
  font-size: var(--vscode-editor-font-size);
  font-family: var(--vscode-editor-font-family);
}

button {
  border: none;
  padding: var(--input-padding-vertical) var(--input-padding-horizontal);
  width: 100%;
  text-align: center;
  outline: 1px solid transparent;
  outline-offset: 2px !important;
  color: var(--vscode-button-foreground);
  background: var(--vscode-button-background);
}

button:hover {
  cursor: pointer;
  background: var(--vscode-button-hoverBackground);
}

button:focus {
  outline-color: var(--vscode-focusBorder);
}

button.secondary {
  color: var(--vscode-button-secondaryForeground);
  background: var(--vscode-button-secondaryBackground);
}

button.secondary:hover {
  background: var(--vscode-button-secondaryHoverBackground);
}

input:not([type="checkbox"]),
textarea {
  display: block;
  width: 100%;
  border: none;
  font-family: var(--vscode-font-family);
  padding: var(--input-padding-vertical) var(--input-padding-horizontal);
  color: var(--vscode-input-foreground);
  outline-color: var(--vscode-input-border);
  background-color: var(--vscode-input-background);
}

input::placeholder,
textarea::placeholder {
  color: var(--vscode-input-placeholderForeground);
}

.container {
  display: flex;
}

.form {
  display: flex;
  flex-direction: column;
  flex: 1;
  padding: 10px;
  gap: 10px;
}
上述样式设置将帮助您重置 HTML 元素的默认样式属性,使其看起来像 VS Code 的原生样式。上面提到的变量由 VS Code 直接提供。
您也可以添加任何您选择的图片,只需将图片文件放入媒体文件夹即可。
要应用 CSS 样式表和图像,只需添加以下代码并将其应用到 HTML 中即可。
const cssStyle = panel.webview.asWebviewUri(vscode.Uri.joinPath(context.extensionUri, "media", "vscode.css"))

const imgSrc = panel.webview.asWebviewUri(vscode.Uri.joinPath(context.extensionUri, "media", "vim.svg"))

panel.webview.html = `<!DOCTYPE html>
    <html lang="en">
    <head>
        <meta charset="UTF-8">
        <meta name="viewport" content="width=device-width, initial-scale=1.0">
        <link rel="stylesheet" type="text/css" href="${cssStyle}" />
    </head>
    <body>
    <div class="container">
        <img src="${imgSrc}" width="200" />
        <div class="form">
            <code>Title</code>
            <input />
            <code>Code</code>
            <textarea></textarea>
            <button>Submit</button>
        </div>
    </div>
    </body>
    </html>`
快速提示:要查看 HTML 中的更改,您需要重新加载整个扩展程序;Ctrl + R要快速重新加载,无需每次都重新启动。Ctrl + F5
预期输出:

脚本编写
您也可以使用 JavaScript 在扩展程序内部更新 DOM。但需要事先启用此功能。
let panel = vscode.window.createWebviewPanel("webview", "Web View", {
            viewColumn: vscode.ViewColumn.One
        },{
        enableScripts: true
    })

const scriptPath= panel.webview.asWebviewUri(vscode.Uri.joinPath(context.extensionUri, "media", "script.js"))

panel.webview.html = `<!DOCTYPE html>
    <html lang="en">
    <head>
        <meta charset="UTF-8">
        <meta name="viewport" content="width=device-width, initial-scale=1.0">
        <script src="${scripts}"></script>
    </head>
    <body>
    <h1>Count:</h1>
        <p id="count">0</p>
    <button onclick="changeHeading()">Add</button>
    </body>
    </html>`
现在,在文件夹script.js内创建文件media,并添加以下几行。
//script.js
function changeHeading() {
    document.getElementById("count").textContent = +document.getElementById("count").textContent + 1
}
运行扩展程序后的预期输出
有趣的事实:脚本部分的变化无需重新加载页面即可查看,只需关闭并重新打开网页视图即可。
实现 React、TypeScript 和 Tailwind
在深入了解了扩展和Web 视图之后,现在是时候了解框架了,原因显而易见,它们在使用不同的库时可以简化操作。
从 React 开始,你可以选择任何你喜欢的框架。
Step 1正在初始化扩展yo code
yo code

? What type of extension do you want to create? New Extension (TypeScript)
? Whats the name of your extension? react-ext
? Whats the identifier of your extension? react-ext
? Whats the description of your extension? LEAVE BLANK
? Initialize a git repository? Yes
? Bundle the source code with webpack? No
? Which package manager to use? npm

? Do you want to open the new folder with Visual Studio Code? Open with `code`
Step 2在根目录下创建一个使用TypeScript的React应用。
npx create-react-app web --template typescript
cd web
Step 3在 React 应用目录中web,设置Tailwind CSS
npm i -D tailwindcss postcss
npx tailwindcss init
编辑tailwind.config.js
//tailwind.config.js
module.exports = {
  content: ['./src/**/*.{js,jsx,ts,tsx}'],
  theme: {
    extend: {},
  },
  plugins: [],
}
编辑web/src/index.css
@tailwind base;
@tailwind components;
@tailwind utilities;

body {
  @apply p-0;
}
Step 4在 React 目录中,创建名为.postcssrc
//.postcssrc
{
  plugins: {
    tailwindcss: { },
  },
}
Step 5编辑 React 应用web/src/App.tsx
function App() {
  return (
    <div className="bg-gradient-to-r from-blue-600 to-purple-500 p-10">
      <p className="text-white/80 text-xl font-semibold">
        Lorem ipsum dolor sit amet consectetur adipisicing elit. Ea, explicabo
        doloremque deserunt, voluptates, fugiat dolorem consectetur odio autem
        quas ipsa veniam ducimus necessitatibus exercitationem numquam assumenda
        natus beatae sed velit!
      </p>
    </div>
  );
}

export default App;
Step 6设置Parcel,最轻量级的打包工具(说实话,在尝试过 webpack、babel 和 rollup 之后,我觉得是在浪费时间)。
在React根目录Parcel中将其作为开发依赖项安装web
npm i -D parcel
在 React 应用中,编辑package.json
//web/package.json
{
...,
"source": "src/index.tsx",
"scripts": {
    "start": "parcel", //overwrite
    "build": "parcel build", //overwrite
    "test": "react-scripts test",
    "eject": "react-scripts eject"
  },
}
运行包裹 (分拣)
npm start

#> web@0.1.0 start
#> parcel

#Server running at http://localhost:1234
每次您更改其中src或与之相关的内容时,src/index.tsx例如index.css,它将重新运行快速构建并将其存储在distreact 应用程序目录下的文件夹中,如index.js和index.css。
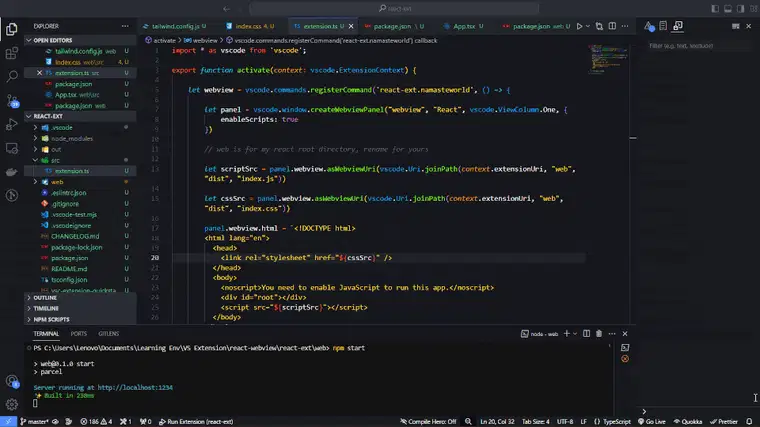
Step 7现在来说说扩展集成部分,编辑src/extension.ts
import * as vscode from 'vscode';

export function activate(context: vscode.ExtensionContext) {

    let webview = vscode.commands.registerCommand('react-ext.namasteworld', () => {

        let panel = vscode.window.createWebviewPanel("webview", "React", vscode.ViewColumn.One, {
            enableScripts: true
        })

        // web is for my react root directory, rename for yours

        let scriptSrc = panel.webview.asWebviewUri(vscode.Uri.joinPath(context.extensionUri, "web", "dist", "index.js"))

        let cssSrc = panel.webview.asWebviewUri(vscode.Uri.joinPath(context.extensionUri, "web", "dist", "index.css"))

        panel.webview.html = `<!DOCTYPE html>
        <html lang="en">
          <head>
            <link rel="stylesheet" href="${cssSrc}" />
          </head>
          <body>
            <noscript>You need to enable JavaScript to run this app.</noscript>
            <div id="root"></div>
            <script src="${scriptSrc}"></script>
          </body>
        </html>
        `
    });

    context.subscriptions.push(webview);
}

export function deactivate() { }
最重要的步骤!
请务必手动将所有已注册的命令写入 package.json 文件,否则命令面板中将缺少 UI 选项。Ctrl+Shift+P
为此,请转到扩展程序根目录下的 package.json 文件。
{
...,
"contributes": {
    "commands": [
      {
        "command": "react-ext.namasteworld",
        "title": "React Web View"
      }
    ]
  },
}
Final Step现在,到了揭晓真相的时刻。
- 只需按下按钮
Ctrl F5,就会打开另一个扩展开发窗口。 - 在另一个测试用的 VS Code 编辑器扩展开发中,按以下键打开命令面板
Ctrl+Shift+P - 搜索您注册的命令,命令名称以您的指定名称显示
package.json,在我的例子中是React Web View。
类似下图所示的窗口必须弹出。

预期步骤:
有趣的事实:在 React 应用中进行更改后,无需重新运行App.tsx,只需像下面这样重新打开窗口即可。

额外内容:VS Code UI 工具包(React)
使用框架而非原始 HTML 的优势在于,您可以使用诸如 shadcn ui、framer motion 等 UI 库。
其中一个有用的例子是他们自己开发的Webview UI 工具包。
这是一个非常棒的UI库,它可以让你的扩展程序感觉就像原生应用一样。
要实现这一点,你只需要vscode/webview-ui-toolkit在你的 React 应用中安装即可。
npm install --save @vscode/webview-ui-toolkit
编辑App.tsx
import {
  VSCodeButton,
  VSCodeDataGrid,
  VSCodeDataGridRow,
  VSCodeDataGridCell,
  VSCodeTextField,
  VSCodeProgressRing,
} from "@vscode/webview-ui-toolkit/react";

function App() {
  const rowData = [
    {
      cell1: "Cell Data",
      cell2: "Cell Data",
      cell3: "Cell Data",
      cell4: "Cell Data",
    },
    {
      cell1: "Cell Data",
      cell2: "Cell Data",
      cell3: "Cell Data",
      cell4: "Cell Data",
    },
    {
      cell1: "Cell Data",
      cell2: "Cell Data",
      cell3: "Cell Data",
      cell4: "Cell Data",
    },
  ];

  return (
    <div className="grid gap-3 p-2 place-items-start">
      <VSCodeDataGrid>
        <VSCodeDataGridRow row-type="header">
          <VSCodeDataGridCell cell-type="columnheader" grid-column="1">
            A Custom Header Title
          </VSCodeDataGridCell>
          <VSCodeDataGridCell cell-type="columnheader" grid-column="2">
            Another Custom Title
          </VSCodeDataGridCell>
          <VSCodeDataGridCell cell-type="columnheader" grid-column="3">
            Title Is Custom
          </VSCodeDataGridCell>
          <VSCodeDataGridCell cell-type="columnheader" grid-column="4">
            Custom Title
          </VSCodeDataGridCell>
        </VSCodeDataGridRow>
        {rowData.map((row) => (
          <VSCodeDataGridRow>
            <VSCodeDataGridCell grid-column="1">{row.cell1}</VSCodeDataGridCell>
            <VSCodeDataGridCell grid-column="2">{row.cell2}</VSCodeDataGridCell>
            <VSCodeDataGridCell grid-column="3">{row.cell3}</VSCodeDataGridCell>
            <VSCodeDataGridCell grid-column="4">{row.cell4}</VSCodeDataGridCell>
          </VSCodeDataGridRow>
        ))}
      </VSCodeDataGrid>

      <span className="flex gap-3">
        <VSCodeProgressRing />
        <VSCodeTextField />
        <VSCodeButton>Add</VSCodeButton>
        <VSCodeButton appearance="secondary">Remove</VSCodeButton>
      </span>
    </div>
  );
}

export default App;
这个库最棒的地方在于,它兼容 VS Code 中的所有可用主题,并使用它们的 CSS 变量(我猜是这样),这真是太棒了。
以下是一个示例

更多使用信息请查看他们的代码库。
如果你在这里,我不相信你真的读到了这里,顺便说一句,谢谢你的阅读。
这是我的 React 配置仓库的 GitHub 链接,您可以轻松克隆并自行尝试。克隆仓库
文章来源:https://dev.to/rakshit47/create-vs-code-extension-with-react-typescript-tailwind-1ba6