样式化组件:是什么、为什么以及如何?
样式化组件是一种使用 CSS和ES6 提供的优势来设置 React 组件样式的方式,官方文档对此进行了最好的解释:
利用标记模板字面量(JavaScript 的最新功能)和 CSS 的强大功能,styled-components 允许您编写实际的 CSS 代码来设置组件的样式。它还消除了组件和样式之间的映射——使用组件作为低级样式结构再简单不过了!
以下是我们今天要讨论的内容:
什么是样式组件?
以下是样式组件的示例:
import styled from "styled-components"

// Creates a StyledButton component of a button with the given style
const StyledButton = styled.button`
  background-color: #710504;
  color: #FFC700;
  border: 2px solid #6A686A;

  &:hover {
    cursor: pointer;
    color: white;
  }
`

// StyledButton can now be used like any other component
const Button = ({ children, onClick }) => {
  return (
    <StyledButton onClick={onClick}>
      {children}
    </StyledButton>
  )
}
如你所见,它们就是你之前所熟悉的 React 组件。创建它们的styled方法如下:调用一个方法,传入你想要使用的 HTML 标签的名称,并传入其样式。以下是所有可用标签的列表。
styled.button只是 的快捷方式styled('button'),这是 ES6 的一项功能,称为标记模板😄
样式化组件的最大优点之一是,你可以根据组件的 props 调整样式,例如:
// https://www.styled-components.com/docs/basics#adapting-based-on-props

const StyledButton = styled.button`
  background: ${props => props.primary ? "palevioletred" : "white"};
  color: ${props => props.primary ? "white" : "palevioletred"};
`;

render(
  <div>
    <Button>Normal</Button>
    <Button primary>Primary</Button>
  </div>
);
优势
可重用组件
样式化组件允许我们创建非常容易重用的组件,因为它们直接包含其样式值。
因此以下 JSX:
<h1 className="title">Christopher Kade</h1>
可以在以下组件中翻译:
const Title = styled.h1`
  color: white;
  font-size: 3rem;
`
并且可以像这样使用:
<Title>Christopher Kade</Title>
这消除了组件与其各自 CSS 之间的映射的需要,并使样式成为每个组件的组成部分。
作用域样式
CSS 本质上是全局的,David Khourshid 对此进行了很好的阐述:
你有没有想过,为什么 CSS 有全局作用域?也许我们想使用一致的字体、颜色、大小、间距、布局、过渡等等,让我们的网站和应用感觉像一个整体?
然而,它的本质却常常被很多人所厌恶,因为改变某个地方的值可能会“破坏”其他地方的某些东西。这时,CSS 作用域就派上用场了。
CSS 作用域允许我们通过限制 CSS 对其组件的影响来避免这些问题,样式组件也不例外。
范围样式使维护变得轻松,您不必在多个文件中搜索弄乱视图的那段 CSS。
轻松创建动态 CSS
我已经提到过样式组件如何允许您使用组件的 props 来动态设置样式值。
例如,我目前正在从事一个附带项目,我正在构建一个基于魔兽世界 UI 的组件库,我有一个ProgressBar具有默认大小和完成百分比的组件,可以使用 prop 进行更改,如下所示:
<ProgressBar text="Loading..." percent={25} width={500} />
然后,我将在样式组件中设置栏的大小和进度,如下所示:
// Set the bar's width based on the width prop
const Wrapper = styled.div`
  width: ${props => props.width}px;
  // ...
`

// Set the bar's advancement based on the percent prop
const Bar = styled.div`
  width: ${props => props.percent}%;
  // ...
`

const Label = styled.span`
  // ...
`

const ProgressBar = ({ width, text, percent }) => {
  return (
    <Wrapper width={width}>
      <Label>
        {text}
      </Label>
      <Bar percent={percent} />
    </Wrapper>
  )
}
支持服务器端渲染
SSR 被广泛使用,特别是得益于Next、Gatsby或Nuxt等工具,因此样式组件团队确保使用称为样式表补水的概念来支持此功能。
基本思想是,每次在服务器上渲染应用程序时,您都可以创建一个 ServerStyleSheet 并将提供程序添加到您的 React 树,该提供程序通过上下文 API 接受样式。
这不会干扰全局样式,例如关键帧或 createGlobalStyle,并允许您将 styled-components 与 React DOM 的各种 SSR API 一起使用。
有关官方文档的更多信息。
性能改进
样式化组件会跟踪在给定页面上渲染的组件,并注入它们的样式,而不会添加任何其他内容。这意味着用户只需加载给定组件所需的最少样式。
其他优势
其他优势包括原生移动支持和单元/快照测试工具,但我认为这三个可能是最重要的。
缺点
学习曲线
样式化组件需要一些时间来适应,它们的语法和它们引入的新思维方式需要一些耐心,但在我看来,回报是值得的。
较小的社区
在撰写本文时,样式组件库在Github上已有 23k⭐ 。尽管如此,获得快速支持有时仍会很困难。虽然我还没有真正遇到过找不到特定问题解决方案的情况。
长寿
就像 JS 生态系统中的任何工具一样,样式化组件可能有一天会消失,这将需要重构你的代码库。因此,在将其投入生产之前,务必牢记这一点。
具体的练习
注意:为了完成这个练习,你需要很好地掌握 CSS 和 React(如果你在使用时遇到困难
flexbox,请随时查看我的文章,其中涵盖了你需要的所有基础知识)。
好吧,让我们开始行动吧。
打开codesandbox,选择create-react-app启动器并导入styled-components依赖项。
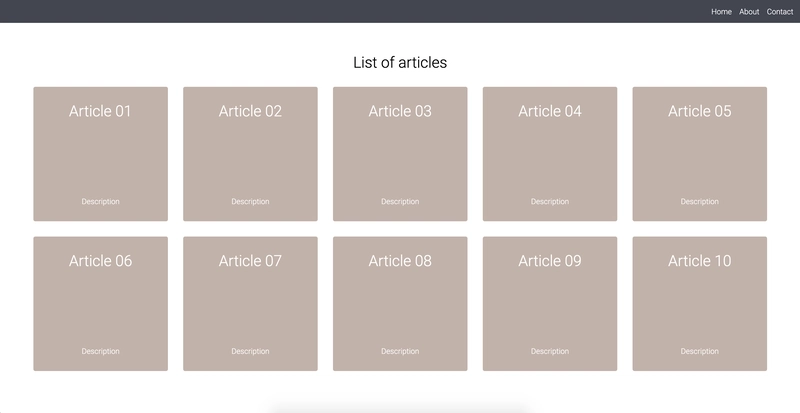
我们将创建一个非常简单的布局,用于显示导航栏和卡片。练习的每个步骤都将包含一个组件(以及其相关的样式组件)。尝试从头开始编写代码,完成后(或者遇到困难时),请随时查看代码片段。
生成的代码可以在这里找到。
1. Navbar 组件
该组件右侧仅包含 3 个链接,并显示在视图的顶部。
首先在Navbar.js下创建一个文件/src/components/。分别从和
导入 react 和 styled 。最后,创建并导出一个尚未返回任何内容的组件。Reactstyled-componentsNavbar
// Navbar.js

import React from "react";
import styled from "styled-components";

const Navbar = () => {
  return (

  );
};

export default Navbar;
我们现在要创建一个Wrapper样式化的组件来包裹我们的链接。确保设置好它的样式,包括flexbox使你的项目在容器的末尾对齐。
最后,确保你的Navbar组件返回Wrapper。
// Navbar.js

import React from "react";
import styled from "styled-components";

const Wrapper = styled.div`
  display: flex;
  justify-content: flex-end;
  align-items: center;
  background-color: #424651;
  height: 3rem;
`;

const Navbar = () => {
  return (
    <Wrapper>
    </Wrapper>
  );
};

export default Navbar;
接下来,我们要创建一个样式组件来显示我们的链接。NavbarItem使用a标签创建,别忘了设置它的:hover样式!
// Navbar.js

// ...

const NavbarItem = styled.a`
  font-size: 1rem;
  margin-right: 1rem;
  color: white;

  &:hover {
    opacity: 0.5;
    cursor: pointer;
  }
`;

const Navbar = () => {
  return (
    <Wrapper>
      <NavbarItem>Home</NavbarItem>
      <NavbarItem>About</NavbarItem>
      <NavbarItem>Contact</NavbarItem>
    </Wrapper>
  );
};

//...
好了!你已经Navbar从头创建了组件,样式化组件背后的思维过程一开始可能看起来有点难以理解,但每一步之后,它都会变得越来越直观。
现在让我们创建与卡片相关的元素😃
2. CardList 组件
让我们创建一个CardList包含卡片的组件。
CardList将采用简单组件的形式Wrapper,并.map通过数据列表(.json例如,您可以使用包含博客文章数组的文件)呈现每张卡片。
首先创建CardList返回Wrapper样式组件的组件,不要忘记使用它flexbox来获得漂亮的布局。
// CardList.js
import React from "react";
import styled from "styled-components";

import data from "../data";

const Wrapper = styled.div`
  display: flex;
  flex-wrap: wrap;
  justify-content: center;
`;

const CardList = () => {
  return (
    <Wrapper>
    </Wrapper>
  );
};

export default CardList;
Card一旦我们的组件完成,我们就会回到这个组件。
3. Card 组件
该Card组件将以其标题和描述的形式接收道具,并将由 3 个样式组件组成:Title和Description。Wrapper
继续创建它,给它任何你想要的样式。我个人确保使用它flexbox作为包装器,以便将每张卡片的内容以列的形式显示。🤷♂️
// Card.js
import React from "react";
import styled from "styled-components";

const Wrapper = styled.div`
  display: flex;
  flex-direction: column;
  justify-content: space-between;
  width: 250px;
  height: 250px;
  background-color: #c4b2a9;
  border-radius: 4px;
  padding: 1rem;
  margin: 1rem;

  &:hover {
    opacity: 0.5;
    cursor: pointer;
  }
`;

const Title = styled.h1`
  font-size: 2rem;
  font-weight: 300;
  margin: 1rem;
  color: white;
`;

const Description = styled.p`
  color: white;
`;

const Card = ({ title, description }) => {
  return (
    <Wrapper>
      <Title>{title}</Title>
      <Description>{description}</Description>
    </Wrapper>
  );
};

export default Card;
现在让我们回过头来CardList确保通过.map我们的数据来呈现我们新创建的组件。
// CardList.js

// ...

// data is simply an imported .json file containing an "articles" array
const CardList = () => {
  return (
    <>
      <Wrapper>
        {data.articles.map(article => (
          <Card title={article.title} description={article.description} />
        ))}
      </Wrapper>
    </>
  );
};
// ...
奖励:使用 styled-component 的动态样式
更进一步,让我们创建一个Title样式化的组件,它将同时用于我们的Card和CardList组件。例如,我们可以使用同一个组件在 组件中显示文章标题,在 组件中显示“文章列表”!
但有一个小技巧:它应该在卡片中显示为白色,而在卡片列表中显示为黑色。
提示:使用 props 有条件地设置样式组件中的颜色Title!
  // Title.js
  import React from "react";
  import styled from "styled-components";

  const Title = styled.h1`
    font-size: 2rem;
    font-weight: 300;
    margin: 1rem;
    color: ${props => (props.main ? "black" : "white")};
  `;

  export default Title;
  // CardList.js

  // ...
  const CardList = () => {
    return (
      <>
        <Title main>List of articles</Title>
        <Wrapper>
          {data.articles.map(article => (
            <Card title={article.title} description={article.description} />
          ))}
        </Wrapper>
      </>
    );
  };

  // ...
恭喜,您已使用样式组件创建布局!🎉
良好的文档
如果您想了解样式组件的工作原理,那么您一定要查看 Eugene Gluhotorenko 的这篇文章:链接。
Robin Wieruch 撰写的这篇精彩的介绍文章:链接。
但当然,没有什么能比得上官方文档:链接。
总结
我在 React 项目中越来越多地使用样式化组件,并发现它们非常直观且优雅。希望这篇文章能促使你们中的一些人开始使用它们 😄
鏂囩珷鏉ユ簮锛�https://dev.to/christopherkade/styled-component-what-why-and-how-5gh3本文最初发表于christopherkade.com,如果您喜欢它或有任何疑问,请务必在 Twitter 上关注我@christo_kade,以便及时了解我将来发布的任何其他文章。❤️
 后端开发教程 - Java、Spring Boot 实战 - msg200.com
