GitHub 使用 ruby、github-actions 和 dev.to API 自动 README
GitHub 上有一个很酷的新功能:你可以创建自己独特的 readme 文件。能够自动完成这项功能对任何软件工程师来说都是一种天赋。我读过一篇名为《如何在我的 Github 个人资料上构建一个自更新的 readme 文件》的文章,它给我留下了深刻的印象。谢谢 Michael!Michael Hoffmann 在本文中提供了现成的 JS 脚本,但该脚本会解析他自己的网站,并且不使用 dev.to API。此外,这篇文章也没有为初学者提供分步指南。最后,这里最大的问题是 JS。每个人都喜欢 Ruby,而不是 JS,这是不争的事实!这正是我想要解决的问题。
今天,我们将使用 github-actions、ruby 和 dev.to API,从零开始创建一个自动更新 README 文件的组件,用于记录你最近的帖子。最终,你将对 github-actions 的工作原理、如何与 ruby 正确配合使用(包括安装 gem)以及如何处理机密的 ENV 变量有一个基本的了解。
DEV.TO API
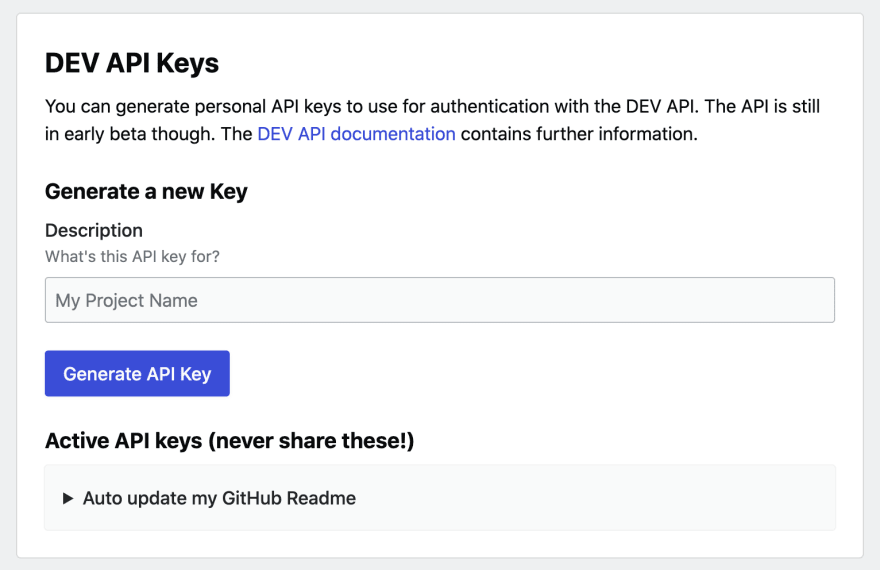
要使用 API,我们需要获取 API 密钥。前往https://dev.to/settings/account,找到“DEV API Keys”部分,然后生成您的个人 API 密钥,并添加您喜欢的描述(我将其命名为“自动更新我的 GitHub Readme”)。请妥善保管!
现在你可以去 DEV.TO API 文档了。这里有很多很酷的东西。我们需要一个用户发布的文章页面。它可以让你获取用户发布的文章。这正是我们要找的!让我们检查一下 API 是否正常工作,以及密钥是否有效。打开你的终端并粘贴:
curl -H "api-key: YOUR_API_KEY_HERE" https://dev.to/api/articles/me/published
如果一切顺利,您将收到一个包含您所有已发布帖子的 JSON 文件。我们需要title,url以及description该 JSON 中的 。
个人自述
打开 GitHub 并创建与您的 GitHub 帐户名称相同的公共仓库。别忘了初始化 README.md 文件,让奇迹发生。您应该会看到您的帐户页面 github.com/your_account/ 包含带有“Hi there 👋”消息的 README 文件。现在您已经有了可以编辑的基本 README 文件,但我们将自动执行此过程。
GitHub 秘密
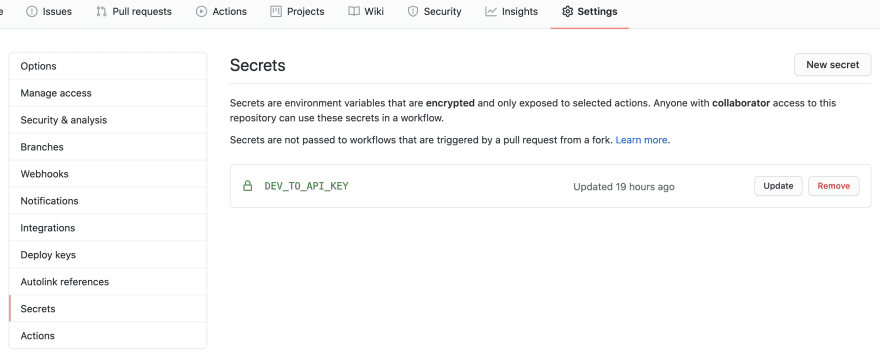
现在我们需要将 DEV.TO API 密钥提供给 GitHub 环境。打开“设置”选项卡your_account_name/your_account_name/,然后点击“密钥”链接。添加一个新的密钥,命名DEV_TO_API_KEY并粘贴你的 API 密钥作为密钥值。
创建你的第一个脚本
克隆你的仓库。添加文件夹scripts/rb/并创建文件update_readme.rb。我们将使用 Faraday 的 Gem 从 API 获取帖子。你可以使用 Ruby 内置的 NET::HTTP 模块,但我想向你展示如何使用 GitHub Actions 来处理 Gem 的安装过程。
# ./scripts/rb/update_readme.rb
require "json"
require "faraday"

# Get all posts
# Take a look how we obtain our secret key by using ENV[]
response = Faraday.get(
  "https://dev.to/api/articles/me/published",
  {},
  { "api-key": ENV["DEV_TO_API_KEY"] }
)

# Retrieve `title`, `url`, and `description` and
# wrap it to markdown syntax
posts = JSON.parse(response.body).map do |article|
  <<~EOF
  __[#{article['title']}](#{article['url']})__
  #{article['description']}
  EOF
end

# Generate your own layout and paste posts in it
# Don't forget to change text and name =)
markdown = <<~EOF
# Hello friends!
I'm a fullstack ruby and js developer. Follow me on [Dev.to](https://dev.to/pashagray)
My last publications:
#{posts.join}

Script is provided by https://github.com/pashagray
EOF

# Write you markdown to README.MD
File.write("./README.md", markdown)
就这样!git push所有更改都返回到 GitHub。
GitHub Actions
在 repo中打开“Actions”选项卡your_account_name/your_account_name并创建新的工作流。有很多模板,但您可以初始化任何模板,或者清空并粘贴我下面提供的代码。不用担心,每行都有注释。
# Name of your workflow
name: README Update
# Triggers to run workflow
on:
  # workflow_dispatch allows to run your workflow manually
  workflow_dispatch:
  # Run workflow based on specific schedule
  schedule:
  # This workflow will run every day at 00:00 UTC.
  # You can use https://crontab.guru/ if cron syntax is
  # looking weird for you
  - cron: "0 0 * * *"

jobs:
  # This workflow contains a single job called "perform"
  perform:
    # The type of runner that the job will run on
    # ubuntu-latest is default
    runs-on: ubuntu-latest

    # Steps represent a sequence of tasks that will be executed as part of the job
    steps:
    # This line to work properly with repo
    - uses: actions/checkout@v2
    # This one to activate ruby magic
    - uses: actions/setup-ruby@v1
      with:
        ruby-version: '2.7'
    # First we need to install Faraday gem. You can use ruby built-in NET::HTTP
    # class, but I want to show you how to work with gems in github-actions
    - name: Install gems
      run: gem install faraday
    # And now we run our script
    - name: Run script
      # Here we are setting our secret API Key
      # Details: https://docs.github.com/en/actions/configuring-and-managing-workflows/using-variables-and-secrets-in-a-workflow
      env:
        DEV_TO_API_KEY: ${{ secrets.DEV_TO_API_KEY }}
      run: ruby ./scripts/rb/update_readme.rb
    # Our script updated README.md, but we need to commit all changes
    - name: Commit and push if changed
      run: |
        git add .
        git diff
        git config --global user.email "github-action-bot@example.com"
        git config --global user.name "GitHub Action Bot"
        git commit -m "Updated README" -a || echo "No changes to commit"
        git push
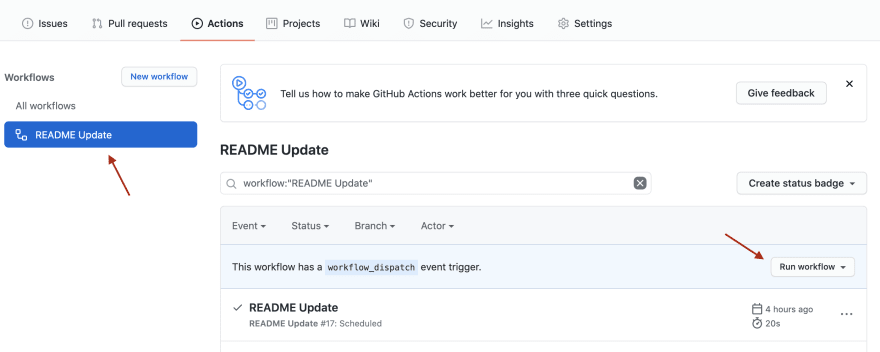
保存你的操作并检查。前往“操作”,找到你的更新 README 操作,然后按“运行工作流程”按钮。
工作流程完成后,请转到您的帐户页面并享受它!
您可以关注我的 repo 并获取所有可立即使用的代码:
https://github.com/pashagray/pashagray
 后端开发教程 - Java、Spring Boot 实战 - msg200.com


