几分钟内轻松为您的 AI 代理构建 UI (LangGraph + CopilotKit)⚡️
TL;DR
在本文中,您将学习如何使用 Langraph、CopilotKit 和 Tavily 构建结合人机交互功能的代理原生研究画布应用程序。
在我们开始之前,我们将介绍以下内容:
- 什么是人工智能代理?
- 使用 LangGraph Studio 构建和可视化 LangGraph AI 代理
- 使用 CopilotKit 为 LangGraph AI 代理构建 UI
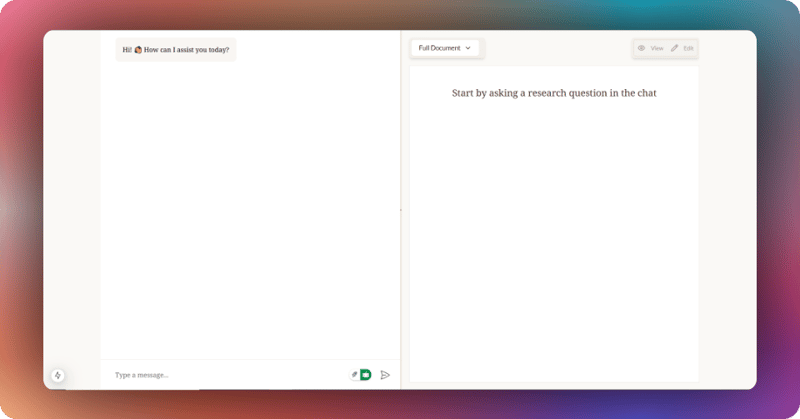
这是我们将要构建的应用程序的预览。
什么是 AI 代理?
简单来说,AI 代理是自主的软件程序,可以使用人工智能执行任务、做出决策并与环境交互。
在这种情况下,它们是可以在执行过程中进行研究、处理信息和与人类互动以确保可靠性和可信度的系统。
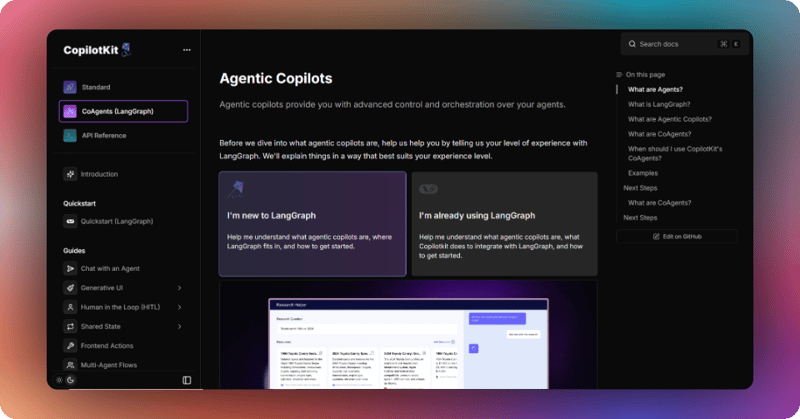
您可以在 CopilotKit 文档上阅读有关 AI 代理的更多信息。
CopilotKit 是什么
CopilotKit 是一个开源的全栈框架,用于构建用户交互代理和副驾驶。它使您的代理能够控制您的应用程序,传达其正在执行的操作,并生成完全自定义的 UI。
先决条件
要完全理解本教程,您需要对 React 或 Next.js 有基本的了解。
我们还将利用以下内容:
- Python—— 一种使用 LangGraph 构建 AI 代理的流行编程语言;确保它已安装在您的计算机上。
- LangGraph - 用于创建和部署 AI 代理的框架。它还有助于定义代理要执行的控制流和操作。
- OpenAI API 密钥 - 使我们能够使用 GPT 模型执行各种任务;对于本教程,请确保您可以访问 GPT-4 模型。
- Tavily AI—— 一种搜索引擎,使人工智能代理能够在应用程序内进行研究并访问实时知识。
- CopilotKit - 一个开源副驾驶框架,用于构建自定义 AI 聊天机器人、应用内 AI 代理和文本区域。
- Docker——一个用于在容器中开发、运输和运行应用程序的平台。
构建和可视化 LangGraph AI 代理
在本节中,您将学习如何使用 Docker 构建和启动 LangGraph 代理,并使用 LangGraph Studio 可视化其工作流程。
让我们开始吧。
首先,从克隆代理原生研究画布应用程序存储库开始,其中包含基于 Python 的 Langraph 代理的代码:
git clone https://github.com/CopilotKit/open-research-ANA.git
该存储库包含两个文件夹:代理和前端。要启动代理,请导航到代理目录。
cd agent
然后使用pip安装所有代理依赖项。
pip install -r requirements.txt
.env 接下来,在代理目录中创建一个 文件。然后将OpenAI、Tavily和LangSmith API 密钥添加到环境变量中。
OPENAI_API_KEY=your_key
TAVILY_API_KEY=your_key
LANGSMITH_API_KEY=your_key
如果您打开该agent/graph.py文件,它定义了一个执行研究工作流程的 MasterAgent 类。
它使用有向图(StateGraph)来管理 LangGraph AI 代理节点、工具执行和人工反馈之间的状态和转换。
该工作流程旨在通过收集数据、提出大纲和编写章节来帮助生成研究报告,同时允许通过使用 CopilotKit 的前端集成进行人工反馈。
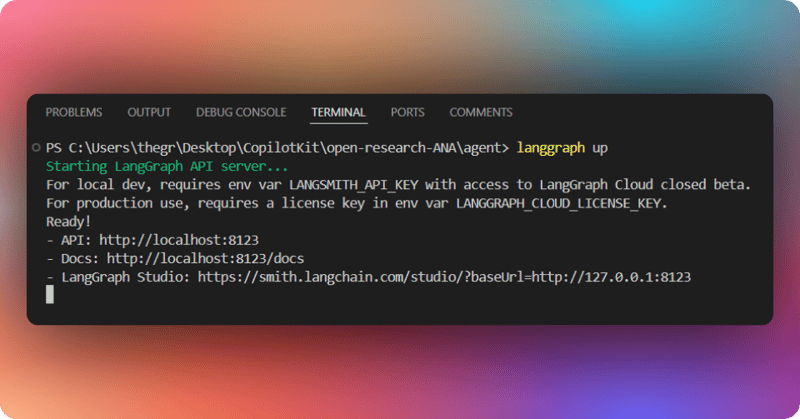
要启动 Langraph AI 代理,请打开 Docker 应用程序并运行以下命令来启动代理。
langgraph up
LangGraph API 服务器启动后,使用提供的 LangGraph Studio 链接导航到 LangGraph Studio。请记下输出中的 API URL(例如http://localhost:8123)。我们将使用它通过 CopilotKit Cloud 将代理连接到前端。
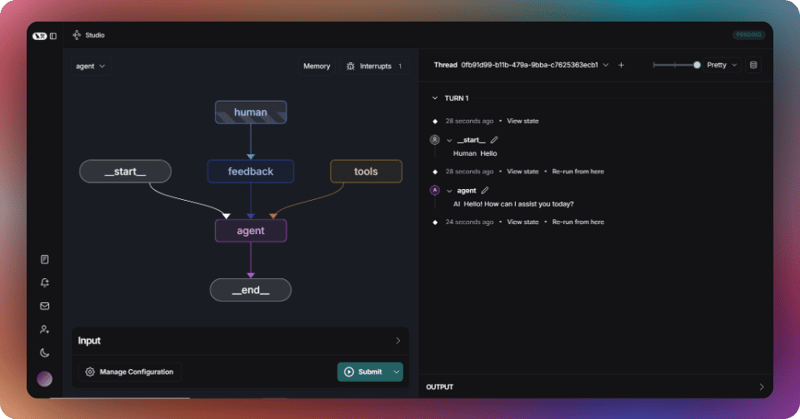
之后,LangGraph代理将在LangGraph工作室上打开,您可以对其进行可视化,如下所示。
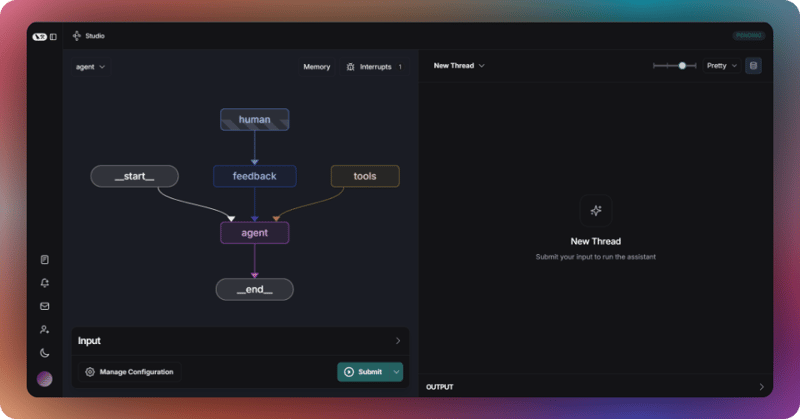
要测试 LangGraph 代理,请向 messages 状态变量添加一条消息,然后单击“提交”按钮。
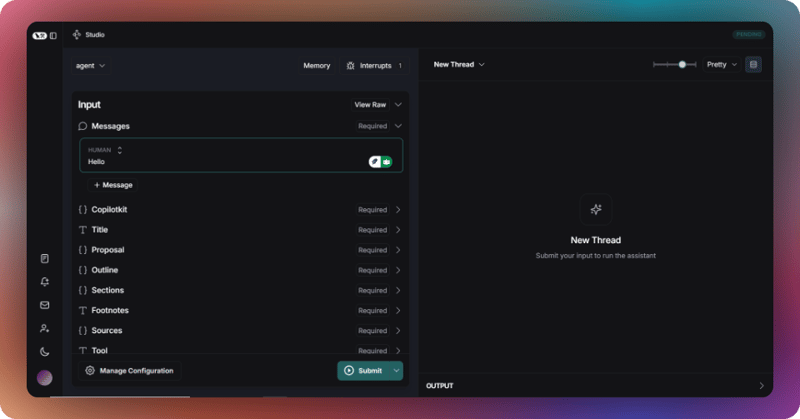
然后,代理将按照定义的工作流程通过连接的节点处理输入,并在线程中响应您的消息,如下所示。
在继续之前,我们先来谈谈代理副驾驶中的一个关键概念,叫做“人机在环”(HITL)。HITL 允许代理在执行过程中请求人工输入或批准,以确保 AI 系统可靠且值得信赖。
您可以在 CopilotKit Docs 上阅读有关 Human-in-the-Loop 的更多信息。
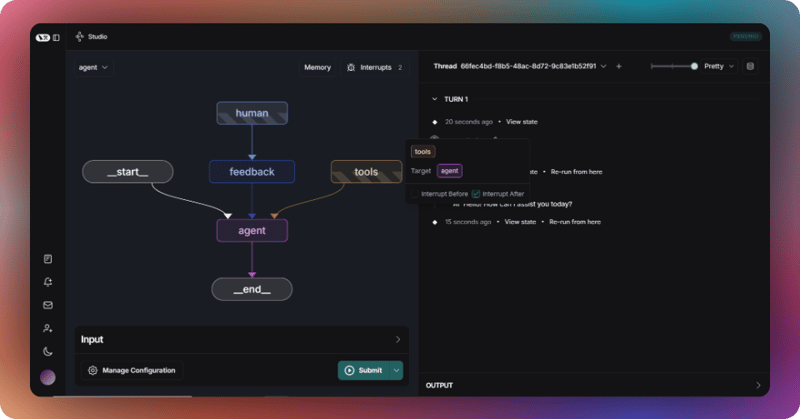
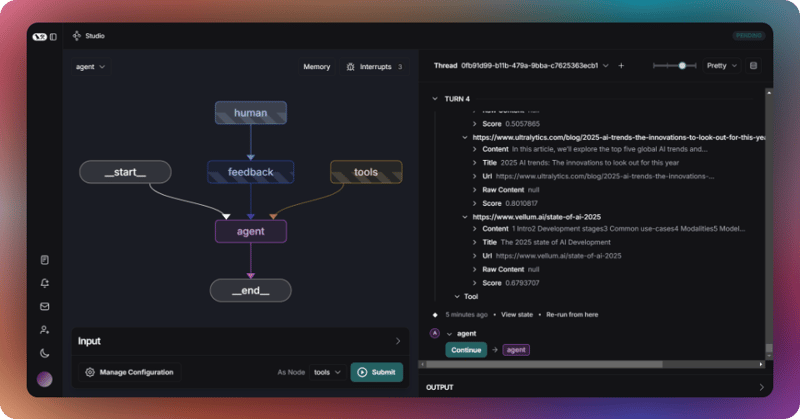
在这种情况下,您可以通过单击其中一个节点并标记复选框将 HITL 添加到代理Interrupt After,如下所示。
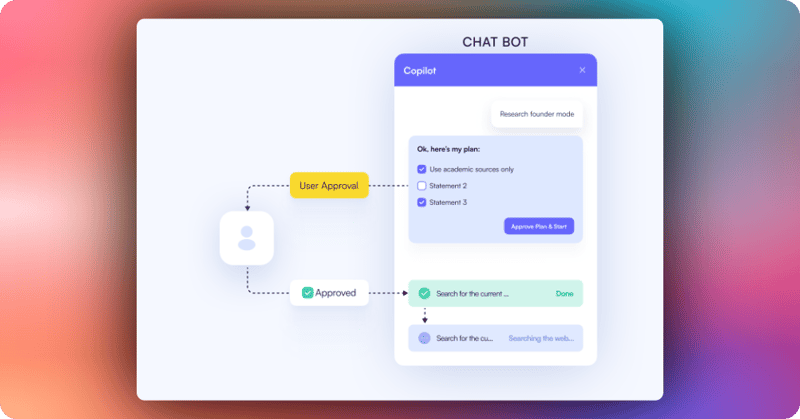
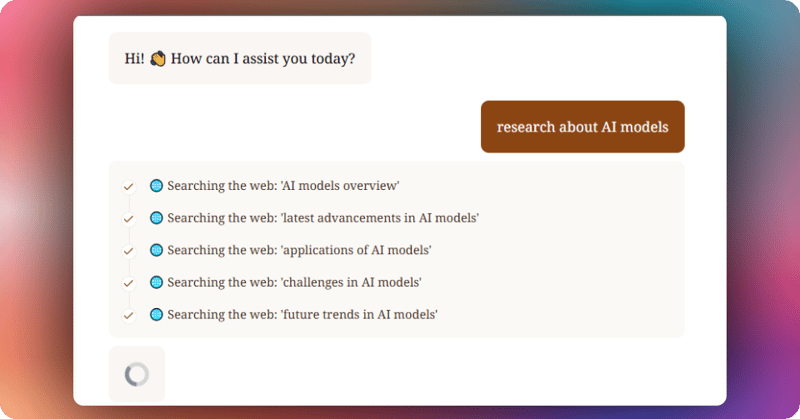
然后向状态变量添加另一条消息,例如“研究 AI 模型” messages ,并点击“提交”按钮。代理将开始研究 AI 模型,完成后,它会要求您查看各个部分并提供反馈或您希望进行的任何具体更改,如下所示。
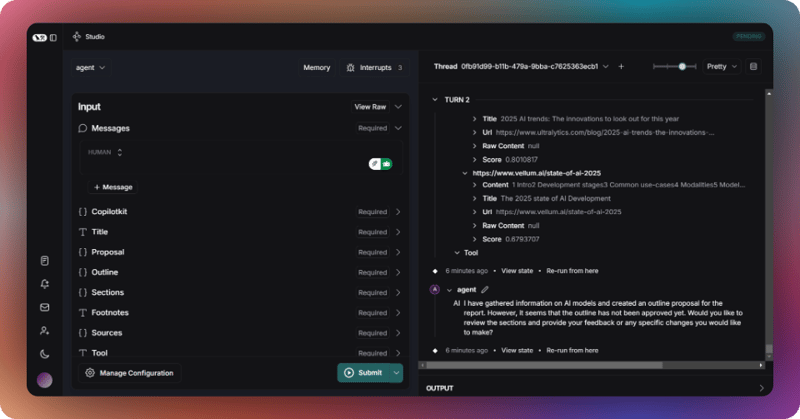
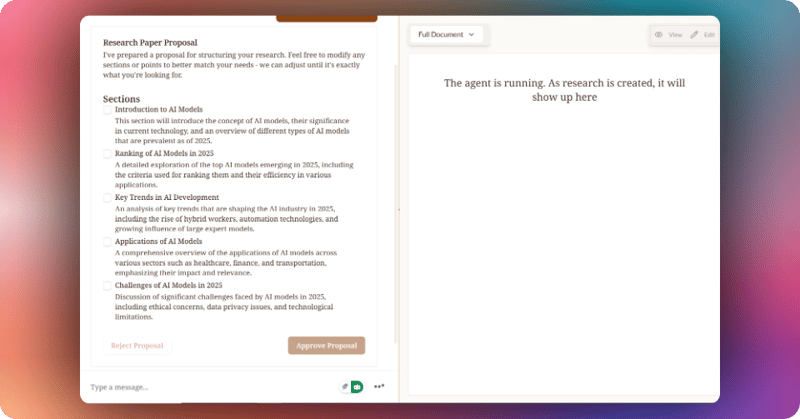
向状态变量添加“是”消息messages ,然后点击“提交”按钮。代理将处理该消息,并为您提供 AI 模型报告的提纲提案。然后,它会询问您是否同意该提纲,或者是否需要进行任何更改,如下所示。
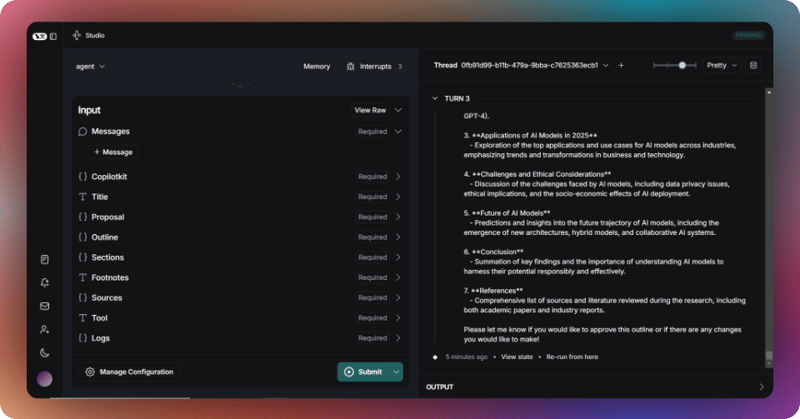
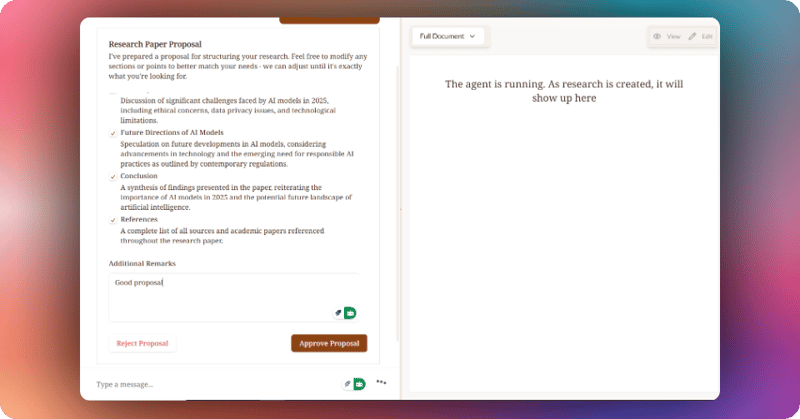
回复“我想批准大纲”消息并点击提交按钮。之后,代理将根据不同部分,编写一份关于 AI 模型的报告,并完成研究流程,如下所示。
现在我们已经了解了如何使用 LangGraph Studio 可视化和测试 LangGraph AI 代理,让我们看看如何添加前端 UI 来与其交互。
使用 CopilotKit 为 LangGraph Agent 构建 UI
在本节中,您将学习如何使用 CopilotKit 云将您的 LangGraph AI 代理连接到 CopilotKit 前端 UI。
让我们开始吧。
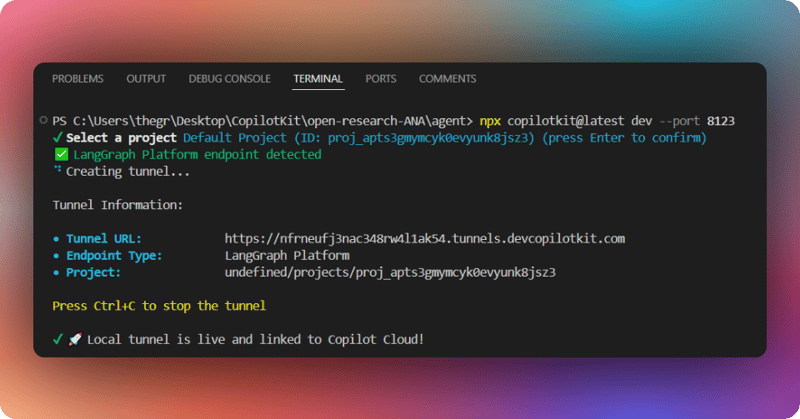
步骤 1:为 LangGraph AI 代理创建隧道
要创建通往 LangGraph AI 代理的隧道,请使用以下命令,以便 Copilot Cloud 能够连接到它。请记住我之前提到的启动代理时需要记录的 API URL;请使用提供的端口号。我这里使用的端口号是 8123。
npx copilotkit@latest dev --port 8123
选择一个项目,隧道应该处于活动状态并连接到 Copilot Cloud,如下所示。
然后导航到前端文件夹。
cd frontend
之后,使用 pnpm 安装前端依赖项。
pnpm install
.env 接下来,在前端目录中创建一个 文件。然后将OpenAI、Copilot Cloud和LangSmith API 密钥添加到环境变量中。
OPENAI_API_KEY=your_openai_key
LANGSMITH_API_KEY=your_langsmith_key
NEXT_PUBLIC_COPILOT_CLOUD_API_KEY=your_copilot_cloud_key
然后使用以下命令启动应用程序。
pnpm run dev
导航到http://localhost:3000/您应该会看到 LangGraph AI 代理前端已启动并正在运行
现在让我们看看如何使用 CopilotKit 为 LangGraph AI 代理构建 UI。
步骤 2:设置 CopilotKit 提供程序
要设置 CopilotKit 提供程序, <CopilotKit> 组件必须封装应用中支持 Copilot 的部分。在大多数情况下,将 CopilotKit 提供程序封装在整个应用中是合适的,例如,在您的 中,如下例layout.tsx所示frontend/src/app/layout.tsx
import { CopilotKit } from "@copilotkit/react-core";

export default function RootLayout({
    children,
}: Readonly<{
    children: React.ReactNode;
}>) {
    return (
        <html lang="en" className="h-full">
        {/* CopilotKit component for integrating an AI agent */}
            <body className={`${lato.variable} ${noto.className} antialiased h-full`}>
                <CopilotKit
                        {/* Pass the Copilot Cloud API key from environment variables */}
                    publicApiKey={process.env.NEXT_PUBLIC_COPILOT_CLOUD_API_KEY}
                    {/* Disable the development console (set to true for debugging) */}
                    showDevConsole={false}
                    {/* Specify the LangGraph agent name */}
                    agent="agent"
                >
                    <TooltipProvider>
                        <ResearchProvider>
                            {children}
                        </ResearchProvider>
                    </TooltipProvider>
                </CopilotKit>
            </body>
        </html>
    );
}
步骤 3:选择 Copilot UI
要设置您的 Copilot UI,首先在您的根组件中导入默认样式(通常是 layout.tsx)。
import "@copilotkit/react-ui/styles.css";
Copilot UI 附带许多内置 UI 模式;从CopilotPopup、CopilotSidebar、CopilotChat到Headless UI中选择您喜欢的一个。
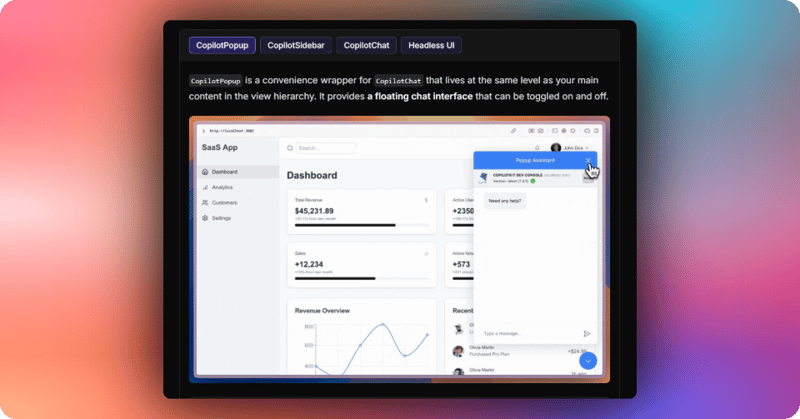
在这种情况下,我们将使用src/components/chat.tsx文件中定义的 CopilotChat。
// Indicate that this component runs on the client side (Next.js directive)
'use client'

// Import the CopilotChat component from the CopilotKit React UI library
import { CopilotChat } from "@copilotkit/react-ui";
// Import constant values for chat configuration from a local library file
import { INITIAL_MESSAGE, MAIN_CHAT_INSTRUCTIONS, MAIN_CHAT_TITLE } from "@/lib/consts";
// @ts-expect-error -- ignore: Suppresses TypeScript error for missing/incorrect type definition
import { CopilotChatProps } from "@copilotkit/react-ui/dist/components/chat/Chat";

// Define the Chat component, accepting props typed as CopilotChatProps
export default function Chat(props: CopilotChatProps) {
  return (
      // Render the CopilotChat component with custom configuration
      <CopilotChat
          instructions={MAIN_CHAT_INSTRUCTIONS} // Pass predefined instructions for the chat behavior
          labels={{
              title: MAIN_CHAT_TITLE, // Set the chat window title from constants
              initial: INITIAL_MESSAGE, // Set the initial message displayed in the chat
          }}
          className="h-full w-full font-noto" // Apply custom CSS classes for full height/width and Noto font
          {...props} // Spread additional props passed to the component (e.g., overrides or customizations)
      />
  );
}
然后,将聊天组件导入到src/app/page.tsx文件中并使用。聊天内容随后会在前端 UI 上呈现,如下所示。
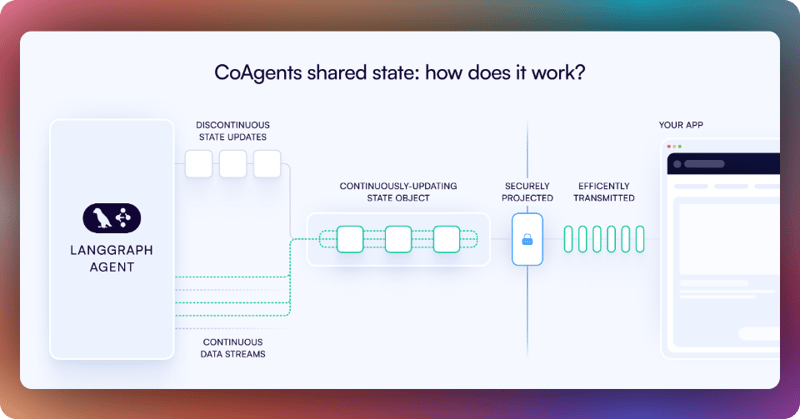
步骤 4:在 UI 和 LangGraph AI 代理之间创建共享状态
协同代理 (CoAgent) 维护一个共享状态,无缝连接您的 UI 与代理的执行。此共享状态系统允许您:
- 显示代理的当前进度和中间结果
- 通过 UI 交互更新代理的状态
- 对整个应用程序的状态变化做出实时反应
您可以在CopilotKit 文档上了解有关 CoAgents 共享状态的更多信息。
要在您的 UI 和 LangGraph AI 代理之间创建共享状态,首先,您需要定义代理状态并将其发送到前端,如agent/graph.py文件中所示。
    # Async method to handle tool execution and update research state
    async def tool_node(self, state: ResearchState, config: RunnableConfig):
        # Customize config to disable message emission to frontend during tool execution
        config = copilotkit_customize_config(config, emit_messages=False)
        msgs = []  # List to store tool messages
        tool_state = {}  # Dictionary to store updated state after tool execution
        # Process each tool call from the last message (assumed to be an AIMessage)
        for tool_call in state["messages"][-1].tool_calls:
            tool = self.tools_by_name[tool_call["name"]]  # Lookup tool by name
            # Simplify messages structure temporarily for tool access
            state['messages'] = {'HumanMessage' if type(message) == HumanMessage else 'AIMessage': message.content for message in state['messages']}
            tool_call["args"]["state"] = state  # Inject state into tool arguments
            # Run the tool asynchronously and get updated state and message
            new_state, tool_msg = await tool.ainvoke(tool_call["args"])
            tool_call["args"]["state"] = None  # Clear state from args after execution
            # Append tool result as a ToolMessage
            msgs.append(ToolMessage(content=tool_msg, name=tool_call["name"], tool_call_id=tool_call["id"]))
            # Build updated tool state with research data
            tool_state = {
                "title": new_state.get("title", ""),
                "outline": new_state.get("outline", {}),
                "sections": new_state.get("sections", []),
                "sources": new_state.get("sources", {}),
                "proposal": new_state.get("proposal", {}),
                "logs": new_state.get("logs", []),
                "tool": new_state.get("tool", {}),
                "messages": msgs
            }
            # Emit updated state to frontend
            await copilotkit_emit_state(config, tool_state)

        return tool_state  # Return the updated state
然后使用CopilotKit 的 useCoAgent 钩子将 LangGraph AI 代理状态与文件中的前端 UI 共享src/components/research-context.tsx。useCoAgent 钩子允许您在应用程序和代理之间双向共享状态。
// Indicate that this component runs on the client side (Next.js directive)
'use client'

// Import React utilities for context, state, and effects
import { createContext, useContext, useState, ReactNode, useEffect } from 'react';
// Import the ResearchState type from a shared library
import type { ResearchState } from '@/lib/types';
// Import CopilotKit's hook for managing agent state
import { useCoAgent } from "@copilotkit/react-core";
// Import a custom hook for interacting with local storage
import useLocalStorage from "@/lib/hooks/useLocalStorage";

// Define the shape of the context value
interface ResearchContextType {
    state: ResearchState; // The current research state
    setResearchState: (newState: ResearchState | ((prevState: ResearchState) => ResearchState)) => void; // Function to update research state
    sourcesModalOpen: boolean; // Boolean to toggle the sources modal
    setSourcesModalOpen: (open: boolean) => void; // Function to set the modal state
    runAgent: () => void; // Function to trigger the agent execution
}

// Create a context for sharing research state, initially undefined
const ResearchContext = createContext<ResearchContextType | undefined>(undefined);

// Define the ResearchProvider component to wrap children with context
export function ResearchProvider({ children }: { children: ReactNode }) {
    // State for controlling the visibility of a sources modal
    const [sourcesModalOpen, setSourcesModalOpen] = useState<boolean>(false);
    // Use CopilotKit's useCoAgent hook to manage agent state and execution
    const { state: coAgentState, setState: setCoAgentsState, run } = useCoAgent<ResearchState>({
        name: 'agent', // Name of the agent (matches backend configuration)
        initialState: {}, // Initial empty state for the agent
    });
    // Use custom hook to manage research state in local storage, initially null
    // @ts-expect-error -- force null: Suppresses TypeScript error for null initial value
    const [localStorageState, setLocalStorageState] = useLocalStorage<ResearchState>('research', null);

    // Effect to synchronize agent state and local storage
    useEffect(() => {
        // Check if agent state or local storage is empty
        const coAgentsStateEmpty = Object.keys(coAgentState).length < 1;
        const localStorageStateEmpty = localStorageState == null || Object.keys(localStorageState).length < 1;

        // If local storage has data but agent state is empty, initialize agent state
        if (!localStorageStateEmpty && coAgentsStateEmpty) {
            setCoAgentsState(localStorageState);
            return;
        }
        // If agent state has data but local storage is empty, save to local storage
        if (!coAgentsStateEmpty && localStorageStateEmpty) {
            setLocalStorageState(coAgentState);
            return;
        }
        // If both exist but differ, update local storage with agent state
        if (!localStorageStateEmpty && !coAgentsStateEmpty && JSON.stringify(localStorageState) !== JSON.stringify(coAgentState)) {
            setLocalStorageState(coAgentState);
            return;
        }
    }, [coAgentState, localStorageState, setCoAgentsState, setLocalStorageState]); // Dependencies for the effect

    // Provide context value to children
    return (
        <ResearchContext.Provider value={{
            state: coAgentState, // Current research state from CopilotKit
            setResearchState: setCoAgentsState as ResearchContextType['setResearchState'], // Setter for research state (cast for type compatibility)
            setSourcesModalOpen, // Function to toggle sources modal
            sourcesModalOpen, // Current modal state
            runAgent: run // Function to run the agent
        }}>
            {children} // Render child components within the provider
        </ResearchContext.Provider>
    );
}

// Custom hook to access the research context
export function useResearch() {
    // Get the context value
    const context = useContext(ResearchContext);
    // Throw an error if used outside of ResearchProvider
    if (context === undefined) {
        throw new Error('useResearch must be used within a ResearchProvider');
    }
    return context; // Return the context value
}
接下来,在聊天界面中渲染代理的状态。这有助于以更符合上下文的方式告知用户代理的状态。为此,您可以使用 文件 中的useCoAgentStateRendersrc/app/page.tsx钩子。
// ...
import {useCoAgentStateRender} from "@copilotkit/react-core";
// ...

export default function HomePage() {
    // ...
  useCoAgentStateRender<ResearchState>(
    {
      name: "agent",
      render: ({ state }) => {
        if (state.logs?.length > 0) {
          return <Progress logs={state.logs} />;
        }
        return null;
      },
    },
    [researchState]
  );
//   ...
}
然后导航到http://localhost:3000/,在聊天中添加“研究 AI 模型”,然后按“Enter”。您应该看到在聊天 UI 中呈现的 LangGraph AI 代理状态,如下所示。
步骤 5:在前端 UI 中添加人机交互断点
要允许 LangGraph 代理在聊天 UI 执行期间请求人工输入或批准,请使用文件中命名的CopiloKit useCopilotKitAction钩子。review_proposalsrc/app/page.tsx
// ...
import { useCopilotAction } from "@copilotkit/react-core";
// ...

export default function HomePage() {
  // ...
  // Define a custom action using the useCopilotAction hook from CopilotKit
  useCopilotAction({
    name: "review_proposal", // Unique name for the action
    description:
      "Prompt the user to review structure proposal. Right after proposal generation", // Description of the action's purpose
    available: "remote", // Indicates the action is available remotely (e.g., triggered by a backend or agent)
    parameters: [], // No parameters required for this action
    // @ts-expect-error -- null element is legit: Suppresses TypeScript error for returning null
    renderAndWaitForResponse: (
      { respond, status } // Function to render UI and wait for user response
    ) =>
      status !== "complete" ? ( // Check if the action is still in progress
        <ProposalViewer // Render a custom ProposalViewer component
          onSubmit={(
            approved,
            proposal // Callback when the user submits their review
          ) =>
            respond?.({
              // Send the response back to CopilotKit
              ...proposal, // Spread the proposal object (assumed to contain structure details)
              approved, // Add the approval status (true/false)
            })
          }
        />
      ) : null, // Return null when the action is complete (hides the UI)
  });
  //   ...
}
然后导航到http://localhost:3000/。一旦 LangGraph 代理完成对 AI 模型的研究,它将要求您批准该提案,如下所示。
选择您想要的部分,添加一些注释,然后点击Approve Proposal按钮。LangGraph AI 代理将开始撰写关于 AI 模型的研究报告。
步骤 6:在 UI 中流式传输 LangGraph AI 代理响应
src/lib/hooks/useStreamingContent.ts要流式传输研究报告内容,请使用文件中定义的 useStreamingContent 钩子src/app/page.tsx。
import { useStreamingContent } from "@/lib/hooks/useStreamingContent";

export default function HomePage() {
  // ...
  const streamingSection = useStreamingContent(researchState);
  //   ...
  return (
    // ...
    {/* Document Viewer */}
    <DocumentsView
    sections={sections ?? []}
    streamingSection={streamingSection}
    selectedSection={sections?.find((s) => s.id === selectedSectionId)}
    onSelectSection={setSelectedSectionId}
         />
    // ...
  )
}
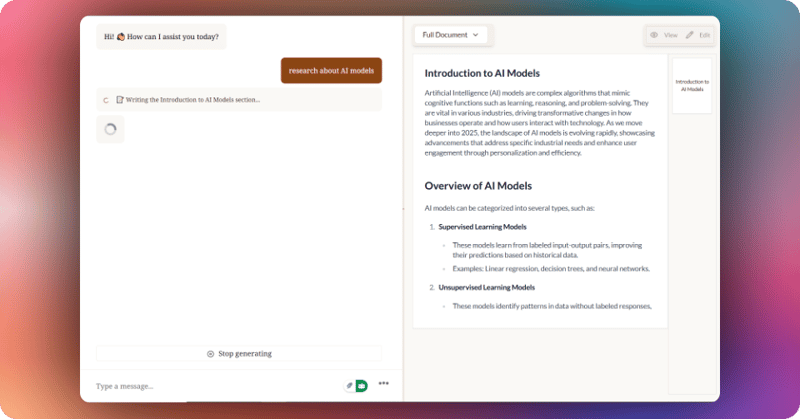
您应该会看到右侧流动的研究内容,如下所示。
结论
本教程涵盖了丰富的内容。希望您学会了如何使用 CopilotKit 为您的应用构建代理副驾驶的 UI,并学会了如何实时执行状态更改,以及如何实现“人在环”的概念。
点击此处查看 GitHub 上的完整源代码
在Twitter上关注 CopilotKit并打招呼,如果您想构建一些很酷的东西,请加入Discord社区。
文章来源:https://dev.to/copilotkit/easily-build-a-ui-for-your-langgraph-ai-agent-in-minutes-with-copilotkit-1khj