使用 PostgreSQL 开发 CRUD Node.js 应用程序
各位程序员们好!你们好吗?今天我们将开启一系列文章,学习如何使用 Node.js 和 PostgreSQL 开发一个 CRUD 应用程序,重点关注后端。之后,我们将使用Azure Functions将项目迁移到无服务器架构,将本地数据库迁移到Azure PostgreSQL,最后使用GitHub Actions部署此应用程序。
我在 GitHub 上创建了一个存储库(此处),其中分配了该项目的所有源代码以及我将在 5 篇文章中提到的资源。
更新的存储库在这里。
重要提示:本项目将重点关注后端。如果在项目结束时,我们想要测试前端某个应用程序中创建的后端 API,那么我可以创建一个通用的前端,专门用于测试创建的 API!
好了,说了这么多,走吧?!
目录
- 教程中使用的资源
- 安装 PostgreSQL 数据库
- 在 PostgreSQL 中创建表
- 在 Node.js 中创建应用程序架构
- 开发应用程序
- 进一步了解“node-postgres”包
- 使用“dotenv”创建环境变量
- 在文件“database.js”中配置到数据库的连接字符串
- 路线:(POST)'创建产品'
- 路线:(GET)'列出所有产品'
- 路线:(GET)'按 ID 列出产品'
- 路线:(PUT)'按 ID 更新产品'
- 路线:(删除)'按 ID 删除产品'
- 结论
教程中使用的资源
我将在本文中提到一些我们将在开发此应用程序过程中使用的资源。它们如下:
吸引众多开发者使用 PostgreSQL 的原因之一是它完全免费,可在任何操作系统上运行,而且最重要的是:它完全开源!Uber、Netflix、Spotify、Instagram、Reddit 等众多大型公司都在使用 PostgreSQL。这就是 PostgreSQL 如此受欢迎的原因!
PostgreSQL 是我学习使用的第一个数据库,2012 年我在大学学习数据库 I 和 II 课程时就接触过它。我一直很喜欢 PostgreSQL,因为它非常简单易用!
我们需要在机器上安装 PostgreSQL。但也可以使用一些 Docker 镜像来继续本教程。
安装 PostgreSQL 数据库
好吧,我将在这里教您如何为不同的操作系统用户安装 PostgreSQL:
-
Windows:对于 Windows 用户,请下载适用于 Windows 的 Postgres。安装过程简单易懂,就像在 Windows 上安装程序一样。
-
macOS :对于 Mac 用户,只需在此处下载软件包。此外,您还需要安装Homebrew。如果您在安装过程中遇到问题或困难,建议您观看此处的视频。
-
Linux:对于 Linux 用户,由于 Linux 有无数不同的版本,我建议您查看此处的PostgreSQL 指南
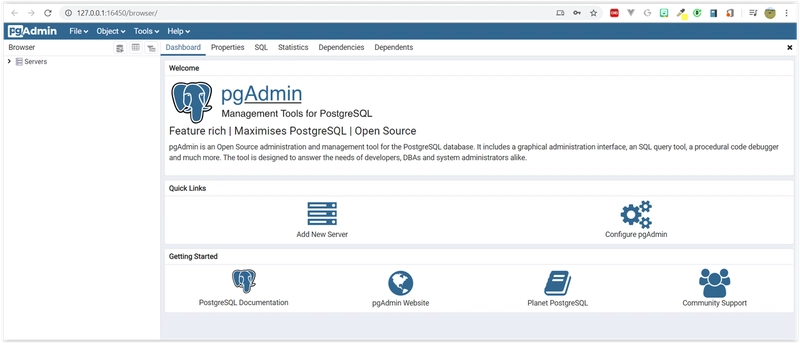
就我而言,我将使用 Windows,因为它是我的主要开发机器。我将使用 PostgreSQL 12 版本。安装完成后,只需搜索 pgAdmin。浏览器页面将打开:http://127.0.0.1: 16450/browser/,现在我们就可以开始使用了!
在 PostgreSQL 中创建表
我们现在将创建一个表,该表具有将用于持久保存在后端使用的属性。
该课程将是:Product
Class: Product

- productId: integer primary
- product_name_: varchar
- quantity: int
- price: real
现在打开 PgAdmin。您可能需要输入密码才能在 PgAdmin 中执行某些操作。您可能需要创建一个数据库。只需使用您想要的名称即可。创建数据库后,右键单击“创建脚本”,然后在 PostgreSQL 上运行以下脚本(如下图所示):
CREATE TABLE products (
    productId SERIAL PRIMARY KEY,
    productName VARCHAR(255) NOT NULL,
    quantity INTEGER NOT NULL,
    price NUMERIC(5,2)
);

现在,您要做的就是访问新创建的表!

太棒了!我们已经创建好了表格!
在 Node.js 中创建应用程序架构
现在我们的表已经创建好了,让我们用 Node.js 创建项目。在这个项目中,我将遵循 SOLID 和 Clean Code 原则。如果您想了解更多关于这两个主题的信息,我强烈建议您查看以下两个链接:
好了,让我们开始构建我们的项目。创建一个名为 API 的文件夹并运行以下命令:
> npm init -y
此命令会创建一个标准的 package.json 文件。现在我们将安装以下软件包:
> npm i --save-dev husky nodemon
并且还安装其他包作为依赖项:
> npm i cors dotenv express express-promise-router pg
最后,package.json文件将如下所示:
{
  "name": "crud-nodejs-psql",
  "version": "1.0.0",
  "description": "Aplicação CRUD com Node.js & PostgreSQL",
  "main": "server.js",
  "scripts": {
    "dev": "nodemon",
    "lint": "eslint --ext .js,.html -f ./node_modules/eslint-friendly-formatter . --fix",
    "prepush": "npm run lint",
    "start": "node server.js"
  },
  "keywords": [
    "node.js",
    "javascript",
    "postgresel",
    "azure",
    "serverless",
    "azure-functions",
    "azure-devops",
    "azure-storage",
    "github-actions",
    "app-service",
    "express"
  ],
  "author": "Glaucia Lemos",
  "license": "MIT",
  "bugs": {
    "url": "https://github.com/glaucia86/nodejs-postgresql-azure/issues"
  },
  "homepage": "https://github.com/glaucia86/nodejs-postgresql-azure#readme",
  "devDependencies": {
    "eslint": "^6.8.0",
    "eslint-config-airbnb-base": "^14.0.0",
    "eslint-plugin-import": "^2.20.1",
    "husky": "^4.2.3",
    "nodemon": "^2.0.2"
  },
  "dependencies": {
    "cors": "^2.8.5",
    "dotenv": "^8.2.0",
    "eslint-friendly-formatter": "^4.0.1",
    "eslint-plugin-html": "^6.0.0",
    "express": "^4.17.1",
    "express-promise-router": "^3.0.3",
    "pg": "^7.18.2"
  }
}
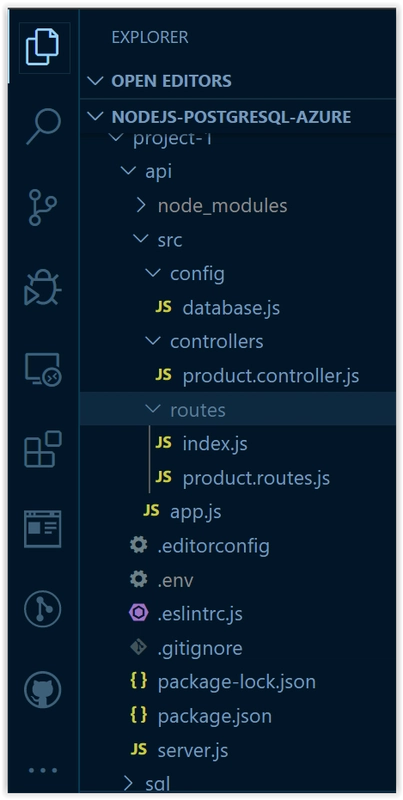
创建文件夹和文件的结构,如下图所示:
开发应用程序
之后我不会解释每个文件的作用。因为本文的重点是创建一个 RESTful API,最终必须将其持久化到 PostgreSQL 中。
打开Visual Studio Code,让我们开始开发文件:server.js 并包含以下代码块:
- 文件:server.js
/**
 * File: server.js
 * Description: arquivo responsável por toda a configuração e execução da aplicação.
 * Data: 02/03/2020
 * Author: Glaucia Lemos
 */

const app = require('./src/app');

const port = process.env.PORT || 3000;

app.listen(port, () => {
  console.log('Aplicação executando na porta ', port);
});
现在,打开src -> app.js文件并包含以下代码块:
- 文件:app.js
const express = require('express');
const cors = require('cors');

const app = express();

// ==> Rotas da API:
const index = require('./routes/index');
// const productRoute = require('./routes/product.routes');

app.use(express.urlencoded({ extended: true }));
app.use(express.json());
app.use(express.json({ type: 'application/vnd.api+json' }));
app.use(cors());

app.use(index);
// app.use('/api/', productRoute);

module.exports = app;
请注意,此处app.js file有几行代码被注释掉了,只是为了能够初步执行我们的 API 并检查开发是否正确。稍后我们将对此文件进行一些重大更改,然后取消注释这些行。
最后,打开src -> routes -> index.js文件并包含以下代码块:
- 文件:src->routes->index.js
/**
 * File: src/routes/index.js
 * Description: arquivo responsável pela chamada da Api da aplicação.
 * Data: 02/03/2020
 * Author Glaucia Lemos
 */

const express = require('express');

const router = express.Router();

router.get('/api', (req, res) => {
  res.status(200).send({
    success: 'true',
    message: 'Seja bem-vindo(a) a API Node.js + PostgreSQL + Azure!',
    version: '1.0.0',
  });
});

module.exports = router;
现在,打开 apifolder 内的命令提示符并运行以下命令:
> nodemon
然后打开邮递员并在(GET)中包含以下URL localhost:3000/api/::
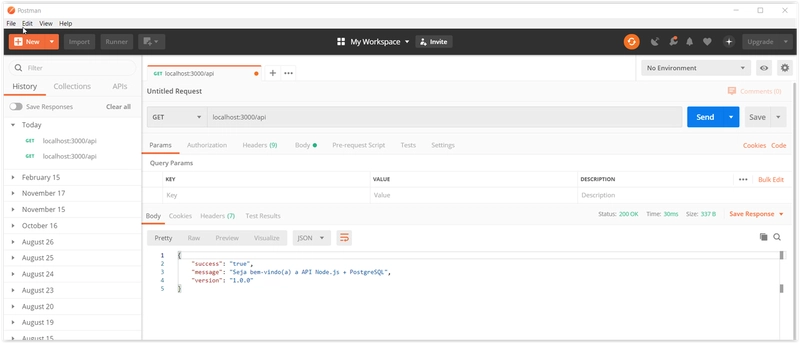
如果屏幕显示的内容与上面类似,则表示我们的 API 正常运行!现在,让我们深入开发。开始吧!
进一步了解“node-postgres”包
你可能注意到,我们在安装一些软件包时,包含了node-postgres包。这个包对于我们在 Node.js 上使用 PostgreSQL 客户端至关重要。
这个包是一个开源项目。它有简单易懂的文档——教我们如何在 Promises 中或使用 Async/Await 来实现这个包。这对我编写这篇教程很有帮助!
我建议阅读包文档,可以在这里找到。
在这个项目中,我决定使用 node-postgres 而不是 Sequelize,后者是 PostgreSQL、MySQL、MariaDB、SQLite 和 Microsoft SQL Server 用户广泛使用的 ORM。只是为了让操作project-1更简单。
由于我们已经在一开始安装了 node-postgres 包,让我们继续吧!
使用“dotenv”创建环境变量
您可能注意到的另一点是,我们还安装了 dotenv 包。这个服务器包很重要,它可以存储我们不想在执行commit.
至于我们将如何使用数据库连接字符串,以及此连接字符串中是否存在敏感数据,我们不希望将其公开给所有人。我们现在将在项目中解决这个问题。为此,请按照以下步骤操作:
DATABASE_URL=postgres://{db_username}:{db_password}@{host}:{port}/{db_name}
如果你不知道你的 PostgreSQL db_username 是什么,只需右键单击 PgAdmin 服务器,然后转到“属性”->“连接”,你就会找到用户名。参见下面的动图:

在文件“database.js”中配置到数据库的连接字符串
现在我们已经将我们的内容包含在.envconnectionstring文件中,现在是时候开始开发和配置我们的应用程序与 PostgreSQL 的数据库连接了。
为此,打开database.js文件并包含以下代码块:
- 配置/数据库.js:
/**
 * Arquivo: config/database.js
 * Descrição: arquivo responsável pelas 'connectionStrings da aplicação: PostgreSQL.
 * Data: 04/03/2020
 * Author: Glaucia Lemos
 */

const { Pool } = require('pg');
const dotenv = require('dotenv');

dotenv.config();

// ==> Conexão com a Base de Dados:
const pool = new Pool({
  connectionString: process.env.DATABASE_URL
});

pool.on('connect', () => {
  console.log('Base de Dados conectado com sucesso!');
});

module.exports = {
  query: (text, params) => pool.query(text, params),
};
此块与我们的连接字符串相连,以便我们最终可以开始使用 Node.js 在 PostgreSQL 中保存数据。
请注意,我们正在使用node-postgres 包。如果您想进一步了解pg.Pool,我建议您阅读此处,因为从现在开始我们将经常使用它,包括此构建器的属性!
路线:(POST)'创建产品'
我们已经完成了应用程序的配置,并且正在连接到数据库!现在游戏即将开始!为此,我们将开发第一条路由。为此,我们将从现在开始大量使用两个文件:product.controller.js和product.routes.js。
请按照以下步骤操作:
在product.routes.js文件中包含以下代码块
- 文件:product.routes.js
// @ts-nocheck
/**
 * Arquivo: src/routes/product.routes.js
 * Descrição: arquivo responsável pelas rotas da api relacionado a classe 'Product'.
 * Data: 04/03/2020
 * Author Glaucia Lemos
 */

const router = require('express-promise-router')();
const productController = require('../controllers/product.controller');

// ==> Definindo as rotas do CRUD - 'Product':

// ==> Rota responsável por criar um novo 'Product': (POST): localhost:3000/api/products
router.post('/products', productController.createProduct);

module.exports = router;
现在我们将开发文件中 createProduct 方法的逻辑product.controller.js
- 控制器/product.controller.js
const db = require("../config/database");

// ==> Método responsável por criar um novo 'Product':

exports.createProduct = async (req, res) => {
  const { product_name, quantity, price } = req.body;
  const { rows } = await db.query(
    "INSERT INTO products (product_name, quantity, price) VALUES ($1, $2, $3)",
    [product_name, quantity, price]
  );

  res.status(201).send({
    message: "Product added successfully!",
    body: {
      product: { product_name, quantity, price }
    },
  });
};
请注意,我们只需在代码中使用插入查询,就像在 SQL 脚本中一样。就是这样。当然,为了返回所有输入的值,我们会添加一条消息来确认已创建的产品并返回该产品的所有值。
现在,我们需要在测试应用程序之前更新app.js文件。为此,请取消注释product.routes所在行:
- 文件:app.js
/**
 * Arquivo: app.js
 * Descrição: arquivo responsável por toda a configuração da aplicação.
 * Data: 02/03/2020
 * Author: Glaucia Lemos
 */

const express = require('express');
const cors = require('cors');

const app = express();

// ==> Rotas da API:
const index = require('./routes/index');
const productRoute = require('./routes/product.routes');

app.use(express.urlencoded({ extended: true }));
app.use(express.json());
app.use(express.json({ type: 'application/vnd.api+json' }));
app.use(cors());

app.use(index);
app.use('/api/', productRoute);

module.exports = app;
打开命令提示符并在 api 文件夹中输入以下命令
> nodemon
- 现在我们可以测试我们创建的第一个路由。现在,在以下端点打开 Postman: (POST) localhost: 3000/api/products,如下图所示:

如果出现如下信息:
{
    "message": "Product added successfully!",
    "body": {
        "product": {
            "product_name": "Logitech MK270 Wireless Keyboard and Mouse Combo",
            "quantity": "2",
            "price": "18.99"
        }
    }
}
这是因为它完美地持久化了。为了确认这一点,请打开已创建表的 PgAdmin,并按照下面的 gif 所示进行操作:

太棒了!一旦我们成功创建了第一条路线,剩下的就很容易了!
我们继续吧!
路线:(GET)'列出所有产品'
现在我们将创建一个路由,用于列出 PostgreSQL 中所有已创建并持久化的产品。由于 POST 路由已经创建,如果您能添加更多数据来帮助后续路由,那就更好了!
再次返回product.routes.js文件并添加列出所有产品的路由:
- 文件:product.routes.js
// ==> Rota responsável por listar todos os 'Products': (GET): localhost:3000/api/products
router.get('/products', productController.listAllProducts);
现在,回到文件product.controller.js并让我们开发listAllProducts方法的逻辑:
- 文件:product.controller.js
// ==> Método responsável por listar todos os 'Products':
exports.listAllProducts = async (req, res) => {
  const response = await db.query('SELECT * FROM products ORDER BY product_name ASC');
  res.status(200).send(response.rows);
};
请注意,我这里执行的查询是:SELECT * FROM products ORDER BY product_name ASC。这里我要求按字母顺序返回所有持久化在 PostegreSQL 中的产品!我这样做是为了让结果看起来有点特别!;)
我们来测试一下,打开Postman看看结果:

完美运行!注意,如果我们需要使用子查询进行更复杂的 SELECT,按照这个逻辑,它也能完美运行!:)
路线:(GET)'按 ID 列出产品'
现在,这非常简单。只需将我们的 SQL 知识与我们在其他 Node.js 应用程序中已经创建的其他 CRUD 知识结合起来即可。
现在让我们创建路由,通过 ID 列出特定产品。再次打开文件 product.routes.js 并添加一条路由:
- 文件:product.routes.js
(...)

// ==> Rota responsável por selecionar 'Product' pelo 'Id': (GET): localhost:3000/api/products/:id
router.get('/products/:id', productController.findProductById);

(...)
现在打开文件product.controller.js,我们将开发此路由的逻辑:
- 文件:product.controller.js
(...)

// ==> Método responsável por selecionar 'Product' pelo 'Id':
exports.findProductById = async (req, res) => {
  const productId = parseInt(req.params.id);
  const response = await db.query('SELECT * FROM products WHERE productid = $1', [productId]);
  res.status(200).send(response.rows);
}
现在让我们在 Postman 上测试这个路由,看看会发生什么:

路线:(PUT)'按 ID 更新产品'
现在让我们回到product.routes.js文件来创建updateProductById路由,该路由将负责通过 Id 更新产品:
- 文件:product.routes.js
(...)

// ==> Rota responsável por atualizar 'Product' pelo 'Id': (PUT): localhost: 3000/api/products/:id
router.put('/products/:id', productController.updateProductById);
让我们回到updateProductById文件来开发product.controller.js方法的逻辑:
- 文件:product.controller.js
(...)

// ==> Método responsável por atualizar um 'Product' pelo 'Id':
exports.updateProductById = async (req, res) => {
  const productId = parseInt(req.params.id);
  const { product_name, quantity, price } = req.body;

  const response = await db.query(
    "UPDATE products SET product_name = $1, quantity = $2, price = $3 WHERE productId = $4",
    [product_name, quantity, price, productId]
  );

  res.status(200).send({ message: "Product Updated Successfully!" });
};
更新完美!请看下面的动图:

现在让我们前往最后一条路线!
路线:(删除)'按 ID 删除产品'
终于,我们到了 api 的最后一条路由!让我们回到product.routes.js文件,并为deleteProductById方法创建路由:
- 文件:product.routes.js
(...)

// ==> Rota responsável por excluir 'Product' pelo 'Id': (DELETE): localhost:3000/api/products/:id
router.delete('/products/:id', productController.deleteProductById);

(...)
最后,在文件product.controller.js中开发此路由的逻辑:
- 文件:product.controller.js
(...)

// ==> Método responsável por excluir um 'Product' pelo 'Id':
exports.deleteProductById = async (req, res) => {
  const productId = parseInt(req.params.id);
  await db.query('DELETE FROM products WHERE productId = $1', [
    productId
  ]);

  res.status(200).send({ message: 'Product deleted successfully!', productId });
};
一切都运行正常,如果我们打开 PostgreSQL,我们将看到现在我们只有 5 个注册产品!

结论
今天我们学习了如何使用 Node.js 创建 RESTFul 的 CRUD API,并将其本地持久化到 PostgreSQL 中。下一篇文章,我将教你如何在 Azure 应用服务中部署此应用程序!部署完成后,我们将在 Postman 上进行测试,之后再在 Swagger 上进行测试!
在这里,我想介绍一些有关 Node.js、Azure Database PostgreSQL 和 GitHub Actions 的优秀资源:
- ✅使用 Node.js 构建 JavaScript 应用程序
- ✅ Azure Database for PostgreSQL 文档
- ✅快速入门:使用 Azure 门户创建 Azure Database for PostgreSQL 服务器
- ✅教程:使用 Azure Database for PostgreSQL – Hyperscale (Citus) 设计实时分析仪表板
- ✅面向 JavaScript 和 Node.js 开发人员的 Azure
- ✅免费电子书 - Azure 无服务器计算指南
- ✅免费课程 - 创建无服务器应用程序
要了解其他最新消息,请务必在 Twitter 上关注我!

并订阅我的Youtube 频道 - Glaucia Lemos观看每周有关 Web 开发、Node.js 和 JavaScript 的新视频!

再见!😍
鏂囩珷鏉ユ簮锛�https://dev.to/glaucia86/developing-a-crud-node-js-application-with-postgresql-4c9o