Appwrite Realtime for Flutter 入门
实时服务是 Appwrite 最受追捧的功能之一,现在终于可以使用了!我们已经发布了实时 alpha 版本和入门教程,这已经是一段时间了。在本教程中,我们将深入探讨细节,并了解如何利用 Appwrite 的实时功能开发 Flutter 应用。
📝 先决条件
要继续本教程,您需要访问带有项目的 Appwrite 控制台。如果您尚未安装 Appwrite,请先安装。按照 Appwrite 的官方安装文档操作,安装 Appwrite 非常简单。安装大约只需 2 分钟。安装完成后,登录控制台并创建一个新的项目。
💾 设置数据库
登录控制台并选择项目后,从仪表板左侧边栏单击数据库选项即可进入数据库页面。
进入数据库页面后,单击“添加集合”按钮。
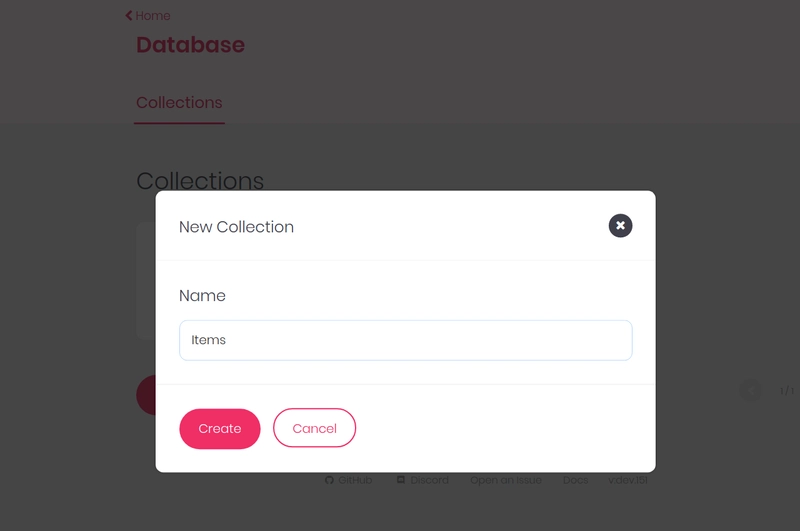
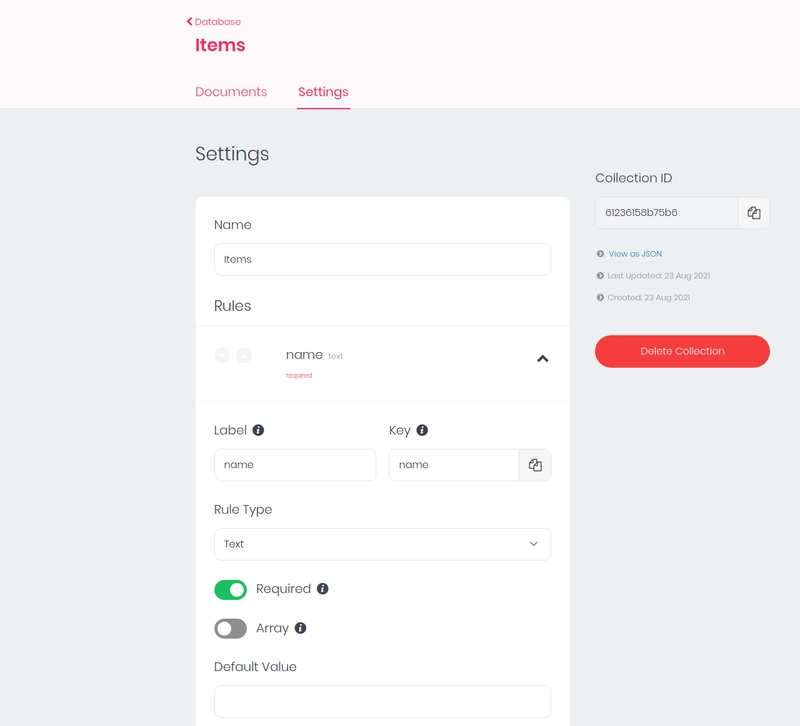
在弹出的对话框中,将集合名称设置为Items,然后点击“创建”按钮创建集合。您将被重定向到新集合的页面,我们可以在其中定义其规则。定义以下规则,然后点击“更新”按钮。同时,请记下设置页面右侧的集合 ID ,因为我们稍后在代码中会用到它。
- 姓名
- 标签:名称
- 关键词:名称
- 规则类型:文本
- 必需:true
- 数组:false
在权限中,设置读取和正确权限,以便*任何人都可以读取和写入。
现在集合已创建,我们需要创建一个用户。当我们使用实时 API 进行身份验证时,此用户将用于创建会话。
⚙️ 设置 Flutter 项目和依赖项
我们将从创建一个新的 Flutter 项目开始。在终端的项目文件夹中,输入以下命令来创建一个新的 Flutter 项目。
flutter create flappwrite_realtime
然后我们添加 Appwrite 的 SDK,从您的终端执行此操作,在您新创建的项目目录中,键入以下命令:
cd flappwrite_realtime
flutter pub add appwrite
此命令将添加 Appwrite 的最新 Flutter SDK 和实时服务,作为 Flutter 项目的依赖项。
一旦安装了依赖项并运行,flutter pub get您就可以使用它了。
➕️ 添加 Flutter 平台
要初始化 Appwrite SDK 并开始与 Appwrite 服务交互,首先需要向项目添加一个新的 Flutter 平台。如果您在 Flutter Web 上运行,则只需添加 Web 平台即可。要添加新平台,请转到 Appwrite 控制台,选择您的项目,然后点击项目仪表板上的“添加平台”按钮。选择 Flutter 或 Web 平台。
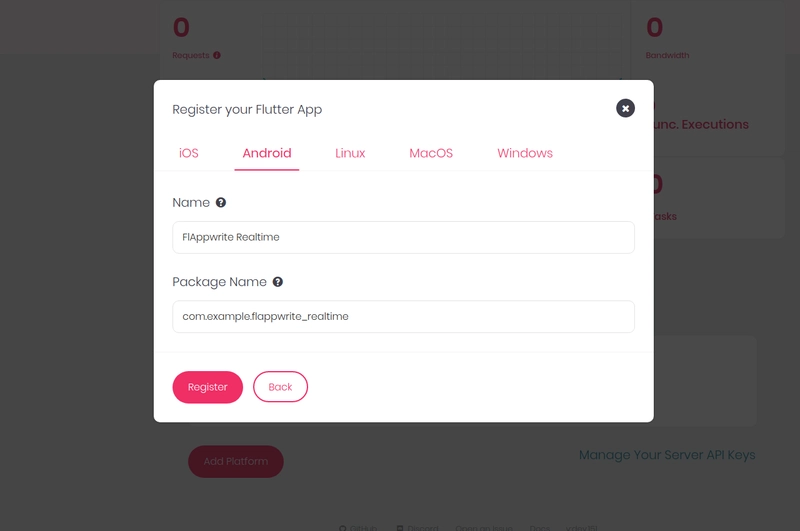
如果您选择 Web,请添加localhost作为主机名。如果您选择 Flutter,请从对话框中根据您计划运行的平台选择一个选项卡。您可以类似地添加多个平台。
如果您选择添加 Android 平台,请在对话框中添加详细信息。添加您的应用名称和软件包名称。软件包名称通常位于applicationId您的应用级build.gradle
文件中。您也可以在您的文件中找到软件包名称AndroidManifest.xml。
通过注册新平台,您可以允许您的应用程序与 Appwrite API 进行通信。
👩🔧 主页
我们将首先创建一个简单的有状态小部件,它将列出 items 集合中的所有项目,并允许添加新项目以及删除现有项目。我们的主页还将连接到 Appwrite 的实时服务,并通过更新 UI 来显示 items 集合中的更改。那么,让我们创建HomePage小部件。修改lib/main.dart中的代码如下:
import 'package:flutter/material.dart';

void main() {
  runApp(MyApp());
}

class MyApp extends StatelessWidget {
  @override
  Widget build(BuildContext context) {
    return MaterialApp(
      title: 'FlAppwrite Realtime Demo',
      theme: ThemeData(
        primarySwatch: Colors.blue,
      ),
      home: HomePage(),
    );
  }
}

class HomePage extends StatefulWidget {
  const HomePage({Key? key}) : super(key: key);

  @override
  _HomePageState createState() => _HomePageState();
}

class _HomePageState extends State<HomePage> {
  List<Map<String, dynamic>> items = [];
  TextEditingController _nameController = TextEditingController();

  @override
  Widget build(BuildContext context) {
    return Scaffold(
      appBar: AppBar(
        title: Text('FlAppwrite Realtime Demo'),
      ),
      body: ListView(children: [
        ...items.map((item) => ListTile(
              title: Text(item['name']),
            )),
      ]),
      floatingActionButton: FloatingActionButton(
        child: Icon(Icons.add),
        onPressed: () {
          // dialog to add new item
          showDialog(
            context: context,
            builder: (context) => AlertDialog(
              title: Text('Add new item'),
              content: TextField(
                controller: _nameController,
              ),
              actions: [
                TextButton(
                  child: Text('Cancel'),
                  onPressed: () => Navigator.of(context).pop(),
                ),
                TextButton(
                  child: Text('Add'),
                  onPressed: () {
                    // add new item
                    final name = _nameController.text;
                    if (name.isNotEmpty) {
                      _nameController.clear();
                      _addItem(name);
                    }
                    Navigator.of(context).pop();
                  },
                ),
              ],
            ),
          );
        },
      ),
    );
  }

  void _addItem(String name) {
    setState(() {
      items.add({'name': name, 'id': DateTime.now().millisecondsSinceEpoch});
    });
  }
}
在 HomePage 的initState函数中,我们将创建并初始化我们的 Appwrite 客户端,以及订阅我们的项目集合中文档的实时变化。
RealtimeSubscription? subscription;
late final Client client;

initState() {
    super.initState();
    client = Client()
        .setEndpoint('<http://localhost/v1>') // your endpoint
        .setProject('5df5acd0d48c2') //your project id
        ;
    subscribe();
}
并在dispose方法中关闭订阅。
dispose(){
    subscription?.close();
    super.dispose();
}
现在让我们设置不同的变量和函数来加载初始数据,监听收集文档的变化并更新 UI 以实时反映变化。
首先,初始化我们的项目集合 ID,并设置一个函数,用于在应用程序首次启动时加载初始数据。为此,我们还将设置 Appwrite 数据库服务。
final itemsCollection = "<collectionId>"; //replace with your collection id, which can be found in your collection's settings page.

late final Database database;

@override
void initState() {
    super.initState();
    client = Client()
            .setEndpoint('<http://localhost/v1>') // your endpoint
            .setProject('5df5acd0d48c2') //your project id
        ;
    database = Database(client);
    loadItems();
}


loadItems() async {
    try {
        final res = await database.listDocuments(collectionId: itemsCollection);
        setState(() {
        items = List<Map<String, dynamic>>.from(res.data['documents']);
        });
    } on AppwriteException catch (e) {
        print(e.message);
    }
}
为了能够将数据添加到我们的集合中,我们必须首先创建一个会话。让我们添加一个登录函数并从我们的initState函数中调用它。
@override
void initState() {
    super.initState();
    //...
    login();
    // ..
}

login() async {
    try {
      await Account(client).createAnonymousSession();
    } on AppwriteException catch (e) {
      print(e.message);
    }
}
现在,我们将设置订阅功能,以监听项目集合中文档的变化。
void subscribe() {
    final realtime = Realtime(client);

    subscription = realtime.subscribe([
      'collections.<collectionId>.documents'
    ]); //replace <collectionId> with the ID of your items collection, which can be found in your collection's settings page.

    // listen to changes
    subscription!.stream.listen((data) {
      // data will consist of `event` and a `payload`
      if (data.payload.isNotEmpty) {
        switch (data.event) {
          case "database.documents.create":
            var item = data.payload;
            items.add(item);
            setState(() {});
            break;
          case "database.documents.delete":
            var item = data.payload;
            items.removeWhere((it) => it['\$id'] == item['\$id']);
            setState(() {});
            break;
          default:
            break;
        }
      }
    });
}
最后,让我们修改我们的_addItem函数以将项目添加到 Appwrite 的数据库并查看视图如何实时更新。
void _addItem(String name) async {
    try {
      await database.createDocument(
        collectionId: itemsCollection,
        data: {'name': name},
        read: ['*'],
        write: ['*']
      );
    } on AppwriteException catch (e) {
      print(e.message);
    }
}
我们还修改我们的ListTile小部件以添加一个删除按钮,以便我们删除该项目。
ListTile(
    title: Text(item['name']),
    trailing: IconButton(
        icon: Icon(Icons.delete),
        onPressed: () async {
            await database.deleteDocument(
            collectionId: itemsCollection,
            documentId: item['\$id'],
            );
        },
    ),
)
完整示例
import 'package:appwrite/appwrite.dart';
import 'package:flutter/material.dart';

void main() {
  runApp(MyApp());
}

class MyApp extends StatelessWidget {
  @override
  Widget build(BuildContext context) {
    return MaterialApp(
      title: 'FlAppwrite Realtime Demo',
      theme: ThemeData(
        primarySwatch: Colors.blue,
      ),
      home: HomePage(),
    );
  }
}

class HomePage extends StatefulWidget {
  const HomePage({Key? key}) : super(key: key);

  @override
  _HomePageState createState() => _HomePageState();
}

class _HomePageState extends State<HomePage> {
  List<Map<String, dynamic>> items = [];
  TextEditingController _nameController = TextEditingController();
  RealtimeSubscription? subscription;
  late final Client client;
  final itemsCollection = 'COLLECTION_ID';
  late final Database database;

  @override
  void initState() {
    super.initState();
    client = Client()
            .setEndpoint('<http://localhost/v1>') // your endpoint
            .setProject('YOUR_PROJECT_ID') //your project id
        ;
    database = Database(client);
    login();
    loadItems();
    subscribe();
  }

  login() async {
    try {
      await Account(client).createAnonymousSession();
    } on AppwriteException catch (e) {
      print(e.message);
    }
  }

  loadItems() async {
    try {
      final res = await database.listDocuments(collectionId: itemsCollection);
      setState(() {
        items = List<Map<String, dynamic>>.from(res.data['documents']);
      });
    } on AppwriteException catch (e) {
      print(e.message);
    }
  }

  void subscribe() {
    final realtime = Realtime(client);

    subscription = realtime.subscribe([
      'collections.<collectionId>.documents'
    ]); //replace <collectionId> with the ID of your items collection, which can be found in your collection's settings page.

    // listen to changes
    subscription!.stream.listen((data) {
      // data will consist of `event` and a `payload`
      if (data.payload.isNotEmpty) {
        switch (data.event) {
          case "database.documents.create":
            var item = data.payload;
            items.add(item);
            setState(() {});
            break;
          case "database.documents.delete":
            var item = data.payload;
            items.removeWhere((it) => it['\$id'] == item['\$id']);
            setState(() {});
            break;
          default:
            break;
        }
      }
    });
  }

  @override
  void dispose() {
    subscription?.close();
    super.dispose();
  }

  @override
  Widget build(BuildContext context) {
    return Scaffold(
      appBar: AppBar(
        title: Text('FlAppwrite Realtime Demo'),
      ),
      body: ListView(children: [
        ...items.map((item) => ListTile(
              title: Text(item['name']),
              trailing: IconButton(
                icon: Icon(Icons.delete),
                onPressed: () async {
                  await database.deleteDocument(
                    collectionId: itemsCollection,
                    documentId: item['\$id'],
                  );
                },
              ),
            )),
      ]),
      floatingActionButton: FloatingActionButton(
        child: Icon(Icons.add),
        onPressed: () {
          // dialog to add new item
          showDialog(
            context: context,
            builder: (context) => AlertDialog(
              title: Text('Add new item'),
              content: TextField(
                controller: _nameController,
              ),
              actions: [
                TextButton(
                  child: Text('Cancel'),
                  onPressed: () => Navigator.of(context).pop(),
                ),
                TextButton(
                  child: Text('Add'),
                  onPressed: () {
                    // add new item
                    final name = _nameController.text;
                    if (name.isNotEmpty) {
                      _nameController.clear();
                      _addItem(name);
                    }
                    Navigator.of(context).pop();
                  },
                ),
              ],
            ),
          );
        },
      ),
    );
  }

  void _addItem(String name) async {
    try {
      await database.createDocument(
          collectionId: itemsCollection,
          data: {'name': name},
          read: ['*'],
          write: ['*']);
    } on AppwriteException catch (e) {
      print(e.message);
    }
  }
}
🥂 结论
我非常享受编写教程的过程,也希望您喜欢学习并使用 Appwrite Realtime 服务构建 Flutter 应用程序。此应用程序的完整源代码可在我的GitHub 仓库中找到。如有任何疑问或意见,请随时联系我们。期待看到社区使用 Flutter 和 Appwrite Realtime 构建的精彩内容。
 后端开发教程 - Java、Spring Boot 实战 - msg200.com


