使用 Next.js、AWS Amplify 和 GraphQL 的服务器端渲染实时 Web 应用程序
编辑后端
在云端保存 Todos
在这篇博文中,我们将介绍如何使用 Next.js 和 AWS Amplify 构建服务器渲染的实时协作待办事项列表应用程序。
- 介绍
- 创建我们的应用程序骨架
- 添加离线功能
- 为 Amplify GraphQL Transform 准备 Graqhql 模式
- 在您的计算机上设置 AWS Amplify
- 创建 API
- 编辑后端
- 在云端保存 Todos
- 在服务器端获取初始待办事项
- 监听其他人添加的待办事项
- 监听其他人修改和删除的todos
- 使用 now 部署我们的应用程序
介绍
该应用将包含动态和静态路由,以演示如何根据传入的请求 URL 从服务器加载和渲染数据。此外,它还订阅了数据变更,以展示如何使用 AWS Amplify 无缝监听来自客户端的远程数据。
无论您的数据来自哪里,Next.js 都可以轻松地进行服务器端渲染。
AWS Amplify 是一个库和工具链,可以轻松设置、管理和使用 AWS 的无限可扩展云基础设施。
您无需熟悉其他 AWS 服务即可使用它。但是,如果您熟悉,您会注意到 Amplify 在热门且久经考验的 AWS 云服务(例如 AppSync、DynamoDB、Cognito、Lambda、S3 等)上提供了一个抽象层。Amplify 将这些云服务打包成分析、身份验证、API、存储、发布订阅等类别。如果您想了解更多信息,请务必访问他们的网站。
请注意,您可以部署一个可用于生产环境的应用程序,而无需了解或手动管理任何这些服务。AWS Amplify 可以作为您与云端的唯一连接点。
话虽如此,让我们开始吧!
创建我们的应用程序骨架
首先,我们建立一个目录并用 git 初始化它
mkdir todo-list
cd todo-list
npm init -y
git init
现在我们有一个仅包含具有指定默认值的 package.json 的目录。
我们现在可以安装依赖项
npm i react react-dom next immer nanoid
# If you're using typescript
npm i -D typescript -@types/react @types/react-dom @types/node
但 immer 可以让我们更容易地操作 React 状态和
nanoid 是一个小工具,可以为每个要做的事情生成一个唯一的 id。
并添加 3 个脚本到我们的package.json
{
  "scripts": {
    "dev": "next",
    "build": "next build",
    "start": "next start"
  }
}
接下来,我们需要为 Web 应用程序创建一个主页,
当使用 Next.js 时,我们只需要创建一个名为 pages 的目录,并将我们的主文件作为 index.js(或 index.tsx)放入其中
mkdir pages
touch pages/index.js # or pages/index.tsx
我们的主页将返回应用程序外壳来确认我们的设置是否正确。
import * as React from "react";

const App = () => {
  return (
    <>
      <header>
        <h2>To Do List</h2>
      </header>
      <main>Hello World</main>
    </>
  );
};
export default App;
现在让我们运行它:
npm run dev
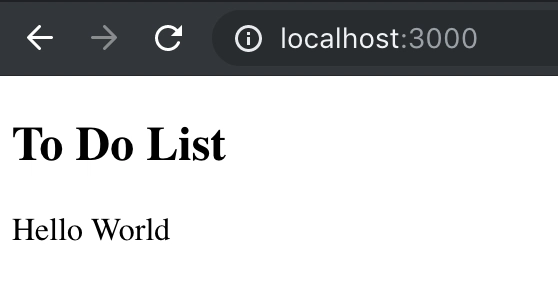
Next.js 将为我们设置 tsconfig(如果我们使用 Typescript)并在 localhost:3000 上启动服务器
访问该链接应该会给我们这样的结果:
添加离线功能
我们现在准备为我们的应用程序添加功能。
它应该有一个文本字段,旁边有一个按钮,以及一个可编辑和可删除的待办事项列表。
为了管理状态,我们将使用React.useReducer初始状态等于:
{
  currentTodo:"",
  todos: []
}
Reducer 将支持 4个动作add:updateset-currentdelete
查看一些代码,我们的 reducer:
import produce from "immer";

/*<IfTypescript>*/
type Todo = {
  id: string;
  name: string;
  createdAt: string;
  completed: boolean;
};
type State = { todos: Todo[]; currentTodo: string };
type Action =
  | { type: "add" | "update" | "delete"; payload: Todo }
  | { type: "set-current"; payload: string };
/*</IfTypescript>*/

const reducer /*: React.Reducer<State, Action>*/ = (state, action) => {
  switch (action.type) {
    case "set-current": {
      return produce(state, draft => {
        draft.currentTodo = action.payload;
      });
    }
    case "add": {
      return produce(state, draft => {
        draft.todos.push(action.payload);
      });
    }
    case "update": {
      const todoIndex = state.todos.findIndex(
        todo => todo.id === action.payload.id
      );
      if (todoIndex === -1) return state;
      return produce(state, draft => {
        draft.todos[todoIndex] = { ...action.payload };
      });
    }
    case "delete": {
      const todoIndex = state.todos.findIndex(
        todo => todo.id === action.payload.id
      );
      if (todoIndex === -1) return state;
      return produce(state, draft => {
        draft.todos.splice(todoIndex, 1);
      });
    }

    default: {
      throw new Error(`Unsupported action ${JSON.stringify(action)}`);
    }
  }
};
UI 组件:
const App = () => {
  // The reducer defined before
  const [state, dispatch] = React.useReducer(reducer, {
    currentTodo: "",
    todos: []
  });
  const add = () => {
    dispatch({
      type: "add",
      payload: {
        id: nanoid(),
        name: state.currentTodo,
        completed: false,
        createdAt: `${Date.now()}`
      }
    });
    dispatch({ type: "set-current", payload: "" });
  };
  const edit = (todo /*:Todo*/) => {
    dispatch({ type: "update", payload: todo });
  };
  const del = (todo /*:Todo*/) => {
    dispatch({ type: "delete", payload: todo });
  };
  return (
    <>
      <header>
        <h2>To Do List</h2>
      </header>
      <main>
        <form
          onSubmit={event => {
            event.preventDefault();
            add(state.currentTodo);
          }}
        >
          <input
            type="text"
            value={state.currentTodo}
            onChange={event => {
              dispatch({ type: "set-current", payload: event.target.value });
            }}
          />
          <button type="submit">Add</button>
        </form>
        <ul>
          {state.todos.map(todo => {
            return (
              <li key={todo.id}>
                <input
                  type={"text"}
                  value={todo.name}
                  onChange={event => {
                    edit({ ...todo, name: event.target.value });
                  }}
                />
                <button
                  onClick={() => {
                    del(todo);
                  }}
                >
                  Delete
                </button>
              </li>
            );
          })}
        </ul>
      </main>
    </>
  );
};
至此,我们已经有了一个可以离线运行的待办事项列表应用。
如果您正在跟着代码走,那么在将我们的应用与 AWS Amplify 集成之前,现在可能是创建提交的好时机。
提交之前请确保添加 .gitignore 文件
printf "node_modules\n.next" > .gitignore
现在让我们将待办事项与云端同步,以便能够共享它们并与他人协作。
为 Amplify GraphQL Transform 准备 Graqhql 模式
让我们快速了解一下 Amplify GraphQL Transform 是什么。
GraphQL Transform 提供了一个易于使用的抽象
,可帮助您快速为 AWS 上的 Web 和移动应用程序创建后端。
我们使用 GraphQL SDL 定义数据模型,amplify cli 负责:
- 为 CRUDL 操作提供/更新所需的基础设施。
- 生成客户端 CRUDL 代码
输入:GraphQL 数据形状。
输出:弹性基础设施以及与其无缝交互的代码。
CRUDL = 创建读取更新删除列表
在我们的例子中,GraphQL 模式很简单,它由一个 Todo 类型和一个包含待办事项排序列表的 TodoList 类型组成:
type Todo @model {
  # ! means non-null GraphQL fields are allowed to be null by default
  id: ID!
  name: String!
  createdAt: String!
  completed: Boolean!
  todoList: TodoList! @connection(name: "SortedList")
  userId: String!
}

type TodoList @model {
  id: ID!
  createdAt: String!
  # Array of Todos sorted by Todo.createdAt
  todos: [Todo] @connection(name: "SortedList", sortField: "createdAt")
}
我们存储该模式以便
schema.graphql以后重新使用。
GraphQL Transform 模式中的指令@model告诉 Amplify 将待办事项视为模型并将该类型的对象存储在 DynamoDB 中,并使用 AppSync 自动配置 CRUDL 查询和变异。
该@connection指令允许我们指定数据类型之间的 n 对 n 关系并在服务器端对其进行排序。
在此处阅读有关 GraphQL Transform 和支持的指令的更多信息。
如果您已经使用过 Amplify,可以直接跳到创建 API
在您的计算机上设置 AWS Amplify
- 注册AWS 账户
- 安装 AWS Amplify cli:
npm install -g @aws-amplify/cli
- 配置 Amplify cli
amplify configure
创建 API
我们首先在项目中初始化放大。
npm i aws-amplify
amplify init
#<Interactive>
? Enter a name for the project (todolist) todolist
? Enter a name for the environment dev # or prod
? Choose your default editor: <MY_FAVORITE_EDITOR>
? Choose the type of app that you\'re building javascript # even if you're using typescript
? What javascript framework are you using react
? Source Directory Path: src
? Distribution Directory Path: out # Next.js exports to the out directory
? Build Command:  npm run-script build
? Start Command: npm run-script start
? Do you want to use an AWS profile? (Y/n) Y # Or use default
? Please choose the profile you want to use default
Your project has been successfully initialized and connected to the cloud!
# 🚀 Ready
#</Interactive>
此时应该已经创建了 2 个新文件夹: 现在可以安全地忽略它们src。amplify
现在 amplify 已初始化,我们可以添加它的任何服务(Auth、API、Analytics……)。
对于我们的用例,我们只需要使用 API 模块。因此,我们使用以下命令将其添加到项目中:
amplify add api
? Please select from one of the below mentioned services GraphQL
? Provide API name: todolist
? Choose an authorization type for the API (Use arrow keys)
❯ API key
  Amazon Cognito User Pool
? Do you have an annotated GraphQL schema? (y/N) y # The one we saved earlier to schema.graphql
? Provide your schema file path: ./schema.graphql
API 配置已准备就绪,我们需要推动将我们的云资源与当前配置同步:
amplify push
? Are you sure you want to continue? (Y/n) Y
? Do you want to generate code for your newly created GraphQL API (Y/n) Y # This code incredibly speeds up development
? Choose the code generation language target
❯ javascript
  typescript
  flow
? Enter the file name pattern of graphql queries, mutations and subscriptions src/graphql/**/*.js
? Do you want to generate/update all possible GraphQL operations - queries, mutations and subscriptions (Y/n) Y
? Enter maximum statement depth [increase from default if your schema is deeply nested] 2
⠼ Updating resources in the cloud. This may take a few minutes...
# Logs explaining what's happening
✔ Generated GraphQL operations successfully and saved at src/graphql
✔ All resources are updated in the cloud

GraphQL endpoint: https://tjefk2x675ex7gocplim46iriq.appsync-api.us-east-1.amazonaws.com/graphql
GraphQL API KEY: da2-d7hytqrbj5cwfgbbnxavvm7xry
就这样🎉!我们的整个后端已经准备好了,并且我们有客户端代码来查询它。
编辑后端
- 编辑
amplify/backend/api/apiname/schema.graphql。 - 跑步
amplify push - 就是这样👍
在云端保存 Todos
在 pages/index 中,我们首先导入并API配置 我们的放大应用程序graphqlOperationaws-amplifysrc/aws-exports.js
import { API, graphqlOperation } from "aws-amplify";
import config from "../src/aws-exports";
API.configure(config);
// Should be a device id or a cognito user id but this will do
const MY_ID = nanoid();
接下来,如果打开,src/graphql/mutations您会看到一个 createTodo 字符串,其中包含用于创建新待办事项的 GraphQL Mutation。
我们在调度动作后导入并使用它add。
const add = async () => {
  const todo = {
    id: nanoid(),
    name: state.currentTodo,
    completed: false,
    createdAt: `${Date.now()}`
  };
  dispatch({
    type: "add",
    payload: todo
  });
  // Optimistic update
  dispatch({ type: "set-current", payload: "" });
  try {
    await API.graphql(
      graphqlOperation(createTodo, {
        input: { ...todo, todoTodoListId: "global", userId: MY_ID }
      })
    );
  } catch (err) {
    // With revert on error
    dispatch({ type: "set-current", payload: todo.name });
  }
};
就是这样,我们的待办事项现在被保存到按请求计费的高可用性 DynamoDB 实例中。
在服务器端获取初始待办事项
我们希望构建的列表及其数据由服务器渲染并发送到客户端。
因此,我们不能使用 React.useEffect hook 来加载数据并将其存储在 state 中。
使用 Next.js 的getInitialProps异步方法,我们可以从任何地方获取数据并将其作为 props 传递给我们的页面组件。
在我们的主页上添加一个看起来像这样
import { getTodoList, createTodoList } from "../src/graphql/queries";

// <TypescriptOnly>
import { GetTodoListQuery } from "../src/API";
// </TypescriptOnly>

App.getInitialProps = async () => {
  let result; /*: { data: GetTodoListQuery; errors: {}[] };*/
  try {
    // Fetch our list from the server
    result = await API.graphql(graphqlOperation(getTodoList, { id: "global" }));
  } catch (err) {
    console.warn(err);
    return { todos: [] };
  }
  if (result.errors) {
    console.warn("Failed to fetch todolist. ", result.errors);
    return { todos: [] };
  }
  if (result.data.getTodoList !== null) {
    return { todos: result.data.getTodoList.todos.items };
  }

  try {
    // And if it doesn't exist, create it
    await API.graphql(
      graphqlOperation(createTodoList, {
        input: {
          id: "global",
          createdAt: `${Date.now()}`
        }
      })
    );
  } catch (err) {
    console.warn(err);
  }
  return { todos: [] };
};
在我们的 App 组件中,我们使用发送的 props 来初始化我们的状态getInitialProps
//<TypescriptOnly>
import { GetTodoListQuery } from '../src/API'
type Props = {
  todos: GetTodoListQuery["getTodoList"]["todos"]["items"];
}
//</TypescriptOnly>

const App = ({ todos }/*:Props */) => {
const [state, dispatch] = React.useReducer(reducer, {
  currentTodo: "",
  todos
});
如果您现在尝试刷新页面,您应该会看到您的待办事项在刷新之间保持不变,并且它们的排序顺序与添加时的顺序相同
监听其他人添加的待办事项
在客户端上呈现应用程序后,我们希望监听来自其他用户的数据变化,以便我们可以相应地更新我们的 UI。
我们将使用 GraphQL 订阅来监听待办事项的添加、更新或删除时间。
幸运的是,这只需要几行代码就可以完成设置。
import { onCreateTodo } from "../src/graphql/subscriptions";
/*
With TS we create an Observable type to describe the return type of a GraphQL subscription.
Hopefully in future releases of aws-amplify we will have generic types for API.graphql that will make this un-necessary.
*/
type Observable<Value = unknown, Error = {}> = {
  subscribe: (
    cb?: (v: Value) => void,
    errorCb?: (e: Error) => void,
    completeCallback?: () => void
  ) => void;
  unsubscribe: Function;
};

// In our function component
const App = props => {
  // bla
  React.useEffect(() => {
    const listener /*: Observable<{
      value: { data: OnCreateTodoSubscription };
    }> */ = API.graphql(graphqlOperation(onCreateTodo));
    const subscription = listener.subscribe(v => {
      if (v.value.data.onCreateTodo.userId === MY_ID) return;
      dispatch({ type: "add", payload: v.value.data.onCreateTodo });
    });
    return () => {
      subscription.unsubscribe();
    };
  }, []);
  // blabla
};
监听其他人修改和删除的todos
我们将首先订阅两个新订阅onUpdateTodo,onDeleteTodo
import {
  onCreateTodo,
  onUpdateTodo,
  onDeleteTodo
} from "../src/graphql/subscriptions";
// <ts>
import { OnUpdateTodoSubscription, OnDeleteTodoSubscription } from "../src/API";

type Listener<T> = Observable<{ value: { data: T } }>;
// </ts>
// In our function component
const App = props => {
  // bla
  React.useEffect(() => {
    const onCreateListener: Listener<OnCreateTodoSubscription> = API.graphql(
      graphqlOperation(onCreateTodo)
    );
    const onUpdateListener: Listener<OnUpdateTodoSubscription> = API.graphql(
      graphqlOperation(onUpdateTodo)
    );
    const onDeleteListener: Listener<OnDeleteTodoSubscription> = API.graphql(
      graphqlOperation(onDeleteTodo)
    );

    const onCreateSubscription = onCreateListener.subscribe(v => {
      if (v.value.data.onCreateTodo.userId === MY_ID) return;
      dispatch({ type: "add", payload: v.value.data.onCreateTodo });
    });
    const onUpdateSubscription = onUpdateListener.subscribe(v => {
      dispatch({ type: "update", payload: v.value.data.onUpdateTodo });
    });
    const onDeleteSubscription = onDeleteListener.subscribe(v => {
      dispatch({ type: "delete", payload: v.value.data.onDeleteTodo });
    });

    return () => {
      onCreateSubscription.unsubscribe();
      onUpdateSubscription.unsubscribe();
      onDeleteSubscription.unsubscribe();
    };
  }, []);
  // blabla
};
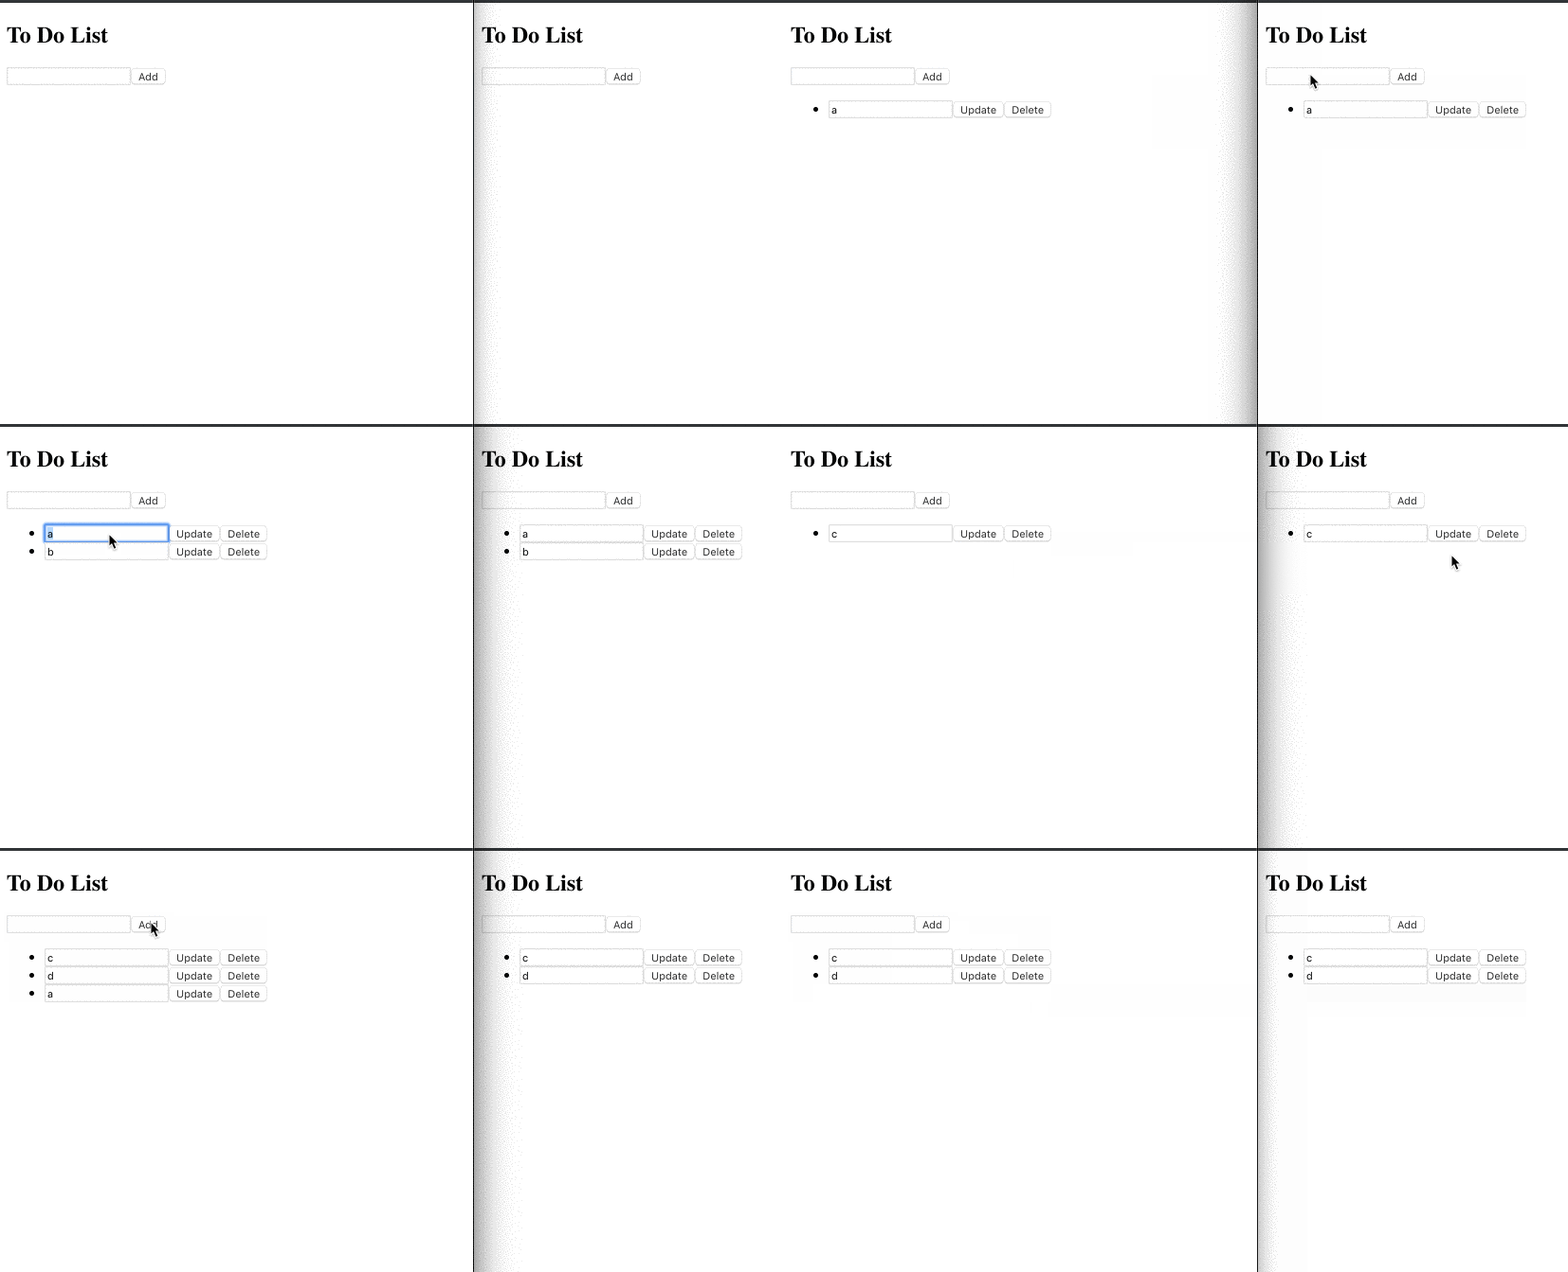
这就是我们的最终成果,一个协作的实时待办事项列表
我们的第一页已经完成,但我们仍然需要有我们自己的待办事项页面并从我们的列表中链接到它。
我们需要让搜索引擎为我们的各个待办事项建立索引,因此我们需要根据 url 中的 id 在服务器中呈现待办事项中的数据。
为此,我们创建一个新的 Next.js 动态路由,pages/todo/[id].(t|j)sx并使用getInitialProps异步方法用来自 AWS Amplify 数据源的数据填充它。
import * as React from "react";
import { API, graphqlOperation } from "aws-amplify";

import { getTodo } from "../../src/graphql/queries";
import config from "../../src/aws-exports";
// <ts>
import { GetTodoQuery } from "../../src/API";
type Props = { todo: GetTodoQuery["getTodo"] };
// </ts>
API.configure(config);

const TodoPage = (props /*: Props*/) => {
  return (
    <div>
      <h2>Individual Todo {props.todo.id}</h2>
      <pre>{JSON.stringify(props.todo, null, 2)}</pre>
    </div>
  );
};

TodoPage.getInitialProps = async context => {
  const { id } = context.query;
  try {
    const todo = (await API.graphql({
      ...graphqlOperation(getTodo),
      variables: { id }
    })) as { data: GetTodoQuery; errors?: {}[] };
    if (todo.errors) {
      console.log("Failed to fetch todo. ", todo.errors);
      return { todo: {} };
    }
    return { todo: todo.data.getTodo };
  } catch (err) {
    console.warn(err);
    return { todo: {} };
  }
};

export default TodoPage;
最后,我们为每个待办事项添加一个链接
<a href={`/todo/${todo.id}`}>Visit</a>
使用 now 部署我们的应用程序
部署 Next.js 应用程序有两种方法:
- 将其导出为 HTML 和静态资产,并从任何地方提供服务
- 运行一个节点服务器,该服务器在每次请求时获取数据并提供预渲染的页面
我们无法将我们的项目导出到静态 html 应用程序,因为我们有一个动态路由todo/[id],它会根据 url 在渲染之前动态获取数据,并且我们的主要路由需要最新的 todos 进行预渲染。
如果没有这些限制,导出就会像运行一样简单:next build && next export。
我们将使用的另一种方法是像部署任何节点服务器一样部署它。
部署 Node.js 服务器的最快方法是使用现在。
我们添加一个now.json包含以下内容的文件:
{
  "version": 2,
  "builds": [{ "src": "package.json", "use": "@now/next" }]
}
阅读更多关于
now.json。
然后我们可以部署
now
就是这样!
我们使用 Next.js 和 AWS Amplify 构建并部署了一个 SEO 友好的服务器端渲染协作待办事项列表。
👋 如果您有任何疑问,请随时在此处发表评论或在推特上联系我。
文章来源:https://dev.to/rakannimer/server-side-rendered-real-time-web-app-with-next-js-aws-amplify-graphql-2j49 后端开发教程 - Java、Spring Boot 实战 - msg200.com


