使用 JWT 进行 Rails 身份验证的完整指南
Rails JWT 身份验证
Rails JWT 身份验证
JSON Web Token(JWT)是一个 JSON 对象,用于在双方之间安全地传输信息。JWT 广泛用于在 REST API 中从客户端安全地验证和授权用户。在本文中,我将逐步讲解如何在 Rails API 中使用 JWT 实现身份验证。
我们需要的宝石:
gem 'bcrypt', '~> 3.1', '>= 3.1.12’

gem 'jwt', '~> 2.5’

gem 'rack-cors'

gem 'active_model_serializers', '~> 0.10.12’
添加 gemfile 运行后bundle install
创建路线
  post "/users", to: "users#create"
  get "/me", to: "users#me"
  post "/auth/login", to: "auth#login"
我们将通过向 /users 发送 POST 请求来注册新用户。现有用户可以通过向 “/auth/login” 发送 POST 请求来登录,而新用户可以通过向 “/me” 发送 GET 请求来访问用户数据。我们至少需要 3 个路由,后续可以添加更多路由。
添加 CORS
Rails.application.config.middleware.insert_before 0, Rack::Cors do
  allow do
    origins '*'

    resource '*',
      headers: :any,
      methods: [:get, :post, :put, :patch, :delete, :options, :head]
  end
end
跨域资源共享 (CORS) 是一个中间件,它只接受来自一个客户端 URL 的 API 请求。我们希望允许发出请求的客户端 URL 将被添加到 中origins。目前,我们设置了 * origins,这意味着任何人都可以向我们的 API 发出请求。
创建用户模型:
rails g model user username password_digest bio --no-test-framework
has_secure_password在用户模型中添加宏并验证用户名:
class User < ApplicationRecord
    has_secure_password
    validates :username, uniqueness: true
end
has_secure_password是一个 bcrypt 方法,用于加密每个用户的密码。为了使此方法有效,我们password_digest在数据库表中添加了一个字段。但是,当我们向服务器发出 post 请求时,我们会发送password。剩下的事情由 Bcrypt 来处理。
示例请求:
fetch('URL/auth/login',{
method: POST,
headers: {
    'Content-type': 'application/json'
},
body: {
    username: 'randomUserName',
    password: 'ask^dsk34'
})
将 JWT 添加到我们的 API
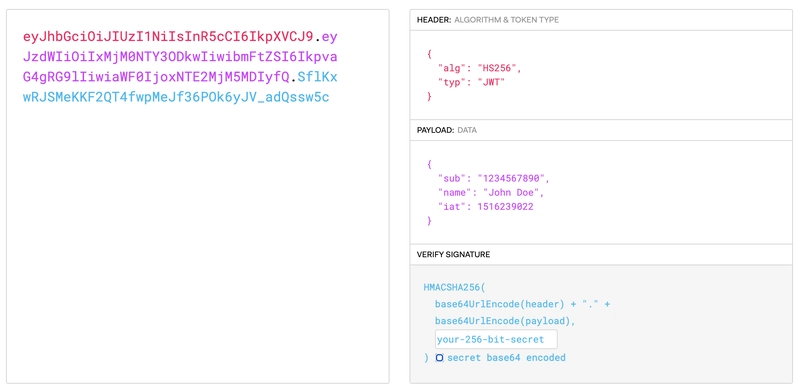
JSON Web Tokens 是一种开放的、符合行业标准的 RFC 7519 方法,用于在双方之间安全地表示声明。JWT Tokens 如下所示:eyJhbGciOiJIUzI1NiIsInR5cCI6IkpXVCJ9.eyJzdWIiOiIxMjM0NTY3ODkwIiwibmFtZSI6IkpvaG4gRG9lIiwiaWF0IjoxNTE2MjM5MDIyfQ.SflKxwRJSMeKKF2QT4fwpMeJf36POk6yJV_adQssw5c
来源-JWT.io
它由三部分组成。第一部分是标头,包含算法和令牌类型。第二部分是有效负载,即我们想要存储在令牌中的数据。第三部分是签名,其中包含密钥。我们将从 application_controller.rb 生成 JWT 令牌。
class ApplicationController < ActionController::API

    def encode_token(payload)
        JWT.encode(payload, 'hellomars1211')
    end

    def decoded_token
        header = request.headers['Authorization']
        if header
            token = header.split(" ")[1]
            begin
                JWT.decode(token, 'hellomars1211')
            rescue JWT::DecodeError
                nil
            end
        end
    end

end
该encode_token方法将有效载荷作为参数。我们将用户 ID 作为有效载荷传递。然后调用该JWT.encode(payload, 'hellomars1211')方法对令牌进行编码。有效载荷将是用户 ID,然后我们可以使用它来查找正确的用户。请注意,'hellomars1211'除了有效载荷之外,我们还传递了一个字符串:作为参数,该字符串将是我们的密钥,我们也将使用它来解码令牌。密钥可以是字符、符号、数字等的任意组合。我们将调用该decoded_token方法对 JWT 令牌进行解码。
每当我们向受保护的路由或资源发出请求时,我们都会将 JWT 令牌连同请求中的数据一起传递到 Authorization 标头中,并使用 Bearer 模式。以下是一个示例请求:
fetch("URL/me", {
  method: "GET",
  headers: {
    Authorization: `Bearer <token>`,
  },
});
我们从标头访问令牌并使用JWT.decode(token, 'hellomars1211', true, algorithm: 'HS256')方法解码令牌,我们还需要传递密钥才能解码令牌。
现在,我们可以user.id从解码后的令牌中访问了。我们将创建一个方法current_user,从解码后的令牌中获取用户 ID,并使用相同的用户 ID 查找用户。这将返回当前已登录的用户。我们将创建另一个方法authorized来检查 current_user 是否已登录。
def current_user
    if decoded_token
        user_id = decoded_token[0]['user_id']
        @user = User.find_by(id: user_id)
    end
end

def authorized
    unless !!current_user
    render json: { message: 'Please log in' }, status: :unauthorized
    end
end
最后,我们将向before_action控制器添加一条规则,该规则将authorized在执行任何操作之前调用该方法并检查用户是否已登录。对于任何未经授权的请求,我们将呈现一条消息:Please log in。这就是我们的 application_controller 的样子:
*app/controllers/application_controller.rb*

class ApplicationController < ActionController::API
    before_action :authorized

    def encode_token(payload)
        JWT.encode(payload, 'hellomars1211')
    end

    def decoded_token
        header = request.headers['Authorization']
        if header
            token = header.split(" ")[1]
            begin
                JWT.decode(token, 'hellomars1211', true, algorithm: 'HS256')
            rescue JWT::DecodeError
                nil
            end
        end
    end

    def current_user
        if decoded_token
            user_id = decoded_token[0]['user_id']
            @user = User.find_by(id: user_id)
        end
    end

    def authorized
        unless !!current_user
        render json: { message: 'Please log in' }, status: :unauthorized
        end
    end

end
创建 users_controller
rails g controller users
在用户控制器中,我们将创建一个用于创建或注册新用户的操作。如果用户使用有效数据注册,我们还将创建一个令牌,并将其与响应一起发送,这将使用户在注册我们的应用时立即登录。我们将在 users_controller.rb 中的 create 方法中处理注册功能。
class UsersController < ApplicationController
    rescue_from ActiveRecord::RecordInvalid, with: :handle_invalid_record

    def create
        user = User.create!(user_params)
        @token = encode_token(user_id: user.id)
        render json: {
            user: UserSerializer.new(user),
            token: @token
        }, status: :created
    end

    private

    def user_params
        params.permit(:username, :password, :bio)
    end

    def handle_invalid_record(e)
            render json: { errors: e.record.errors.full_messages }, status: :unprocessable_entity
    end
end
我们将数据序列化,只返回用户 ID、用户名和个人简介。将密码返回给客户端毫无意义,而且密码在数据库中是加密的。
class UserSerializer < ActiveModel::Serializer
  attributes :id, :username, :bio
end
现在,还记得我们before_action向 application_controller 添加规则的时候吗?如果我们已经登录,这将阻止我们创建新用户。但这没有任何意义。我们甚至还没有注册,又该如何登录呢?或者,如果我们根本无法创建新用户,又该如何登录呢?好吧,为了绕过授权,我们将向skip_before_action用户控制器添加一个,并仅对该create方法设置例外。这样,如果我们想要注册新用户,就可以跳过授权步骤。
此外,我们将创建方法me来获取用户的配置文件,该方法将返回current_user我们在 application_controller 中设置的用户配置文件。
*app/controllers/users_controller.rb*

class UsersController < ApplicationController
    skip_before_action :authorized, only: [:create]
    rescue_from ActiveRecord::RecordInvalid, with: :handle_invalid_record

    def create
        user = User.create!(user_params)
        @token = encode_token(user_id: user.id)
        render json: {
            user: UserSerializer.new(user),
            token: @token
        }, status: :created
    end

    def me
        render json: current_user, status: :ok
    end

    private

    def user_params
        params.permit(:username, :password, :bio)
    end

    def handle_invalid_record(e)
            render json: { errors: e.record.errors.full_messages }, status: :unprocessable_entity
    end
end
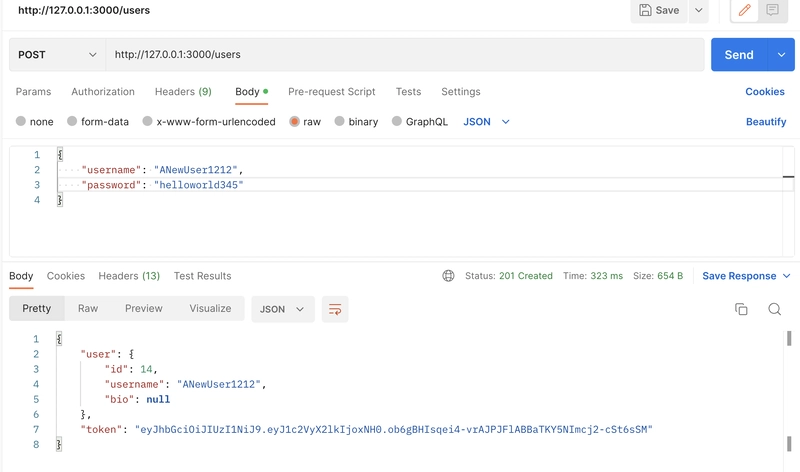
我们的注册已准备就绪。让我们尝试在 Postman 中发出一些请求:
开始吧!!等等!我们还漏掉了什么?身份验证最重要的部分:登录!
为了实现登录,我们将创建一个新的控制器,并将其命名为 auth_controller。
rails g controller auth
*app/controllers/auth_controller.rb*

class AuthController < ApplicationController

    skip_before_action :authorized, only: [:login]
    rescue_from ActiveRecord::RecordNotFound, with: :handle_record_not_found

    def login
        @user = User.find_by!(username: login_params[:username])
        if @user.authenticate(login_params[:password])
            @token = encode_token(user_id: @user.id)
            render json: {
                user: UserSerializer.new(@user),
                token: @token
            }, status: :accepted
        else
            render json: {message: 'Incorrect password'}, status: :unauthorized
        end

    end

    private

    def login_params
        params.permit(:username, :password)
    end

    def handle_record_not_found(e)
        render json: { message: "User doesn't exist" }, status: :unauthorized
    end
end
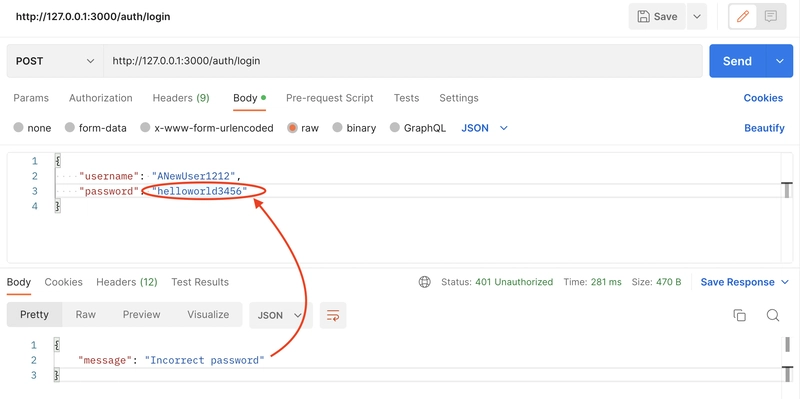
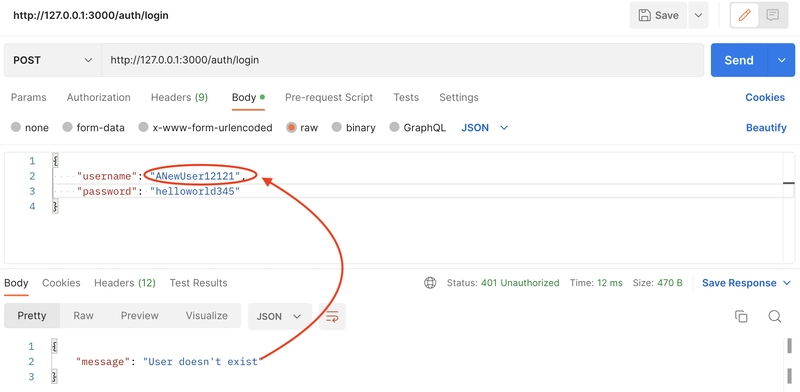
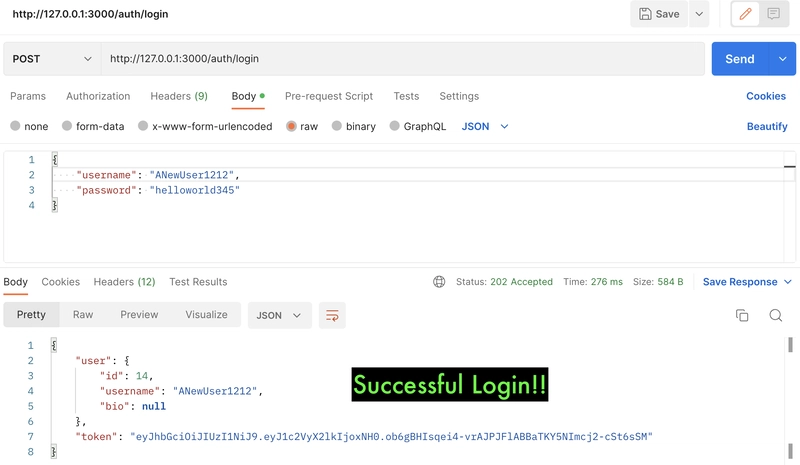
在该login方法中,我们首先通过用户名查找用户,如果未找到用户,则返回一条错误消息:"User doesn't exist"。找到用户后,我们使用 bcrypt 的 authentication 方法通过密码对用户进行身份验证。身份验证完成后,我们将为用户创建一个令牌,并将用户与令牌一起返回。如果身份验证失败,则返回一条错误消息:'Incorrect password'。我们还在skip_before_action :authorized, only: [:login]此处添加了 ,就像在用户控制器中的 create 方法中一样。
让我们在邮递员中进行一些调用:
我们的授权已完成。
用户身份验证分为三步。首先,我们验证数据;然后,我们使用正确的用户名和密码对用户进行身份验证;最后,我们授权用户。
验证————>身份验证————>授权
如果我们使用 JWT 进行身份验证,则无法构建注销功能。JWT 库没有提供用于销毁令牌的方法。那么,我们如何注销呢?这必须在客户端中处理。如果我们使用 React 客户端,我们可以在登录时将令牌存储在 localStorage 中,并在需要注销时将其从 localStorage 中移除。
fetch("http://localhost:3000/auth/login/", {
      method: "POST",
      headers: {
        "Content-type": "application/json",
      },
      body: JSON.stringify({
        username: username,
        password: password,
      }),
    })
      .then((res) => res.json())
      .then((data) => {
        localStorage.setItem("jwt", data.jwt);
      })
我们只需从 localStorage 中删除 jwt 令牌即可注销:
localStorage.removeItem("jwt")
 后端开发教程 - Java、Spring Boot 实战 - msg200.com
