学习 CSS 动画
作为 CSS 动画的新手,我学到了一些很酷的东西,并制作了一个图片库🖼️。这个项目 repo 旨在通过循序渐进的方式与大家分享这些知识。希望对大家有所帮助。
✋ 欢迎关注本项目,我会持续更新源代码。如果觉得对您有帮助,请点个星⭐以示支持。
请随意克隆该 repo 并尝试在本地运行。该项目也已部署Netlify,您可以从此处查看其运行情况:https://css-animation-fun.netlify.app/。
Stargazers用星星(⭐)支持这个项目的人如果你喜欢我的文章,不妨订阅我的新闻通讯。欢迎在 Twitter 上@我,讨论任何话题。
原生版本CSS(无需任何外部 JavaScript 和 CSS 库)允许HTML elements使用 CSS 属性实现动画。它非常强大,而且易于学习和使用。
作为 CSS 动画的新手,我学到了一些很酷的东西,还制作了一个图片库🖼️。本文旨在通过循序渐进的方式与大家分享这些知识。希望对大家有所帮助。
如果你已经使用过 CSS 动画,不妨读读这篇文章,感受一下其中的乐趣。欢迎留言分享你使用的一些技巧和窍门。
照片库就是照片的集合。不妨创建一个娱乐圈明星的图库。为了添加一些动画效果,我们可以把他们的照片挂在墙上,并添加波浪效果,让动画看起来更酷炫。当你将鼠标悬停在照片上时,动画就会停止。
目前,画廊看起来是这样的。看看你是否认识里面的所有角色😎。
本文主要针对像我这样的初学者。因此篇幅可能会比较长,并且会采用循序渐进的教程形式。如果您想快速查看代码和实际演示,请点击以下链接:
- 包含所有示例的演示:http://css-animation-fun.netlify.app/
- Github 源代码链接:https://github.com/atapas/learn-css-animation
CSSanimation属性有助于为许多 CSS 属性添加动画效果。我们可以height为width、color、font、background-color等属性添加动画效果,但有些属性(例如 )background-image无法添加动画效果。
以下是可以使用该属性进行动画处理的 CSS 属性的完整列表。animation
CSSanimation属性有一堆定义动画特性的子属性。
@keyframes animation-name{
  /* animation actions to come here */
}

.element {
   animation: animation-name
             animation-duration
             animation-timing-function
             animation-delay
             animation-direction
             animation-iteration-count
             animation-fill-mode
             animation-play-state;
}
注意,上面的声明是简写形式。我们也可以单独使用这些属性。
@keyframes move{
  /* animation actions to come here */
}

.element {
  animation-name: move;
  animation-duration: 0.5s;
  animation-timing-function: linear;
  animation-delay: 2s;
  animation-direction: alternate;
  animation-iteration-count: infinite;
  animation-fill-mode: none;
  animation-play-state: paused
}
@keyframes :过渡定义的名称。@keyframes每个动画都需要定义一个。keyframe动画和电影制作中的 A 是定义任何平滑过渡的起点和终点的图形。linear。我们也可以使用该函数编写自定义函数。easeease-inease-in-outease-outcubic-bezier(n,n,n,n)infinite来循环播放。forward(normal),,,,。reversealternatealternate-reverse让我们从一个简单的示例开始,将动画属性应用于div元素。在此示例中,我们只想在animation-duration5 秒内更改 div 元素的背景颜色和文本颜色。
首先,创建一个 div 元素。
  <div class="simple">
     I'm so animated, but I animate once!
  </div>
创建一个keyframe用于定义动画操作的规则。在本例中,我们只想更改背景和文本颜色。该@keyframes规则使用两个属性“from”和“to”(分别代表 0%(开始)和 100%(完成))指定动画的开始和结束。
  @keyframes simple {
    from {background-color: orange; color: black;}
    to {background-color: green; color: white;}
  }
注意,本例中存在 animation-name simple。接下来,我们将动画应用到具有该名称和其他子属性的 div 元素上。
  div.simple {
     width: 80%;
     height: 400px;
     padding: 10px;
     border-radius: 4px;
     text-align: center;
     animation-name: simple;
     animation-duration: 5s;
  }
这是在 Codepen 中运行的示例,供您探索、分叉和编辑。
动画动作由规则定义。我们已经了解了和属性@keyframes的用法。现在我们将学习如何使用百分比(例如 0%、25%、50%、75%、100% 等)来指定动作。fromto
在这个例子中,我们将更改百分比分隔符上元素的背景颜色和文本颜色div。规则如下@keyframes:
@keyframes percentage {
  0% {background-color: orange;}
  25% {background-color: green; color: white;}
  50% {background-color: white; color: black;}
  100% {background-color: red; color: white;}
}
接下来,只需将此规则与名称(百分比)一起应用于 div。
div.percentage {
  width: 80%;
  height: 400px;
  background-color: orange;
  padding: 10px;
  border-radius: 4px;
  text-align: center;
  animation-name: percentage;
  animation-duration: 5s;
}
这是用于探索此示例的 Codepen 链接。
到目前为止,我们已经探索了animation-name和animation-duration属性。现在让我们再探索三个属性,animation-delay、animation-iteration-count和animation-direction。这次,我们将在元素的background-color、color、left和top属性上使用这些属性div。
像往常一样,让我们首先创建div元素
<div class="move">I'm moved!</div>
定义@keyframes改变颜色和位置的规则。
  @keyframes move {
    0% {background-color: orange; left: 0px; top: 0px;}
    25% {background-color: green; color: white; left:200px; top:0px;}
    50% {background-color: red; color: white; left:200px; top:200px;}
    75% {background-color: white; color: black; left:0px; top:200px;}
    100% {background-color: yellow; color: black; left:0px; top:0px;}
  }
最后,使用动画属性。注意animation-*这里的属性。我们使用的属性name与规则中定义的相同@keyframes。这里使用了 5 秒的动画duration。动画以 2 秒的动画开始,并按特定方向delay运行。infinitelyalternate
  div.move {
     width: 100px;
     height: 100px;
     color: #000000;
     background-color: orange;
     padding: 10px;
     border-radius: 4px;
     position: relative;
     text-align: center;
     animation-name: move;
     animation-duration: 5s;
     animation-delay: 2s;
     animation-iteration-count: infinite;
     animation-direction: alternate;
    }
这是 Codepen 的链接,你可以进一步探索。不妨试试negative的值animation-delay,或者试试其他的值animation-direction。
看看我如何修改同一个示例,使动画运行 3 次而不是infinite计数。
到目前为止,我们已经分别使用了动画属性。但是,我们可以使用简写形式在单个animation属性中使用它们。
与上述相同的例子可以定义如下,
div.sh {
  width: 100px;
  height: 100px;
  color: #000000;
  background-color: orange;
  padding: 10px;
  border-radius: 4px;
  position: relative;
  text-align: center;
  animation: move 5s linear 1s infinite alternate-reverse;
}
请注意animation这里的属性,以及所有属性值。你可以使用这个 Codepen 示例进一步探索。
在这个例子中,我们将学习animation-timing-function属性。该animation-timing-function属性指定动画的加速度曲线。属性值如下:
linear:线性动画从开始到结束以相同的速度运行。这是默认值。ease:动画轻松地开始缓慢,然后快速,然后缓慢结束。ease-in:这使得动画能够缓慢启动。ease-out:这指定了一个缓慢结束的动画。ease-in-out:这样,动画就可以缓慢开始和结束。cubic-bezier(n,n,n,n):为自定义函数定义您自己的值。让我们使用所有这些。为此,我们将首先创建一些div元素来应用上面解释的各个功能。
<div class="speed" id="linear">linear</div>
<div class="speed" id="ease">ease</div>
<div class="speed" id="easeIn">ease-in</div>
<div class="speed" id="easeOut">ease-out</div>
<div class="speed" id="easeInOut">ease-in-out</div>
<div class="speed" id="custom">Custom</div>
接下来是@keyframes移动 div 的规则。
@keyframes move {
  0% {background-color: orange; left: 0px; top: 0px;}
  100% {background-color: green; color: white; left: 300px; top: 0px;}
}
将其定义animation-name为所有 div 的通用动画。
div.speed {
   width: 100px;
   height: 50px;
   color: #000000;
   background-color: orange;
   padding: 10px;
   margin: 5px;
   border-radius: 4px;
   position: relative;
   text-align: center;
   animation: move 5s infinite;
}
最后,animation-timing-function对每个 div 使用不同的值。
div#linear {
  animation-timing-function: linear;
}
div#ease {
  animation-timing-function: ease;
}
div#easeIn {
  animation-timing-function: ease-in;
}
div#easeOut {
  animation-timing-function: ease-out;
}
div#easeInOut {
  animation-timing-function: ease-in-out;
}
div#custom {
  animation-timing-function: cubic-bezier(0.1, 0.7, 1.0, 0.1);
}
这是输出。所有的 div 都在竞速,对吧?
我们可以使用逗号(,)分隔的值来应用多个动画,如下所示:
animation: move-h 3s linear infinite alternate,
    shape 3s ease-out infinite alternate;
对于此示例,定义两个 div 元素。
<div class="multiple" id="multiple-h">I'm Bunny</div>

<div class="multiple" id="multiple-v">I'm Ginny</div>
接下来是定义@keyframes规则。这里我们将定义三条规则。一条是水平移动 div,一条是垂直移动 div,还有一条是改变 div 的形状。
@keyframes move-h {
  0% {background-color: orange; left: -200px; top: 0px;}
  25% {background-color: green; color: white; left: 0px; top:0px;}
  50% {background-color: white; color: black; left: 200px; top: 0px;}
  100% {background-color: red; color: white; left: 0px; top: 0px;}
}

@keyframes move-v {
  0% {background-color: red; color: white; left: 0px; top: 200px;}
  25% {background-color: white; color: black; left: 200px; top:200px;}
  50% {background-color: green; color: white; left: 200px; top: 0px;}
  100% {background-color: orange; left: -200px; top: 0px;}
}

@keyframes shape {
  0% {transform: scale(.3);}
  25% {transform: scale(.5);}
  100% {transform: scale(1);}
}
animation最后,使用所需的值调用属性。注意,我们在这里应用了多个动画。
div#multiple-h {
  animation: move-h 3s linear infinite alternate,
    shape 3s ease-out infinite alternate;
}

div#multiple-v {
  animation: move-v 3s linear infinite alternate,
    shape 3s ease-out infinite alternate;
}
这是 Codepen 示例,用于查看兔子和金妮 div 如何移动并改变形状和颜色。
好吧,让我们快速回顾一下到目前为止所学的内容。
@keyframes规则。animation。太棒了!在这个最后的例子中,我们将使用它们以及另一个有用的属性,即animation-play-state。
首先,我们使用HTML5元素figure定义四张图片并配上标题。这四张图片就是我们图库中使用的相框。
<div>
        <figure class="wave">
            <img src="./images/rajni_image.jpg" alt="rajni"></img>
            <figcaption>Rajinikanth</figcaption>
        </figure>
        <figure class="wave">
            <img src="./images/chuckn_image.png" alt="chuck"></img>
            <figcaption>Chuck Norris</figcaption>
        </figure>
        <figure class="wave">
            <img src="./images/jackiechan_image.png" alt="chan"></img>
            <figcaption>Jackie Chan</figcaption>
        </figure>
        <figure class="wave">
            <img src="./images/bean.png" alt="bean"></img>
            <figcaption>Mr. Bean</figcaption>
        </figure>
 </div>
接下来,我们要给相框添加动画,让它们左右摇摆。所以,是时候创建@keyframes规则了。
@keyframes wave {
  0% { transform: rotate(3deg); }
  100% { transform: rotate(-3deg); }
}
我们创建了一条规则,将图像左右旋转几度。好了,接下来就应用它吧。
.wave {
  float: left;
  margin: 20px;
  animation: wave  ease-in-out 0.5s infinite alternate;
  transform-origin: center -20px;
}
此时,我们应该看到相框左右摆动。接下来,我们希望当有人hovers站在相框上时,动画停止。我们将使用animation-play-state属性值来paused实现这一点。
.wave:hover {
  animation-play-state: paused;
}
以上就是我们所需的所有功能。不过,等等,我们还得让它看起来更美观。使用以下 CSS 规则,让相框看起来像是用螺丝头挂在墙上的。
.wave img {
    border: 5px solid #f8f8f8;
    display: block;
    width: 200px;
    height: 250px;
}

.wave figcaption {
    text-align: center;
}

.wave:after{
    content: '';
    position: absolute;
    width: 20px;
    height: 20px;
    border: 1.5px solid #ffffff;
    top: -10px;
    left: 50%;
    z-index: 0;
    border-bottom: none;
    border-right: none;
    transform: rotate(45deg);
}

.wave:before{
    content: '';
    position: absolute;
    top: -23px;
    left: 50%;
    display: block;
    height: 44px;
    width: 47px;
    background-image: url(./images/screw-head.png);
    background-size: 20px 20px;
    background-repeat: no-repeat;
    z-index: 16;
}
你可以在这个 Codepen 示例中看到它的工作原理。欢迎随意探索和修改。
CSS 属性的动画可能会引发性能问题。我们应该谨慎使用动画属性。这里有一篇很棒的文章,详细解释了这些担忧。不妨看看。
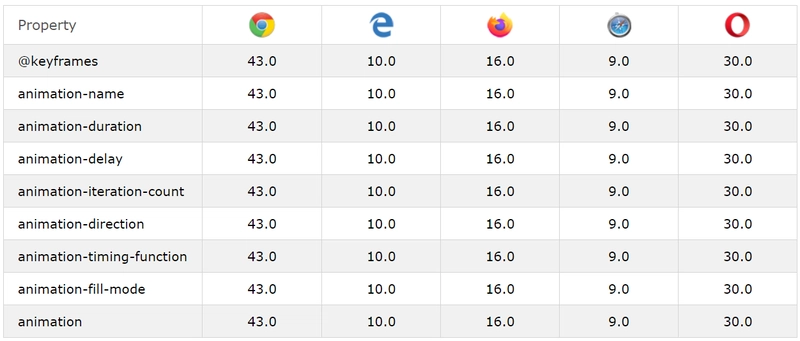
下表显示了浏览器对动画属性的支持情况。

图片取自https://www.w3schools.com/css/css3_animations.asp
如果你一开始是 CSS 动画的新手,读完这篇文章后你有什么感受?是不是很有意思?不妨试试,亲手做一个你梦想中的项目。你一定会爱上它的。
本文使用的所有源代码均位于 GitHub 仓库中。如果您喜欢这篇文章,请点赞。欢迎关注我,我会持续更新源代码和示例。
作为 CSS 动画的新手,我学到了一些很酷的东西,并制作了一个图片库🖼️。这个项目 repo 旨在通过循序渐进的方式与大家分享这些知识。希望对大家有所帮助。
✋ 欢迎关注本项目,我会持续更新源代码。如果觉得对您有帮助,请点个星⭐以示支持。
请随意克隆该 repo 并尝试在本地运行。该项目也已部署Netlify,您可以从此处查看其运行情况:https://css-animation-fun.netlify.app/。
Stargazers用星星(⭐)支持这个项目的人您可能还喜欢,
下篇文章即将与大家见面。在此之前,请多保重。
如果它对您有用,请点赞/分享,以便其他人也能看到。
您可以在 Twitter 上@我(@tapasadhikary)并发表评论,或者随时关注我。
鏂囩珷鏉ユ簮锛�https://dev.to/atapas/i-made-a-photo-gallery-with-css-animation-here-s-what-i-learned-390p