Jaime 的 Tmux 指南:你不知道自己需要的最棒的工具
本文最初发表于Barbarian Meets Coding。
tmux是生活中那些乍一听会觉得很奇怪、很困惑的东西之一。你了解它之后,可能不太明白它到底是干什么用的,它有什么用处,或者为什么有人会想用它。但是,一旦你有机会,当你进行一些尝试,并付出勇气和坚持,你会发现它非常棒,你离不开它。
好的,那么什么是 tmux 以及我为什么要关心它?
在软件开发中,你经常会遇到需要使用大量终端来运行不同任务的情况:开发 Web 服务器、编辑器、git、构建、代码检查、测试、与远程服务器交互等等……如果你没有投入太多精力或心思来优化这些工作流程,你很可能会使用按需创建并时不时借助鼠标排列的标签页或不同的终端窗口。这通常很慢,而且每次重启电脑时都需要重新进行设置。一定有更好的办法!而且,答案就在眼前:tmux 的方法。
Tmux 是一款工具(严格来说,它应该叫终端多路复用器),可以帮助你提升终端操作能力。简而言之,tmux 就是终端管理的 Vim。它:
- 使用一些键盘快捷键简化终端窗口和窗格的创建和管理
- 让您设置可以随意暂停和恢复的开发环境
- 完全可定制,可与 Vim 完美协同工作
- 让您与同事远程配对程序
如果您是 Vim 用户,但目前没有使用 tmux,那么您将大饱眼福,因为 Vim + tmux 提供了卓越的开发体验。即使您不是 Vim 用户,您仍然可以充分利用 tmux。在有效管理终端方面,它无可比拟。
在本文中,您将学习如何设置和使用 tmux 来改进您的开发工作流程。我将逐步指导您,从安装到配置,甚至还会向您展示我最喜欢的功能以及我如何在日常编码中充分利用 tmux。让我们开始吧!
安装 tmux
如果您使用的是 Mac,安装 tmux 的最佳方式是使用 homebrew:
$ brew install tmux
否则,请使用你操作系统中常用的包管理器。如有疑问,请查看tmux 的网站。
您可以通过运行以下命令检查它是否已正确安装:
$ man tmux
它应该向您显示tmux 手册或:
$ tmux
哪个应该启动 tmux 会话。tmux 会话?那是什么?
Tmux 基础知识
会话、窗口和窗格
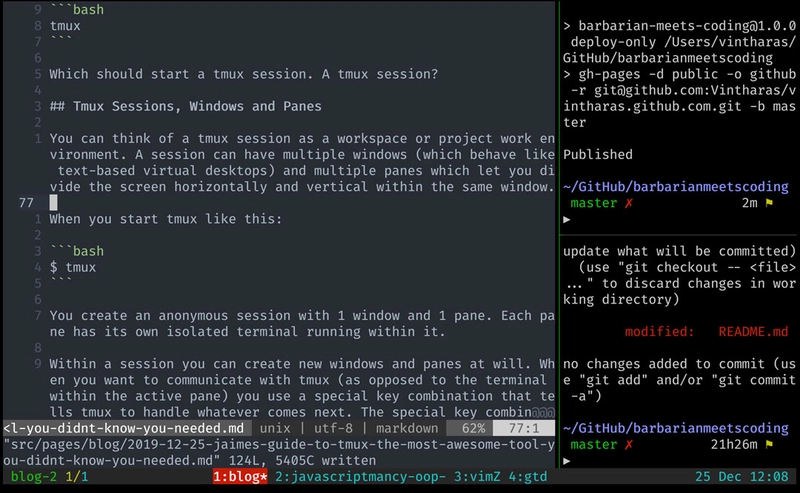
你可以将 tmux 会话视为一个工作区或项目工作环境。一个会话可以包含多个窗口(其行为类似于基于文本的虚拟桌面)和多个窗格,这些窗格允许你在同一个窗口中水平和垂直地划分屏幕。以下是一个包含四个窗口和三个窗格的实时 tmux 会话的示例:
一个包含 4 个窗口的 tmux 会话示例。当前窗口有三个窗格,其中一个包含 Vim,另外两个打开了终端。这是我写这篇文章时的当前 tmux 会话。太难了,我都快崩溃了。
当你像这样启动 tmux 时:
$ tmux
创建一个包含一个窗口和一个窗格的匿名会话。每个窗格都有自己独立的终端在其中运行。
在会话中,您可以随意创建新的窗口和窗格。当您想要与 tmux 通信(而不是与活动窗格中的终端通信)时,可以使用一个特殊的(神奇的)组合键,该组合键会告诉 tmux 处理接下来的操作。这个特殊的组合键通常被称为prefix,其默认值为C-b(例如,在CTRL键入 时按住b)。
例如,您可以键入prefix + %垂直拆分窗口(在右侧创建额外的窗格)、prefix + "水平拆分窗口(在下方创建额外的窗格)以及prefix + c创建新窗口。
我最有效的编程效率技巧之一是将 Caps Lock 键重新映射到 Control 键。这样做,你就能享受到指尖操控编程中最常用的按键之一的乐趣了。
上述这些组合键是对应于更长的 tmux 命令的快捷键。要运行完整的 tmux 命令,请输入prefix :{name-of-command}。例如,我们之前看到的快捷键的等效命令是prefix :split-window -h和prefix :split-window -v 1和prefix :new-window。
您可以通过以下方式在窗口和窗格之间快速移动:
- 输入
prefix n以跳转到下一个窗口 - 通过输入
prefix {arrow keys}在窗格之间跳转 - 打字
prefix (和prefix )在会话之间切换
如果您想查看 tmux 中可用的所有命令,您可以输入:
prefix ?获取所有快捷方式的列表(也prefix :list-keys)prefix :list-commands获取所有 tmux 命令的列表
当你忘记如何在 tmux 中执行某些操作时,这两个命令都非常有用。只需键入prefix :list-commands并上下滚动,或使用搜索/pattern来查找代表你想要实现的目标的关键字即可。
典型的 Tmux 工作流程
这就是使用 tmux 的开发者的典型一天。首先,我会喝杯咖啡——对于精通编程这门神秘魔法的人来说,这杯神奇的饮料有着强大的提神功效。然后,假设我要开始一个新项目。我总是通过创建一个新的 tmux 会话来开始一个新项目:
$ tmux new -t new-project
这将创建一个名为 的会话new-project并打开该会话。我现在会根据需要创建任意数量的窗格,通常在主终端中使用 vim 创建三个窗格,另外两个用于运行临时进程的终端,例如与源代码控制交互、运行测试、Web 服务器等等……
然后我开始编码,点击、拍手、点击、拍手,并根据需要创建其他窗口和窗格。什么时候应该创建新窗口?每当我在当前项目中执行与我当前工作内容相距甚远的任务时(即在不同的上下文中,但仍在同一个项目中)。例如,我可能会创建额外的窗口来处理为前端提供数据的服务,或者一些我正在添加新数据、文档或待办事项列表的原型……
一天的工作结束后,我可能会让会话保持打开状态然后回家,或者使用 断开会话prefix d。会话将在 tmux 服务器中保持活动状态,并保持完全相同的状态,以便我随时可以继续工作。
现在假设我想继续处理一个现有的项目。假设我下班回家,和家人度过了一段美好的时光,哄儿子Teo睡觉后,我想继续工作,因为我今天只工作了5个小时左右(这种情况在有幼儿的父母生活中很常见)。我可以ssh从家里打开我的办公电脑,然后查看我当前的会话:
$ tmux list
然后我将其附加到包含我正在进行的工作的会话中:
$ tmux attach -t new-project
一切都和我离开时一模一样。所以我马上回去,开始努力工作。
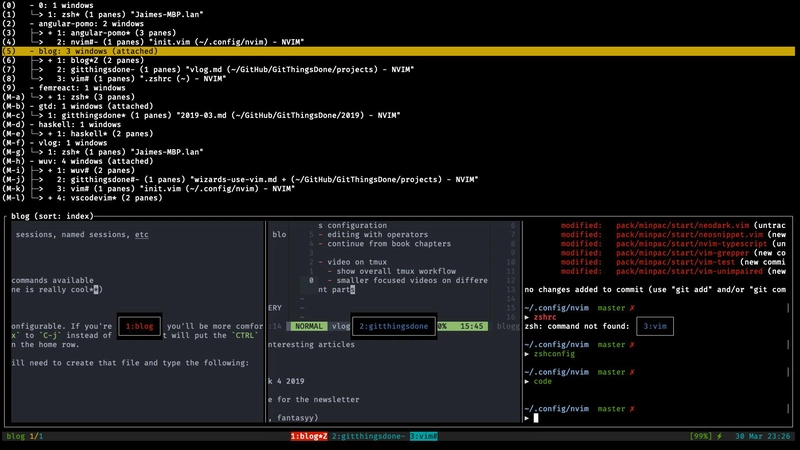
现在假设我想在项目之间快速切换。Tmux 知道你当前所有可用的会话,所以你可以从当前会话跳转到另一个会话,而无需退出 tmux。只需输入prefix w,你就会看到所有可用会话、窗口和窗格的列表。从那里,你可以选择在任何会话中跳转到任何位置。是不是很棒?
当你输入前缀 w 时,tmux 会提供所有可用会话、窗口和窗格的列表。太棒了!
总而言之,基本工作流程大致如下:
- 创建会话
- 设置会话
- 工作
- 分离
- 附
- 工作
- 至4)
然而,有很多方法可以改进这一点:使用更好的快捷方式配置 tmux 以提高效率,为不同类型的项目创建可重复使用的配置,安装插件以增强您的 tmux 等。让我们让我们的 tmux 会话变得更好!
配置 Tmux
有用的别名
改进 tmux fu 的第一步也是最简单的一步是为你的终端创建一些别名:
alias t="tmux"
alias ta="t a -t"
alias tls="t ls"
alias tn="t new -t"
因此,现在您只需键入即可运行任何 tmux 命令t(节省了 3 个字符和大量认知负荷!是的!),使用 创建一个新会话t {session-name},使用 附加到现有会话ta {session-name},并使用 列出所有会话tls。
改进你的 Tmux 配置
tmux 的一大优点在于它完全可配置。从与 tmux 的交互方式,到它的外观,都提供了丰富的自定义可能性。
tmux 的配置位于 中~/.tmux.conf。如果您刚刚安装了 tmux,则需要从头创建该文件。让我们开始配置吧!
一个很好的入门方法是将 键的按键绑定更改为prefix,而C-a不是C-b。此更改会将CTRL键放在左手小指旁边,并a在主行中舒适地放置在该手指下方。将其添加到您的.tmux.conf:
# Remap prefix from 'C-b' to 'C-a'
unbind C-b                  # remove bind for C-b
set-option -g prefix C-a
bind-key C-a send-prefix
这基本上是说你不再想使用C-b并且坚持使用C-a更好的东西。
嘿!你好!记得把 Caps Lock 键重新映射到 Control 键。你不会后悔的。
然后,您可以继续使用助记符自定义内容:vim 方式|。如果您使用来垂直分割,-使用 来水平分割,那么将窗口拆分为窗格会更容易记住:
 # Create Panes: window splitting
 # Split vertically
 unbind %
 bind | split-window -h    # Prefix | to create vertical split
 # Split horizontally
 unbind '"'
 bind - split-window -v    # Prefix - to create horizontal split
现在我们可以像变魔术一样创建窗格了。太棒了!有时你可能想根据正在处理的内容调整这些窗格的大小。这些 Vim 友好的映射让这一切变得更容易:
# resize panes
bind -r H resize-pane -L 5   # 5 px bigger to the left
bind -r J resize-pane -D 5   # 5 px bigger down
bind -r K resize-pane -U 5   # 5 px bigger up
bind -r L resize-pane -R 5   # 5 px bigger right
或者您可以使用 在不同的可用布局之间跳转prefix space。
这样我们就有了一个非常快捷的方法来创建和调整窗格大小。那么在窗格之间移动怎么样?你移动窗格的次数远比创建窗格的次数多,所以移动窗格应该非常顺畅。那么像在 Vim 中一样在窗格之间跳转怎么样?听起来很棒,不是吗?感谢开源,我们有一个插件可以自动为你设置这些映射:vim-tmux-navigator。这个插件很棒,因为它可以让你在 vim 和 tmux 窗格之间无缝跳转(就好像 vim 和 tmux 是同一个一样)。我们将在本文后面学习如何在 tmux 中安装插件,但这些是在窗格之间移动的最终按键绑定:
# You'll learn how to install this plugin in the plugins section below
# These are the mappings
# C-h => move to left pane
# C-j => move to pane below
# C-k => move to pane above
# C-l => move to right pane
我们还可以使用以下配置在窗口之间以同样快的速度移动:
# Quick window selection
bind -r C-h select-window -t :-   # Jump to window on the left
bind -r C-l select-window -t :+   # Jump to window on the right
最后,花点时间调整你的配色方案,因为美丽的东西更令人愉快:
###########################
# Colors
###########################

# color status bar
set -g status-style fg=white,bg=colour235
# color of message bar
set -g message-style fg=white,bold,bg=green

# highlight current window
setw -g window-status-style fg=cyan,bg=colour235
setw -g window-status-current-style fg=white,bold,bg=red

# set color of active pane
set -g pane-border-style fg=colour240,bg=black
set -g pane-active-border-style fg=green,bg=black
更多有用的命令
除了我们已经看到的所有命令和自定义绑定(已经很多了)之外,这些是我经常使用的一些命令:
Prefix Z放大当前窗格。这会使窗格占据整个屏幕。这个命令真的非常好用,Prefix Z再次输入即可缩小。Prefix t获取当前窗格中的时间:new-window -n my-new-window
这里有一份很棒的速查表,当你忘记一些快捷键或想学习新的快捷键时可以参考。记住,你随时可以运行:list-keys(或prefix ?)来:list-commands了解更多按键和命令。
使用插件增强你的 Tmux
另一个提升 Tmux 体验的好方法是使用插件。与许多其他工具一样,Tmux 拥有自己的插件管理器:tmux 插件管理器,简称 tpm。Tpm可以帮助您安装、卸载和更新 tmux 插件。
它的工作原理如下。首先从 GitHub 克隆 tpm:
$ git clone https://github.com/tmux-plugins/tpm ~/.tmux/plugins/tpm
并将以下代码片段添加到您的 tmux 配置中(提醒我如何使用 TPM,我总是一遍又一遍地忘记):
###########################
# Plugins
###########################
# To install plugins:
#   1) Add plugin down here
#   2) Prefix + I to install plugin
# To update plugins:
#   1) Prefix + U
# To remove plugins:
#   1) Remove line down here
#   2) Prefix + ALT + U
# If you're using iTerm2 on a Mac you may need to go to your Profiles,
# then keys and select that the `option` key should be treated as `Esc+`
# in order for the `Prefix + ALT + U` combination to work.

# List of plugins
set -g @plugin 'tmux-plugins/tpm'
set -g @plugin 'tmux-plugins/tmux-sensible'
# Add more plugins below this line

# Run Tmux Plugin Manager
run '~/.tmux/plugins/tpm/tpm'
重要的是,您在之后添加要安装的插件# Add more plugins below this line。
假设我们要安装一个新插件。vim -tmux-navigator是 Vim 用户的必备插件,它能让你在 Vim 和 Tmux 面板之间无缝切换。你可以像下面这样将插件添加到你的 Tmux 配置中:
# ...more tpm config
# Add more plugins below this line
# Make navigation between tmux and vim panes seamlessly
set -g @plugin 'christoomey/vim-tmux-navigator'
然后保存配置并输入prefix SHIFT+I以完成安装。从此以后,你就可以使用熟悉的 Vim 绑定在 Vim 和 tmux 窗格之间导航了:
<ctrl-h> => Left
<ctrl-j> => Down
<ctrl-k> => Up
<ctrl-l> => Right
<ctrl-\> => Previous split
这个特定的插件也附带一个 Vim 插件(用于在 Vim 内部使用)。该插件位于同一个 GitHub 仓库中,可以使用任何流行的 Vim 包管理器进行安装。因此,一般来说,在安装插件之前最好先查看一下文档,因为除了将其添加到你的.tmux.conf.vim文件中之外,可能还需要执行更多步骤。
除了vim-tmux-navigator之外,一些非常有用的 tmux 插件包括:
- tmux-resurrect可以让你在电脑重启后保留 tmux 会话。输入后
prefix CTRL+S,它会保存你所有的 tmux 会话,然后重启电脑(例如,当你的系统管理员要求你进行半频繁更新时),再输入“prefix CTRL+R恢复”。 - tmux-continuum基于 tmux-resurrect 构建,它会定期自动保存你的会话,无需你手动操作。同样,它也会重启 tmux 并自动恢复你的会话。
如果您在设置 tpm 时遇到任何问题,可以在GitHub上找到更多信息。
使用 Tmuxp 创建可重用的 Tmux 配置
tmux 的另一个强大功能是能够定义可复用的开发环境。你可以告诉 tmux……我要为这个项目创建一个开发环境,在这个环境中,我将打开一个包含编辑器和终端的窗口,另一个包含服务器终端的窗口,还有一个包含源代码控制的窗口等等。然后,tmux 会在你需要的时候自动为你启动这个开发环境。
Tmux 提供了一个 API 来创建可重复使用的会话,您基本上可以在其中运行 tmux 命令来创建会话、窗口和窗格,并在其中运行各种命令。
不过,也有一些更简单的替代方案,可以让你以更快、更轻松的方式创建可重用的配置:Tmuxinator和tmuxp。这两个工具都允许你通过在 YAML 中声明式地指定 tmux 来创建开发环境。
我们先来看一下我常用的 tmuxp。你可以使用 Python 包管理器来安装它:
$ pip3 install --user tmuxp
确保 pip 用户目录位于你的路径中,现在你可以使用该tmuxp命令来启动你所需的开发环境。使用 tmuxp,你可以为目录blog.yaml中名为 blogging dev 的环境创建以下配置.tmuxp:
session_name: blog
windows:
  - window_name: blog
    layout: main-vertical
    shell_command_before:
      - cd github/barbarianmeetscoding
    panes:
      - nvim .
      - git status
然后您只需运行以下命令:
$ tmuxp load blog
这将告诉 tmuxp 为您创建所有窗口和窗格,并执行您指定的命令。tmuxp 功能丰富,建议您查看其文档。开始创建您自己的配置的一个好方法是从示例中学习。
继续你的 Tmux 之旅
一本很棒的入门书
一本很棒的 tmux 入门书是《tmux 2:高效的无鼠标开发》,篇幅极短,尤其适合入门者。这本书讲解了 tmux 最重要、最基础的内容,超级流畅,轻松上手。
更多关于 tmux 的优秀资源
- tmux 速查表
- 更多有用的文章
- Tmux 文档
- 更多書籍!
Tmux 配置示例
这是我目前在家用机器上以及用于我的业余项目的 tmux 配置:
##########################
#  Configuration
###########################

# use 256 xterm for pretty colors. This enables same colors from iTerm2 within tmux.
# This is recommended in neovim :healthcheck
set -g default-terminal "screen-256color"
set -ga terminal-overrides ",xterm-256color:Tc"

# increase scroll-back history
set -g history-limit 5000

# use vim key bindings
setw -g mode-keys vi

# disable mouse
set -g mouse off

# decrease command delay (increases vim responsiveness)
set -sg escape-time 1

# increase repeat time for repeatable commands
set -g repeat-time 1000

# start window index at 1 instead of 0
set -g base-index 1

# start pane index at 1 instead of 0
setw -g pane-base-index 1

# highlight window when it has new activity
setw -g monitor-activity on
set -g visual-activity on

# re-number windows when one is closed
set -g renumber-windows on

# enable pbcopy and pbpaste
# https://github.com/ChrisJohnsen/tmux-MacOSX-pasteboard/blob/master/README.md
# set-option -g default-command "reattach-to-user-namespace -l zsh"

###########################
#  Key Bindings
###########################

# Tmux prefix
# Current solution is to keep the default
# and have term map C-; to C-b. This is the nicest
# bind I've found and this is the only way to enable it in tmux
unbind C-b
set -g prefix C-a
bind C-a send-prefix

# force a reload of the config file
unbind r
bind r source-file ~/.tmux.conf \; display "Reloaded tmux config!"

# Copy vim style
# create 'v' alias for selecting text
bind Escape copy-mode
bind C-[ copy-mode
bind -T copy-mode-vi 'v' send -X begin-selection
# copy with 'enter' or 'y' and send to mac os clipboard: http://goo.gl/2Bfn8
unbind -T copy-mode-vi Enter
bind -T copy-mode-vi Enter send -X copy-pipe-and-cancel "reattach-to-user-namespace pbcopy"
bind -T copy-mode-vi 'y' send -X copy-pipe-and-cancel "reattach-to-user-namespace pbcopy"
# paste
bind p paste-buffer
# paste from system clipboard MacOS
bind C-v run \"tmux set-buffer \"$(reattach-to-user-namespace pbpaste)\"; tmux paste-buffer"

# panes: window splitting
unbind %
bind | split-window -h
unbind '"'
bind - split-window -v

# Switch panes with hjkl
bind h select-pane -L
bind j select-pane -D
bind k select-pane -U
bind l select-pane -R

# Quick window selection
bind -r C-h select-window -t :-
bind -r C-l select-window -t :+

# resize panes
bind -r H resize-pane -L 5
bind -r J resize-pane -D 5
bind -r K resize-pane -U 5
bind -r L resize-pane -R 5

## Quickly switch panes
unbind ^J
bind ^J select-pane -t :.+

############################
## Status Bar
############################

# enable UTF-8 support in status bar
set -gq status-utf8 on

# set refresh interval for status bar
set -g status-interval 30

# center the status bar
set -g status-justify centre

# show session, window, pane in left status bar
set -g status-left-length 40
set -g status-left '#[fg=green] #S #[fg=yellow]#I/#[fg=cyan]#P '

# show hostname, date, tim 100
set -g status-right '#(battery -t) #[fg=cyan] %d %b %R '

# update status bar info
set -g status-interval 60

###########################
# Colors
###########################

# color status bar
set -g status-style fg=white,bg=colour235
# color of message bar
set -g message-style fg=white,bold,bg=green

# highlight current window
setw -g window-status-style fg=cyan,bg=colour235
setw -g window-status-current-style fg=white,bold,bg=red

# set color of active pane
set -g pane-border-style fg=colour240,bg=black
set -g pane-active-border-style fg=green,bg=black

# dim non active panes (don't like it much)
# setw -g window-style fg=colour240,bg=colour235
# setw -g window-active-style fg=white,bg=black


###########################
# Plugins
###########################
# Setup TPM first
#   1) Check instructions on GitHub
# To install plugins:
#   1) Add plugin down here
#   2) Prefix + I to install plugin
# To update plugins:
#   1) Prefix + U
# To remove plugins:
#   1) Remove line down here
#   2) Prefix + ALT + U

# List of plugins
set -g @plugin 'tmux-plugins/tpm'
set -g @plugin 'tmux-plugins/tmux-sensible'
# Add more plugins below this line
# Plugin to save and restore tmux sessions after restart
# * Save with: prefix + Ctrl-s
# * Restore with: prefix + Ctlr-r
set -g @plugin 'tmux-plugins/tmux-resurrect'
  # restore vim and nvim sessions as well
  # for vim
  set -g @resurrect-strategy-vim 'session'
  # for neovim
  set -g @resurrect-strategy-nvim 'session'
set -g @plugin 'tmux-plugins/tmux-continuum'
  # Automatic restore
  set -g @continuum-restore 'on'

# Make navigation between tmux and vim panes seamlessly
set -g @plugin 'christoomey/vim-tmux-navigator'

# Run Tmux Plugin Manager
run '~/.tmux/plugins/tpm/tpm'
-
由于某种原因,我一直无法理解 tmux 认为水平分割是世界其他地方认为的垂直分割 。↩
 后端开发教程 - Java、Spring Boot 实战 - msg200.com


