使用 Apollo、React 和 Graphql 创建开源 Twitter 克隆
在过去的几年里,GraphQL已经成为构建 API 的热门选择。它也是 REST 方法的绝佳替代选择。
GraphQL 是一种用于开发 API 的开源查询语言。与 REST(一种架构或“一种做事方式”)不同,GraphQL 的开发理念是客户端在单个请求中仅向服务器请求所需的一组数据。
在本教程中,您将使用 Apollo Client 和 React 应用程序构建最小的 Twitter 克隆(前端)。
要学习本教程,您需要一个服务器,该服务器通过 GraphQL API 提供 MongoDB 数据库中的数据。如果您还没有阅读上一篇文章,可以克隆此 Github 仓库,按照说明启动服务器并继续学习本教程。
此外,请确保您已在本地开发环境中安装了 MongoDB,或者如果您知道如何在云上部署 MongoDB 实例,请继续使用它。
内容
- 要求
- 入门:创建一个新的 React 项目
- 集成 Apollo 客户端
- 创建推文组件
- 创建 GraphQL 查询
- 创建 GraphQL 突变
- 显示所有推文
- 创建新推文
- 将 Crowdbotics 支持连接到您的 Github Repo
- 结论
要求
- 安装Nodejs
8.x.x或更高版本以及 npm/yarn create-react-app搭建 React 项目的全局模块- 已启动并运行的服务器端应用程序,为 React Client 提供 GraphQL API
奖励:您现在可以使用npx它生成新的 React 项目,而无需安装create-react-app。
入门:创建一个新的 React 项目
要创建一个新的 React 项目,请确保已将 create-react-app 安装为全局模块。运行以下命令来创建新项目。
create-react-app twitter-clone-apollo-client

# traverse inside the project dir
cd twitter-clone-apollo-client
目前,你可以随意命名你的 React 项目。创建完成后,遍历项目内部,并使用以下命令启动开发服务器,以测试或验证一切是否正常运行。
npm start
这将在 URL 处打开一个http://localhost:3000包含默认应用的新浏览器窗口。另外,在本教程中,我目前使用的是create-react-app版本3。您至少需要此版本或更高版本才能继续学习。
集成 Apollo 客户端
Apollo 是一个团队,致力于构建和维护一个涵盖各种用例(例如前端(客户端)、服务器和引擎)的 GraphQL 工具链。您可以通过多种方式在您的应用中使用或集成 Apollo。在Twitter Clone Server 教程中,我们了解到您可以在服务器端应用程序上使用 Apollo 来查询数据并创建 GraphQL API。
Apollo 客户端可帮助您在应用程序的前端使用 GraphQL API。使用 Apollo 客户端,您可以通过两种方式查询 API:无论您拥有自己的服务器还是第三方 GraphQL API。它与 React、Angular、Vue 等流行的前端框架完美集成。
如何在 React 应用程序中使用 Apollo?
要使用 Apollo,你需要安装一些依赖项,以便将 Apollo 挂载到 React 应用中。请使用 npm 或 yarn 安装以下依赖项。我将使用 yarn,因为它是所有 React 项目的默认包管理器。
yarn add apollo-boost graphql react-apollo
简而言之,这些依赖项起什么作用?
apollo-boost是包含设置 Apollo 客户端所需的一切内容的软件包。graphql需要解析 GraphQL 查询。react-apollo是 React 的 Apollo 集成。
为了继续操作,请确保您的本地开发环境中已运行 MongoDB 实例。您可以使用mongod终端中的命令启动一个实例。另外,请确保 Twitter 克隆服务器也正在运行。
现在,打开文件src/index.js。您将修改此文件以将后端端点连接到ApolloClient。这ApolloClient将帮助我们稍后通过从 GraphQL QPI 获取数据来轻松构建 UI。您还将使用 包装App组件,ApolloProvider这将允许我们在 React 应用程序中的任何地方访问 的上下文ApolloClient。
import React from 'react'
import ReactDOM from 'react-dom'
import ApolloClient from 'apollo-boost'
import { ApolloProvider } from 'react-apollo'

import './index.css'
import App from './App'
import * as serviceWorker from './serviceWorker'

const client = new ApolloClient({
  uri: 'http://localhost:5000/graphiql'
})

const AppContainer = () => (
  <ApolloProvider client={client}>
    <App />
  </ApolloProvider>
)

ReactDOM.render(<AppContainer />, document.getElementById('root'))

// If you want your app to work offline and load faster, you can change
// unregister() to register() below. Note this comes with some pitfalls.
// Learn more about service workers: https://bit.ly/CRA-PWA
serviceWorker.unregister()
是ApolloClient从 apollo-boost 库导入的, 也是ApolloProvider从库导入的react-apollo。始终建议将包装器放置ApolloProvider在 React 应用组件树的较高位置。原因是你需要确保组件树中的所有组件都能够从 GraphQL API 获取数据。
在大多数情况下,你最终会将App组件包装在 中ApolloProvider。在上面的代码片段中,client是允许你从 API 获取数据的端点。
创建推文组件
现在让我们创建一个components/Tweets.js如下所示的新组件。
import React from 'react'

class Tweets extends React.Component {
  render() {
    return (
      <div>
        <h1>Twitter Clone</h1>
      </div>
    )
  }
}

export default Tweets
修改App.js并导入新创建的Tweets组件。
import React from 'react'
import Tweets from './components/Tweets'

function App() {
  return <Tweets />
}

export default App
注意,上面的代码片段中,App是一个函数组件。这是create-react-app版本 3。运行 yarn start 后,你将得到以下结果。

现在看起来不太好。让我们添加一些样式,创建一个骨架组件,来展示最终的效果。要添加样式,请在components/目录中创建一个名为 的新文件Tweets.css。
body {
  background-color: #e6ecf0;
}

.tweet {
  margin: 20px auto;
  padding: 20px;
  border: 1px solid #ccc;
  height: 150px;
  width: 80%;
  position: relative;
  background-color: #ffffff;
}

.author {
  text-align: left;
  margin-bottom: 20px;
}

.author strong {
  position: absolute;
  top: 40px;
  margin-left: 10px;
}

.author img {
  width: 50px;
  height: 50px;
  border-radius: 50%;
}

.content {
  text-align: left;
  color: #222;
  text-align: justify;
  line-height: 25px;
}

.date {
  color: #aaa;
  font-size: 14px;
  position: absolute;
  bottom: 10px;
}

.twitter-logo img {
  position: absolute;
  right: 10px;
  top: 10px;
  width: 20px;
}

.createTweet {
  margin: 20px auto;
  background-color: #f5f5f5;
  width: 86%;
  height: 225px;
  border: 1px solid #aaa;
}

.createTweet header {
  color: white;
  font-weight: bold;
  background-color: #2aa3ef;
  border-bottom: 1px solid #aaa;
  padding: 20px;
}

.createTweet section {
  padding: 20px;
  display: flex;
}

.createTweet section img {
  border-radius: 50%;
  margin: 10px;
  height: 50px;
}

textarea {
  border: 1px solid #ddd;
  height: 80px;
  width: 100%;
}

.publish {
  margin-bottom: 20px;
}

.publish button {
  cursor: pointer;
  border: 1px solid #2aa3ef;
  background-color: #2aa3ef;
  padding: 10px 20px;
  color: white;
  border-radius: 20px;
  float: right;
  margin-right: 20px;
}

.delete {
  position: absolute;
  right: 10px;
  bottom: 10px;
  cursor: pointer;
}

.edit {
  position: absolute;
  right: 30px;
  bottom: 10px;
  cursor: pointer;
}
Tweets.js现在,按照以下代码片段编辑文件。
import React from 'react'
import './Tweets.css'
import TwitterLogo from '../assets/twitter.svg'

class Tweets extends React.Component {
  render() {
    return (
      <div className="tweets">
        <div className="tweet">
          <div className="author">
            <img
              src={'https://api.adorable.io/avatars/190/abott@adorable.png'}
              alt="user-avatar"
            />
            <strong>@amanhimself</strong>
          </div>
          <div className="content">
            <div className="twitter-logo">
              <img src={TwitterLogo} alt="twitter-logo" />
            </div>
            <textarea autoFocus className="editTextarea" value="" onChange="" />
          </div>
        </div>
      </div>
    )
  }
}

export default Tweets
目前,它只是一个包含静态用户图像、Twitter 徽标和文本区域的简单框。您可以在此项目的 Github 仓库TwitterLogo中找到它src/assets。在浏览器窗口中,您将获得以下结果。

创建 GraphQL 查询
在本节中,您将编写查询和突变,以便在与 GraphQL API 通信时获取数据。首先,在src/目录中创建一个新目录并将其命名为graphql/。该目录将包含另外两个子目录,分别用于突变和查询。这两个子目录都将包含一个名为 的文件index.js。简而言之,新项目的结构如下所示。

首先,让我们创建一个查询。打开queries/index.js文件并添加以下内容。
import { gql } from 'apollo-boost'

export const QUERY_GET_TWEETS = gql`
  query getTweets {
    getTweets {
      _id
      tweet
      author
      createdAt
    }
  }
`
上面的代码片段负责向 Graphql API 发出请求。作为返回结果,它希望将所有推文存储在数据库中,因此得名getTweets。查询本身写在字符串模板中。gql标签将此查询字符串解析为AST。这使得区分像上面代码片段中的 graphql 字符串和普通的 JavaScript 字符串模板变得更加容易。
要获取推文,请创建一个名为 的新组件。该组件将使用附带Query.js的辅助组件。该组件接受来自 graphQL 查询的 props,并告诉 React 要渲染的内容。它有三个预定义属性可供利用:、和 ,以便进行渲染。根据查询的状态,其中一个将被渲染。Queryreact-apolloloadingerrordata
import React, { Component } from 'react'
import { Query as ApolloQuery } from 'react-apollo'

class Query extends Component {
  render() {
    const { query, render: Component } = this.props

    return (
      <ApolloQuery query={query}>
        {({ loading, error, data }) => {
          if (loading) {
            return <p>Loading</p>
          }
          if (error) {
            return <p>{error}</p>
          }
          return <Component data={data || false} />
        }}
      </ApolloQuery>
    )
  }
}

export default Query
创建 GraphQL 突变
这些变更将遵循与我们在上一节中构建的查询类似的模式。打开graphql/mutations/index.js文件并添加两个变更,如下所示。
import { gql } from 'apollo-boost'

export const MUTATION_CREATE_TWEET = gql`
  mutation createTweet($tweet: String, $author: String) {
    createTweet(tweet: $tweet, author: $author) {
      _id
      tweet
      author
    }
  }
`

export const MUTATION_DELETE_TWEET = gql`
  mutation deleteTweet($_id: String) {
    deleteTweet(_id: $_id) {
      _id
      tweet
      author
    }
  }
`
第一个变更是创建一条新推文,其中包含推文和推文作者,两者都用标量类型字符串表示。作为回报,您将获得新创建的推文的 ID、推文和作者字段。第二个变更是删除推文本身。_id必须提供 才能从数据库中删除推文。
现在,让我们创建一个组件来运行这些变更。同样,我们将利用react-apollo名为的辅助组件Mutation。创建一个新的组件文件 。Mutation.js这将是一个很长的组件,所以我们将它分成几个部分。首先导入辅助函数。
import React, { Component } from 'react'
import { Mutation as ApolloMutation } from 'react-apollo'

class Mutation extends Component {
  // ...
}

export default Mutation
在函数内部定义传入的 props render。Mutation上面代码片段中的组件接受不同数量的 props。对于我们的用例,我们感兴趣的是以下内容。
mutation:这是辅助组件必需的属性。它使用 gql 字符串模板将 GraphQL 变异文档解析为 AST。query:它使用 gql 字符串模板将 GraphQL 查询解析为 AST。children:另一个必需的 prop。它是一个允许从 UI 触发突变的函数。onCompleted:这是突变成功完成后执行的回调。
render() {
  const {
  mutation,
  query,
  children,
  onCompleted
  } = this.props;

  return(
  <ApolloMutation>
  {*/... */}
  </ApolloMutation>
  )
}
接下来,返回要渲染的辅助组件。它将接受来自上述的常用 props,例如mutation。接下来,它将利用一个函数作为 props,在发生突变后更新缓存。此函数再次可供我们的ApolloMutation辅助组件使用。此外,您负责获取查询和突变的名称(它们都作为 props 接收给辅助组件),然后从上一个查询中获取缓存的数据。
<ApolloMutation
  mutation={mutation}
  update={(cache, { data }) => {
  const { definitions: [{ name: { value: mutationName } }] } = mutation;
  const { definitions: [{ name: { value: queryName } }] } = query;
  const cachedData = cache.readQuery({ query });
  const current = data[mutationName];
>
在上面的代码片段中,我们从 prop 中获取了当前数据的状态mutation。然后,定义一个新数组,用于保存发生新突变时更新数据的状态。将突变名称转换为小写有助于运行一系列if语句来检查突变是被删除还是被创建。
let updatedData = []
const mutationNameLC = mutationName.toLowerCase()

if (mutationNameLC.includes('delete') || mutationNameLC.includes('remove')) {
  updatedData = cachedData[queryName].filter(row => row._id !== current._id)
} else if (
  mutationNameLC.includes('create') ||
  mutationNameLC.includes('add')
) {
  updatedData = [current, ...cachedData[queryName]]
}
最后,更新数据以刷新推文列表。然后,渲染组件的内容,但在此之前,使用onCompleted方法作为 prop,这样当删除或创建新推文的变更完成时,就会触发该方法onCompleted。
<ApolloMutation
  // ...
  cache.writeQuery({
    query,
    data: {
    [queryName]: updatedData
    }
    });
  }} // update prop ends here
  onCompleted={onCompleted}
>
  {children}
</ApolloMutation>
组件的完整代码ApolloMutation如下所示。
import React, { Component } from 'react'
import { Mutation as ApolloMutation } from 'react-apollo'

class Mutation extends Component {
  render() {
    const { mutation, query, children, onCompleted } = this.props

    return (
      <ApolloMutation
        mutation={mutation}
        update={(cache, { data }) => {
          const {
            definitions: [
              {
                name: { value: mutationName }
              }
            ]
          } = mutation
          const {
            definitions: [
              {
                name: { value: queryName }
              }
            ]
          } = query
          const cachedData = cache.readQuery({ query })
          const current = data[mutationName]
          let updatedData = []
          const mutationNameLC = mutationName.toLowerCase()

          if (
            mutationNameLC.includes('delete') ||
            mutationNameLC.includes('remove')
          ) {
            updatedData = cachedData[queryName].filter(
              row => row._id !== current._id
            )
          } else if (
            mutationNameLC.includes('create') ||
            mutationNameLC.includes('add')
          ) {
            updatedData = [current, ...cachedData[queryName]]
          }
          cache.writeQuery({
            query,
            data: {
              [queryName]: updatedData
            }
          })
        }}
        onCompleted={onCompleted}
      >
        {children}
      </ApolloMutation>
    )
  }
}

export default Mutation
显示所有推文
由于两个辅助组件都已完成,接下来我们来创建一个Tweet组件,用于处理创建和删除新推文的变更。在目录Tweet.js中创建一个名为 的文件components。同样,这个组件包含很多内容。因此,让我们将其分解成易于理解的部分。稍后,在本节中,您将获得该组件的完整代码。
我们首先导入必要的组件,包括 GraphQL 变更、查询和Mutation辅助组件。然后,我们导入一些资源,例如TwitterLogo用户头像的占位符图片。
import React, { Component } from 'react'
import Mutation from './Mutation'
import {
  MUTATION_DELETE_TWEET,
  MUTATION_UPDATE_TWEET
} from '../graphql/mutations'
import { QUERY_GET_TWEETS } from '../graphql/queries'
import TwitterLogo from '../assets/twitter.svg'

const Avatar = 'https://api.adorable.io/avatars/190/abott@adorable.png'
组件内部Tweet有一个通过运行所需的变异来删除推文的功能。
handleDeleteTweet = (mutation, _id) => {
        mutation({
            variables: {
                _id
            }
        })
    }
}
接下来,在函数内部render,映射所有现有的推文并显示它们,然后使用Mutation组件。
render() {
        const {
            data: { getTweets: tweets }
        } = this.props

        return tweets.map(({ _id, tweet, author }) => (
            <div className='tweet' key={`tweet-${_id}`}>
                <div className='author'>
                    <img src={Avatar} alt='avatar' />
                    <strong>{author}</strong>
                </div>

                <div className='content'>
                    <div className='twitter-logo'>
                        <img src={TwitterLogo} alt='Twitter' />
                    </div>
                    {tweet}
                </div>
                <Mutation mutation={MUTATION_DELETE_TWEET} query={QUERY_GET_TWEETS}>
                    {deleteTweet => (
                        <div
                            className='delete'
                            onClick={() => {
                                this.handleDeleteTweet(deleteTweet, _id)
                            }}
                        >
                            <span>Delete Tweet</span>
                        </div>
                    )}
                </Mutation>
        ))
  }
这是文件的完整代码Tweet.js。
import React, { Component } from 'react'
import Mutation from './Mutation'
import { MUTATION_DELETE_TWEET } from '../graphql/mutations'
import { QUERY_GET_TWEETS } from '../graphql/queries'
import TwitterLogo from '../assets/twitter.svg'

const Avatar = 'https://api.adorable.io/avatars/190/abott@adorable.png'

class Tweet extends Component {
  handleDeleteTweet = (mutation, _id) => {
    mutation({
      variables: {
        _id
      }
    })
  }

  render() {
    const {
      data: { getTweets: tweets }
    } = this.props

    return tweets.map(({ _id, tweet, author }) => (
      <div className="tweet" key={`tweet-${_id}`}>
        <div className="author">
          <img src={Avatar} alt="avatar" />
          <strong>{author}</strong>
        </div>

        <div className="content">
          <div className="twitter-logo">
            <img src={TwitterLogo} alt="Twitter" />
          </div>
          {tweet}
        </div>
        <Mutation mutation={MUTATION_DELETE_TWEET} query={QUERY_GET_TWEETS}>
          {deleteTweet => (
            <div
              className="delete"
              onClick={() => {
                this.handleDeleteTweet(deleteTweet, _id)
              }}
            >
              <span>Delete Tweet</span>
            </div>
          )}
        </Mutation>
      </div>
    ))
  }
}

export default Tweet
我们尚未创建添加新推文的功能,但我已经手动添加了两条推文,以验证该Tweet功能是否正常运行。修改Tweets.js文件如下,以从数据库中获取所有现有推文。
import React from 'react'
import Tweet from './Tweet'
import Query from './Query'
import { QUERY_GET_TWEETS } from '../graphql/queries'
import './Tweets.css'
import TwitterLogo from '../assets/twitter.svg'

class Tweets extends React.Component {
  render() {
    return (
      <div className="tweets">
        <div className="tweet">
          <div className="author">
            <img
              src={'https://api.adorable.io/avatars/190/abott@adorable.png'}
              alt="user-avatar"
            />
            <strong>@amanhimself</strong>
          </div>
          <div className="content">
            <div className="twitter-logo">
              <img src={TwitterLogo} alt="twitter-logo" />
            </div>
            <textarea autoFocus className="editTextarea" value="" onChange="" />
          </div>
        </div>
        <Query query={QUERY_GET_TWEETS} render={Tweet} />
      </div>
    )
  }
}

export default Tweets
如果您手动添加一条或两条推文,您将获得以下结果。

创建新推文
在本节中,我们将创建一个名为 的新组件,CreateTweet以实现向数据库添加新推文的功能。像往常一样,首先导入以下必要的文件。
// Dependencies
import React, { Component } from 'react'
import Mutation from './Mutation'
import { MUTATION_CREATE_TWEET } from '../graphql/mutations'
import { QUERY_GET_TWEETS } from '../graphql/queries'
const Avatar = 'https://api.adorable.io/avatars/190/abott@adorable.png'

class CreateTweet extends Component {
  state = {
    tweet: ''
  }

  handleChange = e => {
    const {
      target: { value }
    } = e

    this.setState({
      tweet: value
    })
  }

  handleSubmit = mutation => {
    const tweet = this.state.tweet
    const author = '@amanhimself'

    mutation({
      variables: {
        tweet,
        author
      }
    })
  }

  render() {
    return (
      <Mutation
        mutation={MUTATION_CREATE_TWEET}
        query={QUERY_GET_TWEETS}
        onCompleted={() => {
          this.setState({
            tweet: ''
          })
        }}
      >
        {createTweet => (
          <div className="createTweet">
            <header>Write a new Tweet</header>

            <section>
              <img src={Avatar} alt="avatar" />

              <textarea
                placeholder="Write your tweet here..."
                value={this.state.tweet}
                onChange={this.handleChange}
              />
            </section>

            <div className="publish">
              <button
                onClick={() => {
                  this.handleSubmit(createTweet)
                }}
              >
                Tweet
              </button>
            </div>
          </div>
        )}
      </Mutation>
    )
  }
}

export default CreateTweet
定义一个本地状态,用于存储新推文的创建,并在文本区域发生变化时立即更新。它handleChange会监听输入值的任何变化,然后根据状态更新推文变量。该方法负责在用户点击“推文”按钮时textarea执行突变操作。MUTATION_CREATE_TWEEThandleSubmit
将此组件添加到Tweets.js文件如下。
import React from 'react'
import Tweet from './Tweet'
import CreateTweet from './CreateTweet'
import Query from './Query'
import { QUERY_GET_TWEETS } from '../graphql/queries'
import './Tweets.css'

class Tweets extends React.Component {
  render() {
    return (
      <div className="tweets">
        <CreateTweet />
        <Query query={QUERY_GET_TWEETS} render={Tweet} />
      </div>
    )
  }
}

export default Tweets
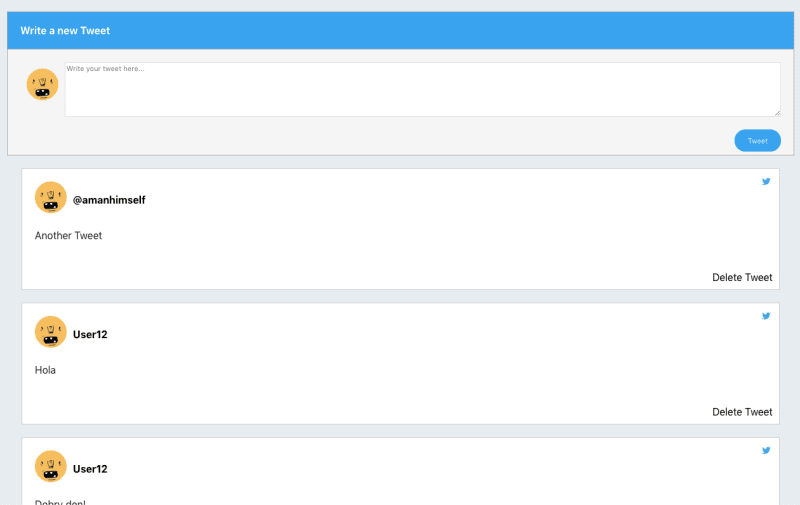
要添加新推文,请尝试输入一些内容,然后点击Tweet按钮。您将获得类似的结果。
结论
在本教程结束时,我们已经完成了:
- 如何集成到
ApolloClientReact 应用中 - 使用 GraphQL 查询和变异来接收和发送数据到 API
- 利用库中的辅助函数,
Mutation例如Queryreact-apollo - 另外,了解每个辅助函数的 props
App理解使用 ApolloProvider包装组件的原因- 如何使用
gql模板字面量来创建查询或修改
要了解有关该库的更多信息,您可以访问此处的react-apollo官方 API 文档。
您可以在此 Github 存储库中找到此帖子的完整代码。
最初发表于Crowdbotics.com
我经常撰写有关 Node.js、React.js 和 React Native 的文章。您可以订阅我的每周新闻通讯,直接在邮箱中收到最新更新 💌
文章来源:https://dev.to/amanhimself/create-an-open-source-twitter-clone-with-apollo-react-and-graphql-mc9