了解 JavaScript 数据结构
作者:Paul Ryan✏️
我们会谈论什么?
在 JavaScript 中,数据结构常常被忽视——或者更确切地说,我们很少考虑它们。忽视数据结构的问题在于,许多顶级公司通常要求你对如何管理数据有深入的理解。掌握数据结构也有助于你处理日常工作中遇到的问题。
在本文中,我们将讨论/实现的数据结构是:
- 堆
- 队列
- 链表
- 哈希表
- 树木

堆
我们讨论的第一个数据结构是堆栈。它与队列非常相似,你可能之前听说过调用堆栈,它是 JavaScript 用来处理事件的。
从视觉上看,堆栈如下所示:
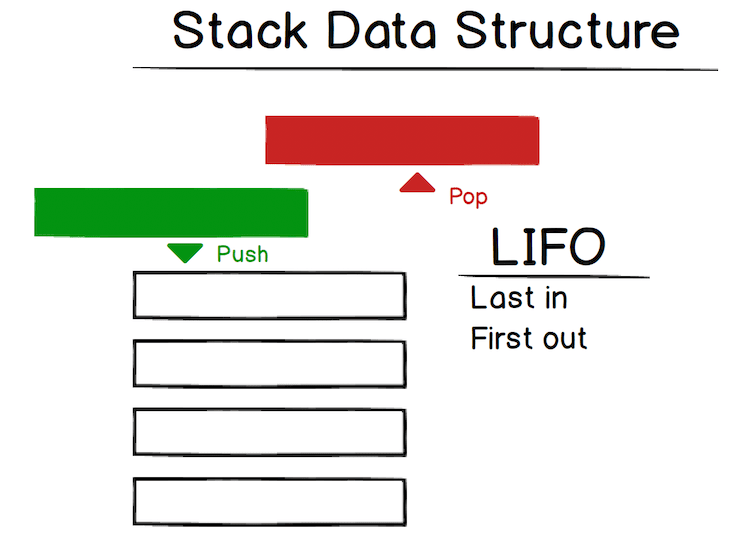
因此,当你有一个堆栈时,你最后压入堆栈的项目将最先被移除。这被称为后进先出 (LIFO)。Web 浏览器中的“后退”按钮就是一个很好的例子:你浏览的每个页面都会被添加到堆栈中,当你点击“后退”按钮时,当前页面(最后添加的页面)将从堆栈中弹出。
理论讲得够多了。让我们来看一些代码:
class Stack {
  constructor() {
    // create our stack, which is an empty object
    this.stack = {}
  }
  // this method will push a value onto the top of our stack
  push(value) {

  }
  // this method is responsible for popping off the last value and returning it
  pop() {

  }

  // this will peek at the last value added to the stack
  peek() {

  }
}
我已经注释了上面的代码,希望你能理解我的意思。我们要实现的第一个方法是push。
那么让我们想想我们需要这个方法做什么:
- 我们需要接受一个值
- 然后我们需要将该值添加到堆栈顶部
- 我们还应该跟踪堆栈的长度,以便知道堆栈的索引
如果您能先自己尝试一下那就太好了,但如果不行,完整的push方法实现如下:
class Stack {
  constructor() {
    this._storage = {};
    this._length = 0; // this is our length
  }

  push(value) {
    // so add the value to the top of our stack
    this._storage[this._length] = value;
    // since we added a value we should also increase the length by 1
    this._length++;
  }
  /// .....
}
我敢打赌,这比你想象的要简单。我觉得很多结构听起来比实际要复杂得多。
现在我们来看看这个pop方法。该方法的目标pop是移除栈中最后一个被添加的值,然后返回该值。如果可以的话,请先自己尝试一下,否则请继续阅读下面的代码:
class Stack {
  constructor() {
    this._storage = {};
    this._length = 0;
  }

  pop() {
    // we first get the last val so we have it to return
    const lastVal = this._storage[--this._length]
    // now remove the item which is the length - 1
    delete this._storage[--this._length]
    // decrement the length
    this._length--;
    // now return the last value
    return lastVal
  }
}
酷!快完成了。最后一步是peek函数,它会检查堆栈中的最后一个元素。这是最简单的函数:我们只需返回最后一个值即可。具体实现如下:
class Stack {
  constructor() {
    this._storage = {};
    this._length = 0;
  }
  /*
  * Adds a new value at the end of the stack
  * @param {*} value the value to push
  */

  peek() {
    const lastVal = this._storage[--this._length]
    return lastVal
  }
}
这与pop方法非常相似,但这次我们不会删除最后一项。
是的!这是我们讲解的第一个数据结构。现在我们来学习队列,它和栈很相似。
队列
我们接下来要讨论的结构是队列——希望你对栈还记忆犹新,因为队列和栈非常相似。栈和队列的关键区别在于,队列是先进先出 (FIFO) 的。
从视觉上来说,我们可以这样表示:

所以两个重要的操作是enqueue和dequeue。我们在后面添加,从前面移除。让我们开始实现一个队列,以便更好地理解。
我们的代码的核心结构如下所示:
class Queue {
  constructor() {
    // similar to above we have an object for our data structure
    // and we also have a variable to keep track of the length
    this.queue = {}
    this.length = 0
    // this is a new variable which tracks the head
    this.head = 0
  }

  enqueue(value) {

  }

  dequeue() {

  }

  peek() {

  }
}
那么我们先来实现我们的enqueue方法。它的目的是将一个项目添加到队列的后面。
enqueue(value) {
  // add a key of our length + head to our object with the value param
  this.queue[this.length + this.head] = value;
  this.length++
}
这是一个相当简单的方法,它将一个值添加到队列的末尾,但您可能会对此感到有些困惑this.queue[this.length + this.head] = value;。
假设我们的队列如下所示{14 : 'randomVal'}。当向其中添加键时,我们希望下一个键是15,因此它将是 length(1) + head(14),结果为15。
下一个要实现的方法是dequeue:
dequeue() {
  // get a reference to our first val so we can return it
  const firstVal = this.queue[this.head]
  // now delete this from our queue
  delete this.queue[this.head]
  // decrement our lenght
  this.length--;
  // finally increment our head to be the next node
  this.head++;
}
最后要实现的方法peek很简单:
peek() {
  // simply return the value at our head
  return this.queue[this.head];
}
这就是队列的全部内容 — — 让我们继续讨论Linked List数据结构。
链表
那么,让我们来讨论一下这个强大的链表。它比我们上面的结构要复杂得多,但只要我们齐心协力,就能搞定它。
你可能会问的第一个问题是,为什么要使用链表?链表主要用于不支持动态大小数组的语言。链表按顺序组织元素,每个元素都指向下一个元素。
链表中的每个节点都有一个data值和一个next值。下面的5是数据值,next值指向下一个节点,即具有该值的节点10。
从视觉上看,它看起来像这样:

顺便提一下,前一个指针称为双向链表。
在对象中,上面的内容LinkedList看起来如下

您可以看到最后一个值的值为1,因为这是我们的结尾。nextnullLinkedList
那么现在,我们该如何实现这一点呢?
让我们创建一个LinkedList具有值1、2和 的37。
const myLinkedList = {
    head: {
        value: 1
        next: {
            value: 2
            next: {
                value: 37
                next: null
            }
        }
    }
};
因此,我们知道如何手动创建LinkedList,但让我们来编写实现的方法LinkedList。
我们首先要注意的是,aLinkedList只是一堆嵌套的对象!
当构造 a 时LinkedList,我们需要 ahead和 a tail,它最初将指向我们的头部(因为head是第一个和最后一个)。
class LinkedList {
  constructor(value) {
    this.head = {value, next: null}
    this.tail = this.head
  }
}
我们将实现的第一个方法是insert将一个值插入到链表末尾的方法。
// insert will add to the end of our linked list
insert(value) {
  /* create the node */
  const node = {value, next: null}
  /* set the next property of the tail = to the new node */
  this.tail.next = node;
  /* the new node is now the tail */
  this.tail = node;
}
上面最令人困惑的一行可能是this.tail.next = node。我们这样做是因为当我们添加一个新节点时,我们也希望 currenttail指向新的node,而新的 将成为新的tail。第一次插入 时node,nexthead 的指针将指向新节点——就像我们在构造函数中设置的那样this.tail = this.head。
您还可以通过访问此网站来直观地了解插入过程,这将帮助您了解插入是如何发生的(按下esc即可摆脱烦人的弹出窗口)。
我们要实现的下一个方法是删除一个节点。首先要确定的是,我们的参数是 avalue还是 a 的引用node(面试时,最好问问面试官这个问题)。为了方便理解,我们假设value传递的是 a。通过值从列表中删除节点是一个很慢的过程,因为我们必须循环遍历整个列表才能找到该值。
我们这样做:
removeNode(val) {
  /* begin at the head */
  let currentNode = this.head
  /* we need to hold reference to the previous node */
  let previousNode
  /* while we have a node i.e. not passed the tail */
  while(currentNode) {
     /* if we find our value then break out */
     if(currentNode.value === val) {
        break;
     }
    /* with no value found currentNode we set this to previousNode */
    previousNode = currentNode
    /* we get the next node and assign it to currentNode  */
    currentNode = currentNode.next
  }
  /* we return undefined as we have found no node with that value  */
  if (currentNode=== null) {
    return false;
  }

  // if the node is the head then we set our head to the next value
  // of the head node
  if (currentNode === this.head) {
    this.head = this.head.next;
    return;
  }
  /* so we remove our node by setting the node before it to the node in front of it */
  previousNode.next = currentNode.next
}
该removeNode方法让我们对其工作原理有了更深入的了解LinkedList。
再次解释一下,我们首先将变量设置currentNode为head我们的LinkedList,因为这是我们的第一个节点。然后,我们创建一个名为的占位符变量previousNode,我们将在循环中使用它。我们以条件while开始循环——只要存在,它就会一直运行。whilecurrentNodecurrentNode
循环中的第一个检查while是检查我们是否找到了值。如果没有,我们将 our 设置previousNode为 our currentNode,并将 ourcurrentNode设置为列表中的下一个节点。我们继续这个过程,直到找到我们的值或用完所有节点。
循环结束后while,如果没有currentNode,则返回false,这向用户表明未找到任何节点。如果有一个currentNode,则检查 是否currentNode是头节点。如果是,则将 设置head为 的LinkedList第二个节点,该节点将成为head。
最后,如果我们的currentNode不是我们的头,我们将设置previousNode为指向node我们正前方的currentNode,这将把我们currentNode从对象中移除。
另一种非常流行的方法是(面试官可能也会问你),即removeTail方法。这种方法的作用LinkedList正如其名称所示,就是简单地去掉 的尾部。你可以想象,这比上面的方法简单得多,但工作原理类似。
我建议您先自己尝试一下,然后查看下面的代码(为了使其更棘手一些,我们不会tail在构造函数中使用它):
removeTail() {
  let currentNode = this.head;
  let previousNode;
  while (currentNode) {
    /* the tail is the only node without a `next` value, so if no next value is present, then this must be our tail */
    if (!currentNode.next) {
      break;
    }
    // get a reference to our previous node
    previousNode = currentNode;
    // move onto the next node
    currentNode = currentNode.next;
  }
  // to remove the tail, we set the previousNode.next to null
  previousNode.next = null;
}
以上是一些主要的方法LinkedList。您可能会遇到各种各样的方法,但凭借以上所学的知识,您应该能够掌握所有这些方法。
哈希表
所以,我们要处理的倒数第二个数据结构是强大的哈希表。我特意把它放在LinkedList解释之后,因为它们之间距离并不远。
哈希表是一种实现关联数组的数据结构,这意味着它将键映射到值。JavaScript 对象是一个hash table,因为它存储的是键值对。
从视觉上看,可以这样表示:

在开始讨论如何实现哈希表之前,我们需要讨论一下哈希函数的重要性。哈希函数的核心概念是它接受任意大小的输入,并返回固定大小的哈希码标识符。
hashThis('i want to hash this') => 7
哈希函数可以非常复杂,也可以非常直接。GitHub 上的每个文件都经过哈希处理,这使得查找每个文件的速度非常快。哈希函数的核心思想是,相同的输入将返回相同的输出。
了解了哈希函数之后,我们来谈谈如何实现哈希表。
我们将讨论的三个操作是insert、get,以及remove。
实现哈希表的核心代码如下:
class HashTable {
  constructor(size) {
    // define the size of our hash table, which will be used in our hashing function
    this.size = size;
    this.storage = [];
  }
  insert(key, value) { }
  get() {}
  remove() {}
  // this is how we will hash our keys
  myHashingFunction(str, n) {
    let sum = 0;
    for (let i = 0; i < str.length; i++) {
      sum += str.charCodeAt(i) * 3;
    }
    return sum % n;
  }
}
现在我们来处理第一个方法,即insert。放入哈希表的代码insert如下(为了简单起见,此方法将处理冲突但不处理重复):
insert(key, value) {
  // will give us an index in the array
  const index = this.myHashingFunction(key, this.size);
  // handle collision - hash function returns the same
  // index for a different key - in complicated hash functions it is very unlkely
  // that a collision would occur
  if (!this.storage[index]) {
    this.storage[index] = [];
  }
  // push our new key value pair
  this.storage[index].push([key, value]);
}
因此,如果我们像这样调用插入方法:
const myHT = new HashTable(5);
myHT.insert("a", 1);
myHT.insert("b", 2);
您认为我们的哈希表会是什么样子?

您可以看到我们的键值对已插入到表中的索引1和处4。
现在我们如何从哈希表中删除?
remove(key) {
    // first we get the index of our key
    // remember, the hashing function will always return the same index for the same
    // key
    const index = this.myHashingFunction(key, this.size);
    // remember we could have more than one array at an index (unlikely)
    let arrayAtIndex = this.storage[index];
    if (arrayAtIndex) {
      // let's loop over all the arrays at that index
      for (let i = 0; i < arrayAtIndex.length; i++) {
        // get the pair (a, 1)
        let pair = arrayAtIndex[i];
        // check if the key matches the key param
        if (pair[0] === key) {
          // delete the arrayatindex
          delete arrayAtIndex[i];
          // job done, so break out of the loop
          break;
        }
      }
    }
}
关于上述内容,您可能会想:“这不是线性时间吗?我以为哈希表应该是常量?” 您这样想是正确的,但由于这种情况在复杂的哈希函数中很少见,因此我们仍然认为哈希表是常量。
我们将要实现的最后一个方法是get方法。这与方法相同remove,但这次我们返回pair而不是删除它。
get(key) {
    const index = this.myHashingFunction(key, this.size);
    let arrayAtIndex = this.storage[index];
    if (arrayAtIndex) {
      for (let i = 0; i < arrayAtIndex.length; i++) {
        const pair = arrayAtIndex[i];
        if (pair[0] === key) {
          // return the value
          return pair[1];
        }
      }
    }
  }
我认为没有必要经历这个,因为它的作用与remove方法相同。
这篇关于哈希表的介绍很棒,而且你也能看出,它并没有想象中那么复杂。哈希表是一种非常常用的数据结构,所以理解起来非常容易!
二叉搜索树
遗憾的是(或者值得庆幸的是),这是我们要处理的最后一个数据结构——臭名昭著的二叉搜索树。
当我们考虑二叉搜索树时,我们应该考虑以下三件事:
- 根:这是树结构的最顶层节点,没有父节点
- 父节点:既是子节点,也是父节点
- 子节点:该节点是某个节点的子节点,但不一定有子节点
在二叉搜索树中,每个节点要么有零个,要么有一个,要么有两个子节点。左侧的子节点称为左子节点,右侧的子节点称为右子节点。在二叉搜索树中,左侧的子节点必须小于右侧的子节点。
从视觉上看,你可以将二叉搜索树描绘成这样:

树的核心类如下所示:
class Tree {
   constructor(value) {
     this.root = null
   }

   add(value) {
    // we'll implement this below
   }

}
我们还将创建一个Node类来代表我们的每个节点。
class Node {
  constructor(value, left = null, right = null) {
    this.value = value;
    this.left = left;
    this.right = right;
  }
}
好的,让我们来实现这个add方法。我已经把代码注释得很好了,但如果你觉得它令人困惑,只需记住我们所做的就是从根节点开始,检查每个节点的leftand即可。right
add(value) {
    // if we do not have a root, then we create one
    if (this.root === null) {
      this.root = new Node(value);
      return;
    }
    let current = this.root;
    // keep looping
    while (true) {
      // go left if our current value is greater
      // than the value passed in
      if (current.value > value) {
        // if there is a left child then run the
        // loop again
        if (current.left) {
          current = current.left;
        } else {
          current.left = new Node(value);
          return;
        }
      }
      // the value is smaller, so we go right
      else {
        // go right
        // if there is a left child then run the
        // loop again
        if (current.right) {
          current = current.right;
        } else {
          current.right = new Node(value);
          return;
        }
      }
    }
}
让我们add像这样测试我们的新方法:
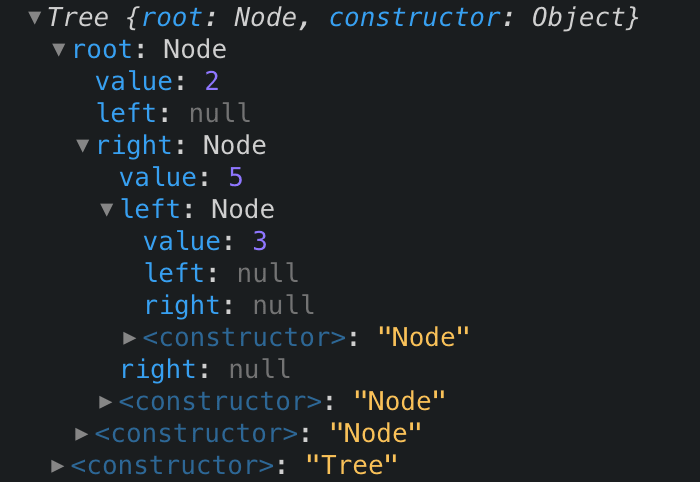
const t = new Tree();
t.add(2);
t.add(5);
t.add(3);
我们的树现在看起来像:
为了更好地理解,让我们实现一种方法来检查我们的树是否包含一个值。
contains(value) {
  // get the root
  let current = this.root;
  // while we have a node
  while (current) {
    // check if our current node has the value
    if (value === current.value) {
      return true; // leave the function
    }
    // we decide on the next current node by comparing our value
    // against current.value - if its less go left else right
    current = value < current.value ? current.left : current.right;
  }
  return false;
}
Add和Contains是二叉搜索树的两种核心方法。理解这两种方法能让你更好地理解如何处理日常工作中的问题。
结论
哇,这篇文章好长啊。我们这篇文章讲了很多内容,掌握这些知识后,面试时就能占据上风。我真心希望你学到了一些东西(我知道我学到了),并且能更轻松地应对技术面试(尤其是那些棘手的白板面试)。
编者注:觉得这篇文章有什么问题?您可以在这里找到正确版本。
插件:LogRocket,一个用于 Web 应用的 DVR

LogRocket是一款前端日志工具,可让您重播问题,就像它们发生在您自己的浏览器中一样。无需猜测错误发生的原因,也无需要求用户提供屏幕截图和日志转储,LogRocket 让您重播会话,快速了解问题所在。它可与任何应用程序完美兼容,不受框架限制,并且提供插件来记录来自 Redux、Vuex 和 @ngrx/store 的额外上下文。
除了记录 Redux 操作和状态外,LogRocket 还记录控制台日志、JavaScript 错误、堆栈跟踪、带有标头 + 正文的网络请求/响应、浏览器元数据以及自定义日志。它还会对 DOM 进行插桩,以记录页面上的 HTML 和 CSS,即使是最复杂的单页应用程序,也能重现像素完美的视频。
免费试用。
了解 JavaScript 数据结构一文最先出现在LogRocket 博客上。
文章来源:https://dev.to/bnevilleoneill/know-your-javascript-data-structs-76j