如何在 React JS 中创建管理面板 - 第 1 部分
这是仪表板
构建 React 仪表板面板很快就会变得复杂,尤其是在处理多个模块的情况下。想象一下构建一个模拟人力资源管理系统的软件,该系统包含考勤管理模块、财务管理模块、招聘、录用、员工管理等。
如果有一个开箱即用的解决方案,可以大幅减少你编写的代码行数,那会怎样呢?一个迷你框架,可以处理创建、更新、删除、将项目显示在屏幕上、状态管理,以及使用最佳设计系统之一进行主题设置。这就是一个单一的 Take 能为我们做的事情。
在本教程中,我们将使用 react-admin 包来启动我们的应用程序。在本教程结束时,你应该能够
- 创建用户的基本仪表板并发布
- 能够创建新用户/帖子
- 能够编辑新用户/帖子
- 能够添加新用户/帖子
- 能够更新新用户/帖子
- 能够创建您自己的数据提供者(本教程中有更多相关内容)。
那么,让我们开始吧😊
您应该在系统上安装 nodejs 来下载所有需要的软件包。如果您没有安装 nodejs,请下载到您的系统上。如果您已经安装了它,请在这里获取它
,打开您的终端并输入或,应该会返回一个版本,如下所示
node -v
node --version

首先,我们将安装并创建 React 应用程序以开始使用。
打开你的终端
create-react-app reactadmin

按回车键,安装所有需要的软件包需要一段时间,具体取决于您的互联网速度。
安装后,输入,这将启动您的应用程序,您应该会看到如下所示的前端。npm
start

现在,我们准备开始 react-admin 项目。
打开你的终端并输入
i react-admin ra-data-json-server prop-types

转到您的源文件,打开您的 app.js 并用以下代码替换;
// in src/App.js
import * as React from "react";
import { Admin, Resource, ListGuesser } from 'react-admin';
import jsonServerProvider from 'ra-data-json-server';

const dataProvider = jsonServerProvider
 (
'https://jsonplaceholder.typicode.com'
 );
const App = () => <Admin dataProvider={dataProvider} />;

export default App;
保存更改并检查浏览器,如果一切正常且没有错误,您将看到如下页面。

映射并添加我们的资源
我们将使用的首选 API 是流行的 JSON 占位符 API,我们将从 API 中提取用户并发布可用的资源。
如果您点击用户的端点(获取),您将收到如下响应。

Admin 组件期望的道具之一是 dataProvider 道具,这就是将数据从 API 注入应用程序的东西,因为我们在这里使用 JSON 占位符作为测试,我们已经准备好使用 dataProvider 稍后我们将继续添加我们自己的自定义道具,但现在,我们将坚持使用可用的道具。
Admin组件还需要一个或多个 Resources 组件作为其子组件。根据我们的用例场景,我们可以拥有一个、两个或更多个 Resources 组件。
我们的代码应该是这样的。
import * as React from "react";
import { Admin, Resource, ListGuesser } from "react-admin";
import jsonServerProvider from "ra-data-json-server";

const dataProvider = jsonServerProvider("https://jsonplaceholder.typicode.com");

const App = () => (
  <Admin dataProvider={dataProvider}>
    <Resource name="users" list={ListGuesser} />
  </Admin>
);

export default App;
注意添加了名称 prop、users、list prop、ListGusser。
名称 prop users与我们告诉 react-admin 从https://jsonplaceholder.typicode.com/users获取数据同义。
然后我们有了列表props,它负责获取数据并进行映射。ListGuesser是一个非常棒的工具,可以帮助我们了解如何构建在 UI 上返回数据的组件。顾名思义,它就是猜测我们的结构应该是什么样子。如果你保存更改并查看 UI,你将看到屏幕上显示的用户列表。

现在事情变得有趣了,🤓
在底层,react-admin 使用 ListGuesser 来显示我们的数据,这些组件只能在开发阶段使用,好吧,应该只在开发阶段使用。让我们继续摆脱它,并构建我们自己的组件来显示相同的内容。继续打开控制台,ListGuesser 会告诉我们新组件应该是什么样子。

现在我们开始创建该组件并将其导入到我们的 app.js 中。我喜欢遵循的一个模式是创建一个组件文件夹,然后在其中创建所有其他组件。注意,这不是强制性的,这只是个人喜好,以确保一切井然有序。
//Post.js

import React from "react"
import { List, Datagrid, TextField, EmailField} from 'react-admin';


export const UserList = props => (
    <List {...props}>
        <Datagrid rowClick="edit">
            <TextField source="id" />
            <TextField source="name" />
            <TextField source="username" />
            <EmailField source="email" />
            <TextField source="address.street" />
            <TextField source="phone" />
            <TextField source="website" />
            <TextField source="company.name" />
        </Datagrid>
    </List>
);
在我们的 app.js 中,我们将删除 ListGuesser,导入我们的帖子组件,并将 List prop 作为 List 值传递
import * as React from "react";
import { Admin, Resource } from "react-admin";
import jsonServerProvider from "ra-data-json-server";
import { UserList } from "./Components/Post.jsx";

const dataProvider = jsonServerProvider("https://jsonplaceholder.typicode.com");

const App = () => (
  <Admin dataProvider={dataProvider}>
    <Resource name="users" list={UserList} />
  </Admin>
);

export default App;
保存并检查您的浏览器,您会发现没有任何变化,但我们已成功删除 Guesser 组件。

使用此设置,您可以开始做一些令人惊奇的事情,例如呈现列表、在页面上显示一组最大项目数、选择和删除项目,我们马上就会知道在哪里编辑和添加项目。
在删除时,react-admin 会使用所谓的乐观 UI 更新。这到底是什么意思?🤔
跟我来,我不会用数据库、响应术语来打扰你。😄当我们更新 UI 时,例如删除功能,数据实际从服务器中删除会有一个时间滞后。
最终,当数据库中不再有数据时,它将从 UI 中删除,但是,我们希望为用户创建一种错觉,这样当他们点击删除按钮时,它会自动从 UI 中删除,并且请求会被发送到数据库。
在幕后,在这种情况下,我们希望/乐观地认为它能够真正地从数据库中移除,不会出现任何问题。但如果出现任何问题,例如网速突然变慢、服务器突然宕机等等,被移除的项目将会被重新添加到用户界面。
使用悲观方法,我们会将请求发送到后端并等待收到响应后才能更新 UI。
react-admin 使用了一种乐观的方法,顺便说一句,这很酷,🥳。
你可能注意到了,我们正在获取并映射服务器返回的所有数据。理想情况下,我们只希望在 UI 上显示某些特定的数据,而不是全部。
Post.js 中的 Datagrid 负责为返回的信息分配不同的数据类型,我们接下来会精简信息。Datagrid 下有不同的组件, 还有这么多。我将继续删除地址、文本字段、公司名称,其余部分暂时保留。
数据之间的关系
react-admin 能够处理 API 之间数据之间的关系,它可以检测它们之间的关系,并帮助我们以最合适的方式渲染视图。让我们使用相同的 API 将另一组数据渲染到屏幕上,但这次使用 post 端点。
我们将首先使用 ListGuesser,然后按照 ListGuesser 的建议创建一个新组件,并将其导入我们的 app.js 中,就像我们对用户组件所做的那样。

让我们删除猜测者,在组件文件夹中创建一个新组件,然后导入它。
import React from "react";
import { List, Datagrid, TextField, ReferenceField } from "react-admin";

export const PostList = props => (
  <List {...props}>
    <Datagrid rowClick="edit">
      <ReferenceField source="userId" reference="users">
        <TextField source="id" />
      </ReferenceField>
      <TextField source="id" />
      <TextField source="title" />
      <TextField source="body" />
    </Datagrid>
  </List>
);
让我们来看看文章中提到的一些组件。首先是,引用字段实际上不会向您的 UI 添加任何标记,它所做的是从外部源获取一些数据并准备好供其子组件使用。
在我们的示例中,userId 属性告诉引用字段使用此处的数据作为入口点,开始从引用“用户”中获取数据。希望您理解了这一点。
这才是真正消耗并显示我们数据的地方。看看这篇文章,ID 这个列其实没什么意义,我们把它改成显示作者的名字。
 <TextField source="name" />

```, this is what we now have instead of using the id.

I'll go ahead to trim down the data, put the post-Id as the first column, remove the *<TextField />, and add an edit button to the UI. I'll be importing the Edit button component to our UI and removing the "rowClick" prop on our Datagrid component.
从“react”导入 React; 从“react-admin”
导入 {
List、
Datagrid、
TextField、
ReferenceField、
EditButton、 };
导出 const PostList = props => (
);
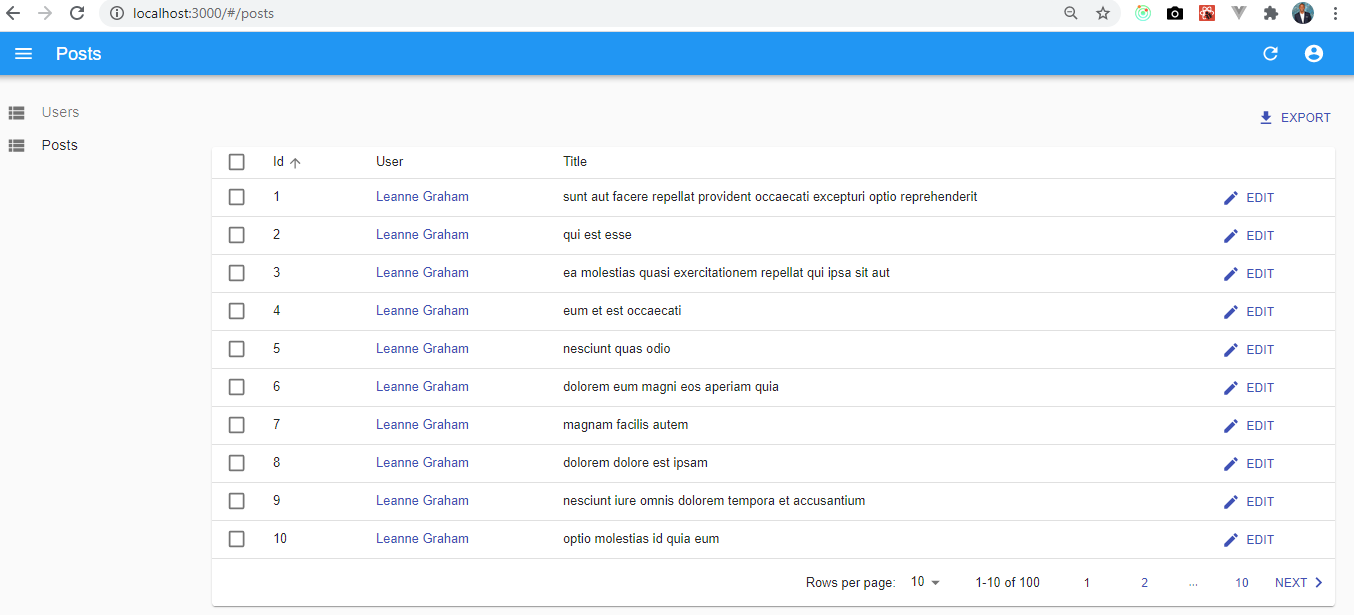
Our UI should look like the above screenshot. 😎
###Editing and Adding New Records.
up until now, we have been viewing, deleting our records, it's time to edit and add new records.
Like the ListGuesser component, we also have what we call the EditGuesser component, sweet! right? 😇
In our app.js, we'll be importing the EditGuesser, check our console, to see the guessed components that will enable us to edit our displayed items.
So, we will have some like this in our app.js
从“react”导入 * 作为 React;
从“react-admin”导入 { Admin, Resource, EditGuesser };
从“ra-data-json-server”导入 jsonServerProvider;
从“./Components/User.jsx”导入 { UserList };
从“./Components/Post.jsx”导入 { PostList };
const dataProvider = jsonServerProvider(" https://jsonplaceholder.typicode.com" );
const App = () => (
);
导出默认应用程序;
We imported the EditGuesser, add another prop, edit to our post component, and give it the value EditGuesser. Sure we'll be removing the EditGuesser and replace it with our created component as suggested by the EditGuesser.

//EditPost.jsx
从“react”导入 React; 从“react-admin”
导入 {
Edit、
SimpleForm、
ReferenceInput、
TextInput、
SelectInput、 };
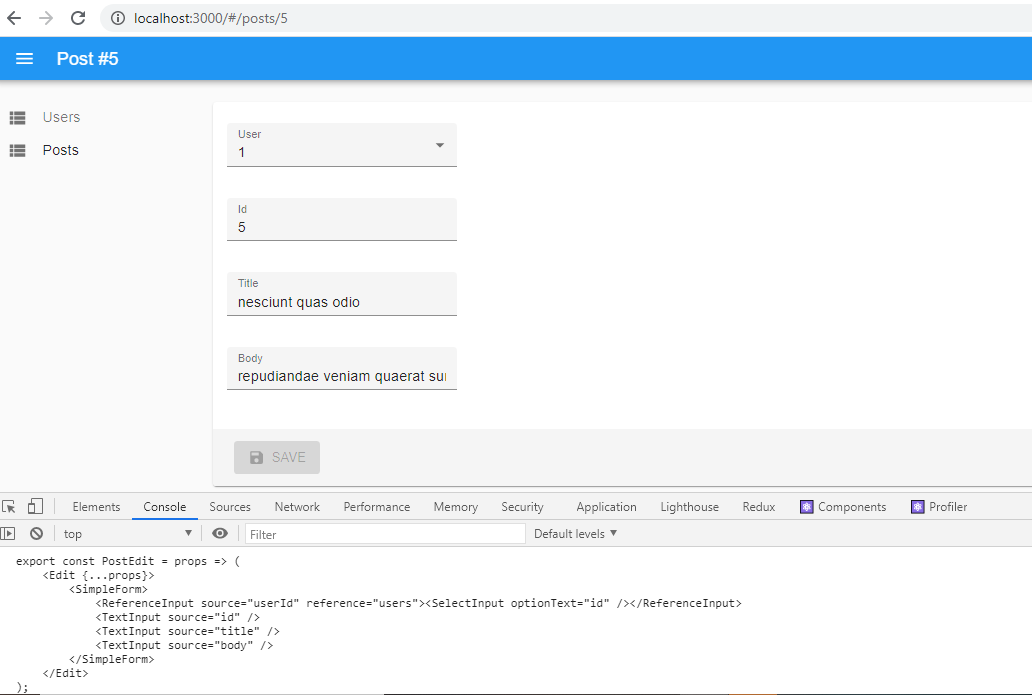
导出 const PostEdit = props => (
);
This is our newly created edit component, I have successfully removed the EditGuesser and everything still works well.
Let's make some adjustments to our EditPost component to improve its UX.
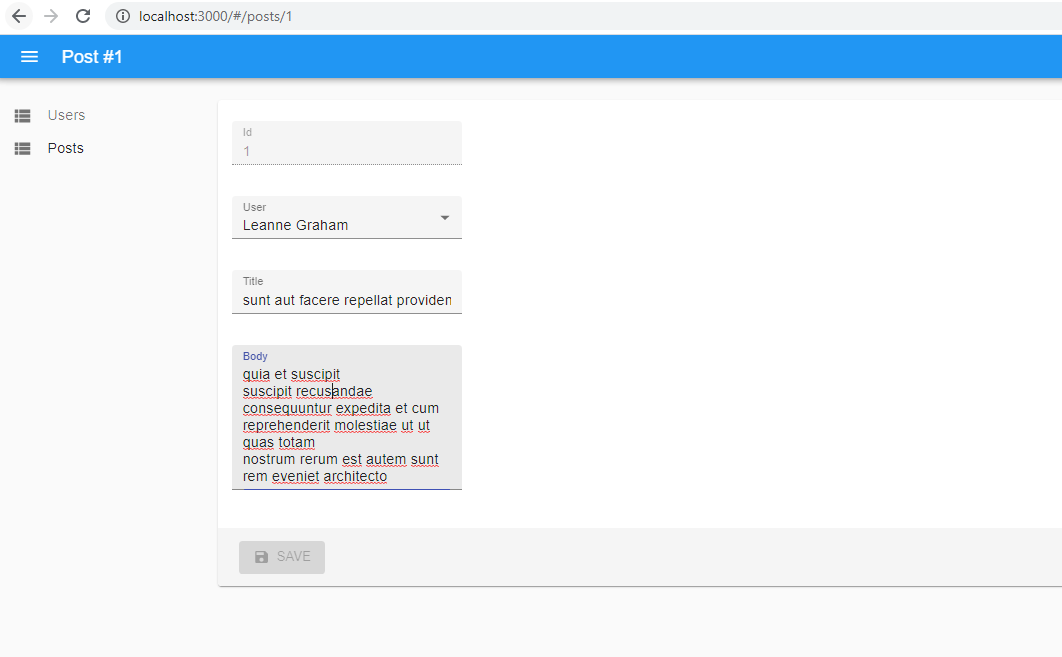
First, we want to make sure the user options is giving us the name of the user, not its id, we want to make sure the id of the id is read-only and should be placed at the top of the component, lastly, the body section should be able to expand and display the text at only.
We'll be placing the textfield component immediately after the simpleform component, add a disabled prop to it. One issue is settled.
We'll be changing the SelectInput OptionText from the value id to name, to reflect the name of the posts' author.
We'll add the multiline prop to the textinput body, this will expand the text input for the user to see all the text at once.
//EditPost.jsx
从“react”导入 React; 从“react-admin”
导入 {
Edit、
SimpleForm、
ReferenceInput、
TextInput、
SelectInput、 };
导出 const PostEdit = props => (
);
Our code should be above as above and UI should change to what we have below.
###Adding New Records.
For us to be able to add a new record, we just have to copy the PostEdit component add little tweaks and we're good to go.
Create a PostCreate component, replace the Edit with Create, remove the *<TextInput disabled source="id" />* and import the new component into our app.js
//CreatePost.jsx
从“react”导入 React; 从“react-admin”
导入 {
Create、
SimpleForm、
ReferenceInput、
TextInput、
SelectInput、 };
导出 const PostCreate = props => (
);
In our app.js, under our Resources component, add a new prop "create" and let the value be the newly imported "PostCreate".

We have successfully added the ability to create, update, delete, and view our records. 🎉🎉🎉

Note, because the JSON placeholder API is read-only when we attempt to create a new record it doesn't appear on our records, if we're using a real API that accepts a post request then everything should work fine.

##Adding Filters To Our Post

From our previous work, we have been able to sort, view according to pages but not the ability to filter our records, filtering our records is short and simple and let' do just that.
//FilterPost.jsx
从“react”导入 React;
从“react-admin”导入 {Filter、ReferenceInput、TextInput、SelectInput};
导出 const PostFilter = props => (
);
The **<Filter>** component comes in handy from react-admin, the source prop of the value "q" is pertaining to the JSON placeholder API the alwaysOn makes our filter feature always visible in the UI.

We'll be embedding our filter component in a different way compared to how we have been adding other components to the app.js. This time we'll be adding it as a prop to the List Component in Post.jsx.

Import the FilterPost Component, add the "filters" props to the List component and let the value be the FilterComponent, just like what we have below.
从“react”导入 React; 从“react-admin”
导入 {
List、
Datagrid、
TextField、
ReferenceField、
EditButton、 };
从“./FilterPost”导入{PostFilter};
导出 const PostList = props => (
} {...props}>
);
Now, we can filter our records, and users can even add search criteria.
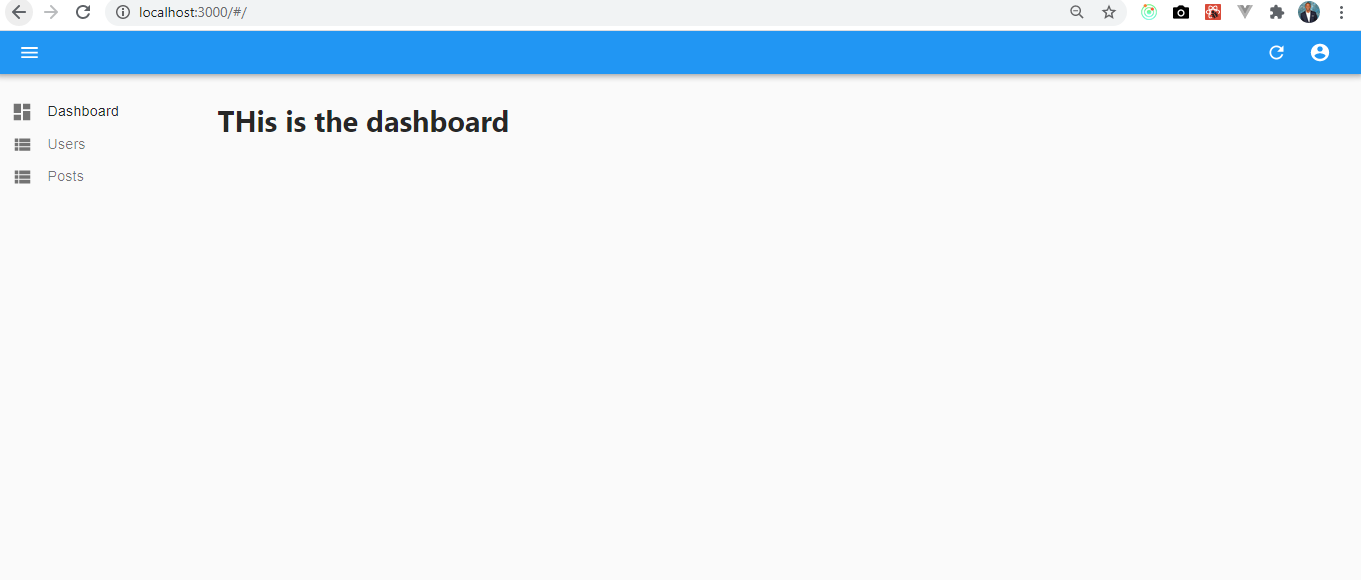
###Adding Homepage to our Dashboard
Let's add a home page to our dashboard. By default react-admin places the first resource as the home page, we can however change that and add our own custom dashboard home.
从“react”导入*作为React;
导出 const 仪表板 = () =>
这是仪表板
;
Create a dashboard.jsx in the components folder, go to the source folder, app.js, and import the newly created dashboard.js as a dashboard prop to our **<Admin />** component.
从“react”导入 * 作为 React;
从“react-admin”导入 { Admin, Resource };
从“ra-data-json-server”导入 jsonServerProvider;
从“./Components/User.jsx”导入 { UserList };
从“./Components/Post.jsx”导入 { PostList };
从“./Components/EditPost.jsx”导入 { PostEdit };
从“./Components/CreatePost.jsx”导入 { PostCreate };
从“./Components/DashBoard.jsx”导入 { Dashboard };
const dataProvider = jsonServerProvider(" https://jsonplaceholder.typicode.com" );
const App = () => (
name="posts"
列表={PostList}
编辑={PostEdit}
创建={PostCreate}
/>
);
导出默认应用程序;
There are a couple of things we can still do to make this dashboard, a little better, for example, supporting mobile devices, how to add own API instead of the JSON placeholder, and build a custom dataprovider, this will be rolled out in the next post. So keep your eyes peeled.
[Source code available on Github](https://github.com/okeken/react-admin-tutorial)
UPDATE: The Part 2 is available <a href="https://dev.to/okeken/how-to-create-an-admin-panel-in-react-js-part-2-3j9">here </a>