React 测试驱动开发入门指南(面向初学者)
测试驱动开发 (TDD) 的首要规则是在编写功能代码之前编写测试。说实话,这在做后端工作时听起来更直观,但在做前端工作时,尤其是在 React 中,这真的管用吗?🚀
在本文中,我们将通过一个简单的组件来探索 React 中的 TDD。
功能
在本文中,我们将复现以下组件。一个简单——而且非常丑陋的🤧——计数器。
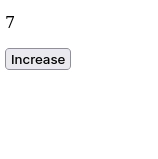
好吧,它会完成我们想要理解的工作,因为我们更关注功能而不是美观。💄
设置项目
首先,创建一个简单的 React 项目。
yarn create react-app react-test-driven-development
项目创建完成后,通过运行项目确保一切正常。
cd react-test-driven-development
yarn start
您将在http://localhost:3000上运行类似的程序。
编写计数器功能
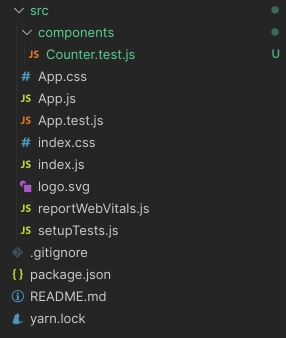
src在目录中创建一个名为 的新目录components。此目录将包含我们将要编写的组件。并在新目录中创建一个名为 的文件Counter.test.js。如前所述,在进行 TDD 时,我们会在编写功能代码之前编写测试。
这有助于为该功能建立更好的架构,因为您必须认真思考要编写和测试的内容。
计数器组件的描述
理想的组件需要一个名为 的 prop value。然后,该值会以
标签。
太棒了!我们先写测试吧。
编写测试
在里面Counter.test.js添加以下内容。
import { render, screen } from '@testing-library/react';
import Counter from "Counter";
我们首先导入编写测试所需的工具。不用担心第二行,我们Counter还没有创建组件。TDD 的目标是确保在编写功能之前先测试失败。
有了这个,我们现在可以编写第一个测试了。
test('renders counter component', () => {
    render(<Counter value={2} />);
    const counterElement = screen.getByTestId("counter-test");
});
在这里,我们在 DOM 中渲染Counter组件并检索元素。这里有两件事需要测试:
- 组件是否渲染?
- 计数器显示的值是否正好是 2?
test('renders counter component', () => {
    render(<Counter value={2} />);
    const counterElement = screen.getByTestId("counter-test");

    // Testing that the counter element is rendered
    expect(counterElement).toBeInTheDocument();

    // Testing that the counter element has the correct value
    expect(counterElement).toHaveTextContent("2");
});
太棒了!现在在命令行中运行以下命令来运行测试。
yarn test
命令自然就会失败。
太棒了!我们继续编写组件吧。
编写组件
在组件目录中,创建一个名为 的新文件Counter.jsx。并在该文件中添加以下内容。
import React from "react";


// This is the component we are testing

function Counter(props) {

    const { value } = props;
    return (
        <p data-testid="counter-test">
            {value}
        </p>
    );
}

export default Counter;
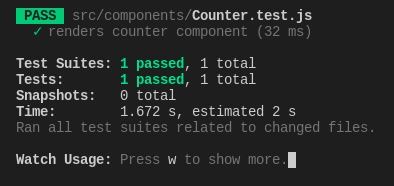
现在再次运行测试,一切都应该是绿色的。
太棒了!太棒了!我们做得太棒了。下一步是把这个组件添加到App.js,并用 来button触发状态变化。我们也会为此进行 TDD 测试驱动开发 (TDD)。
运行测试后,您可能会在终端中遇到类似错误的问题。
Warning: ReactDOM.render is no longer supported in React 18...
查看StackOverflow上的这个答案来了解如何解决它。
编写完整的计数器功能
在本例中,我们现在添加一个按钮来修改中的值Counter.jsx。由于我们要直接在中写入代码App.js,所以我们先在文件中编写测试App.test.js。
要求
此功能的要求是:
- 点击按钮将显示的值增加 1
很简单吧?我们先写测试吧。
编写测试
它testing-library提供了一些工具,可以用来触发按钮上的操作。非常棒!
让我们首先导入所需的工具。由于我们将触发屏幕上的点击事件(点击按钮)来增加计数器的值,因此测试函数将是异步的。
import { render, screen } from '@testing-library/react';
import App from './App';
import userEvent from "@testing-library/user-event";
这UserEvent是一个模拟用户触发操作(例如点击、输入等)的工具。以下是测试。
import { render, screen } from '@testing-library/react';
import App from './App';
import userEvent from "@testing-library/user-event";

describe('Render the counter with Button', () => {
  render(<App />);

  it("render counter", async () => {
    const appElement = screen.getByTestId('app-test');
    expect(appElement).toBeInTheDocument();

    // Testing that the counter element has the correct default value
    const counterElement = screen.getByTestId('counter-test');
    expect(counterElement).toHaveTextContent('0');

    // Retrieving the button element
    const buttonElement = screen.getByTestId('button-counter-test');
    expect(buttonElement).toBeInTheDocument();

    // Triggering the click event on the button

    await userEvent.click(buttonElement);

    // Testing that the counter element has the correct value
    expect(counterElement).toHaveTextContent('1');
  })
});
太棒了!测试会正常失败。我们来编写功能吧。
编写完整的计数器功能
在文件内App.js添加以下内容。
import React from "react";
import Counter from "./components/Counter";

function App() {

  const [count, setCount] = React.useState(0);

  return (
    <div data-testid="app-test">
      <Counter value={count} />
      <button data-testid="button-counter-test" onClick={() => setCount(count + 1)}>Increase</button>
    </div>
  );
}

export default App;
我们使用 React.useState 来跟踪和修改状态。
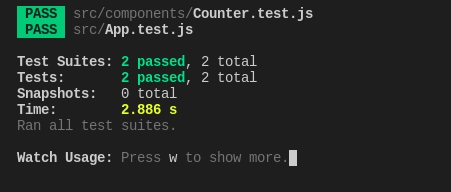
之后,再次运行所有测试。应该会显示绿色。🟢
恭喜!我们刚刚用 TDD 完成了一些 React 测试驱动开发 (TDD)。下一篇文章,我们将深入探讨 TDD,但会使用 Redux 和 thunk。我们将搭建一个独立于远程后端的完整测试环境。🔥
挺有意思的,对吧?好吧,如果你想了解一下,我正在开通一个新闻简报。如果订阅人数超过10人,我就会开始每周更新。🚀
你可以在这里订阅。
本文使用bloggu.io发布。免费试用。
鏂囩珷鏉ユ簮锛�https://dev.to/koladev/introduction-to-test-driven-development-in-react-for-beginners-260f 后端开发教程 - Java、Spring Boot 实战 - msg200.com
