使用 Angular 构建可扩展、健壮且类型安全的表单
目录
语境
介绍演示并了解我们想要构建的示例
反应形式
 反应式表单不是强类型的 #13721
Ngx-Sub-Form:将 Angular 表单分解为多个子组件的实用程序库
总结和收获
有用的链接
发现拼写错误?
跟我来
您可能还喜欢阅读
你好👋!
今天,我想分享一些使用 Angular 构建(我认为是)大型复杂表单的经验。不过,需要注意的是:如果您不介意“可扩展性”或“大型表单”,请注意,以下所有内容仍然适用于超小型表单,并且您仍然会从中获得很多好处!
免责声明:我并非唯一一个花费大量时间思考如何更好地处理表单的人。Zak Henry(@zak)和我共同构思了我今天要介绍的解决方案,我要感谢他花费大量时间进行设计、编码和代码审查👏👏👏。
目录
语境
在我们深入探讨主要话题之前,让我先介绍一些背景知识,解释一下为什么我在工作中要构建大型表单,以及为什么我真的需要找到一个更好的解决方案。
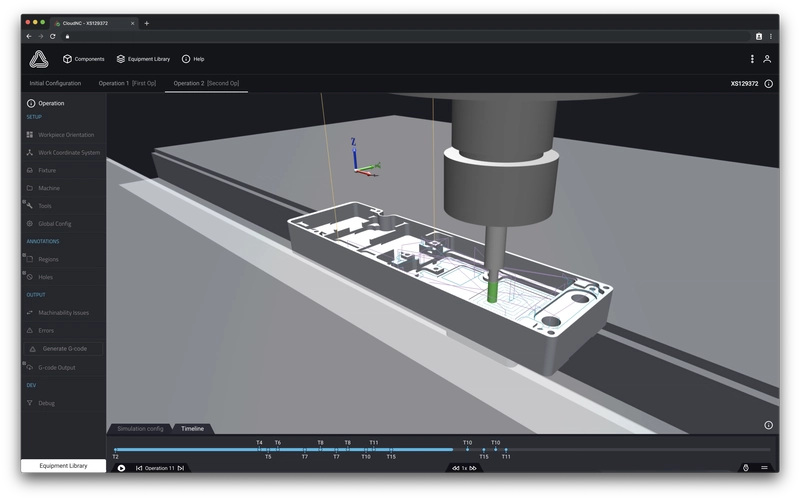
我目前在伦敦的一家初创公司CloudNC工作,我们的目标是大幅简化、加速并改进使用CNC 铣床加工零件的流程。在我们的应用程序中,我们需要对环境(机器、工具等)进行建模,并将其作为生成机器运动的算法的输入。这个环境包含大量参数,因此我们拥有相当多的表单。
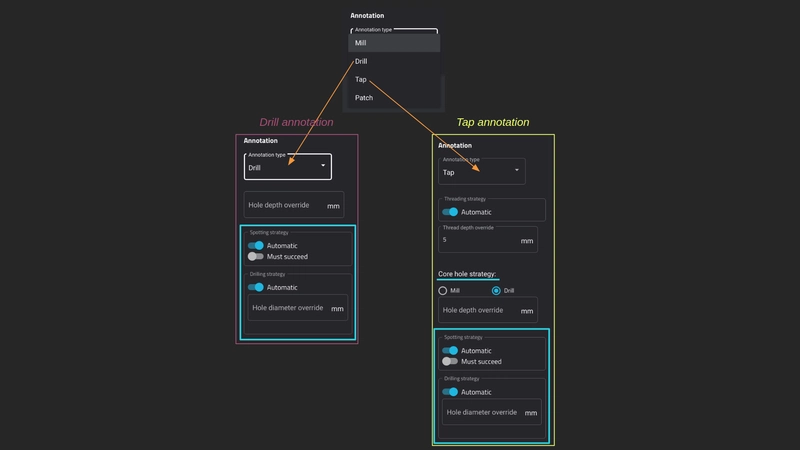
一个很好的例子是,当我们想要注释零件上的特定孔时,我们可以在不同类型的注释中进行选择,并选择特定的行为:
通过此示例,您可以看到我们有两个独立的表单,每个表单都由一个下拉菜单选择(这构成了一个多态模型——稍后解释!)。每个表单都使用相同的“发现策略”子表单。这甚至不是我们最复杂的表单,因此您可以开始理解我们提出一个通用解决方案的动机,该方案将表单分解为易于组合的逻辑组件。
介绍演示并了解我们想要构建的示例
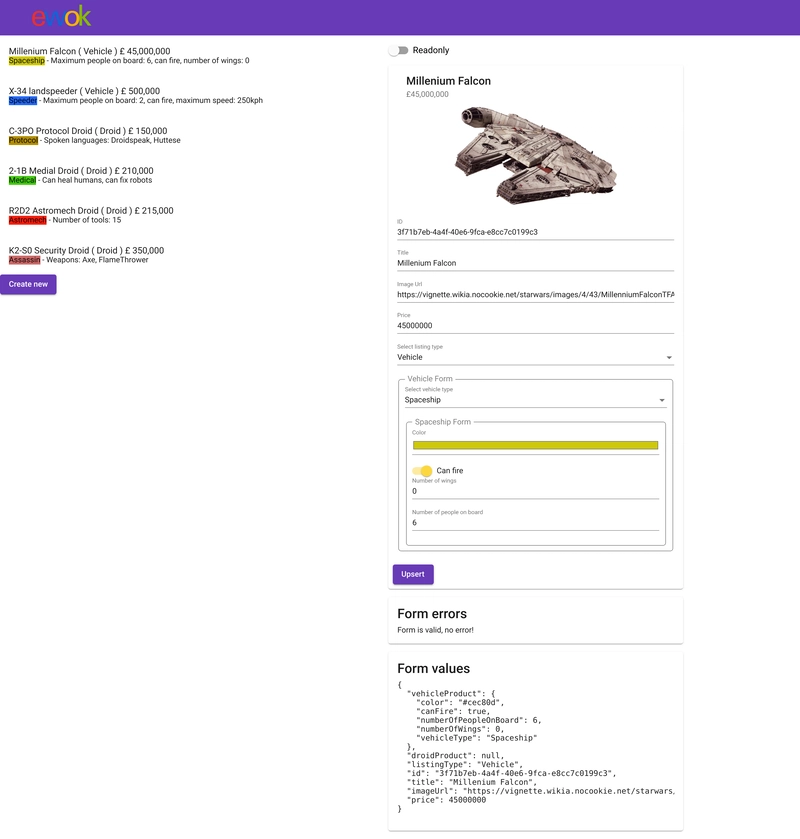
为了展示如何正确构建一个好的表单,我们开发了一款应用。其核心理念是“银河销售”,用户可以选择出售Droid(Assassin,Astromech,Medical,Protocol)或Vehicle(Spaceship,Speeder)。
在左侧,您可以看到一个简单的列表,显示待售物品。
右侧有一个表单,显示已点击的项目(因此可以编辑,可以将其视为管理视图)。您也可以通过点击“新建”按钮来创建新条目。
如果您想使用演示的现场版本,可以访问此处:https
://cloudnc.github.io/ngx-sub-form 如果您想查看演示的源代码,可以访问此处:https://github.com/cloudnc/ngx-sub-form/tree/master/src/app
现在让我们仔细研究一下这些模型(interfaces、enums等等),并构建一个简化版本。这样既能理解所有概念,又能避免重复。
AListing是待售商品:
// can either be a vehicle or a droid
export enum ListingType {
  VEHICLE = 'Vehicle',
  DROID = 'Droid',
}

export interface BaseListing {
  id: string;
  title: string;
  imageUrl: string;
  price: number;
}

export interface VehicleListing extends BaseListing {
  listingType: ListingType.VEHICLE;
  product: OneVehicle;
}

export interface DroidListing extends BaseListing {
  listingType: ListingType.DROID;
  product: OneDroid;
}

export type OneListing = VehicleListing | DroidListing;
Vehicle现在让我们看一下模型:
export enum VehicleType {
  SPACESHIP = 'Spaceship',
  SPEEDER = 'Speeder',
}

export interface BaseVehicle {
  color: string;
  canFire: boolean;
  numberOfPeopleOnBoard: number;
}

export interface Spaceship extends BaseVehicle {
  vehicleType: VehicleType.SPACESHIP;
  numberOfWings: number;
}

export interface Speeder extends BaseVehicle {
  vehicleType: VehicleType.SPEEDER;
  maximumSpeed: number;
}

export type OneVehicle = Spaceship | Speeder;
这里要注意的一件重要的事情是,它OneListing是一种多态类型(它也是OneVehicle):
export type OneListing = VehicleListing | DroidListing;
这里保存值的对象可以是VehicleListing或DroidListing。在这种情况下,Typescript 只能通过查看属性来确保类型安全,但为了更安全,并且以后可以轻松了解对象的类型,我们使用了一个判别属性:listingType。
现在让我们进入下一步,了解构建可以表示该数据结构的表单的挑战。
反应形式
它们在 Angular 的早期版本中就已引入,彻底改变了表单的推理方式。而且是以一种好的方式!我们不再需要从模板中管理表单的所有逻辑,而是可以通过 Typescript/Components 文件进行管理。此外,所有表单都可以享受类型安全!
嗯……不完全是。Github 上有一个长期存在的 issue。
 反应式表单不是强类型的 #13721
[x] feature request
- 角度版本: 2
反应式表单旨在用于复杂的表单,但控件valueChanges却是Observable<any>,这完全违背了复杂代码的良好实践。
应该有一种方法可以创建强类型的表单控件。
我邀请您通过在帖子上点赞来表示支持,以便最终能够优先处理该帖子。
虽然目前我们无法真正从类型安全中获益,但我们仍然可以使用响应式形式来构建它。让我们来看看不同的解决方案。
所有内容都在一个文件中🔥
一种解决方案是把所有东西都放在同一个组件里。你可以想象,这远非理想:
- 巨大的文件
- 很难与多个开发人员并行处理同一个文件
- 没有将逻辑分成不同的组来将问题分解成更小的部分
- 无法重复使用表单的子部分(例如,仅编辑较小的子集)
将表单分解为子组件👍
因此,就像处理其他组件或函数一样,你开始思考如何将其分解成更简单、更小的子组件,并处理它们各自的逻辑。由此,你可能会发现一些博客文章和 Stack Overflow 问题,建议将表单组实例作为 传递@Input(),然后从子组件动态添加所需的新表单属性。
但总感觉哪里不对劲,不是吗?如果它不是表单,只是一个简单的对象,你会把它传递Listing给Vehicle组件吗?这样一来,组件就能访问属性了listing.vehicle,这没问题,但也能访问它listing本身,这感觉很危险。最糟糕的是,它还能变异listing.vehicle(添加/删除属性)。遵循单向数据绑定原则,你就会意识到这样做是不对的。我认为这也适用于表单。
正确做法:将表单拆分成子组件!🎉
KaraControlValueAccessor在 2017 年 Angular Connect 上的精彩演讲中谈到了这一点: https://youtu.be/CD_t3m2WMM8
如果你从未听说过ControlValueAccessor,它可以让你创建一个可用作的组件FormControl。基本上,你可以执行以下操作:
@Component({
  selector: 'my-custom-input',
  // ...
  providers: [
    {
      provide: NG_VALUE_ACCESSOR,
      useExisting: forwardRef(() => MyCustomInput),
      multi: true,
    },
  ],
})
export class MyCustomInput implements ControlValueAccessor {
  writeValue(obj: any): void {
    // every time the form control is
    // being updated from the parent
  }
  registerOnChange(fn: any): void {
    // when we want to let the parent
    // know that the value of the
    // form control should be updated
    // call `fn` callback
  }
  registerOnTouched(fn: any): void {
    // when we want to let the parent
    // know that the form control
    // has been touched
    // call `fn` callback
  }
  setDisabledState?(isDisabled: boolean): void {
    // when the parent updates the
    // state of the form control
  }
}
FormGroup你能发现传递实例和使用之间的主要区别ControlValueAccessor吗?它现在和我们创建哑组件时使用的模式几乎相同!
以下内容在 Angular 中不可用,但只是为了说明我的观点,您可以这样想:
  @Input() set value(obj: any) {}
  @Input() set disabledState(isDisabled: boolean): void {}

  @Output() updated: EventEmitter<any> = new EventEmitter();
  @Output() touched: EventEmitter<any> = new EventEmitter();
注意:
- 尊重单向数据流
- 子组件无权访问整个表单
如果你仔细研究 Angular Material 的源代码,就会发现很多组件(作为输入)都是这样构建的!比如,select、radio、slide-toggle、slider ……
理解ControlValueAccessor
在编写前面的示例时,我创建了一个实现的空类ControlValueAccessor,然后我的 IDE 生成了所需的方法。让我们仔细看看其中的一个:
writeValue(obj: any): void
你注意到参数的名称了吗?obj这很有趣🤔。
你可以传递任何类型的对象writeValue!不限于像string或 这样的原始类型number。你可以传递对象、数组……所有我们需要的,都可以用于构建深度嵌套的表单。
因此,假设我们要构建一个可以处理以下对象的表单:
export interface Spaceship {
  name: string;
  builtInYear: number;
  config: {
    maxSpeed: number;
    nbCanons: number;
  };
}
我们可以:
- 创建
SpaceshipForm组件 - 该组件将仅处理原始值(此处
name和builtInYear),并从另一个组件请求配置 - 创建一个子组件
SpaceshipConfigForm,该子组件本身只处理原始值(在这种情况下是所有原始值)
但是让我们看一下第一级组件(SpaceshipForm),看看为什么在每个子组件上执行此操作会是一个小负担:
@Component({
  selector: 'my-custom-input',
  // ...
  providers: [
    {
      provide: NG_VALUE_ACCESSOR,
      useExisting: forwardRef(() => MyCustomInput),
      multi: true,
    },
  ],
})
export class MyCustomInput implements ControlValueAccessor, OnInit, OnDestroy {
  private onChange: (value: any) => void;
  private onTouched: () => void;
  private onDestroy$: Subject<void> = new Subject();

  public internalFormGroup: FormGroup = new FormGroup({
    name: new FormControl(),
    builtInYear: new FormControl(),
    config: new FormControl(),
  });

  public ngOnInit(): void {
    this.internalFormGroup.valueChanges
      .pipe(
        tap(value => {
          this.onChange(value);
          this.onTouched();
        }),
        takeUntil(this.onDestroy$),
      )
      .subscribe();
  }

  public ngOnDestroy(): void {
    this.onDestroy$.next();
    this.onDestroy$.complete();
  }

  writeValue(obj: any): void {
    // every time the form control is
    // being updated from the parent

    this.internalFormGroup.setValue(obj, { emitEvent: false });

    this.internalFormGroup.markAsPristine();
    this.internalFormGroup.markAsUntouched();
  }
  registerOnChange(fn: any): void {
    // when we want to let the parent
    // know that the value of the
    // form control should be updated

    this.onChange = fn;
  }
  registerOnTouched(fn: any): void {
    // when we want to let the parent
    // know that the form control
    // has been touched

    this.onTouched = fn;
  }
  setDisabledState?(isDisabled: boolean): void {
    // when the parent updates the
    // state of the form control

    if (isDisabled) {
      this.internalFormGroup.disable();
    } else {
      this.internalFormGroup.enable();
    }
  }
}
逻辑本身其实并不复杂,但有一点是肯定的:它很冗长。这只是一个最简单的例子,你完全可以做得更进一步。但它已经大约有 75 行了。在我看来,仅仅处理该组件的两个输入就太多了🤷♂️。
希望您能够了解为什么要写这篇博文(是时候了,是吗?)以及如何更好地处理上述代码。
Ngx-Sub-Form:将 Angular 表单分解为多个子组件的实用程序库
正如该文章上下文部分简要介绍的那样,我们一直在CloudNC开发一个库,它可以为您处理所有样板文件,并提供一些实用的帮助。它叫做ngx-sub-form。
该库已在Github和NPM上发布,遵循 MIT 许可证,可立即使用。我们在 Github 仓库中创建了一个完整的示例/演示,并且经过了良好的测试(端到端和集成)。我们也用它重写了很多我们自己的表单,我们相信它现在已经足够稳定,可以被其他人使用了,所以欢迎在您自己的项目中尝试一下!
有什么ngx-sub-form可提供的
ControlValueAccessor使用最少的样板轻松创建子表单或自定义表单.ts对组件和.html文件进行类型安全保护- 访问表单的所有值,甚至是嵌套的值
FormGroup访问表单的所有错误,甚至是嵌套的错误( s本身不支持,请参阅https://github.com/angular/angular/issues/10530)- 您应该能够处理大部分同步值,而不必处理流
- 将原始数据重新映射到每个表单/子表单所需的形状(并且仍然保持其类型安全)
- 以简单的方式处理表单中的多态数据
什么时候应该使用它?
你有表格吗?
是的
然后使用它。
我的表格很小而且很简单,我不确定它是否值得
您将免费获得类型安全、更少的样板代码和一些辅助函数。
除非您真的只需要一个函数FormControl来处理一个搜索输入,否则就直接使用它吧。
话不多说,给我看一些代码吧!
构建演示
我们现在将重构前一个组件,但这次我们将构建整个表单(包括配置!)。
这是界面作为提醒:
我现在将其分解为 2 个,就像我们通常会做/应该做的那样!
export interface SpaceshipConfig {
  maxSpeed: number;
  nbCanons: number;
}

export interface Spaceship {
  name: string;
  builtInYear: number;
  config: SpaceshipConfig;
}
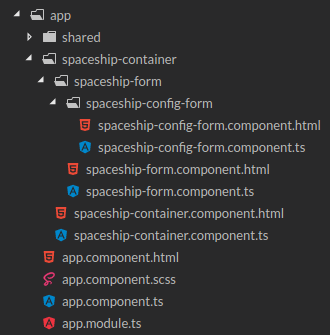
通过查看界面,我们可以很容易地猜出我们想要什么样的架构:
- 太空船容器:智能组件,当表单有效并发送时,它将注入服务以检索太空船或保存它
- spaceship-form:顶层表单的哑组件,负责处理
Spaceship - spaceship-config-form:哑组件,作为子表单,仅负责配置部分
我们将从底部组件开始,然后逐步向上。
以下是我将要介绍的内容的现场演示:https://stackblitz.com/edit/ngx-sub-form-b asics
当您想要查看上下文中的代码时,您可以使用并关注 Stackblitz。
太空船配置表单.component.ts:
@Component({
  selector: 'app-spaceship-config-form',
  templateUrl: './spaceship-config-form.component.html',
  providers: subformComponentProviders(SpaceshipConfigFormComponent),
})
export class SpaceshipConfigFormComponent extends NgxSubFormComponent<SpaceshipConfig> {
  protected getFormControls(): Controls<SpaceshipConfig> {
    return {
      maxSpeed: new FormControl(),
      nbCanons: new FormControl(),
    };
  }
}
如您所见,这是一个子表单组件,样板很少。
首先,让我们看一下
providers: subformComponentProviders(SpaceshipConfigFormComponent),
在构建时,如果您希望能够处理验证,ControlValueAccessor则至少需要提供NG_VALUE_ACCESSOR并传递。它通常如下所示:NG_VALIDATORS
{
  // ...
  providers: [
    {
      provide: NG_VALUE_ACCESSOR,
      useExisting: forwardRef(() => component),
      multi: true,
    },
    {
      provide: NG_VALIDATORS,
      useExisting: forwardRef(() => component),
      multi: true,
    },
  ];
}
所有这些操作都简化为一行,subformComponentProviders只需使用实用函数提供当前类即可。它也适用于 AoT 编译器。
然后,请注意这一行:
export class SpaceshipConfigFormComponent extends NgxSubFormComponent<SpaceshipConfig>
只要这样做,你就可以访问很多
特性:
formGroup[formGroup]="formGroup":实际的表单组,用于定义与视图的绑定formControlNames:表单中所有可用的控件名称。formControlName像这样定义时使用它:<input [formControlName]="formControlNames.yourControl">如果您更改了接口,它会在构建时(使用 AOT)捕获错误!formGroupControls:表单的所有控件,有助于避免这样做formGroup.get(formControlNames.yourControl);而只需做formGroupControls.yourControlformGroupValues:直接访问表单的所有值,无需执行formGroup.get(formControlNames.yourControl).value,只需执行formGroupValues.yourControl(并且它会被正确输入!)formGroupErrors:当前表单的所有错误,包括子错误(如果有)。只需使用formGroupErrors或 即可formGroupErrors?.yourControl。注意 中的问号formGroupErrors?.yourControl,如果没有错误,它会返回null
方法:
onFormUpdatehook:允许您在表单修改时做出反应。无需订阅this.formGroup.valueChanges或 ,this.formControls.someProp.valueChanges您无需处理任何异步操作,也不必担心订阅和内存泄漏。只需实现 方法onFormUpdate(formUpdate: FormUpdate<FormInterface>): void,如果您需要知道哪些属性发生了更改,请执行如下检查:if (formUpdate.yourProperty) {}。请注意,仅当表单发生本地更改或来自子表单的更改时,才会调用此方法。如果父级调用setValue或patchValue,则不会调用此方法。getFormGroupControlOptionshook:允许你定义内部构造的控制选项FormGroup。使用它来定义FormGroup级别的验证器handleEmissionRatehook:允许您定义自定义发射率(顶层或任何子层)
现在你肯定会觉得内容有点多,希望之后我们不会再加太多。如果是这样,你会很高兴知道,这涵盖了大部分内容ngx-sub-form,剩下的部分现在会感觉似曾相识。
太空船配置表单.component.html:
<fieldset [formGroup]="formGroup">
  <legend>Config</legend>

  Maximum speed
  <input type="number" [formControlName]="formControlNames.maxSpeed" />

  Number of canons
  <input type="number" [formControlName]="formControlNames.nbCanons" />
</fieldset>
我认为不需要进一步解释html。
现在,让我们转到顶层表单。
太空船表单.component.ts:
@Component({
  selector: 'app-spaceship-form',
  templateUrl: './spaceship-form.component.html',
})
export class SpaceshipFormComponent extends NgxRootFormComponent<Spaceship> {
  @DataInput()
  @Input('spaceship')
  public dataInput: Spaceship | null | undefined;

  @Output('spaceshipUpdated')
  public dataOutput: EventEmitter<Spaceship> = new EventEmitter();

  protected getFormControls(): Controls<Spaceship> {
    return {
      name: new FormControl(),
      builtInYear: new FormControl(),
      config: new FormControl(),
    };
  }
}
该组件的目的不是与以前的组件绑定,FormControl而是:
Input为了能够从(dataInput,当然您可以重命名)更新表单- 一旦表单有效并保存,就能够共享(发出)新值(通过
OutputdataOutput,您也可以重命名)
注意:使用 时NgxRootFormComponent,dataInput确实需要您配合使用@DataInput()装饰器。背后的原因很简单:ngx-sub-form它无法知道您将如何重命名输入,并且需要一个钩子来在值更改时发出警告。我们无需要求您从钩子中调用方法,或在输入上创建 setter 并调用相同的方法,而是使用装饰器ngOnChanges来处理所有这些。
让我们快速浏览一下该视图。
太空船表单.component.html:
<form [formGroup]="formGroup">
  <fieldset>
    <legend>Spaceship</legend>
    Name
    <input type="text" [formControlName]="formControlNames.name" />

    Built in year
    <input type="number" [formControlName]="formControlNames.builtInYear" />

    <app-spaceship-config-form [formControlName]="formControlNames.config"></app-spaceship-config-form>

    <button (click)="manualSave()">Save</button>
  </fieldset>
</form>

<pre>{{ formGroup.value | json }}</pre>
没有什么特别新的,但请注意,我们可以通过使用来显示整个表单值(此处用于调试目的),formGroup.value并且为了保存表单,我们只需在使用时调用manualSave提供的方法。ngx-sub-formNgxRootFormComponent
一旦我们调用manualSave,如果表单有效,它将通过输出发出表单的值。这样,父组件就可以简单地检索一个新Spaceship对象并处理它(将其放入本地存储,将其传递给服务以进行 HTTP 调用等)。但是表单只负责表单本身,而智能组件(父组件)甚至不知道该表单的存在。它只是知道有新值可用。
说到这里,我们来看看父组件。
宇宙飞船容器.component.ts
// only to demo that passing a value as input will update the form
// but this info might come from a server for example when you want to
// edit an existing value
const getDefaultSpaceship = (): Spaceship => ({
  name: 'Galactico',
  builtInYear: 2500,
  config: {
    maxSpeed: 8000,
    nbCanons: 10,
  },
});

@Component({
  selector: 'app-spaceship-container',
  templateUrl: './spaceship-container.component.html',
})
export class SpaceshipContainerComponent {
  public spaceship$: Subject<Spaceship> = new Subject();

  public preFillForm(): void {
    this.spaceship$.next(getDefaultSpaceship());
  }

  public spaceshipUpdated(spaceship: Spaceship): void {
    // from here, you can pass that value to a
    // service to save/update it on a backend for example
    console.log(spaceship);
  }
}
这里有趣的是 - 那个智能组件会检索数据以填充表单并在保存表单时收集表单的新值,它只处理类型的对象。没有声明/使用Spaceship单个FormGroup实例或。我们只是将这个责任委托给。这真的很方便,因为如果我们稍后在应用程序中想要显示 ,我们可以重复使用表单并禁用它,所以它将是只读的。怎么做到的?和都有一个可选的输入属性。只需将布尔值绑定到它,当值为 时,表单将为只读。更具体地说,整个表单将是只读的,其中也包括所有子表单组件👍。FormControlSpaceshipFormComponentSpaceshipNgxRootFormComponentNgxAutomaticRootFormComponentdisabledtrue
此处的视图非常简单,但为了完整性:
宇宙飞船容器.component.html
<button (click)="preFillForm()">Pre fill form (demo)</button>

<app-spaceship-form [spaceship]="spaceship$ | async" (spaceshipUpdated)="spaceshipUpdated($event)"></app-spaceship-form>
进一步了解重映射和/或多态性
到目前为止,我们已经了解了如何将表单分解成更小的组件。
现在剩下的最后一点是探索如何处理包含多态数据的表单。
让我们从关于polymorphism(维基百科)的一个小提醒开始:
在编程语言和类型理论中,多态性是向不同类型的实体提供单一接口或使用单一符号来表示多种不同类型。
使用文章开头的接口的示例:
export type OneListing = VehicleListing | DroidListing;
一个类型的对象OneListing可以是VehicleListing或DroidListing。
即使它可能不是您在表单中经常使用的那种结构,但它是一种相当常见的用例,并ngx-sub-form提供了一个专用的类来处理该问题:NgxSubFormRemapComponent<ControlInterface, FormInterface>。
请注意,NgxRootFormComponent和NgxAutomaticRootFormComponent都用作NgxSubFormRemapComponent基类,因此您也可以使用提供的方法在其中重新映射。
从这里开始,我们的想法是为表单的该部分创建一个新的界面,该界面将具有:
- 一个条目即可了解当前选定的类型
- 每种可能的类型都有不同的条目
我们的例子:
export type OneListing = VehicleListing | DroidListing;

export enum OneListingType {
  VEHICLE = 'Vehicle',
  DROID = 'Droid',
}

export interface OneListingForm {
  listingType: OneListingType | null;
  vehicle: VehicleListing | null;
  droid: DroidListing | null;
}
然后我们可以像下面这样创建我们的组件:
@Component({
  selector: 'app-one-listing-form',
  templateUrl: '...',
})
export class OneListingForm extends NgxRootFormComponent<OneListing, OneListingForm> {
  // note that we use `NgxRootFormComponent` as it extends `NgxSubFormRemapComponent`
  // and this is the top level form; that's why we will be using `NgxRootFormComponent`
  // ...
}
此时,Typescript 将显示错误并告诉您需要正确实现该类。
@Component({
  selector: 'app-one-listing-form',
  templateUrl: '...',
})
export class OneListingForm extends NgxSubFormRemapComponent<OneListing, OneListingForm> {
  @DataInput()
  @Input('listing')
  public dataInput: OneListing | null | undefined;

  @Output('listingUpdated')
  public dataOutput: EventEmitter<OneListing> = new EventEmitter();

  public OneListingType: typeof OneListingType = OneListingType;

  protected getFormControls(): Controls<OneListingForm> {
    return {
      listingType: new FormControl(null, { validators: [Validators.required] }),
      vehicle: new FormControl(null),
      droid: new FormControl(null),
    };
  }

  protected transformToFormGroup(obj: OneListing): OneListingForm {
    return {
      listingType: obj.listingType,
      vehicle: obj.listingType === OneListingType.VEHICLE ? obj : null,
      droid: obj.listingType === OneListingType.DROID ? obj : null,
    };
  }

  protected transformFromFormGroup(formValue: OneListingForm): OneListing | null {
    switch (formValue.listingType) {
      case OneListingType.VEHICLE:
        return formValue.vehicle;
      case OneListingType.DROID:
        return formValue.droid;
      case null:
        return null;
      default:
        throw new UnreachableCase(formValue.listingType);
    }
  }
}
您可能已经注意到,我们使用两种新方法来处理多态数据:
transformToFormGroup:将写入该子组件的值作为参数传递(或通过dataInput使用顶级组件),并将该值重新映射到将多态对象拆分为独立实体的内部值transformFromFormGroup:传递表单的值并期望输出与原始接口匹配的对象
在这个方法中transformToFormGroup,如果不同的对象拥有discriminator属性,那么操作起来会非常简单。在我们的例子中,它们确实:
export interface VehicleListing extends BaseListing {
  listingType: ListingType.VEHICLE; // discriminator
  product: OneVehicle;
}

export interface DroidListing extends BaseListing {
  listingType: ListingType.DROID; // discriminator
  product: OneDroid;
}

export type OneListing = VehicleListing | DroidListing;
该属性与和listingType相同,但在两种情况下都设置为明确定义的值。这使我们能够进行如下非常简单的检查:VehicleListingDroidListing
protected transformToFormGroup(obj: OneListing): OneListingForm {
  return {
    listingType: obj.listingType,
    vehicle: obj.listingType === OneListingType.VEHICLE ? obj : null,
    droid: obj.listingType === OneListingType.DROID ? obj : null,
  };
}
如果您的属性上没有鉴别器,您将需要以某种方式根据其他属性区分它们,但如果您可以控制界面,我强烈建议您添加鉴别器,因为它将使事情变得更容易,不仅适用于您的表单。
该transformFromFormGroup方法也很简单 - 根据表单值,listingType我们将从表单中返回适当的值:
protected transformFromFormGroup(formValue: OneListingForm): OneListing | null {
  switch (formValue.listingType) {
    case OneListingType.VEHICLE:
      return formValue.vehicle;
    case OneListingType.DROID:
      return formValue.droid;
    case null:
      return null;
    default:
      throw new UnreachableCase(formValue.listingType);
  }
}
引发错误的行永远不应该发生,这里主要出于类型安全的原因,因为它会强制您实现所有情况:
throw new UnreachableCase(formValue.listingType);
如果你自己的项目中没有类似的东西,你可以把以下内容放在共享文件夹中
export class UnreachableCase {
  constructor(payload: never) {}
}
如果将来我们向枚举中添加或删除一个值OneListingType,Typescript 将抛出一个错误并确保我们不会忘记任何用例。
总结和收获
本文即将结束,希望你喜欢这种(新的?)表单操作方式。由于我们讨论得比较深入,阅读起来需要将近20分钟,所以我想对一些你应该记住的重要内容做一个小总结:
- 分解你的表格,这样事情就更容易推理和处理
- 更喜欢
ControlValueAccessor而不是将你的FormGroup或FormControl作为输入传递给子组件 - 戴上手套、盔甲和头盔,盯着终端几秒钟,然后跑开,
yarn install ngx-sub-form以避免创建自定义的样板ControlValueAccessor(还可以享受一些不错的助手和类型安全!) - 如果您正在构建顶级表单组件,请在
NgxRootFormComponent两者之间进行选择NgxAutomaticRootFormComponent(手动保存或一旦发生变化立即保存) - 如果您正在构建子表单组件,请
NgxSubFormComponent根据NgxSubFormRemapComponent是否需要重新映射数据来选择 - 享受
感谢您的阅读,这是我的第一篇博文,所以请告诉我您的感受,以便我改进下一篇!我们可能在某些观点上意见不一,或者我可能解释得不够清楚。无论如何,我都想知道,所以请不要害羞,分享您不喜欢的地方,我可以跳过的地方,以及文章是否太长、不够详细等等。
如果您有其他改进想法ngx-sub-form,请随时访问 Github 项目并撰写问题或发出拉取请求🔥。
有用的链接
- Github仓库:https://github.com/cloudnc/ngx-sub-form
- 具有多态数据的表单的现场演示,该表单已被分解为不同的子组件:https://cloudnc.github.io/ngx-sub-form
- 现场演示的源代码:https://github.com/cloudnc/ngx-sub-form/tree/master/src/app
- 我们在本文中构建的演示的 Stackblitz:https://stackblitz.com/edit/ngx-sub-form-b asics
- 在 Twitter 上关注我:https://twitter.com/maxime1992(我分享有关 Angular 的内容🌈)
- 在 Github 上关注我:https://github.com/maxime1992(我尝试尽可能多地开源东西,大部分时间围绕 Typescript、Node、Angular、NestJs)
- Zak的推特:https://twitter.com/zak
- Zak 的 Github 页面:https://github.com/zakhenry
- CloudNC 网站:https://cloudnc.com (如果你感兴趣的话,伦敦有很多工作机会!)
- CloudNC 的 Github 页面:https://github.com/cloudnc(我们还有一些其他用于图标和 Web 工作者的库)
再次感谢您的阅读!
发现拼写错误?
如果您发现本博文中有拼写错误、需要改进的句子或其他任何需要更新的内容,您可以通过 Git 仓库访问并提交拉取请求。无需发表评论,请直接前往https://github.com/maxime1992/my-dev.to并提交新的拉取请求,提交您的修改。如果您对我如何通过 Git 和 CI 管理我的 dev.to 帖子感兴趣,请点击此处了解更多信息。
 后端开发教程 - Java、Spring Boot 实战 - msg200.com
