如何将 Paypal 与 NextJs 集成
当我们要开发电商网站时,支付集成是至关重要的。PayPal 是最常用的支付平台之一,它让我们的交易更加顺畅。那么,让我们学习如何将 Paypal 与我们的 NextJs 电商应用集成。
安装所需的软件包
首先,我们需要一些能够帮助我们集成 Paypal 的包,我们只需要根据需要使用它们即可。
@paypal/react-paypal-js
对于前端,我们需要显示 Paypal 付款按钮以及以下功能:
- 创建订单
- 获取订单
这个包将帮助我们满足这些要求
@paypal/checkout-server-sdk
对于后端,我们实际上需要调用 paypal Api,这个包为我们提供了有用的类。
获取凭证并设置环境
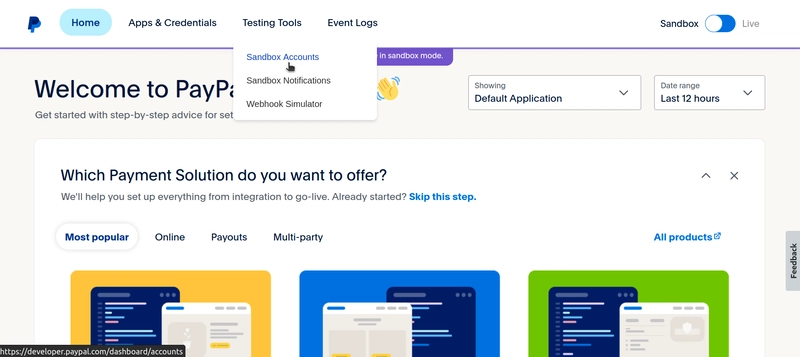
前往Paypal 开发者页面并创建账户。
进入控制面板后:
-
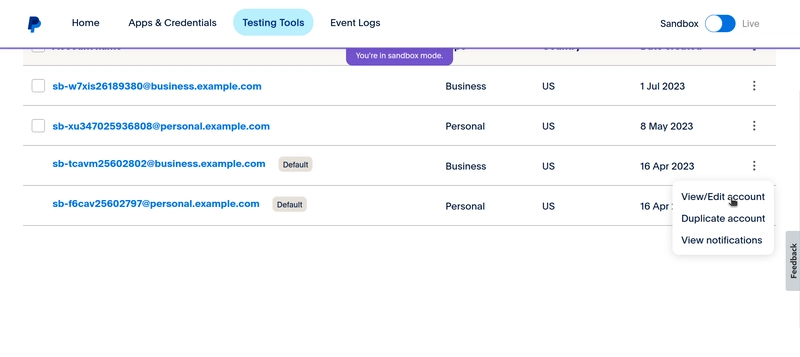
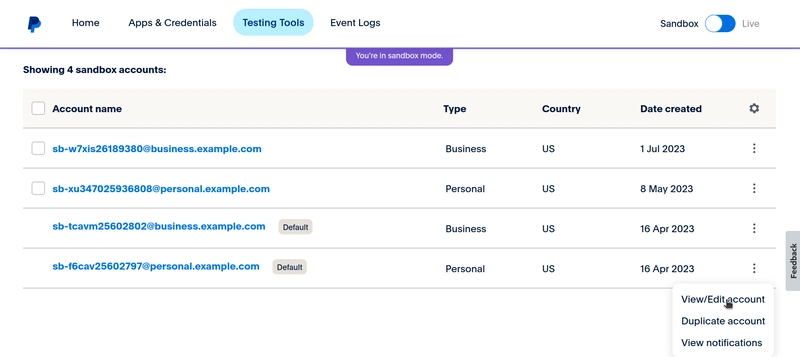
点击“沙盒帐户”:

-
向下滚动并查看企业帐户的详细信息:
-
在Rest Api Apps下,复制客户端 ID和密钥,并将它们存储在应用程序的 .env 文件中。如果您无法在Rest Api Apps
下找到这些内容,则需要单击“创建应用程序”按钮来创建一个应用程序。弹出窗口时,选择“商家帐户”。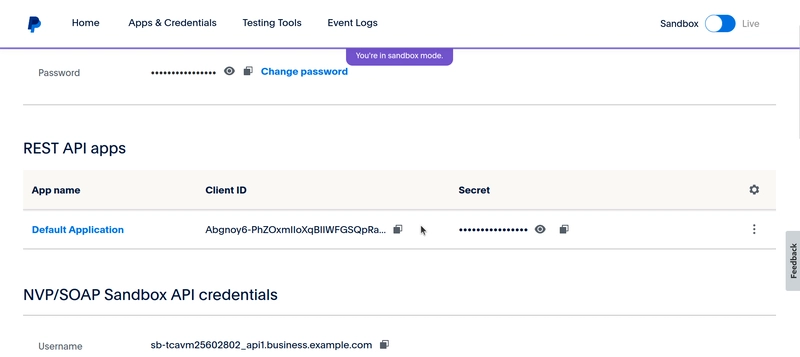


.env:
PAYPAL_CLIENT_ID = "<your cliend id>"
PAYPAL_CLIENT_SECRET = "<your client secret>"
NEXT_PUBLIC_PAYPAL_CLIENT_ID = "<your client id>"
注意:本教程使用的是沙盒账户。您可以轻松将沙盒凭证、客户端 ID 和密钥替换为真实账户,从而切换到真实账户。
后端集成
我们需要定义 api 端点,通过它我们可以从前端创建和捕获订单。
我们需要定义两个端点,一个用于创建订单,另一个用于捕获订单。
但在此之前,我们需要创建一个包含所需配置的客户端。该客户端将帮助我们调用 Paypal API 来创建和捕获订单。因此,请在
/utils/paypal/index.js:
import checkoutNodeJssdk from '@paypal/checkout-server-sdk'

const configureEnvironment = function () {
  const clientId = process.env.PAYPAL_CLIENT_ID
  const clientSecret = process.env.PAYPAL_CLIENT_SECRET

  return process.env.NODE_ENV === 'production'
    ? new checkoutNodeJssdk.core.LiveEnvironment(clientId, clientSecret)
    : new checkoutNodeJssdk.core.SandboxEnvironment(clientId, clientSecret)
}

const client = function () {
  return new checkoutNodeJssdk.core.PayPalHttpClient(configureEnvironment())
}

export default client
现在,我们已经将客户端配置为使用之前在 .env 文件中定义的客户端 ID 和客户端密钥。Paypal 需要这些客户端 ID 和客户端密钥来创建和捕获订单。
现在回到我们的 api 端点。/api/paypal/createorder.js
:
import client from 'backend/paypal'
import paypal from '@paypal/checkout-server-sdk'

...
...

export default async function Handler(req, res) {

  if(req.method != "POST")
    return res.status(404).json({success: false, message: "Not Found"})

  if(!req.body.order_price || !req.body.user_id)
    return res.status(400).json({success: false, message: "Please Provide order_price And User ID"})


  try{
    const PaypalClient = client()
    //This code is lifted from https://github.com/paypal/Checkout-NodeJS-SDK
    const request = new paypal.orders.OrdersCreateRequest()
    request.headers['prefer'] = 'return=representation'
    request.requestBody({
      intent: 'CAPTURE',
      purchase_units: [
        {
          amount: {
            currency_code: 'USD',
            value: req.body.order_price+"",
          },
        },
      ],
    })
    const response = await PaypalClient.execute(request)
    if (response.statusCode !== 201) {
      console.log("RES: ", response)
      return res.status(500).json({success: false, message: "Some Error Occured at backend"})
    }

    ...

    // Your Custom Code for doing something with order
    // Usually Store an order in the database like MongoDB

    ...

    res.status(200).json({success: true, data: {order}})
  }
  catch(err){
    console.log("Err at Create Order: ", err)
    return res.status(500).json({success: false, message: "Could Not Found the user"})
  }

}
/api/paypal/captureorder.js
import client from 'backend/paypal'
import paypal from '@paypal/checkout-server-sdk'


...

export default async function Handler(req, res) {

  if(req.method != "POST")
    return res.status(404).json({success: false, message: "Not Found"})

  if(!req.body.orderID)
    return res.status(400).json({success: false, message: "Please Provide Order ID"})

  //Capture order to complete payment
  const { orderID } = req.body
  const PaypalClient = client()
  const request = new paypal.orders.OrdersCaptureRequest(orderID)
  request.requestBody({})
  const response = await PaypalClient.execute(request)
  if (!response) {
    return res.status(500).json({success: false, message: "Some Error Occured at backend"})
  }

  ...

  // Your Custom Code to Update Order Status
  // And Other stuff that is related to that order, like wallet
  // Here I am updateing the wallet and sending it back to frontend to update it on frontend

  ...

  res.status(200).json({success: true, data: {wallet}})
}
前端集成
现在打开一个需要显示 Paypal 付款按钮的组件。
导入以下内容:
import { PayPalScriptProvider, PayPalButtons } from '@paypal/react-paypal-js'
移至“return”语句并通过以下方式添加 Paypal 付款按钮:
return (
   ...
   ...

   <PayPalScriptProvider
            options={{
              'client-id': process.env.NEXT_PUBLIC_PAYPAL_CLIENT_ID,
              currency: 'USD',
              intent: 'capture'
            }}
          >
            <PayPalButtons
              style={{
                color: 'gold',
                shape: 'rect',
                label: 'pay',
                height: 50
              }}
              createOrder={async (data, actions) => {
                let order_id = await paypalCreateOrder()
                return order_id + ''
              }}
              onApprove={async (data, actions) => {
                let response = await paypalCaptureOrder(data.orderID)
                if (response) return true
              }}
            />
          </PayPalScriptProvider>

   ...
   ...
)
您可以更改按钮的货币和样式。
正如您在代码中看到的,我们在“createOrder”中调用了“paypalCreateOrder”,并在“onApprove”中调用了“paypalCaptureOrder”。
createOrder 函数需要我们定义一个函数,该函数必须返回Paypal 中生成的订单的订单 ID
。 为此,我们定义了另一个函数paypalCaptureOrder,它将调用我们的后端 API 并返回生成订单的订单 ID。
onApprove是我们定义一个函数的地方,当付款被批准时,它会被调用。在这里,我们将调用后端 API 来捕获订单,并更新钱包和订单状态。
paypal创建订单:
   ...
   ...

   const paypalCreateOrder = async () => {
    try {
      let response = await axios.post('/api/paypal/createorder', {
        user_id: store.getState().auth.user._id,
        order_price: amountRef.current.value
      })
      return response.data.data.order.order_id
    } catch (err) {
      // Your custom code to show an error like showing a toast:
      // toast.error('Some Error Occured')
      return null
    }
  }

   ...
   ...
paypalCreateOrder是一个函数,它将调用我们的后端 api,负责在 Paypal 中创建订单。
paypal捕获订单:
   ...
   ...

   const paypalCaptureOrder = async orderID => {
    try {
      let response = await axios.post('/api/paypal/captureorder', {
        orderID
      })
      if (response.data.success) {
        // Order is successful
        // Your custom code

        // Like showing a success toast:
        // toast.success('Amount Added to Wallet')

        // And/Or Adding Balance to Redux Wallet
        // dispatch(setWalletBalance({ balance: response.data.data.wallet.balance }))
    } catch (err) {
      // Order is not successful
      // Your custom code

      // Like showing an error toast
      // toast.error('Some Error Occured')
    }
  }

   ...
   ...
paypalCaptureOrder是一个函数,它将调用我们的后端 api,负责在 Paypal 中捕获订单,即履行订单。
我们的按钮看起来是这样的:

注意:不要忘记在这两个函数中将后端端点替换为您的后端 api 端点。
测试
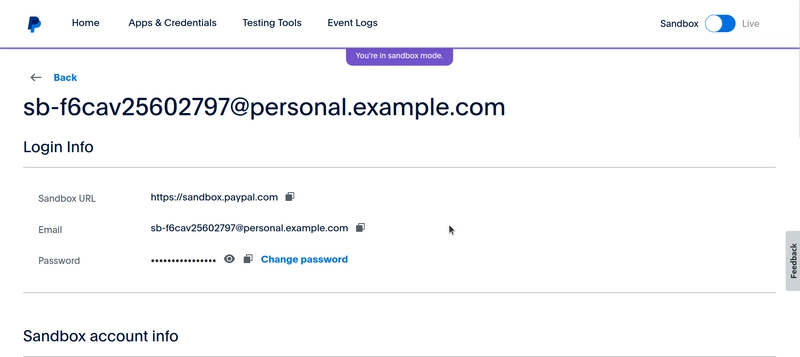
现在,您可以测试 PayPal 与沙盒个人帐户的电子邮件和密码的集成,您可以在以下位置找到它们:
-
沙盒帐户:
-
在“帐户”下,选择“个人帐户”:
-
最后使用凭证进行付款:


就这些了,
如果您有任何问题,请随时提问。