Angular 系列:使用 TDD 创建登录
让我们用 Angular 和 TDD 创建一个登录页面。最终项目可以在我的个人 Github 中找到:Angular 系列
第一步:创建项目
让我们从创建一个新的 Angular 项目开始:
ng new [project-name]
就我而言,我创建了它ng new angular-series,然后选择路由和您喜欢的文件样式扩展名。
等效的替代方法是仅添加相应的选项:
ng new angular-series --style=css --routing
更多 CLI 选项请参考官方文档:ng new
现在,如果我们运行,npm start我们应该一切正常,并且npm run test我们还应该看到 3 个测试通过。
第二步:App 组件
我们的目标是显示我们的登录页面,因此让我们修改当前的测试以反映我们的意图:
src/app/app.component.spec.ts我们应该删除那些不再有意义的测试:
it(`should have as title 'angular-series'`, () => {
    const fixture = TestBed.createComponent(AppComponent);
    const app = fixture.debugElement.componentInstance;

    expect(app.title).toEqual('angular-series');
});

it('should render title', () => {
    const fixture = TestBed.createComponent(AppComponent);
    fixture.detectChanges();
    const compiled = fixture.debugElement.nativeElement;

    expect(compiled.querySelector('.content span').textContent)
      .toContain('angular-series app is running!');
});
并将其替换为:
it('should have router-outlet', () => {
    const fixture = TestBed.createComponent(AppComponent);

    expect(fixture.nativeElement.querySelector('router-outlet')).not.toBeNull();
});
这样,我们期望我们的app.component已经<router-outlet></router-outlet>定义,而路由器需要它来将其他组件注入到那里。更多信息:路由器出口
如果你注意到的话,我们的测试已经通过了。这是因为默认app.component.html已经有了那个指令。但现在,我们要删除那些不必要的文件。删除app.component.html和app.component.css。检查你的控制台,你应该会看到一个错误,因为app.component.ts引用了我们刚刚删除的文件。
让我们首先修复编译错误:
//app.component.ts
import { Component } from '@angular/core';

@Component({
  selector: 'app-root',
  template: 'hello world'
})
export class AppComponent {}
templateUrl: ...注意和之间的区别template
如果我们打开,http://localhost:4200我们应该看到:“hello world”,但是现在我们的测试失败了(首先检查我们的测试是否失败,然后使其变为“绿色”,在这里阅读有关红色、绿色、重构的更多信息:TDD 的循环)
好的,现在我们的测试失败了,让我们修复它:
//app.component.ts
import { Component } from '@angular/core';

@Component({
  selector: 'app-root',
  template: '<router-outlet></router-outlet>'
})
export class AppComponent {}
第三步:创建登录组件
打开终端并运行:
ng generate module login --routing
您应该看到:
- src/app/login/login.module.ts
- src/app/login/login-routing.module.ts
接下来,创建登录组件:
ng generate component login
您应该看到:
- src/app/login/login.component.css
- src/app/login/login.component.html
- src/app/login/login.component.spec.ts
- src/app/login/login.component.ts
最后,让我们将新创建的模块引用到我们的app-routing.module.ts
const routes: Routes = [
  {
    path: '',
    loadChildren: () => import('./login/login.module').then(m => m.LoginModule),
    data: { preload: true }
  }
];
最终结果:
//app-routing.module.ts
import { NgModule } from '@angular/core';
import { Routes, RouterModule } from '@angular/router';

const routes: Routes = [
  {
    path: '',
    loadChildren: () => import('./login/login.module').then(m => m.LoginModule),
    data: { preload: true }
  }
];

@NgModule({
  imports: [RouterModule.forRoot(routes)],
  exports: [RouterModule]
})
export class AppRoutingModule {}
我们还应该修改我们的login-routing.module.ts:
//login-routing.module.ts
import { NgModule } from '@angular/core';
import { Routes, RouterModule } from '@angular/router';
import { LoginComponent } from './login.component';

const routes: Routes = [
  {
    path: '',
    component: LoginComponent
  }
];

@NgModule({
  imports: [RouterModule.forChild(routes)],
  exports: [RouterModule]
})
export class LoginRoutingModule {}
如果您打开http://localhost:4200,您应该会看到:“登录成功!”
第四步:登录组件
在开始之前,我们可以删除不必要的 css 文件。
首先,让我们创建测试来断言我们已经渲染了一个表单:
//login.component.spec.ts
  it('should render form with email and password inputs', () => {
    const element = fixture.nativeElement;

    expect(element.querySelector('form')).toBeTruthy();
    expect(element.querySelector('#email')).toBeTruthy();
    expect(element.querySelector('#password')).toBeTruthy();
    expect(element.querySelector('button')).toBeTruthy();
  });
我们应该有一个失败的测试😎。现在,我们需要让它通过!
让我们这样做,打开login.component.html:
<form>
  <input id="email" type="email" placeholder="Your email" />
  <input id="password" type="password" placeholder="********" />
  <button type="submit">Sign in</button>
</form>
我们应该看到有 4 个测试通过了!太棒了,但我们仍然没有可用的表单。
因此,让我们为表单模型添加一个测试(我们将使用Reactive forms)
//login.component.spec.ts

  it('should return model invalid when form is empty', () => {
    expect(component.form.valid).toBeFalsy();
  });
正如您所注意到的,出现了一个错误error TS2339: Property 'form' does not exist on type 'LoginComponent'.。
让我们form在我们的中定义我们的login.component.ts:
import { Component, OnInit } from '@angular/core';
import { FormGroup } from '@angular/forms';

@Component({
  selector: 'app-login',
  templateUrl: './login.component.html'
})
export class LoginComponent implements OnInit {
  form: FormGroup;

  constructor() {}

  ngOnInit() {}
}
我们看到编译错误不再存在,但是我们的测试仍然失败。
为什么我们已经声明了 ,但仍然会失败呢form?
没错!它仍然是 undefined!所以,在ngOnInit函数中,我们使用 来初始化我们的表单FormBuilder:
import { Component, OnInit } from '@angular/core';
import { FormGroup, FormBuilder } from '@angular/forms';

@Component({
  selector: 'app-login',
  templateUrl: './login.component.html'
})
export class LoginComponent implements OnInit {
  form: FormGroup;

  constructor(private formBuilder: FormBuilder) {}

  ngOnInit() {
    this.form = this.formBuilder.group({});
  }
}
糟糕!现在,我们有不止一个测试失败了!一切都崩溃了!别慌 😉,这是因为我们添加了一个依赖项,FormBuilder而我们的测试模块不知道该如何解决这个问题。让我们通过导入来修复它ReactiveFormsModule:
//login.component.spec.ts

  beforeEach(async(() => {
    TestBed.configureTestingModule({
      declarations: [LoginComponent],
      imports: [ReactiveFormsModule] //here we add the needed import
    }).compileComponents();
  }));
但是,我们仍然有 2 个测试失败!我们需要formGroup添加<form>:
<form [formGroup]="form">
现在,我们应该只会看到form is invalid测试失败😃。
你觉得我们应该如何让表单无效才能让测试通过呢?
答案是肯定的,只需在表单控件中添加必要的验证器即可。那么,我们再添加一个测试来断言它:
//login.component.spec.ts
it('should validate email input as required', () => {
  const email = component.form.controls.email;

  expect(email.valid).toBeFalsy();
  expect(email.errors.required).toBeTruthy();
});
让我们通过这些测试:
ngOnInit() {
  this.form = this.formBuilder.group({
    email: ['', Validators.required]
  });
}
太棒了😎!我们还需要在表单中添加一个密码属性,并配置相应的验证器。
//login.component.spec.ts
it('should validate password input as required', () => {
  const password = component.form.controls.password;

  expect(password.valid).toBeFalsy();
  expect(password.errors.required).toBeTruthy();
});
为了使其变为绿色,我们需要在表单声明中添加密码属性:
ngOnInit() {
  this.form = this.formBuilder.group({
    email: ['', Validators.required],
    password: ['', Validators.required]
  });
}
让我们验证一下是否应该插入有效的电子邮件:
it('should validate email format', () => {
  const email = component.form.controls.email;
  email.setValue('test');
  const errors = email.errors;

  expect(errors.required).toBeFalsy();
  expect(errors.pattern).toBeTruthy();
  expect(email.valid).toBeFalsy();
});
为了添加正确的验证器,我们需要添加如下正则表达式模式:
ngOnInit() {
  this.form = this.formBuilder.group({
    email: ['', [Validators.required, Validators.pattern('[^ @]*@[^ @]*')]],
    password: ['', Validators.required]
  });
}
我们可以添加一个额外的测试来验证它是否按预期工作:
it('should validate email format correctly', () => {
  const email = component.form.controls.email;
  email.setValue('test@test.com');
  const errors = email.errors || {};

  expect(email.valid).toBeTruthy();
  expect(errors.required).toBeFalsy();
  expect(errors.pattern).toBeFalsy();
});
现在是时候在 HTML 中渲染错误了。为了熟悉操作,我们首先需要添加一个测试。
it('should render email validation message when formControl is submitted and invalid', () => {
  const elements: HTMLElement = fixture.nativeElement;
  expect(elements.querySelector('#email-error')).toBeFalsy();

  component.onSubmit();

  fixture.detectChanges();
  expect(elements.querySelector('#email-error')).toBeTruthy();
  expect(elements.querySelector('#email-error').textContent).toContain(
    'Please enter a valid email.'
  );
});
当然,因为我们没有定义onSubmit函数,所以它失败了。加上onSubmit() {}our login.component.ts,就完成了,我们漂亮的红色测试😃。
如何让这个测试通过?我们需要一个在测试中提到的“已提交”属性,用于在触发 onSubmit 后显示错误:
//login.component.ts

import { Component, OnInit } from '@angular/core';
import { FormGroup, FormBuilder, Validators } from '@angular/forms';

@Component({
  selector: 'app-login',
  templateUrl: './login.component.html'
})
export class LoginComponent implements OnInit {
  form: FormGroup;
  submitted = false;

  constructor(private formBuilder: FormBuilder) {}

  ngOnInit() {
    this.form = this.formBuilder.group({
      email: ['', [Validators.required, Validators.pattern('[^ @]*@[^ @]*')]],
      password: ['', Validators.required]
    });
  }

  onSubmit() {
    this.submitted = true;
  }
}
并在HTML中添加验证消息错误
<span *ngIf="submitted && form.controls.email.invalid" id="email-error">
  Please enter a valid email.
</span>
好的,现在我们的测试已经通过了,但是如果我们运行我们的应用程序,单击后我们将不会看到错误消息Sign in。
出了什么问题?是的,我们的测试onSubmit()直接调用了,而不是点击按钮。
在编写测试时,识别此类错误非常重要,以避免“误报”。测试通过并不一定意味着测试按预期运行。
component.onSubmit()因此,如果我们通过单击按钮来修复测试,我们应该再次得到一个失败的测试:
it('should render email validation message when formControl is submitted and invalid', () => {
  const elements: HTMLElement = fixture.nativeElement;
  expect(elements.querySelector('#email-error')).toBeFalsy();

  elements.querySelector('button').click();

  fixture.detectChanges();
  expect(elements.querySelector('#email-error')).toBeTruthy();
  expect(elements.querySelector('#email-error').textContent).toContain(
    'Please enter a valid email.'
  );
});
(ngSubmit)="onSubmit()"现在还缺少什么才能让这个测试通过呢?没错,我们应该在点击“登录”按钮时,通过添加到表单中的 onSubmit 函数来调用它。
<form [formGroup]="form" (ngSubmit)="onSubmit()">
  <input id="email" type="email" placeholder="Your email" />
  <span *ngIf="submitted && form.controls.email.invalid" id="email-error">
    Please enter a valid email.
  </span>
  <input id="password" type="password" placeholder="********" />
  <button type="submit">Sign in</button>
</form>
最后,让我们对密码输入做同样的事情。
it('should render password validation message when formControl is submitted and invalid', () => {
  const elements: HTMLElement = fixture.nativeElement;
  expect(elements.querySelector('#password-error')).toBeFalsy();

  elements.querySelector('button').click();

  fixture.detectChanges();
  expect(elements.querySelector('#password-error')).toBeTruthy();
  expect(elements.querySelector('#password-error').textContent).toContain(
    'Please enter a valid password.'
  );
});
在继续之前,请检查测试是否失败。
好的,现在我们需要 HTML 部分来使其显示绿色:
<span *ngIf="submitted && form.controls.password.invalid" id="password-error">
  Please enter a valid password.
</span>
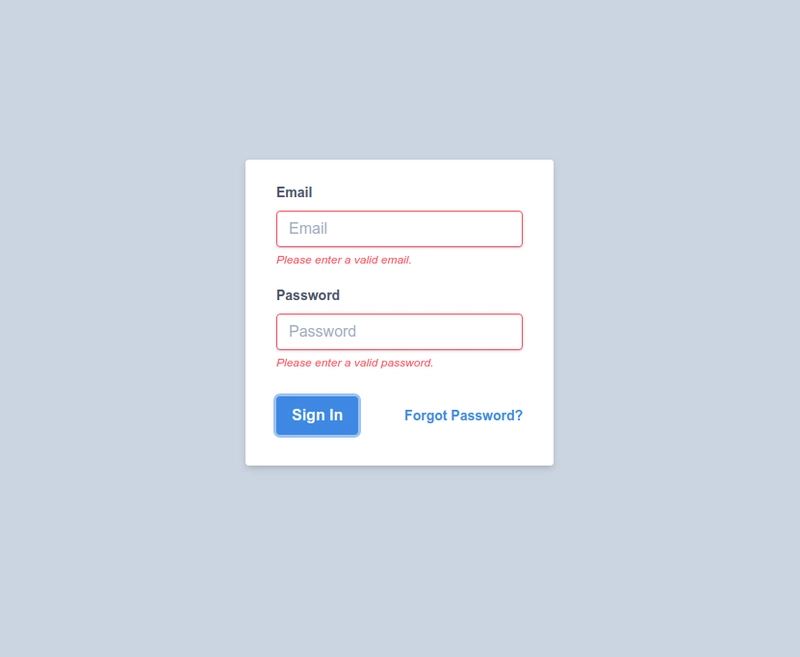
第五步:造型
现在是时候让我们的登录表单看起来更漂亮了!你可以使用普通的 CSS 或你喜欢的 CSS 框架。在本教程中,我们将使用TailwindCSS,你可以阅读这篇文章了解如何安装它:
对于表单的样式,我们可以按照官方文档进行操作:
登录表单
我们的最终结果:
下一篇文章将介绍身份验证服务以及如何使用我们刚刚构建的表单来调用它。
如果您有任何疑问,可以留言或通过Twitter联系我。我很乐意为您提供帮助!
鏂囩珷鏉ユ簮锛�https://dev.to/jpblancodb/angular-series-creating-a-login-with-tdd-3jkl 后端开发教程 - Java、Spring Boot 实战 - msg200.com


