在 Firebase 上部署 nuxt
更新:
介绍
我已经有一个使用 Nuxt 和 SSR 的网站,那么为什么我要将所有内容都转移到 Firebase?
SSR 代表服务器端渲染,您可以在这里找到更多信息了解服务器端渲染
原因太多了!
列举几个……
价格
目前的解决方案:我必须每月支付私人服务器的费用
Firebase:嗯,就我的需求而言,它是免费的。
配置
目前的解决方案:我必须自己配置一切。Docker 容器、https、Nginx 反向代理……
Firebase:您所需的一切都已准备就绪。日志记录、分析、https、自定义域名……
更新
当前解决方案:我的网站有变化吗?步骤如下
- 将更改推送到 git
- 挂接 docker hub 并构建容器(10-15 分钟)
- 连接服务器(1 分钟)
- 拉取最新的容器版本(1 分钟)
- 找到 docker-compose.yaml 所在的正确文件夹并更新它(2 分钟)
我知道我本可以让事情更加自动化一些,但是......
Firebase:步骤
- 在终端中输入firebase deploy (1-2 分钟)
- 完成...更改已生效
你上瘾了吗?显然你上瘾了。让我帮你把它运行起来。
设置 Firebase 项目
创建您的 Firebase 帐户
你想使用 Firebase 吗?嗯,你需要先创建你的账户。
完成了吗?我们现在可以创建一个新项目。
创建 Firebase 项目
让我们转到Firebase 控制台并单击添加项目。
设置您的项目名称。
点击“继续”。
暂时取消选中Google Analytics(谷歌分析),然后点击“添加 Firebase”。
等待项目初始化,然后点击继续。
安装 Firebase CLI
现在在 NPM 的帮助下,我们将在我们的计算机上安装 firebase 工具。
只需在您最喜欢的终端上输入此命令
npm i -g firebase-tools
之后,您应该可以使用此命令登录
firebase login
将会弹出一个浏览器窗口,允许您使用 Google 帐户登录。
好的,初始 Firebase 设置已完成...
在将 firebase 添加到我们的项目之前,我们需要更新我们的应用程序项目结构...
项目结构
我假设你已经有一个 nuxt 项目。
如果没有,请前往Nuxt 网站,使用 express 为服务器端创建一个新的应用程序。
我们的项目将分解为 3 个目录
- src:这是我们的开发文件所在的地方
- functions:这是我们的 SSR 函数所在的地方
- public:此目录将保存由 Firebase 托管提供的文件
我们不会关心函数和公共目录。它将自动生成。
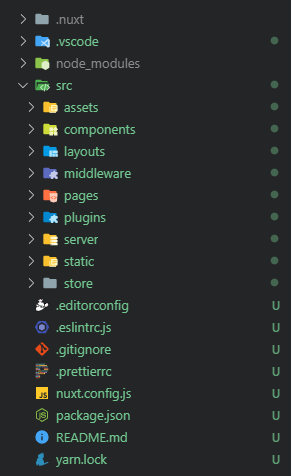
因此,创建src目录并将所有 nuxt目录移到其中。
仅保留目录,配置文件保留在根目录下。
你应该有类似下面的结构
应用程序现在坏了!让我们通过更新 nuxt 配置来修复它……
更新 Nuxt 配置
在 nuxt.config.js 中,在 module.exports 中添加以下几行
module.exports = {
[...]
  srcDir: 'src',
  buildDir: 'functions/.nuxt',
[...]
}
并在构建对象中将 extractCss 设置为 true
module.exports = {
[...]
  build: {
    extractCSS: true,
    [...]
  }
[...]
}
它仍然无法正常工作,因为 npm script 找不到我们的入口文件server/index.js
让我们更新我们的 package.json
用这些替换dev和start脚本。
我只是在路径前面加上了“src”
    "dev": "cross-env NODE_ENV=development nodemon src/server/index.js --watch server",
    "start": "cross-env NODE_ENV=production node src/server/index.js",
现在,您应该能够通过输入yarn dev或npm run dev来启动您的应用程序
请注意,函数目录已经创建,其中包含 nuxt 文件。
将 Firebase 添加到项目
与 Git 或 NPM 一样,Firebase CLI 有其init命令,可快速获取所需的一切。
启动命令
firebase init
CLI 会询问您一些问题,以下是答案:
? Are you ready to proceed?
> Yes

? Which Firebase CLI features do you want to set up for this folder? Press Space to select features, then Enter to confirm your choices.
> Functions: Configure and deploy Cloud Functions,
> Hosting: Configure and deploy Firebase Hosting sites

? Please select an option:
> Use an existing project
(Select the project we created earlier)

? What language would you like to use to write Cloud Functions? (Use arrow keys)
> JavaScript

? Do you want to use ESLint to catch probable bugs and enforce style? (y/N)
> y

? Do you want to install dependencies with npm now? (Y/n)
> Y

? What do you want to use as your public directory? (public)
> public

? Configure as a single-page app (rewrite all urls to /index.html)? (y/N)
> N
一个野生的公共目录出现了!我们的项目结构现已完成。
我们现在可以编辑我们的功能...
实现SSR功能
打开functions/index.js文件,删除所有内容并粘贴以下代码
const functions = require('firebase-functions')
const { Nuxt } = require('nuxt')
const express = require('express')

const app = express()

const config = {
  dev: false
}

const nuxt = new Nuxt(config)

let isReady = false
const readyPromise = nuxt
  .ready()
  .then(() => {
    isReady = true
  })
  .catch(() => {
    process.exit(1)
  })

async function handleRequest(req, res) {
  if (!isReady) {
    await readyPromise
  }
  res.set('Cache-Control', 'public, max-age=1, s-maxage=1')
  await nuxt.render(req, res)
}

app.get('*', handleRequest)
app.use(handleRequest)
exports.nuxtssr = functions.https.onRequest(app)
总而言之,在每个请求中,该函数将把响应和请求对象传递给nuxt.render(req, res)函数,该函数将处理应用程序渲染。
更新函数package.json
该函数需要与你的 nuxt 应用相同的库。将 package.json 依赖项复制到functions/package.json依赖项中。
在撰写本文时,firebase 支持 node 版本 10。在functions/package.json中,您可以将 node 引擎版本从 8 更新到 10。
以下是空白 nuxt 项目的functions/package.json示例
{
  "name": "functions",
  "description": "Cloud Functions for Firebase",
  "scripts": {
    "lint": "eslint .",
    "serve": "firebase serve --only functions",
    "shell": "firebase functions:shell",
    "start": "npm run shell",
    "deploy": "firebase deploy --only functions",
    "logs": "firebase functions:log"
  },
  "engines": {
    "node": "10"
  },
  "dependencies": {
    "firebase-admin": "^8.0.0",
    "firebase-functions": "^3.1.0",
    "cross-env": "^5.2.0",
    "nuxt": "^2.3.4",
    "express": "^4.16.4",
    "vuetify": "^1.3.14",
    "vuetify-loader": "^1.0.8",
    "@nuxtjs/pwa": "^2.6.0"
  },
  "devDependencies": {
    "eslint": "^5.12.0",
    "eslint-plugin-promise": "^4.0.1",
    "firebase-functions-test": "^0.1.6"
  },
  "private": true
}
更新firebase.json
用以下代码替换整个文件
{
  "hosting": {
    "public": "public",
    "ignore": ["firebase.json", "**/.*", "**/node_modules/**"],
    "rewrites": [
      {
        "source": "**",
        "function": "nuxtssr"
      }
    ]
  }
}
它会将所有请求重定向到我们创建的功能
使用高于 10 的节点版本可能会导致一些问题...
您可以使用nvm或直接在您的计算机上安装NodeJs 10 。
自动化一切
静态文件
我们之前了解到静态文件将由public目录保存。但是 nuxt 静态文件是什么?
将会有 nuxt 应用程序本身,即 nuxt build命令的结果。
静态文件(.jpg、.ico、.png、...)存储在src/static目录中
因此我们需要将它们都移动到公共目录中,让我们看看如何...
步步
以下是我们将要使用脚本实现的自动化操作
- 清理目录中已有的内容
- 构建 nuxt 应用
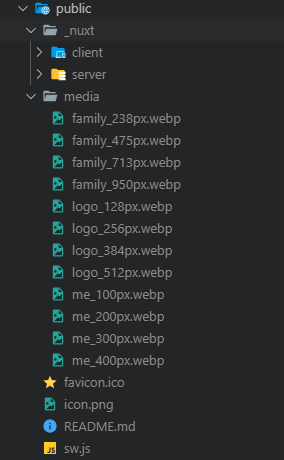
- 构建好的应用现在位于functions目录中。将functions/.nuxt/dist/目录的内容复制到public/_nuxt目录。
- 将静态文件从src/static/目录复制到公共目录的根目录
- 使用yarn安装函数依赖项
公共文件夹应该看起来像这样
这些脚本会帮我们完成所有这些工作。真是太好了。
把它们添加到主package.json文件中。
Windows 版本
scripts: {
    "build": "nuxt build",
    "build:firebase": "yarn clean && yarn build && yarn copy && cd \"functions\" && yarn",

    "clean": "yarn clean:public && yarn clean:functions && yarn clean:static",
    "clean:functions": "rimraf \"functions/node_modules\" && rimraf \"functions/.nuxt\"",
    "clean:public": "rimraf \"public/**/*.*!(md)\" && rimraf \"public/_nuxt\"",
    "clean:static": "rimraf \"src/static/sw.js\"",

    "copy": "yarn copy:nuxt && yarn copy:static",
    "copy:nuxt": "xcopy \"functions\\.nuxt\\dist\\*\" \"public\\_nuxt\\\" /E /Y",
    "copy:static": "xcopy \"src\\static\\*\" \"public\\\" /E /Y",

    "start:firebase": "firebase serve --only functions,hosting",

    "deploy": "firebase deploy --only functions,hosting"
}
MacOs 版本
感谢Michael Messerli提供的 MacOs 脚本版本
 "scripts": {
    // ...
    "build:firebase": "yarn clean && yarn build && yarn copy && cd functions && yarn",

    "clean": "yarn clean:public && yarn clean:functions && yarn clean:static",
    "clean:functions": "rimraf \"functions/node_modules\" && rimraf \"functions/.nuxt\"",
    "clean:public": "rimraf \"public/**/*.*!(md)\" && rimraf \"public/_nuxt\"",
    "clean:static": "rimraf \"src/static/sw.js\"",

    "copy": "yarn copy:nuxt && yarn copy:static",
    "copy:nuxt": "mkdir public/_nuxt && cp -r functions/.nuxt/dist/* public/_nuxt",
    "copy:static": "cp -r src/static/* public",

    "start:firebase": "firebase serve --only functions,hosting",

    "deploy": "firebase deploy --only functions,hosting",

    // ...
  }
仍有问题?James Block 的评论或许能帮到你https://dev.to/meanjames/comment/leln
盛大结局
您现在可以启动以下命令来启动您的应用程序:
yarn build:firebase
yarn start:firebase
并部署:
yarn build:firebase
yarn deploy
不过,对于开发来说,你仍然可以使用
yarn dev
结论
现在您在 firebase 上获得了一个服务器渲染的 nuxt 应用程序...很简单吧?
在本文中,我使用一个空白的 Nuxt 应用做了一个示例。最终的项目示例代码如下:nuxt-on-firebase。
你发现错误了吗?真丢脸!你可以在这里提交一个nuxt-on-firebase 仓库的拉取请求来修正它。
鏂囩珷鏉ユ簮锛�https://dev.to/kiritchoukc/deploy-nuxt-on-firebase-4ad8 后端开发教程 - Java、Spring Boot 实战 - msg200.com

