如何使用 React 和 Tailwind 创建通知/Toast
让我们开始编码
概述
通知是与用户更有效地沟通的最重要组件之一。显然,通知有多种类型,有些是提醒,有些是用于传达特定操作。它们的结构差异很大,例如,提醒、消息框和信息栏通常将信息包含在一行中,有时带有图标,有时不带有图标。
但所有类型都有一些共同的方面,例如:
- 定位——可以放置在屏幕上的不同位置;
- 动画——考虑到它们的放置位置,它们最终都遵循完全相同的模式;
- 动作- 它们都只有一个动作,无论是关闭、解除还是取消。
我们需要记住的一点是,通知通常显示在平台所有内容的上方,以便用户轻松注意到。但是,它们不能遮挡其他操作元素,例如按钮。
今天的例子
在今天的示例中,我们将使用我最喜欢的两个库来创建一个简单的通知。对于组件样式,我们将使用 Tailwind;为了帮助我们创建通知,我们将使用React Hot Toast库。
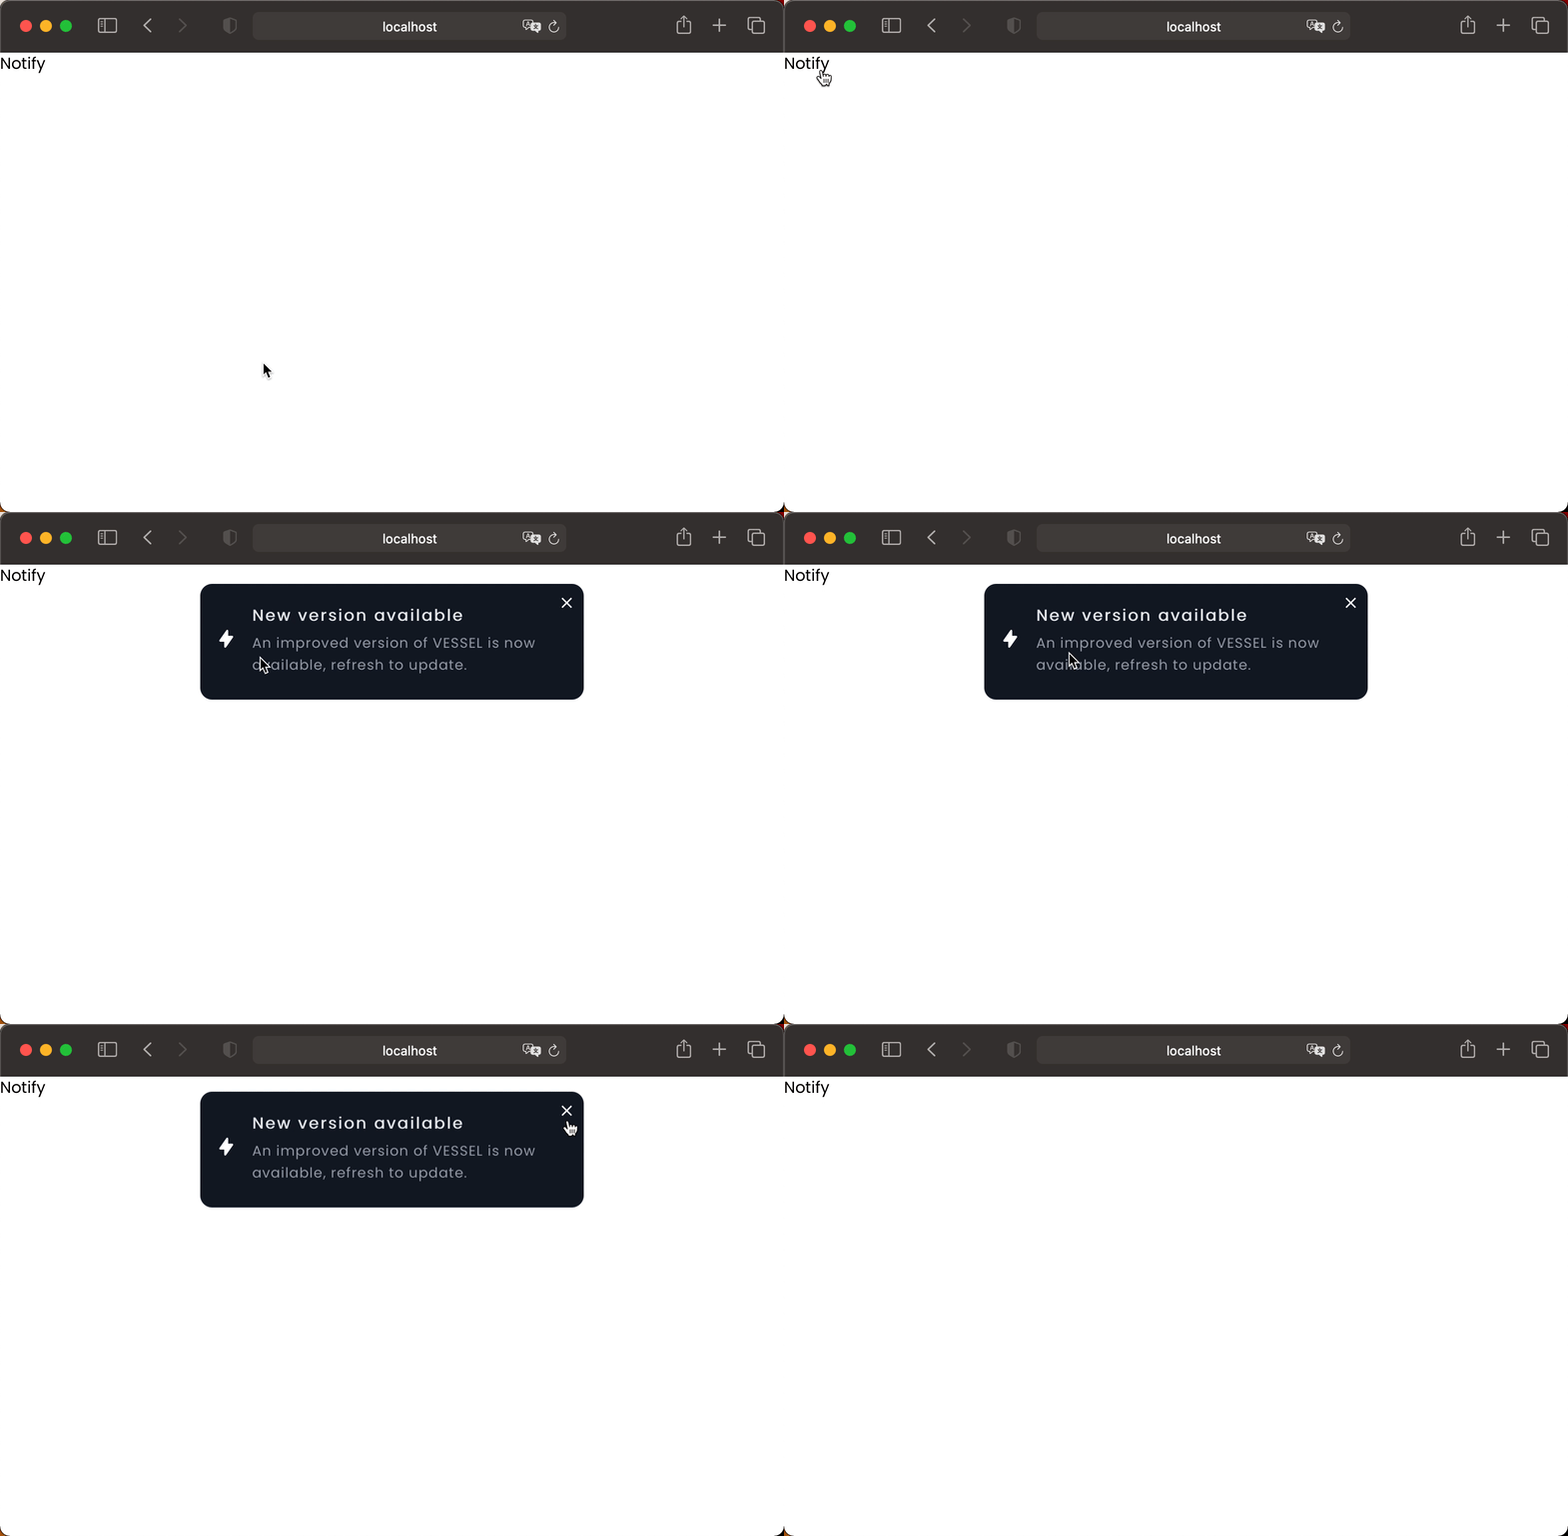
我们的组件将由四个元素组成:图标、标题、文本和操作(关闭)。虽然所有样式和动画都将由 Tailwind 完成,但创建通知的所有复杂工作将完全由 React Hot Toast 完成。
通过本文中的代码,我希望您能够创建几个不同的通知/toast,但您将获得与此类似的结果:
让我们开始编码
首先让我们安装以下依赖项:
npm install classnames react-icons react-hot-toast
现在App.jsx我们将导入我们的依赖项:
// @src/App.jsx

import React from "react";
import classNames from "classnames";
import toast, { Toaster } from "react-hot-toast";
import { MdOutlineClose } from "react-icons/md";
import { HiLightningBolt } from "react-icons/hi";

// ...
然后让我们创建将在我们的中使用的样式App.jsx:
/* @src/App.module.css */

.notificationWrapper {
  @apply flex flex-row items-center justify-between w-96 bg-gray-900 px-4 py-6 text-white shadow-2xl hover:shadow-none transform-gpu translate-y-0 hover:translate-y-1 rounded-xl relative transition-all duration-500 ease-in-out;
}

.iconWrapper {
  @apply text-xl;
}

.contentWrapper {
  @apply flex flex-col items-start justify-center ml-4 cursor-default;
}

.contentWrapper h1 {
  @apply text-base text-gray-200 font-semibold leading-none tracking-wider;
}

.contentWrapper p {
  @apply text-sm text-gray-400 mt-2 leading-relaxed tracking-wider;
}

.closeIcon {
  @apply absolute top-2 right-2 cursor-pointer text-lg;
}
现在我们可以继续我们的工作了App.jsx。首先,我们将导入刚刚创建的样式,然后开始处理通知组件。
// @src/App.jsx

import React from "react";
import classNames from "classnames";
import toast, { Toaster } from "react-hot-toast";
import { MdOutlineClose } from "react-icons/md";
import { HiLightningBolt } from "react-icons/hi";

import styles from "./App.module.css";

const notify = () =>
  toast.custom(
    (t) => (
      <div
        className={classNames([
          styles.notificationWrapper,
          t.visible ? "top-0" : "-top-96",
        ])}
      >
        <div className={styles.iconWrapper}>
          <HiLightningBolt />
        </div>
        <div className={styles.contentWrapper}>
          <h1>New version available</h1>
          <p>
            An improved version of VESSEL is now available, refresh to update.
          </p>
        </div>
        <div className={styles.closeIcon} onClick={() => toast.dismiss(t.id)}>
          <MdOutlineClose />
        </div>
      </div>
    ),
    { id: "unique-notification", position: "top-center" }
  );

// ...
剩下的就是创建我们的 App 组件,它将只包含一个按钮来显示通知和 Toaster 组件(负责呈现所有 toast)。
// @src/App.jsx

import React from "react";
import classNames from "classnames";
import toast, { Toaster } from "react-hot-toast";
import { MdOutlineClose } from "react-icons/md";
import { HiLightningBolt } from "react-icons/hi";

import styles from "./App.module.css";

const notify = () =>
  toast.custom(
    (t) => (
      <div
        className={classNames([
          styles.notificationWrapper,
          t.visible ? "top-0" : "-top-96",
        ])}
      >
        <div className={styles.iconWrapper}>
          <HiLightningBolt />
        </div>
        <div className={styles.contentWrapper}>
          <h1>New version available</h1>
          <p>
            An improved version of VESSEL is now available, refresh to update.
          </p>
        </div>
        <div className={styles.closeIcon} onClick={() => toast.dismiss(t.id)}>
          <MdOutlineClose />
        </div>
      </div>
    ),
    { id: "unique-notification", position: "top-center" }
  );

const App = () => {
  return (
    <div>
      <button onClick={notify}>Notify</button>
      <Toaster />
    </div>
  );
};

export default App;
你可能已经注意到,在我们的通知组件中,我们分配了一个 id,以便礼物中只显示一个 toast。如果你删除它,你会注意到行为会发生变化。开始在 dom 中渲染多个通知。
结论
一如既往,希望你觉得这篇文章有趣。如果你发现本文有任何错误,请在评论区指出。🧑🏻💻
祝你度过美好的一天!😈
文章来源:https://dev.to/franciscomendes10866/how-to-create-a-notificationtoast-using-react-and-tailwind-545o 后端开发教程 - Java、Spring Boot 实战 - msg200.com
