🚀 使用 Node.js React.js 构建和生成发票 PDF
基于 Node.js React.js 的开源 ERP CRM
基于 Node.js React.js 的开源 ERP CRM
使用 React.js、Redux 和 Node.js 构建并生成发票 PDF 系统可能是一项复杂的任务,但我会指导您完成整个过程。以下是有关如何创建此类系统的分步教程:
Github 仓库:https://github.com/idurar/idurar-erp-crm
步骤 1:设置环境
- 确保您的机器上安装了 Node.js。
- 为您的项目创建一个新目录并使用终端导航到该目录。
- 通过运行来初始化一个新的 Node.js 项目
npm init。 - 通过运行安装所需的依赖项
npm install react redux react-redux。
第 2 步:设置服务器(Node.js/Express)
- 创建一个名为的新文件
server.js并设置一个基本的 Express 服务器。 - 在服务器文件中导入必要的依赖项(
express, )。html-pdf - 定义生成和下载发票的路线。
const express = require('express');

const helmet = require('helmet');
const path = require('path');
const cors = require('cors');

const cookieParser = require('cookie-parser');
require('dotenv').config({ path: '.variables.env' });

const helpers = require('./helpers');

const erpApiRouter = require('./routes/erpRoutes/erpApi');
const erpAuthRouter = require('./routes/erpRoutes/erpAuth');
const erpDownloadRouter = require('./routes/erpRoutes/erpDownloadRouter');

const errorHandlers = require('./handlers/errorHandlers');

const { isValidAdminToken } = require('./controllers/erpControllers/authJwtController');

// create our Express app
const app = express();
// serves up static files from the public folder. Anything in public/ will just be served up as the file it is

// Takes the raw requests and turns them into usable properties on req.body

app.use(helmet());
app.use(cookieParser());
app.use(express.json());
app.use(express.urlencoded({ extended: true }));
app.use(express.static(path.join(__dirname, 'public')));


// pass variables to our templates + all requests

app.use((req, res, next) => {
  res.locals.h = helpers;
  res.locals.admin = req.admin || null;
  res.locals.currentPath = req.path;
  const clientIP = req.socket.remoteAddress;
  let isLocalhost = false;
  if (clientIP === '127.0.0.1' || clientIP === '::1') {
    // Connection is from localhost
    isLocalhost = true;
  }
  res.locals.isLocalhost = isLocalhost;
  next();
});

// app.use(function (req, res, next) {
//   if (req.url.slice(-1) === "/" && req.path.length > 1) {
//     // req.path = req.path.slice(0, -1);
//     req.url = req.url.slice(0, -1);
//   }
//   next();
// });

// Here our API Routes

var corsOptionsDelegate = function (req, callback) {
  var corsOptions;
  const clientIP = req.socket.remoteAddress;
  let isLocalhost = false;
  if (clientIP === '127.0.0.1' || clientIP === '::1') {
    // Connection is from localhost
    isLocalhost = true;
  }
  if (isLocalhost) {
    corsOptions = {
      origin: '*',
      credentials: true,
    };
  } else {
    corsOptions = {
      origin: true,
      credentials: true,
    };
  }
  callback(null, corsOptions); // callback expects two parameters: error and options
};

app.use(
  '/api',
  cors({
    origin: true,
    credentials: true,
  }),
  erpAuthRouter
);

app.use(
  '/api',
  cors({
    origin: true,
    credentials: true,
  }),
  isValidAdminToken,
  erpApiRouter
);

app.use('/download', cors(), erpDownloadRouter);

// If that above routes didnt work, we 404 them and forward to error handler
app.use(errorHandlers.notFound);

// Otherwise this was a really bad error we didn't expect! Shoot eh
if (app.get('env') === 'development') {
  /* Development Error Handler - Prints stack trace */
  app.use(errorHandlers.developmentErrors);
}

// production error handler
app.use(errorHandlers.productionErrors);

// done! we export it so we can start the site in start.js
module.exports = app;
步骤3:构建React.js应用程序
- 在项目的根目录中,创建一个名为 的新文件夹
client。 - 导航到
client文件夹并运行npx create-react-app .以生成新的 React.js 应用程序。 - 将生成的文件夹的内容替换
src为您自己的代码。 - 为发票表单、发票列表和发票详细信息视图创建组件。
- 使用 Redux 管理应用程序的状态,包括发票数据。
import React from 'react';
import dayjs from 'dayjs';
import { Tag } from 'antd';
import InvoiceModule from '@/modules/InvoiceModule';
import { useMoney } from '@/settings';

export default function Invoice() {
  const { moneyRowFormatter } = useMoney();

  const entity = 'invoice';
  const searchConfig = {
    displayLabels: ['name', 'surname'],
    searchFields: 'name,surname,birthday',
  };
  const entityDisplayLabels = ['number', 'client.company'];
  const dataTableColumns = [
    {
      title: '#N',
      dataIndex: 'number',
    },
    {
      title: 'Client',
      dataIndex: ['client', 'company'],
    },
    {
      title: 'Date',
      dataIndex: 'date',
      render: (date) => {
        return dayjs(date).format('DD/MM/YYYY');
      },
    },
    {
      title: 'Due date',
      dataIndex: 'expiredDate',
      render: (date) => {
        return dayjs(date).format('DD/MM/YYYY');
      },
    },
    {
      title: 'Total',
      dataIndex: 'total',
      render: (amount) => moneyRowFormatter({ amount }),
    },
    {
      title: 'Balance',
      dataIndex: 'credit',
      render: (amount) => moneyRowFormatter({ amount }),
    },
    {
      title: 'status',
      dataIndex: 'status',
      render: (status) => {
        let color = status === 'draft' ? 'cyan' : status === 'sent' ? 'magenta' : 'gold';

        return <Tag color={color}>{status && status.toUpperCase()}</Tag>;
      },
    },
    {
      title: 'Payment',
      dataIndex: 'paymentStatus',
      render: (paymentStatus) => {
        let color =
          paymentStatus === 'unpaid'
            ? 'volcano'
            : paymentStatus === 'paid'
            ? 'green'
            : paymentStatus === 'overdue'
            ? 'red'
            : 'purple';

        return <Tag color={color}>{paymentStatus && paymentStatus.toUpperCase()}</Tag>;
      },
    },
  ];

  const PANEL_TITLE = 'invoice';
  const dataTableTitle = 'invoices Lists';
  const ADD_NEW_ENTITY = 'Add new invoice';
  const DATATABLE_TITLE = 'invoices List';
  const ENTITY_NAME = 'invoice';
  const CREATE_ENTITY = 'Save invoice';
  const UPDATE_ENTITY = 'Update invoice';

  const config = {
    entity,
    PANEL_TITLE,
    dataTableTitle,
    ENTITY_NAME,
    CREATE_ENTITY,
    ADD_NEW_ENTITY,
    UPDATE_ENTITY,
    DATATABLE_TITLE,
    dataTableColumns,
    searchConfig,
    entityDisplayLabels,
  };
  return <InvoiceModule config={config} />;
}
步骤 4:将 React.js 与 Node.js 集成
axios在您的 React.js 应用程序中,使用或 等库向步骤 2 中创建的服务器端点发出 HTTP 请求fetch。- 提交发票表单时,将表单数据发送到服务器,并在服务器端处理PDF发票的创建。
- 从服务器检索生成的 PDF 并显示链接或按钮让用户下载。
import React, { useState, useEffect } from 'react';
import { Form, Divider } from 'antd';

import { Button, PageHeader, Row, Statistic, Tag } from 'antd';

import { useSelector, useDispatch } from 'react-redux';
import { erp } from '@/redux/erp/actions';
import { selectCreatedItem } from '@/redux/erp/selectors';

import { useErpContext } from '@/context/erp';
import uniqueId from '@/utils/uinqueId';

import Loading from '@/components/Loading';
import { CloseCircleOutlined, PlusOutlined } from '@ant-design/icons';

function SaveForm({ form, config }) {
  let { CREATE_ENTITY } = config;
  const handelClick = () => {
    form.submit();
  };

  return (
    <Button onClick={handelClick} type="primary" icon={<PlusOutlined />}>
      {CREATE_ENTITY}
    </Button>
  );
}

export default function CreateItem({ config, CreateForm }) {
  let { entity, CREATE_ENTITY } = config;
  const { erpContextAction } = useErpContext();
  const { createPanel } = erpContextAction;
  const dispatch = useDispatch();
  const { isLoading, isSuccess } = useSelector(selectCreatedItem);
  const [form] = Form.useForm();
  const [subTotal, setSubTotal] = useState(0);
  const handelValuesChange = (changedValues, values) => {
    const items = values['items'];
    let subTotal = 0;

    if (items) {
      items.map((item) => {
        if (item) {
          if (item.quantity && item.price) {
            let total = item['quantity'] * item['price'];
            //sub total
            subTotal += total;
          }
        }
      });
      setSubTotal(subTotal);
    }
  };

  useEffect(() => {
    if (isSuccess) {
      form.resetFields();
      dispatch(erp.resetAction({ actionType: 'create' }));
      setSubTotal(0);
      createPanel.close();
      dispatch(erp.list({ entity }));
    }
  }, [isSuccess]);

  const onSubmit = (fieldsValue) => {
    if (fieldsValue) {
      // if (fieldsValue.expiredDate) {
      //   const newDate = fieldsValue["expiredDate"].format("DD/MM/YYYY");
      //   fieldsValue = {
      //     ...fieldsValue,
      //     expiredDate: newDate,
      //   };
      // }
      // if (fieldsValue.date) {
      //   const newDate = fieldsValue["date"].format("DD/MM/YYYY");
      //   fieldsValue = {
      //     ...fieldsValue,
      //     date: newDate,
      //   };
      // }
      if (fieldsValue.items) {
        let newList = [...fieldsValue.items];
        newList.map((item) => {
          item.total = item.quantity * item.price;
        });
        fieldsValue = {
          ...fieldsValue,
          items: newList,
        };
      }
    }
    dispatch(erp.create({ entity, jsonData: fieldsValue }));
  };

  return (
    <>
      <PageHeader
        onBack={() => createPanel.close()}
        title={CREATE_ENTITY}
        ghost={false}
        tags={<Tag color="volcano">Draft</Tag>}
        // subTitle="This is create page"
        extra={[
          <Button
            key={`${uniqueId()}`}
            onClick={() => createPanel.close()}
            icon={<CloseCircleOutlined />}
          >
            Cancel
          </Button>,
          <SaveForm form={form} config={config} key={`${uniqueId()}`} />,
        ]}
        style={{
          padding: '20px 0px',
        }}
      ></PageHeader>
      <Divider dashed />
      <Loading isLoading={isLoading}>
        <Form form={form} layout="vertical" onFinish={onSubmit} onValuesChange={handelValuesChange}>
          <CreateForm subTotal={subTotal} />
        </Form>
      </Loading>
    </>
  );
}
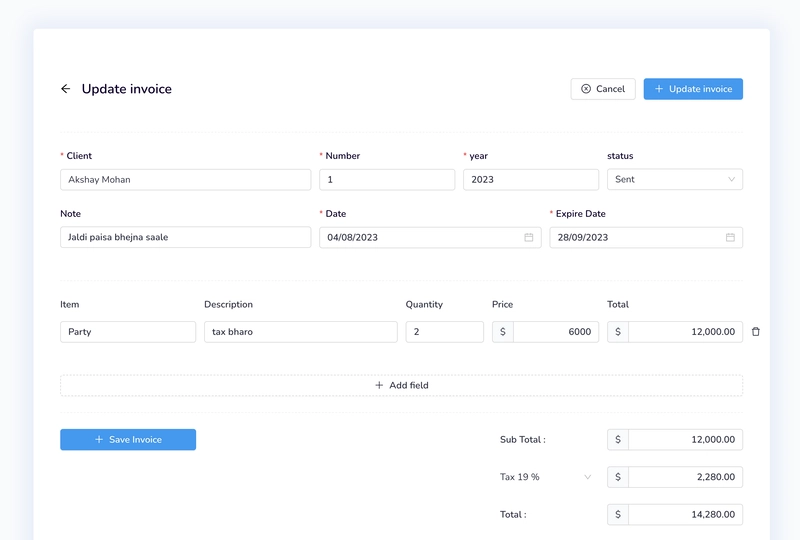
步骤 5:设计并增强用户界面
- 利用 CSS 和您选择的任何 CSS 框架(例如,Ant Design)来设计您的应用程序。
- 通过分页、排序、搜索和过滤发票等功能增强用户界面。
import React, { useState, useEffect, useRef } from 'react';
import dayjs from 'dayjs';
import { Form, Input, InputNumber, Button, Select, Divider, Row, Col } from 'antd';

import { PlusOutlined } from '@ant-design/icons';

import { DatePicker } from '@/components/CustomAntd';

import AutoCompleteAsync from '@/components/AutoCompleteAsync';
import ItemRow from '@/components/ErpPanel/ItemRow';

import MoneyInputFormItem from '@/components/MoneyInputFormItem';

export default function InvoiceForm({ subTotal = 0, current = null }) {
  const [total, setTotal] = useState(0);
  const [taxRate, setTaxRate] = useState(0);
  const [taxTotal, setTaxTotal] = useState(0);
  const [currentYear, setCurrentYear] = useState(() => new Date().getFullYear());
  const handelTaxChange = (value) => {
    setTaxRate(value);
  };

  useEffect(() => {
    if (current) {
      const { taxRate = 0, year } = current;
      setTaxRate(taxRate);
      setCurrentYear(year);
    }
  }, [current]);
  useEffect(() => {
    const currentTotal = subTotal * taxRate + subTotal;
    setTaxTotal((subTotal * taxRate).toFixed(2));
    setTotal(currentTotal.toFixed(2));
  }, [subTotal, taxRate]);

  const addField = useRef(false);

  useEffect(() => {
    addField.current.click();
  }, []);

  return (
    <>
      <Row gutter={[12, 0]}>
        <Col className="gutter-row" span={9}>
          <Form.Item
            name="client"
            label="Client"
            rules={[
              {
                required: true,
                message: 'Please input your client!',
              },
            ]}
          >
            <AutoCompleteAsync
              entity={'client'}
              displayLabels={['company']}
              searchFields={'company,managerSurname,managerName'}
              // onUpdateValue={autoCompleteUpdate}
            />
          </Form.Item>
        </Col>
        <Col className="gutter-row" span={5}>
          <Form.Item
            label="Number"
            name="number"
            initialValue={1}
            rules={[
              {
                required: true,
                message: 'Please input invoice number!',
              },
            ]}
          >
            <InputNumber style={{ width: '100%' }} />
          </Form.Item>
        </Col>
        <Col className="gutter-row" span={5}>
          <Form.Item
            label="year"
            name="year"
            initialValue={currentYear}
            rules={[
              {
                required: true,
                message: 'Please input invoice year!',
              },
            ]}
          >
            <InputNumber style={{ width: '100%' }} />
          </Form.Item>
        </Col>
        <Col className="gutter-row" span={5}>
          <Form.Item
            label="status"
            name="status"
            rules={[
              {
                required: false,
                message: 'Please input invoice status!',
              },
            ]}
            initialValue={'draft'}
          >
            <Select
              options={[
                { value: 'draft', label: 'Draft' },
                { value: 'pending', label: 'Pending' },
                { value: 'sent', label: 'Sent' },
              ]}
            ></Select>
          </Form.Item>
        </Col>
        <Col className="gutter-row" span={9}>
          <Form.Item label="Note" name="note">
            <Input />
          </Form.Item>
        </Col>
        <Col className="gutter-row" span={8}>
          <Form.Item
            name="date"
            label="Date"
            rules={[
              {
                required: true,
                type: 'object',
              },
            ]}
            initialValue={dayjs()}
          >
            <DatePicker style={{ width: '100%' }} format={'DD/MM/YYYY'} />
          </Form.Item>
        </Col>
        <Col className="gutter-row" span={7}>
          <Form.Item
            name="expiredDate"
            label="Expire Date"
            rules={[
              {
                required: true,
                type: 'object',
              },
            ]}
            initialValue={dayjs().add(30, 'days')}
          >
            <DatePicker style={{ width: '100%' }} format={'DD/MM/YYYY'} />
          </Form.Item>
        </Col>
      </Row>
      <Divider dashed />
      <Row gutter={[12, 12]} style={{ position: 'relative' }}>
        <Col className="gutter-row" span={5}>
          <p>Item</p>
        </Col>
        <Col className="gutter-row" span={7}>
          <p>Description</p>
        </Col>
        <Col className="gutter-row" span={3}>
          <p>Quantity</p>
        </Col>
        <Col className="gutter-row" span={4}>
          <p>Price</p>
        </Col>
        <Col className="gutter-row" span={5}>
          <p>Total</p>
        </Col>
      </Row>
      <Form.List name="items">
        {(fields, { add, remove }) => (
          <>
            {fields.map((field) => (
              <ItemRow key={field.key} remove={remove} field={field} current={current}></ItemRow>
            ))}
            <Form.Item>
              <Button
                type="dashed"
                onClick={() => add()}
                block
                icon={<PlusOutlined />}
                ref={addField}
              >
                Add field
              </Button>
            </Form.Item>
          </>
        )}
      </Form.List>
      <Divider dashed />
      <div style={{ position: 'relative', width: ' 100%', float: 'right' }}>
        <Row gutter={[12, -5]}>
          <Col className="gutter-row" span={5}>
            <Form.Item>
              <Button type="primary" htmlType="submit" icon={<PlusOutlined />} block>
                Save Invoice
              </Button>
            </Form.Item>
          </Col>
          <Col className="gutter-row" span={4} offset={10}>
            <p
              style={{
                paddingLeft: '12px',
                paddingTop: '5px',
              }}
            >
              Sub Total :
            </p>
          </Col>
          <Col className="gutter-row" span={5}>
            <MoneyInputFormItem readOnly value={subTotal} />
          </Col>
        </Row>
        <Row gutter={[12, -5]}>
          <Col className="gutter-row" span={4} offset={15}>
            <Form.Item
              name="taxRate"
              rules={[
                {
                  required: false,
                  message: 'Please input your taxRate!',
                },
              ]}
              initialValue="0"
            >
              <Select
                value={taxRate}
                onChange={handelTaxChange}
                bordered={false}
                options={[
                  { value: 0, label: 'Tax 0 %' },
                  { value: 0.19, label: 'Tax 19 %' },
                ]}
              ></Select>
            </Form.Item>
          </Col>
          <Col className="gutter-row" span={5}>
            <MoneyInputFormItem readOnly value={taxTotal} />
          </Col>
        </Row>
        <Row gutter={[12, -5]}>
          <Col className="gutter-row" span={4} offset={15}>
            <p
              style={{
                paddingLeft: '12px',
                paddingTop: '5px',
              }}
            >
              Total :
            </p>
          </Col>
          <Col className="gutter-row" span={5}>
            <MoneyInputFormItem readOnly value={total} />
          </Col>
        </Row>
      </div>
    </>
  );
}
步骤6:测试和调试
- 使用 React DevTools 和 Redux DevTools 等工具来调试您的应用程序。
- 使用 Jest 或 Enzyme 等库编写单元测试以确保代码库的稳定性。
步骤 7:部署
- 将您的 Node.js 服务器和 React.js 应用程序部署到 Heroku、AWS 或 Netlify 等托管平台。
- 配置必要的环境变量并确保生产环境中的一切均按预期运行。
Github 仓库:https://github.com/idurar/idurar-erp-crm

本教程概述了如何使用 React.js、Redux 和 Node.js 构建并生成发票 PDF 系统。祝你的项目顺利!
文章来源:https://dev.to/idurar/building-an-invoice-pdf-system-with-reactjs-redux-and-nodejs-5g1a