如何利用无限滚动功能从页面抓取数据
您是否遇到过需要“点击按钮”之类的操作才能显示更多内容的网页?这类网页被称为“动态网页”,因为它们会根据用户交互加载更多内容。相比之下,静态网页会一次性显示所有内容,无需用户操作。
从动态页面抓取内容可能非常困难,因为它需要模拟用户交互,例如点击按钮来访问更多隐藏内容。在本教程中,您将学习如何通过“加载更多”按钮从具有无限滚动功能的网页中抓取数据。
先决条件
要学习本教程,您需要:
- Node.js:安装标记为“LTS”(长期支持)的版本,该版本比最新版本更稳定。
- Npm:这是一个用于安装软件包的包管理器。好消息是,“npm”会自动随 Node.js 安装,这让安装速度更快。
- Cheerio:用于解析 HTML
- Puppeteer:您将使用它来控制无头浏览器。
- 用于构建 Scraper 的 IDE:您可以获取任何代码编辑器,例如Visual Studio Code。
此外,你需要对 HTML、CSS 和 JavaScript 有基本的了解。你还需要一个像Chrome这样的网络浏览器。
初始化项目
创建一个新文件夹,然后在代码编辑器中打开它。在代码编辑器中找到“终端”选项卡,然后打开一个新的终端。以下是使用 Visual Studio Code 查找终端的方法。
接下来,在终端中运行以下命令来安装此构建所需的包。
$ npm install cheerio puppeteer
在代码编辑器的项目文件夹内创建一个新文件并将其命名为dynamicScraper.js。
干得好,伙计!
访问页面内容
Puppeteer是一个功能强大的 Node.js 库,可让您控制无头 Chrome 浏览器,使其成为与网页交互的理想选择。借助 Puppeteer,您可以使用 URL 定位到某个网页,访问其内容,并轻松从该网页中提取数据。
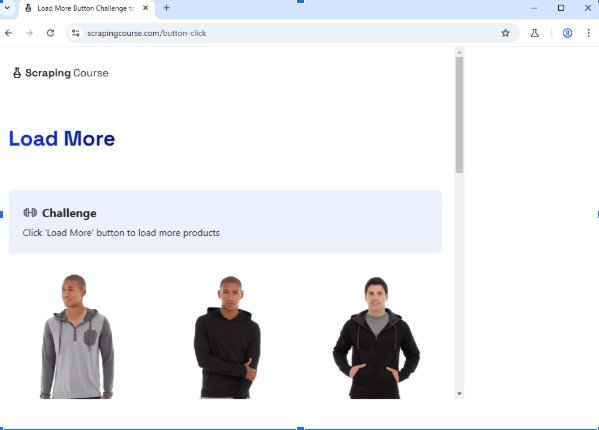
在本节中,您将学习如何使用无头浏览器打开页面、访问内容以及检索该页面的 HTML 内容。您可以在此处找到本教程的目标网站。
注意:您必须在里面编写所有代码dynamicScraper.js。
首先使用 require() Node.js 内置函数导入 Puppeteer,它可以帮助您加载模块:核心模块、第三方库(如 Puppeteer)或自定义模块(如本地 JS 文件)。
const puppeteer = require('puppeteer');
接下来,定义一个变量来存储目标 URL。这不是强制性的,但它可以使你的代码更简洁,因为你只需在代码中的任何位置引用这个全局变量即可。
const url = 'https://www.scrapingcourse.com/button-click';
下一步是创建启动无头浏览器并检索目标页面 HTML 内容的函数。您应该选择立即调用函数表达式(IIFE) 方法来加快执行速度。
使用 try-and-catch 块定义异步IIFE:
(async () => {
    try {
        // Code goes here
    } catch (error) {
        console.error('Error:', error.message);
    }
})();
注意:您应该在 try 块内编写本教程部分的其他所有代码。
在 IIFE 内部,创建 Puppeteer 的新实例并打开一个新页面进行交互。
使用 launch 方法启动 Puppeteer 库的新实例,并将无头模式传递给它。无头模式可以设置为 true 或 false。将无头模式设置为 true 会使 Puppeteer 启动时无头浏览器不可见,而将其设置为 false 则使浏览器可见。
启动 Puppeteer 后,您还需要调用 newPage 方法,这会触发在无头浏览器中打开新选项卡。
// Launch Puppeteer
const browser = await puppeteer.launch({ headless: false }); // Headless mode
const page = await browser.newPage(); // Open a new page
现在,查询 newPage 方法以定位到预期的 URL,并使用该page.goto方法在新标签页中打开该网站。除此之外,您还需要确保 Puppeteer 仅在页面加载完所有必要资源(例如图片和 JS)后,才认为该页面已准备好进行交互和数据提取。
为了确保页面准备就绪,Puppeteer 提供了一个名为的选项waitUntil,该选项可以采用各种值来定义加载页面的不同条件:
-
load:等待 load 事件触发,该事件发生在 HTML 文档及其资源(例如,图片、CSS、JS)加载完成后。然而,这可能无法计算在事件之后加载的其他 JavaScript 渲染内容
load。 -
domcontentloaded:等待事件
DOMContentLoaded,该事件在初始 HTML 解析完成后触发。但这会在外部资源(例如图片或其他 JS)加载之前加载。 -
networkidle2:等待 500 毫秒,直到活动网络请求(正在进行的 HTTP 请求,例如加载图片、脚本或其他资源)不超过两个。当处理那些持续发出小规模请求但不影响主要内容的页面时,此值是首选。
// Navigate to the target URL
await page.goto(url, {
    waitUntil: 'networkidle2', // Ensure the page is fully loaded
});
最后,您只需使用 检索当前页面的所有 HTML 内容即可page.content()。最重要的是,您应该关闭浏览器实例,以避免不必要的内存占用,从而降低系统速度。browser.close()在脚本末尾使用 来关闭浏览器。
// Get the full HTML content of the page
const html = await page.content();

// Log the entire HTML content
console.log(html);

// Close the browser
await browser.close();
使用您现有的代码,浏览器加载和关闭速度会非常快,您甚至可能无法正常浏览页面。在这种情况下,您可以使用 该page.waitForTimeout方法将浏览器延迟几秒钟。该方法应该放在 该方法之前browser.close。
// Delay for 10 seconds to allow you to see the browser
await page.waitForTimeout(10000);
以下是本节的完整代码:
const puppeteer = require('puppeteer');

const url = 'https://www.scrapingcourse.com/button-click';

(async () => {
    try {
        // Launch Puppeteer
        const browser = await puppeteer.launch({ headless: false }); // Headless mode
        const page = await browser.newPage(); // Open a new page

        // Navigate to the target URL
        await page.goto(url, {
            waitUntil: 'networkidle2', // Ensure the page is fully loaded
        });

        // Get the entire HTML content of the page
        const html = await page.content();

        // Log the entire HTML content
        console.log(html);

        // Delay for 10 seconds to allow you to see the browser
        await page.waitForTimeout(10000);

        // Close the browser
        await browser.close();
    } catch (error) {
        console.error('Error fetching the page:', error.message);
    }
})();
保存文件并使用以下命令在终端内运行脚本:
$ node dynamicScraper.js
该脚本将打开一个无头浏览器,如下所示:
浏览器加载,Puppeteer 获取其整个 HTML 内容,然后控制台将内容记录到终端。
这是您在终端中应该得到的输出:
<!DOCTYPE html>
<html lang="en">
<head>
    <title>Load More Button Challenge - ScrapingCourse.com</title>
</head>
<body>
    <header>
        <!-- Navigation Bar -->
        <nav>
            <a href="/">
                <img src="logo.svg" alt="Logo">
                <span>Scraping Course</span>
            </a>
        </nav>
    </header>

    <main>
        <!-- Product Grid -->
        <div id="product-grid">
            <div class="product-item">
                <a href="/ecommerce/product/chaz-kangeroo-hoodie">
                    <img src="mh01-gray_main.jpg" alt="Chaz Kangeroo Hoodie">
                    <span class="product-name">Chaz Kangeroo Hoodie</span>
                    <span class="product-price">$52</span>
                </a>
            </div>
            <div class="product-item">
                <a href="/ecommerce/product/teton-pullover-hoodie">
                    <img src="mh02-black_main.jpg" alt="Teton Pullover Hoodie">
                    <span class="product-name">Teton Pullover Hoodie</span>
                    <span class="product-price">$70</span>
                </a>
            </div>
            <!-- Additional products (3-12) follow the same structure -->
        </div>

        <!-- Load More Button -->
        <div id="load-more-container">
            <button id="load-more-btn">Load more</button>
        </div>
    </main>
</body>
</html>
请注意,上面的代码结构就是您的输出应该的样子。
哇!你应该为自己能走到这一步感到自豪。你刚刚完成了第一次网页内容抓取的尝试。
模拟加载更多产品流程
在这里,您想要访问更多产品,为此,您需要多次单击“加载更多”按钮,直到您用尽所有产品的列表或获得您想要访问的产品数量。
要访问此按钮并单击它,您必须首先使用任何 CSS 选择器(元素的类、id、属性或标签名称)来定位元素。
本教程旨在从目标网站获取至少 48 种产品,为此,您必须至少单击“加载更多”按钮三次。
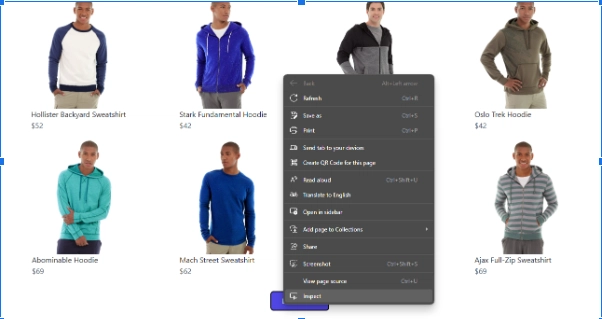
首先,使用任意 CSS 选择器找到“加载更多”按钮。前往目标网站,找到“加载更多”按钮,右键单击,然后选择该inspect选项。
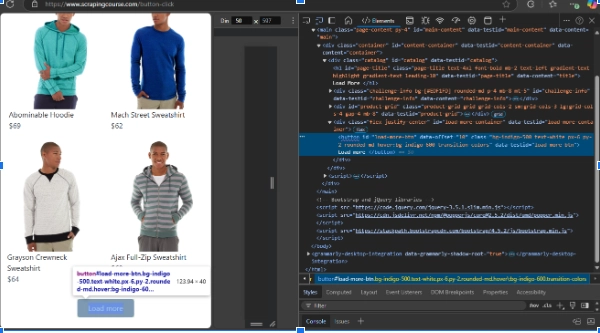
选择检查选项将打开开发人员工具,就像下面的页面一样:
上面的截图显示,“加载更多”按钮元素有一个id值为“load-more-btn”的属性。您可以使用此id选择器在模拟过程中定位该按钮并多次点击它。
回到代码,仍然在try块内,在注销页面上默认的 12 个产品的先前 HTML 内容的代码行之后。
定义您想要点击按钮的次数。请记住,每次点击都会额外加载 12 个产品。如果是 48 个产品,则需要点击 3 次才能加载剩余的 36 个产品。
// Number of times to click "Load More"
const clicks = 3;
接下来,你需要循环模拟点击。模拟将使用for循环运行i多次,其中i是clicks变量。
for (let i = 0; i < clicks; i++) {
    try {

    } catch (error) {
        console.log('No more "Load More" button or an error occurred:', error.message);
        break; // Exit the loop if no button is found or an error occurs
    }
}
注意:本节的剩余代码应写在 for 循环中的 try 块内。
为了帮助调试和跟踪输出,请注销当前的点击尝试。
console.log(`Clicking the 'Load More' button - Attempt ${i + 1}`);
接下来,你需要找到“加载更多”按钮并点击至少三次。但在模拟点击之前,你需要确保“加载更多”按钮可用。
Puppeteer 提供了waitForSelector()在使用元素之前检查其可见性的方法。
对于“加载更多”按钮,您必须首先使用id其上的选择器的值来找到它,然后检查可见性状态,如下所示:
// Wait for the "Load More" button to be visible and click it
await page.waitForSelector('#load-more-btn', { visible: true });
现在您知道“加载更多”按钮可用,您可以使用 Puppeteerclick()方法单击它。
// Click the Load more button once it is available
await page.click('#load-more-btn');
模拟点击“加载更多”按钮后,应等待内容加载完毕后再模拟再次点击,因为数据可能依赖于服务器请求。您必须使用 在请求之间引入延迟setTimeout()。
下面的代码通知脚本等待至少两秒钟,然后再模拟再次单击“加载更多”按钮。
// Wait 2 seconds for the new content to load using setTimeout
await new Promise(resolve => setTimeout(resolve, 2000));
为了完成本节,您需要使用该content()方法在每次点击后获取当前 HTML 内容,然后将输出记录到终端。
// Get and log the updated full HTML after each click
html = await page.content();
console.log(`Full HTML after ${12 * (i + 2)} products loaded:`);
console.log(html);
到目前为止的完整代码:
const puppeteer = require('puppeteer');

(async () => {
    try {
        const browser = await puppeteer.launch({ headless: false }); // Launch the browser
        const page = await browser.newPage(); // Open a new page

        // Navigate to the target website
        await page.goto('https://www.scrapingcourse.com/button-click', {
            waitUntil: 'networkidle2', // Wait until the network is idle
        });

        console.log("Initial page loaded with 12 products");
        // Get full HTML of the initial page
        let html = await page.content();

        // Log the full HTML (first 12 products)
        console.log(html);

        // Number of times to click "Load More"
        const clicks = 3;
        for (let i = 0; i < clicks; i++) {
            try {
                console.log(`Clicking the 'Load More' button - Attempt ${i + 1}`);

                // Wait for the "Load More" button to be visible and click it
                await page.waitForSelector('#load-more-btn', { visible: true });
                await page.click('#load-more-btn');

                // Wait 2 seconds for the new content to load using setTimeout
                await new Promise(resolve => setTimeout(resolve, 2000));

                // Get and log the updated full HTML after each click
                html = await page.content();
                console.log(`Full HTML after ${12 * (i + 2)} products loaded:`);
                console.log(html);
            } catch (error) {
                console.log('No more "Load More" button or an error occurred:', error.message);
                break; // Exit the loop if no button is found or an error occurs
            }
        }

        // Delay for 10 seconds to allow you to see the browser
        await new Promise(resolve => setTimeout(resolve, 10000));

        await browser.close(); // Close the browser
    } catch (error) {
        console.error('Error fetching the page:', error.message);
    }
})();
以下是模拟单击按钮三次以获取 48 种产品的输出:
<!DOCTYPE html>
<html lang="en">
<head>
    <title>Load More Button Challenge</title>
</head>
<body>
    <header>
        <nav>
            <!-- Navigation and Logo Section -->
        </nav>
    </header>

    <main>
        <h1>Load More Products</h1>

        <!-- Products Section -->
        <div id="product-grid">
            <!-- Product 1 -->
            <div class="product-item">
                <a href="https://scrapingcourse.com/ecommerce/product/chaz-kangeroo-hoodie">
                    <img src="https://scrapingcourse.com/ecommerce/wp-content/uploads/2024/03/mh01-gray_main.jpg" alt="Chaz Kangeroo Hoodie">
                    <div>
                        <span>Chaz Kangeroo Hoodie</span>
                        <span>$52</span>
                    </div>
                </a>
            </div>

            <!-- Product 2 -->
            <div class="product-item">
                <a href="https://scrapingcourse.com/ecommerce/product/teton-pullover-hoodie">
                    <img src="https://scrapingcourse.com/ecommerce/wp-content/uploads/2024/03/mh02-black_main.jpg" alt="Teton Pullover Hoodie">
                    <div>
                        <span>Teton Pullover Hoodie</span>
                        <span>$70</span>
                    </div>
                </a>
            </div>

            <!-- Product 3 -->
            <div class="product-item">
                <a href="https://scrapingcourse.com/ecommerce/product/bruno-compete-hoodie">
                    <img src="https://scrapingcourse.com/ecommerce/wp-content/uploads/2024/03/mh03-black_main.jpg" alt="Bruno Compete Hoodie">
                    <div>
                        <span>Bruno Compete Hoodie</span>
                        <span>$63</span>
                    </div>
                </a>
            </div>

            <!-- ... -->
            <!-- Additional products follow the same structure -->
            <!-- Total of 48 products loaded -->
        </div>

        <!-- Load More Button -->
        <div id="load-more-container">
            <button id="load-more-btn">Load More</button>
        </div>
    </main>

    <!-- Bootstrap and jQuery libraries -->
    <script src="https://code.jquery.com/jquery-3.5.1.slim.min.js"></script>
    <script src="https://cdn.jsdelivr.net/npm/@popperjs/core@2.5.2/dist/umd/popper.min.js"></script>
    <script src="https://stackpath.bootstrapcdn.com/bootstrap/4.5.2/js/bootstrap.min.js"></script>
</body>
</html>
解析产品信息
解析当前输出(48 款产品的完整 HTML)至关重要,这样才能使其易于阅读且结构清晰。为了使当前输出有意义,您需要提取每款产品的特定信息,例如其名称、价格、图片 URL 和链接。
您需要访问目标网站,加载更多产品,并检查它们以查看每种产品的结构并知道class使用哪些选择器来获取所需的信息。
下面的代码片段是产品结构的样子:
<div class="product-item flex flex-col items-center rounded-lg">
    <a href="https://scrapingcourse.com/ecommerce/product/bruno-compete-hoodie">
        <img class="product-image rounded-lg" width="200" height="240" decoding="async" fetchpriority="high" src="https://scrapingcourse.com/ecommerce/wp-content/uploads/2024/03/mh03-black_main.jpg" alt="Bruno Compete Hoodie">
        <div class="product-info self-start text-left w-full">
            <span class="product-name">Bruno Compete Hoodie</span>
            <br>
            <span class="product-price text-slate-600">$63</span>
        </div>
    </a>
</div>
在检查每个产品时,您应该注意到它们都有一个共同的类:product-item。您将使用此类来获取产品列表中的每个产品。
这些是您需要解析的产品元素的 CSS 选择器值:产品名称(.product-name)、价格(.product-price)、图像(.product-image)和链接(<a>标签)。
首先,导入Cheerio库,它将用于解析 HTML 内容。
const cheerio = require('cheerio');
现在,你只需要关心与所有 48 个产品的输出进行交互。为此,你需要清理上一节中的代码。
html您还需要在循环块之后降低变量for,以便只获得包含所有 48 种产品的一个输出。
您的清理代码应与以下代码片段相同:
const puppeteer = require('puppeteer');
const cheerio = require('cheerio');

(async () => {
    try {
        const browser = await puppeteer.launch({ headless: false }); // Launch the browser
        const page = await browser.newPage(); // Open a new page

        // Navigate to the target website
        await page.goto('https://www.scrapingcourse.com/button-click', {
            waitUntil: 'networkidle2', // Wait until the network is idle
        });

        // Number of times to click "Load More"
        const clicks = 3;
        for (let i = 0; i < clicks; i++) {
            try {
                // Wait for the "Load More" button to be visible and click it
                await page.waitForSelector('#load-more-btn', { visible: true });
                await page.click('#load-more-btn');

                // Wait 2 seconds for the new content to load using setTimeout
                await new Promise(resolve => setTimeout(resolve, 2000));
            } catch (error) {
                console.log('No more "Load More" button or an error occurred:', error.message);
                break; // Exit the loop if no button is found or an error occurs
            }
        }

        // Get the final HTML content
        const html = await page.content();

        await browser.close(); // Close the browser
    } catch (error) {
        console.error('Error fetching the page:', error.message);
    }
})();
现在,让我们使用Cheerio进行 HTML 解析。
首先,Cheerio 需要访问它想要解析的 HTML 内容,为此,它提供了一种load()接收该 HTML 内容的方法,使其可以使用类似 jQuery 的语法进行访问。
使用 HTML 内容创建 Cheerio 库的实例:
// Load HTML into Cheerio
const $ = cheerio.load(html);
您现在可以使用 $ 来查询和操作已加载的 HTML 中的元素。
接下来,初始化一个数组来存储产品信息。该数组将保存提取的数据,每个产品将存储为一个对象,其中包含name、price、image和link。
// Array to store product information
const products = [ ];
回想一下,每个产品都有一个类.product-item。你将使用它和 Cheerio 的变量实例 ($) 来获取每个产品,然后执行一些操作。
该.each()方法用于通过.product-item类选择器迭代每个匹配的元素。
$('.product-item').each((_, element) => {

});
让我们使用特定产品详情的类选择器来检索每个产品的详细信息。例如,要获取产品名称,您需要使用类选择器在每个产品中查找子元素.product-item。检索该子元素的文本内容,并修剪其中的空格。
$('.product-item').each((_, product) => {
    const name = $(product).find('.product-name').text().trim();
})
- $(element).find('.product-name'):在当前 .product-item 中搜索具有类 .product-name 的子元素。
- .text():检索元素内的文本内容。
- .trim():从文本中删除不必要的空格。
利用这个概念,让我们使用它们的类属性来获取price、image URL和。link
$('.product-item').each((_, product) => {
    const name = $(product).find('.product-name').text().trim();
    const price = $(product).find('.product-price').text().trim();
    const image = $(product).find('.product-image').attr('src');
    const link = $(product).find('a').attr('href');
})
现在您已经获得了所有预期的信息,下一步就是将每个解析的产品信息作为单独的对象推送到products数组中。
$('.product-item').each((_, product) => {
    const name = $(product).find('.product-name').text().trim();
    const price = $(product).find('.product-price').text().trim();
    const image = $(product).find('.product-image').attr('src');
    const link = $(product).find('a').attr('href');

    products.push({
        name,
        price,
        image,
        link,
    });
});
最后,注销products数组以在终端中获取预期的输出。
console.log(`Total products parsed: ${products.length}`);
console.log(products);
您的整个代码应类似于以下代码片段:
const puppeteer = require('puppeteer');
const cheerio = require('cheerio');

(async () => {
    try {
        const browser = await puppeteer.launch({ headless: false }); // Launch the browser
        const page = await browser.newPage(); // Open a new page

        // Navigate to the target website
        await page.goto('https://www.scrapingcourse.com/button-click', {
            waitUntil: 'networkidle2', // Wait until the network is idle
        });

        // Number of times to click "Load More"
        const clicks = 3;
        for (let i = 0; i < clicks; i++) {
            try {
                // Wait for the "Load More" button to be visible and click it
                await page.waitForSelector('#load-more-btn', { visible: true });
                await page.click('#load-more-btn');

                // Wait 2 seconds for the new content to load using setTimeout
                await new Promise(resolve => setTimeout(resolve, 2000));
            } catch (error) {
                console.log('No more "Load More" button or an error occurred:', error.message);
                break; // Exit the loop if no button is found or an error occurs
            }
        }

        // Get the final HTML content
        const html = await page.content();

        // Load HTML into Cheerio
        const $ = cheerio.load(html);
        // Array to store product information
        const products = [];

        $('.product-item').each((_, product) => {
            const name = $(product).find('.product-name').text().trim();
            const price = $(product).find('.product-price').text().trim();
            const image = $(product).find('.product-image').attr('src');
            const link = $(product).find('a').attr('href');

            products.push({
                name,
                price,
                image,
                link,
            });
        });

        console.log(`Total products parsed: ${products.length}`);
        console.log(products); // Output all parsed product information

        await browser.close(); // Close the browser
    } catch (error) {
        console.error('Error fetching the page:', error.message);
    }
})();
保存并运行脚本时的输出应如下所示:
Total products parsed: 48
[
  {
    name: 'Chaz Kangeroo Hoodie',
    price: '$52',
    image: 'https://scrapingcourse.com/ecommerce/wp-content/uploads/2024/03/mh01-gray_main.jpg',
    link: 'https://scrapingcourse.com/ecommerce/product/chaz-kangeroo-hoodie'
  },
  {
    name: 'Teton Pullover Hoodie',
    price: '$70',
    image: 'https://scrapingcourse.com/ecommerce/wp-content/uploads/2024/03/mh02-black_main.jpg',
    link: 'https://scrapingcourse.com/ecommerce/product/teton-pullover-hoodie'
  },
  {
    name: 'Bruno Compete Hoodie',
    price: '$63',
    image: 'https://scrapingcourse.com/ecommerce/wp-content/uploads/2024/03/mh03-black_main.jpg',
    link: 'https://scrapingcourse.com/ecommerce/product/bruno-compete-hoodie'
  },
  {
    name: 'Frankie  Sweatshirt',
    price: '$60',
    image: 'https://scrapingcourse.com/ecommerce/wp-content/uploads/2024/03/mh04-green_main.jpg',
    link: 'https://scrapingcourse.com/ecommerce/product/frankie--sweatshirt'
  },

  // Every other product goes here, reduced to make things brief and concise
  {
    name: 'Zoltan Gym Tee',
    price: '$29',
    image: 'https://scrapingcourse.com/ecommerce/wp-content/uploads/2024/03/ms06-blue_main.jpg',
    link: 'https://scrapingcourse.com/ecommerce/product/zoltan-gym-tee'
  }
]
将产品信息导出为 CSV
下一步是将解析后的产品信息(目前为 JavaScript 对象表示法 (Json) 格式)导出为逗号分隔值 (CSV) 格式。我们将使用json2csv库将解析后的数据转换为相应的 CSV 格式。
首先导入所需的模块。
Node.js 提供了文件系统 (fs) 模块用于文件处理,例如将数据写入文件。导入该fs模块后,您应该parse()从json2csv库中解构该方法。
const fs = require('fs');
const { parse } = require('json2csv');
CSV 文件通常需要列标题;请仔细按照解析信息的顺序书写列标题。此处,解析后的数据是一个products数组,每个元素都是一个对象,包含四个键(名称、价格、图片和链接)。您应该使用这些对象键来命名列标题,以便正确映射。
定义 CSV 文件的字段(列标题):
// Define CSV fields
const fields = ['name', 'price', 'image', 'link'];
现在您已经定义了字段,接下来的操作是将当前解析的信息转换为 CSV 格式。该parse()方法的执行格式如下:parse(WHAT_YOU_WANT_TO_CONVERT, { YOUR_COLUMN_HEADERS })。
// Convert JSON to CSV
const csv = parse(products, { fields });
现在,您需要将此 CSV 信息保存到一个以 .csv 为扩展名的新文件中。使用 Node.js 时,您可以使用模块writeFileSync()上的方法来处理文件创建fs。此方法接受两个参数:文件名和数据。
// Save CSV to a file
fs.writeFileSync('products.csv', csv);
本节的完整代码应如下所示:
const puppeteer = require('puppeteer');
const cheerio = require('cheerio');
const fs = require('fs');
const { parse } = require('json2csv');

(async () => {
    const browser = await puppeteer.launch({ headless: false }); // Launch Puppeteer
    const page = await browser.newPage(); // Open a new page

    // Navigate to the website
    await page.goto('https://www.scrapingcourse.com/button-click', {
        waitUntil: 'networkidle2',
    });

    // Click "Load More" 3 times to load all products
    for (let i = 0; i < 3; i++) {
        try {
            await page.waitForSelector('#load-more-btn', { visible: true });
            await page.click('#load-more-btn');
            await new Promise(resolve => setTimeout(resolve, 2000)); // Wait for 2 seconds
        } catch (error) {
            console.log('No more "Load More" button or an error occurred:', error.message);
            break;
        }
    }

    // Get the final HTML content
    const html = await page.content();

    // Use Cheerio to parse the product data
    const $ = cheerio.load(html);
    const products = [];

    $('.product-item').each((_, element) => {
        const name = $(element).find('.product-name').text().trim();
        const price = $(element).find('.product-price').text().trim();
        const image = $(element).find('.product-image').attr('src');
        const link = $(element).find('a').attr('href');

        products.push({
            name,
            price,
            image,
            link,
        });
    });

    console.log(`Total products parsed: ${products.length}`);

    // Convert product information to CSV
    try {
        // Define CSV fields
        const fields = ['name', 'price', 'image', 'link'];
        // Convert JSON to CSV
        const csv = parse(products, { fields });

        // Save CSV to a file
        fs.writeFileSync('products.csv', csv);
        console.log('Product information exported to products.csv');
    } catch (error) {
        console.error('Error exporting to CSV:', error.message);
    }

    await browser.close(); // Close the browser
})();
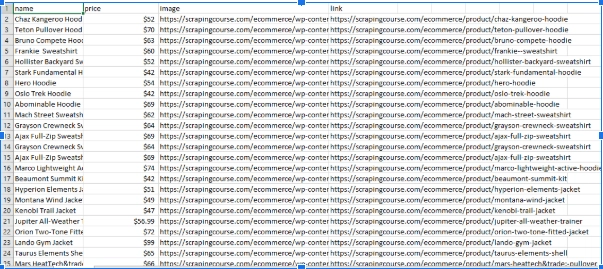
products.csv保存并运行脚本后,您应该会看到一个名为的文件自动添加到您的文件结构中。
结论
本教程深入探讨了从需要模拟访问隐藏内容的页面抓取数据的复杂过程。您学习了如何使用 Node.js 和其他一些库在动态页面上执行网页抓取,将抓取的数据解析为更有条理的格式,并将其解压为 CSV 文件。
文章来源:https://dev.to/shegz/how-to-scrape-data-from-a-page-with-infinite-scroll-4o14 后端开发教程 - Java、Spring Boot 实战 - msg200.com


