AWS Amplify 无服务器功能的介绍
关于无服务器的一个小故事
行业工具
添加 API
关于无服务器的一个小故事
自 2014 年以来,我的日常工作就是帮助人们在 Amazon Web Services (AWS) 上构建和维护服务。我帮助过的企业涵盖方方面面,从最小众的初创公司到家喻户晓的知名企业,从实时库存管理到披萨的机器学习,无所不包。
我见证了容器的流行。我见证了“无服务器”一词被如此频繁地使用,以至于我甚至都不确定它的含义了。不过,有一件事是肯定的:我参与创建的那些处理了数十亿笔交易的现实世界无服务器系统,是我职业生涯中见过的维护和操作体验最愉悦的系统之一。
那么,我为什么热爱无服务器?它为什么如此重要?大家还记得 2018 年初的 Spectre/Meltdown 事件吗?当时人们发现了芯片级漏洞,每个人都惊慌失措,手忙脚乱地试图修复。我运营的无服务器环境在大多数组织预订会议室制定应急计划之前就已修复。

我收到过的一些最有趣的工单和回复都是这样的:“您好,我们是 X 公司安全团队的,我们需要您尽快为我们维护的环境制定一份完整的维护和审计计划,以解决最近的安全问题。” 没有什么比说“已处理”并附上漏洞公开前就已完成的 AWS 补丁说明链接更有趣的了。
归根结底,您的目标是交付商业价值。您也可以通过无服务器实践,以极低的成本,充分利用最优秀、最聪明的计算能力。无需再为服务器补丁、网络、SSH 密钥等问题操心,专注于交付核心价值。
行业工具
如今,有很多选择,从无服务器框架到Apex Up以及许多其他提供商和框架(其中许多专注于小众用例或语言)。
最近,我的大多数新项目都是从 AWS Amplify CLI 开始的。AWS Amplify CLI 在某种程度上是对云复杂性的包装,它提供了自定的解决方案,同时仍然提供您需要的可定制性。
确保您拥有 Node.js 8.11.x 或更高版本以及一个 AWS 账户(不用担心配置任何东西,我们只需要账户),然后我们就可以开始了。
我们今天的项目将与过去有所不同,并略作改动。还记得以前每个人网站底部都会有的“访客计数器”小徽章吗?它们通常就放在各自国家国旗的动图旁边。
让我们这样做,但要更好...我们要使它实时™!
首先安装 Amplify CLI 并在终端中npm install -g @aws-amplify/cli运行amplify configure。您将在终端和浏览器窗口中逐步完成各个步骤,最终创建并配置新的 IAM 用户。
$ npm install -g @aws-amplify/cli
$ amplify configure
Follow these steps to set up access to your AWS account:

Sign in to your AWS administrator account:
https://console.aws.amazon.com/
Press Enter to continue

Specify the AWS Region
? region:  us-east-1
Specify the username of the new IAM user:
? user name:  captain-counter
Complete the user creation using the AWS console
https://console.aws.amazon.com/iam/home?region=undefined#/users$new?step=final&accessKey&userNames=captain-counter&permissionType=policies&policies=arn:aws:iam::aws:policy%2FAdministratorAccess
Press Enter to continue

Enter the access key of the newly created user:
? accessKeyId:  AKIAWTXIHO**********
? secretAccessKey:  AfGA3kTlGyv6F0GMyzQS********************
This would update/create the AWS Profile in your local machine
? Profile Name:  captain-counter

Successfully set up the new user.
让我们设置我们的项目目录并初始化我们的放大应用程序。
$ mkdir counter && cd counter
$ amplify init
Note: It is recommended to run this command from the root of your app directory
? Enter a name for the project counter
? Enter a name for the environment dev
? Choose your default editor: Visual Studio Code
? Choose the type of app that you're building javascript
Please tell us about your project
? What javascript framework are you using none
? Source Directory Path:  src
? Distribution Directory Path: dist
? Build Command:  npm run-script build
? Start Command: npm run-script start
Using default provider  awscloudformation

For more information on AWS Profiles, see:
https://docs.aws.amazon.com/cli/latest/userguide/cli-multiple-profiles.html

? Do you want to use an AWS profile? Yes
? Please choose the profile you want to use captain-counter
⠙ Initializing project in the cloud...
完成这些步骤(大部分使用默认答案)后,您的 AWS 账户中将运行一个基本的 Amplify 应用。它现在功能不多,但我们继续编写代码吧。请注意:我选择不使用任何特定的框架。我希望保持它的轻量级,因为我们会在其他网站加载该脚本,而我们要访问的网站不需要框架。
添加 API
如果没有办法追踪点击量,我们的小项目就不会很成功。我们将利用 GraphQL API 和一项名为 AWS AppSync 的服务。AppSync 是一个完全托管的 GraphQL 解决方案,可让您快速轻松地映射到各种数据源。我个人已经将它用于很多事情,它确实名副其实,甚至更多。
$ amplify add api
? Please select from one of the below mentioned services: GraphQL
? Provide API name: counter
? Choose an authorization type for the API API key
? Do you have an annotated GraphQL schema? No
? Do you want a guided schema creation? No
? Provide a custom type name Counter
Creating a base schema for you...
太好了,现在让我们打开amplify/backend/api/counter/schema.graphql并改变模式。
type Counter
    @model
{
    id: String!
    hits: Int
}
现在到了最有趣的部分,让我们部署 API。在后台,Amplify 会将您的架构编译为各种查询和变更,更新您的 CloudFormation 模板以管理 API 所需的所有资源,代码会生成一个小型客户端来访问您的 API,最后通过 CloudFormation 将所有内容部署到您的 AWS 账户。
$ amplify push

Current Environment: dev

| Category | Resource name | Operation | Provider plugin   |
| -------- | ------------- | --------- | ----------------- |
| Api      | counter       | Create    | awscloudformation |
? Are you sure you want to continue? Yes

GraphQL schema compiled successfully.
Edit your schema at /Users/jshort/Work/counter/amplify/backend/api/counter/schema.graphql or place .graphql files in a directory at /Users/jshort/Work/counter/amplify/backend/api/counter/schema
? Do you want to generate code for your newly created GraphQL API Yes
? Choose the code generation language target javascript
? Enter the file name pattern of graphql queries, mutations and subscriptions src/graphql/**/*.js
? Do you want to generate/update all possible GraphQL operations - queries, mutations and subscriptions Yes
? Enter maximum statement depth [increase from default if your schema is deeply nested] 2
⠦ Updating resources in the cloud. This may take a few minutes...

....sometime later

GraphQL endpoint: https://ol2t5s4qlvbidcx2mwmigeya4m.appsync-api.us-east-1.amazonaws.com/graphql
GraphQL API KEY: da2-rbk5t2xpuvevlm6qza4onbly7m
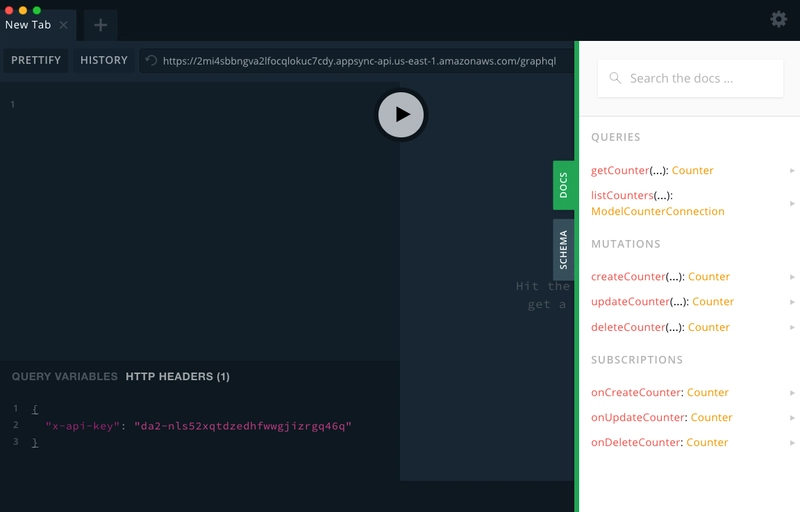
完成此过程后,您将获得一个 GraphQL 端点和 API 密钥。您可以使用它们立即开始体验和探索您的 API。使用 GraphQL Playground 或 Insomnia 之类的工具可能是体验 API 的最快方式。
如果你检查一下你的 API,你会发现有大量针对常规 CRUD 操作(创建、读取、更新、删除)的预置功能。但对于我们的用例来说,我们不需要任何预置功能,因此我们将使用我们自己的功能来替代。
更改您的amplify/backend/api/counter/schema.graphql配置以反映这种更严格的架构。我们移除了几乎所有的 CRUD 操作,重命名了部分操作,并添加了过滤订阅方法。如果您想了解更多信息,请查看AWS Amplify 文档中的 GraphQL 转换。
type Counter
    @model(
        queries: { get: "counter" },
        mutations: { create: "hit" },
        subscriptions: null
    )
{
    id: String!
    hits: Int
}

type Subscription {
    hits(id: String!): Counter
        @aws_subscribe(mutations: ["hit"])
}
在后台,Amplify 为我们管理着一张 DynamoDB 表。这是一个托管的 NoSQL 数据库,能够处理巨大的负载(以我的经验来看,它是最好的无服务器数据库之一)。
接下来,我们将定制我们的 GraphQL 解析器,以利用Amazon DynamoDB 中的原子更新,这意味着计数器的每次“命中”突变,我们都会在“命中”列上加 1。
resolversAmplify 为我们提供了一种便捷的方法,可以使用中的文件夹覆盖默认的解析器实现。在下面的Velocity 模板语言amplify/backend/api/counter/resolvers代码中创建一个文件调用Mutation.hit.req.vtl并弹出。
$util.qr($context.args.input.put("__typename", "Counter"))

#if( $util.isNullOrBlank($context.args.input.id) )
    $util.error("You MUST pass an `id` parameter")
#else

{
  "version": "2017-02-28",
  "operation": "UpdateItem",
  "key": {
      "id": $util.dynamodb.toDynamoDBJson($ctx.args.input.id)
  },
  "update": {
    "expression": "SET #typename = :typename ADD hits :one",
    "expressionNames": {
        "#typename": "__typename"
    },
    "expressionValues": {
        ":one": $util.dynamodb.toDynamoDBJson(1),
        ":typename": $util.dynamodb.toDynamoDBJson("Counter")
    }
  }
}
#end
再快速地amplify push(继续并同意提示)拿一杯自己选择的饮料,然后回到一个闪亮的新 API 供我们使用。
继续在您的 GraphQL 编辑器中尝试一下。
mutation{
  hit(input: {
    id: "test"
  }){
    id
    hits
  }
}
您应该会得到类似这样的回应。
{
  "data": {
    "hit": {
      "id": "test",
      "hits": 118
    }
  }
}
太棒了。接下来的任务是,给我们自己做一个小柜台。
cd src从项目根目录。您将在其中看到一些其他文件和文件夹,例如aws-exports.js和graphql。创建一个名为 的新文件,package.json内容如下。
{
  "name": "counter",
  "version": "1.0.0",
  "description": "",
  "main": "index.js",
  "scripts": {
    "test": "echo \"Error: no test specified\" && exit 1",
    "start": "parcel index.html"
  },
  "author": "",
  "license": "ISC",
  "devDependencies": {
    "parcel-bundler": "^1.12.3"
  },
  "dependencies": {
    "aws-amplify": "^1.1.28"
  },
  "browserslist": [
    "last 2 Chrome versions"
  ]
}
准备好文件并保存运行后npm install,这可能需要几分钟时间。作为此过程的一部分,我们将安装 aws-amplify Javascript SDK 以及Parcel(一个零配置打包器),以便我们可以打包模块并利用 SDK,同时方便以后的开发。

好吧,这是大回报之前的最后两点。
首先,index.html在中创建一个文件src。
<!DOCTYPE html>
<html>
<head>
    <title>Counter Widget</title>
</head>
<body>
    <div data-counter-id="test">Loading...</div>
    <script type="text/javascript" src="/index.js"></script>
</body>
</html>
我们需要这个来让 Parcel 挂载。请注意,您可以使用 React、Vue、Svelte、WebPack 或任何您喜欢的框架来完成大部分工作。我使用了 Amplify SDK,其余代码的编写旨在简化流程并展示其强大的功能,我并非试图推广任何特定的前端方法。
终于,我们终于获得了丰厚的回报。让我们也index.js来创造吧。src
import Amplify, { API, graphqlOperation } from 'aws-amplify';
import awsmobile from './aws-exports';

Amplify.configure(awsmobile);

import * as mutations from "./graphql/mutations";
import * as subscriptions from "./graphql/subscriptions";

/*
Find all the unique counter id on the page.
Send a single hit request for each unique ID.
Subscribe to all updates for each one as well.
*/

const init = function createUpdateCounters() {
    const countersToUpdate = document.querySelectorAll(`[data-counter-id]`);
    const counterHitIdSet = new Set();

    countersToUpdate.forEach((counter) => {
        counterHitIdSet.add(counter.dataset.counterId);
    })

    counterHitIdSet.forEach((id) => {
        hitCounter(id);
    });
}

/*
Send a mutation to your GraphQL to let it know we hit it.
This also means we get back the current count, including our own hit.
*/
async function hitCounter(id) {
    const counter = await API.graphql(graphqlOperation(mutations.hit, { input: { id } }));
    updateText(counter.data.hit)
    subscribeCounter(id)
}

function updateText(counter) {
    const countersToUpdate = document.querySelectorAll(`[data-counter-id=${counter.id}]`);
    countersToUpdate.forEach(function (elem) {
        elem.innerHTML = counter.hits;
    })
}

/*
Subscribe via WebSockets to all future updates for the counters
we have on this page.
*/
function subscribeCounter(id) {
    const subscription = API.graphql(
        graphqlOperation(subscriptions.hits, { id })
    ).subscribe({
        next: (counter) => updateText(counter.value.data.hits)
    });
}

// On dom loaded, kick things off
document.addEventListener("DOMContentLoaded", function () {
    init();
});
评论包含了关于正在发生的事情的大部分提示,但 Amplify 和 GraphQL 为我们完成了大量繁重的工作。
继续npm start在终端中运行,并访问它提示的本地开发服务器启动的 URL。如果一切正常,你应该会在一条简短的Loading...消息后看到一个计数器。
打开多个选项卡即可看到计数器随着点击次数的增加而增加,点击刷新一次或两次即可看到更改实时传播到所有打开的选项卡中。
所以,我们成功了!这里有一些重要的要点需要考虑。我们所做的就是运行在可立即投入生产、高度可扩展的服务上。这可以轻松扩展到每秒数千个请求(在取消一些默认限制之后)。我们实际编写的代码非常精简,这使得 Amplify 可以承担繁重的工作,更不用说所有代码实际上都是“基础设施即代码”,这意味着我们可以按需创建全新的应用实例和环境。
无服务器的理念就是卸载“无差别的繁重工作”,利用 AWS Amplify 和 AppSync 等工具和服务让我们更接近创造商业价值,而远离管理基础设施。
文章来源:https://dev.to/trek10inc/build-a-real-time-serverless-visitor-counter-with-aws-amplify-1c0l 后端开发教程 - Java、Spring Boot 实战 - msg200.com
