使用 Notion 作为 Next.JS 博客的数据库
Notion 是一个非常强大的工具,它可以通过创建数据库来管理您的内容,您甚至可以向页面添加属性:发布日期、标签等。
在本文中,您将学习如何从 Notion API 获取页面并呈现其内容,以创建一个完全由 Notion 管理的精彩的 Next.JS 博客。
1. 创建 Notion 数据库
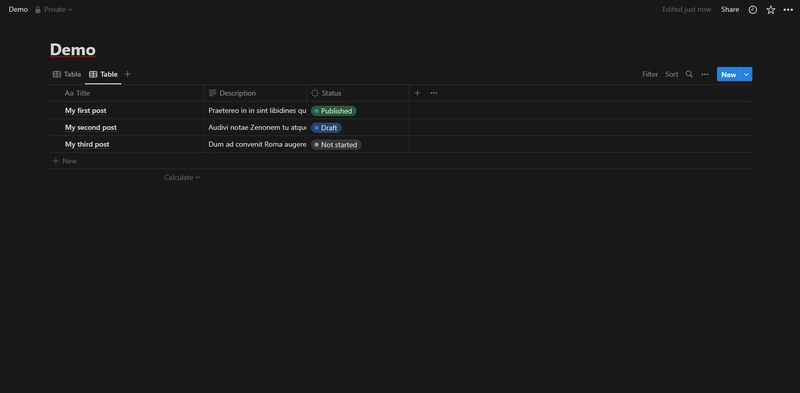
Notion 数据库是具有定义属性的页面列表,它提供使用不同类型的视图(表格、日历等)轻松管理内容的功能。
为了本指南的目的,我们将添加以下属性:
- 标题:文章的标题
- 日期:帖子发布日期
- 状态:帖子的状态(未开始、草稿、已发布)
- 创建时间:帖子的创建日期
不要忘记创建您的帖子并在其中写一些内容!
您可以随意添加自己的属性并根据需求进行调整。例如,您可以添加发布日期,以便在特定日期自动发布。
查找数据库 ID
本指南稍后会用到数据库的 ID。您可以在以下 URL 中找到它:https ://www.notion.so/myworkspace/50b6156388e445eaaca3a3599d6f7ade
2. 获取 Notion 代币
创建集成
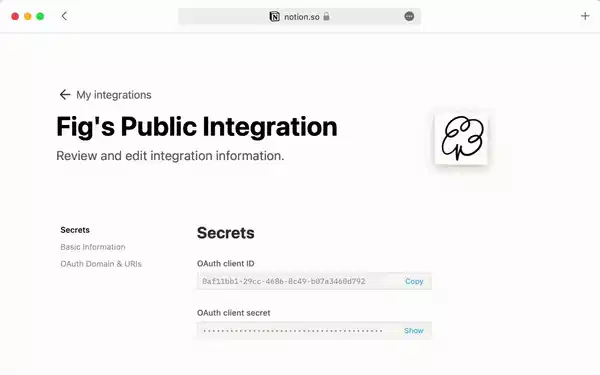
为了与 Notion API 交互,您将需要一个内部集成令牌,又名 Notion 令牌。
前往以下链接创建新的 Notion 集成。本例中我们只读取数据,因此您只需添加“读取”容量即可。
创建集成后,您将获得一个内部集成令牌。请保存并妥善保管,它将作为您用于 API 身份验证的“Notion 令牌”。
授权集成到您的数据库
您必须明确授予您的集成查询数据库的权限。
单击•••数据库右上角的,然后单击“添加连接”并选择集成。
为了避免授予每个数据库的访问权限,您可以将集成添加到父页面。
3. 设置项目
让我们安装所需的依赖项。我们将使用四个库:
- @notionhq/client官方 Notion Javascript SDK
- @notion-render/client将 Notion Blocks(页面内容)转换为 HTML 的库
- @notion-render/hljs-plugin一个用于突出显示代码块的插件
- @notion-render/bookmark-plugin一个用于获取网站元数据以呈现书签的插件
$ yarn add @notionhq/client @notion-render/client @notion-render/hljs-plugin @notion-render/bookmark-plugin
# Or
$ npm install @notionhq/client @notion-render/client @notion-render/hljs-plugin @notion-render/bookmark-plugin
然后将您的内部集成令牌和数据库 ID 存储到您的.env.local文件中,以便您以后可以访问它。
NOTION_TOKEN="secret_xxxxxxxxxxxxxxxxxxxxxxxxxxxxxxxxxxxxx"
NOTION_DATABASE_ID="xxxxxxxxxxxxxxxxxxxxxxx"
4.创建帖子页面
创建 Not 客户端
创建一个新文件,lib/notion.ts我们将在其中添加获取帖子所需的函数。
import "server-only";

import { Client } from "@notionhq/client";
import React from "react";
import {
  BlockObjectResponse,
  PageObjectResponse,
} from "@notionhq/client/build/src/api-endpoints";

export const notion = new Client({
  auth: process.env.NOTION_TOKEN,
});

export const fetchPages = React.cache(() => {
  return notion.databases.query({
    database_id: process.env.NOTION_DATABASE_ID!,
    filter: {
      property: "Status",
      select: {
        equals: "Published",
      },
    },
  });
});

export const fetchPageBySlug = React.cache((slug: string) => {
  return notion.databases
    .query({
      database_id: process.env.NOTION_DATABASE_ID!,
      filter: {
        property: "Slug",
        rich_text: {
          equals: slug,
        },
      },
    })
    .then((res) => res.results[0] as PageObjectResponse | undefined);
});

export const fetchPageBlocks = React.cache((pageId: string) => {
  return notion.blocks.children
    .list({ block_id: pageId })
    .then((res) => res.results as BlockObjectResponse[]);
});
您会注意到两件事:
-import 'server-only';
此行确保文件永远不会被客户端导入,以避免泄露您的 Notion Token。
-React.cache
Next.JS 提供了一个具有该fetch()功能的非常好的缓存系统,但由于我们使用的是 Notion JS SDK,因此我们无法从中受益。
相反,我们可以使用React.cache,这是一种强大的方法,如果我们使用相同的参数调用我们的函数,它将返回相同的结果。
创建页面
创建一个带有动态段的页面[slug]。我们将在里面获取页面,因此它必须是一个服务器组件:
// app/blog/[slug]/page.tsx

import { fetchPageBlocks, fetchPageBySlug } from "@/lib/notion";

import { notFound } from "next/navigation";

export default async function Page({ params }: { params: { slug: string } }) {

  const post = await fetchPageBySlug(params.slug);

  if (!post) notFound();

const content = await fetchPageBlocks(post.id);

return <></>;

}
渲染页面内容
import { fetchPageBlocks, fetchPageBySlug, notion } from "@/lib/notion";

import bookmarkPlugin from "@notion-render/bookmark-plugin";

import { NotionRenderer } from "@notion-render/client";

import hljsPlugin from "@notion-render/hljs-plugin";

import { notFound } from "next/navigation";

export default async function Page({ params }: { params: { slug: string } }) {

  const post = await fetchPageBySlug(params.slug);

  if (!post) notFound();

const blocks = await fetchPageBlocks(post.id);

const renderer = new NotionRenderer({

    client: notion,

  });

renderer.use(hljsPlugin());

  renderer.use(bookmarkPlugin());

const html = await renderer.render(...blocks);

return <div dangerouslySetInnerHTML={{ __html: html }}></div>;

}
后续步骤Next steps
- 导入您最喜欢的highlight.js主题
- 从以下位置导入 Notion 主题
@notion-render/client/sass/theme.scss - 创建具有您自己品牌的主题
- 用于
generateStaticParams在构建时生成页面 - 用于
draftMode预览尚未发布的帖子
 后端开发教程 - Java、Spring Boot 实战 - msg200.com

