使用 Next.Js 13 构建简单的 CRUD API
现在我将在 NextJS 13 中创建一个 CRUD(创建、读取、更新、删除)的示例。与大家分享如何在 NextJS 13 中设置路由,以便我们可以在应用程序中配置创建、读取和编辑的路径。这里我使用的是最新版本的 NextJS 13。由于我已经有一个后端,因此在本文中我将只介绍前端。
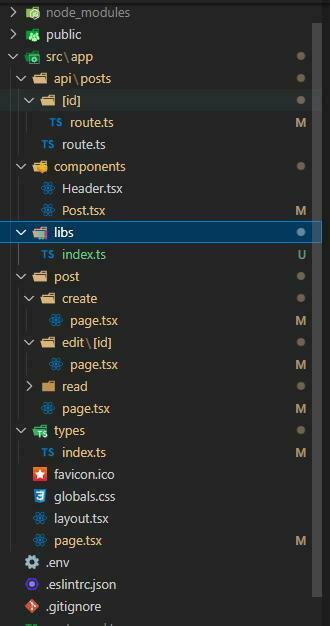
- app/libs/index.ts:构建你想要的库
- app/types/index.ts:构建接口
- api /posts/route.ts:GET(获取所有帖子列表)、POST(添加帖子)
- api/posts/[id]/route.ts:GET:通过 ID 获取帖子 PUT:根据 ID 更新帖子 DELETE:根据 ID 删除帖子
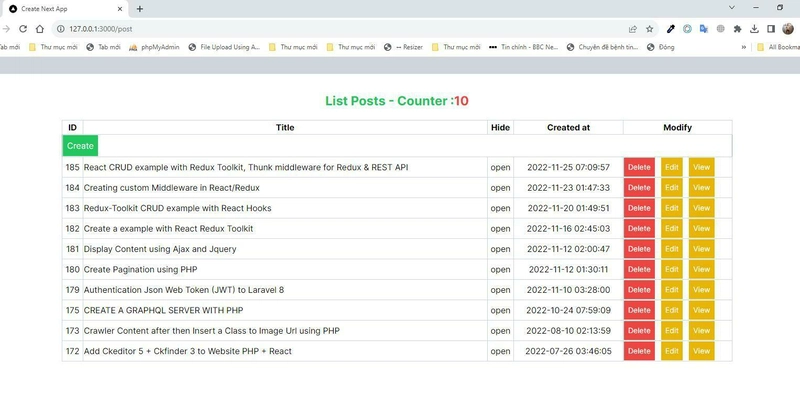
- app/post/page.tsx:显示帖子列表
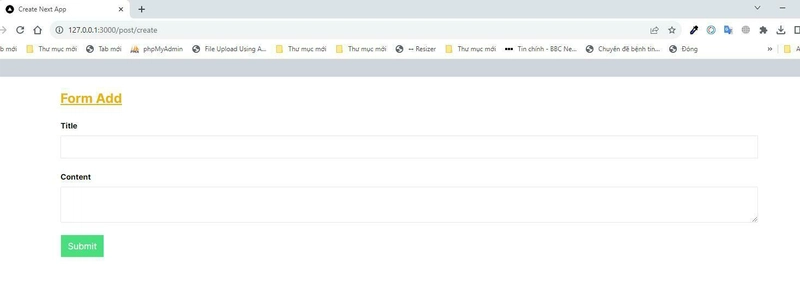
- app/post/create/page.tsx:添加帖子的表单
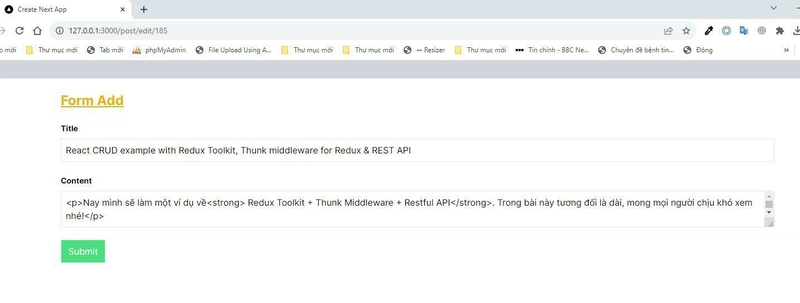
- app/post/edit/[id]/page.tsx:根据 ID 编辑帖子的表单
- app/post/read/[id]/page.tsx:用于显示来自 ID 的帖子的表单
- app/components/Header.ts:设计标题界面
- app/components/Post.ts:显示帖子数据
- app/layout.tsx:项目布局界面
- app/page.tsx:首页界面
演示:
Github:使用 Next.Js 13 构建一个简单的 CRUD API
好的,让我们开始构建一个项目
npx create-next-app@latest
如果您还没有看过关于创建 NextJS 项目的文章,请阅读这篇文章:使用 Next.Js 创建项目
- app/libs/index.ts:下面的代码,我们处理 API 请求
export const fetcher = (url: string) => fetch(url).then((res) => res.json());
- app/types/index.ts:设置Model的属性,使用typescript中的接口,需要配置某种数据类型的属性
export  interface UserModel{
    id:number,
    name:string,
}
export  interface PostModel{
    id:number,
    title:string,
    keyword:string,
    des:string,
    slug:string,
    image:string,
    publish:number,
    content:string,
    created_at:string
    user:UserModel,
    deletePost:(id: number)=> void;
}
export interface PostAddModel{
    title:string,
    content:string
}
- api/posts/route.ts:我们需要建立一个路由,来请求 Api,这里我们需要安装 2 种方法(GET , POST)
import { NextRequest, NextResponse } from 'next/server'

export async function GET() {
  const res = await fetch(process.env.PATH_URL_BACKEND+'/api/posts', {
    headers: {
      'Content-Type': 'application/json',
    },
  })
  const result = await res.json()
  return NextResponse.json({ result })
}
export async function POST(request: NextRequest) {
  const body = await request.json()
  const res = await fetch(process.env.PATH_URL_BACKEND+'/api/posts', {
    method: 'POST',
    headers: {
      'Content-Type': 'application/json',
    },
    body: JSON.stringify(body),
  })
  const data = await res.json();
  return NextResponse.json(data)

}
process.env.PATH_URL_BACKEND:是您的 BackEnd 地址的路径,您创建一个 .env 文件并使用项目的配置变量。
- api/posts/[id]/route.ts:在此路由中,我们使用诸如(GET , PUT , DELETE)之类的方法,正如我在上面部分中所说的那样 GET:用于通过 ID 获取帖子 PUT :根据 ID 更新帖子 DELETE :根据 ID 删除帖子
import { NextRequest, NextResponse } from 'next/server'
export async function GET(request : NextRequest,{ params }: { params: { id: number } }) {
  const res = await fetch(process.env.PATH_URL_BACKEND+`/api/posts/${params.id}`, {
    next: { revalidate: 10 } ,
    headers: {
      'Content-Type': 'application/json',
    },
  })
  const result = await res.json()
  return NextResponse.json(result)
}
export async function PUT(request: NextRequest,{ params }: { params: { id: number } }) {
  const body = await request.json()
  const res = await fetch(process.env.PATH_URL_BACKEND+`/api/posts/${params.id}`, {
    method: 'PUT',
    headers: {
      'Content-Type': 'application/json',
    },
    body: JSON.stringify(body),
  })
  const data = await res.json();
  return NextResponse.json(data)

}
export async function DELETE(request: NextRequest,{ params }: { params: { id: number } }) {
  const res = await fetch(process.env.PATH_URL_BACKEND+`/api/posts/${params.id}`, {
    next: { revalidate: 10 },
    method: 'DELETE',
    headers: {
      'Content-Type': 'application/json',
    },
  })
  const data = await res.json();
  return NextResponse.json(data)

}
你可以看一下上面的代码,我用的是next: { revalidate: 10 },它是用来在10秒内保存数据内存的,根据你的应用,配置一下。
- app/post/page.tsx:显示供用户查看的帖子列表
"use client";
import React,{useEffect, useState} from "react";
import useSWR from "swr";
import { fetcher } from "../libs";
import Post from "../components/Post";
import { PostModel } from "../types";
import Link from "next/link";

export default function Posts() {
  const [posts,setPosts] = useState<PostModel[]>([]);
  const { data, error, isLoading } = useSWR<any>(`/api/posts`, fetcher);
  useEffect(()=>{
    if(data && data.result.data)
    {
      console.log(data.result.data);
      setPosts(data.result.data);
    }
  },[data,isLoading]);
  if (error) return <div>Failed to load</div>;
  if (isLoading) return <div>Loading...</div>;
  if (!data) return null;
  let delete_Post : PostModel['deletePost']= async (id:number) => {
    const res = await fetch(`/api/posts/${id}`, {
      method: 'DELETE',
      headers: {
        'Content-Type': 'application/json'
      },
    });
    const content = await res.json();
    if(content.success>0)
    {

      setPosts(posts?.filter((post:PostModel)=>{  return post.id !== id  }));
    }
  }
  return (
    <div className="w-full max-w-7xl m-auto">
      <table className="w-full border-collapse border border-slate-400">
        <caption className="caption-top py-5 font-bold text-green-500 text-2xl">
          List Posts - Counter :
          <span className="text-red-500 font-bold">{ posts?.length}</span>
        </caption>

        <thead>
          <tr className="text-center">
            <th className="border border-slate-300">ID</th>
            <th className="border border-slate-300">Title</th>
            <th className="border border-slate-300">Hide</th>
            <th className="border border-slate-300">Created at</th>
            <th className="border border-slate-300">Modify</th>
          </tr>
        </thead>
        <tbody>
           <tr>
              <td colSpan={5}>
                 <Link href={`/post/create`} className="bg-green-500 p-2 inline-block text-white">Create</Link>
              </td>
           </tr>
           {
              posts && posts.map((item : PostModel)=><Post key={item.id} {...item} deletePost = {delete_Post} />)
           }
        </tbody>
      </table>
    </div>
  );
}
上面的代码中有很多内容我在上一篇文章中与大家分享过,例如:SWR
如果您还没有看过,请在这里回顾一下:在 NextJS 中使用 SWR 创建一个处理数据获取的示例
看看这段代码,我创建了一个函数来捕获删除帖子的事件
let delete_Post : PostModel['deletePost']= async (id:number) => {
    const res = await fetch(`/api/posts/${id}`, {
      method: 'DELETE',
      headers: {
        'Content-Type': 'application/json'
      },
    });
    const content = await res.json();
    if(content.success>0)
    {

      setPosts(posts?.filter((post:PostModel)=>{  return post.id !== id  }));
    }
  }
----------
//chèn function đó qua component để bắt sự kiện click delete
posts && posts.map((item : PostModel)=><Post key={item.id} {...item} deletePost = {delete_Post} />
- app/components/Post.ts:组件显示帖子并处理点击事件以删除帖子
import React from 'react'
import { PostModel } from '../types'
import Link from 'next/link'
export default function Post(params: PostModel) {
  return (
    <tr>
            <td className='w-10 border border-slate-300 text-center'>{params.id}</td>
            <td className='border border-slate-300'>{params.title}</td>
            <td className='border border-slate-300 text-center'>{params.publish>0?'open':'hide'}</td>
            <td className='border border-slate-300 text-center'>{params.created_at}</td>
            <td className='w-52 border border-slate-300'>
              <span onClick={()=>params.deletePost(params.id)} className='bg-red-500 p-2 inline-block text-white text-sm'>Delete</span>
              <Link href={`/post/edit/${params.id}`} className='bg-yellow-500 p-2 inline-block ml-3 text-white text-sm'>Edit</Link>
              <Link href={`/post/read/${params.id}`} className='bg-yellow-500 p-2 inline-block ml-3 text-white text-sm'>View</Link>
            </td>
    </tr>
  )
}
捕捉点击事件来删除帖子:params.deletePost(params.id)
- app/post/create/page.tsx:创建一个表单,用于输入添加帖子的信息。以下代码使用 useState 保存数据,与 React 基本相同。因此,此处不再赘述。
"use client"
import React, {useState } from 'react'
import { useRouter } from 'next/navigation'
export default function PostCreate() {
  const router = useRouter()
  const [title, setTitle] =useState<string>('');
  const [body, setBody] = useState<string>('');
  const addPost = async (e: any) => {
    e.preventDefault()
    if (title!="" && body!="") {
      const formData = {
          title: title,
          content: body
      }
      const add = await fetch('/api/posts', {
        method: 'POST',
        headers: {
          'Content-Type': 'application/json'
        },
        body: JSON.stringify(formData)
      });
      const content = await add.json();
      if(content.success>0)
      {
        router.push('/post');
      }

    }
  };
  return (
    <form className='w-full' onSubmit={addPost}>
        <span className='font-bold text-yellow-500 py-2 block underline text-2xl'>Form Add</span>
        <div className='w-full py-2'>
             <label htmlFor="" className='text-sm font-bold py-2 block'>Title</label>
             <input type='text' name='title' className='w-full border-[1px] border-gray-200 p-2 rounded-sm'  onChange={(e:any)=>setTitle(e.target.value)}/>
        </div>
        <div className='w-full py-2'>
             <label htmlFor="" className='text-sm font-bold py-2 block'>Content</label>
             <textarea name='title' className='w-full border-[1px] border-gray-200 p-2 rounded-sm' onChange={(e:any)=>setBody(e.target.value)} />
        </div>
        <div className='w-full py-2'>
          <button className="w-20 p-2 text-white border-gray-200 border-[1px] rounded-sm bg-green-400">Submit</button>
        </div>
    </form>
  )
}
- app/post/edit/[id]/page.tsx:编辑帖子,通过获取帖子的ID,请求到/api/posts/edit/[id]/route.ts获取数据进行编辑修复
"use client"
import React, {useState,useEffect } from 'react'
import { useRouter } from 'next/navigation'
import { fetcher } from '@/app/libs'
import useSWR from 'swr'
export default function PostEdit({params} :{params:{id:number}}) {
  const router = useRouter()
  const {data : post,isLoading, error} = useSWR(`/api/posts/${params.id}`,fetcher)
  const [title, setTitle] =useState<string>('');
  const [body, setBody] = useState<string>('');
  useEffect(()=>{
     if(post){
         setTitle(post.result.title)
         setBody(post.result.content)
     }
  },[post, isLoading])
  const updatePost = async (e: any) => {
    e.preventDefault()
    if (title!="" && body!="") {
      const formData = {
          title: title,
          content: body
      }
      const res = await fetch(`/api/posts/${params.id}`, {
        method: 'PUT',
        headers: {
          'Content-Type': 'application/json'
        },
        body: JSON.stringify(formData)
      });
      const content = await res.json();
      if(content.success>0)
      {
        router.push('/post');
      }

    }
  };
  if(isLoading) return <div><span>Loading...</span></div>
  if (!post) return null;
  return (
    <form className='w-full' onSubmit={updatePost}>
        <span className='font-bold text-yellow-500 py-2 block underline text-2xl'>Form Add</span>
        <div className='w-full py-2'>
             <label htmlFor="" className='text-sm font-bold py-2 block'>Title</label>
             <input type='text' name='title' className='w-full border-[1px] border-gray-200 p-2 rounded-sm' value={title} onChange={(e:any)=>setTitle(e.target.value)}/>
        </div>
        <div className='w-full py-2'>
             <label htmlFor="" className='text-sm font-bold py-2 block'>Content</label>
             <textarea name='title' className='w-full border-[1px] border-gray-200 p-2 rounded-sm' value={body} onChange={(e:any)=>setBody(e.target.value)} />
        </div>
        <div className='w-full py-2'>
          <button className="w-20 p-2 text-white border-gray-200 border-[1px] rounded-sm bg-green-400">Submit</button>
        </div>
    </form>
  )
}
- app/post/read/[id]/page.tsx:与编辑类似,但在此路由中我们只需要显示信息供用户查看
'use client'
import { fetcher } from '@/app/libs'
import useSWR from 'swr'

export default function Detail({params}: {params:{id :number}}) {
  const {data: post, isLoading, error}  = useSWR(`/api/posts/${params.id}`,fetcher)
  if(isLoading) return <div><span>Loading...</span></div>
  if (!post) return null;
  return (
    <div className='w-full'>
        <h2 className='text-center font-bold text-3xl py-3'>{post.result.title}</h2>

       <div className='w-full max-w-4xl m-auto border-[1px] p-3 border-gray-500 rounded-md'>
         <p dangerouslySetInnerHTML={{ __html: post.result.content}}></p>

       </div>
    </div>
  )
}
- app/page.tsx:导入组件/app/post/page.tsx,用于显示首页主界面
import Posts from './post/page'
export default function Home() {
  return (
        <Posts />
  )
}
- app/layout.tsx:应用程序布局
import './globals.css'
import type { Metadata } from 'next'
import { Inter } from 'next/font/google'
import Header from './components/Header'

const inter = Inter({ subsets: ['latin'] })

export const metadata: Metadata = {
  title: 'Create Next App',
  description: 'Generated by create next app',
}

export default function RootLayout({
  children,
}: {
  children: React.ReactNode
}) {
  return (
    <html lang="en">
      <body className={inter.className}>
        <Header />
        <div className='w-full max-w-7xl mt-4 m-auto'>
            {children}
        </div>
      </body>
    </html>
  )
}
演示:
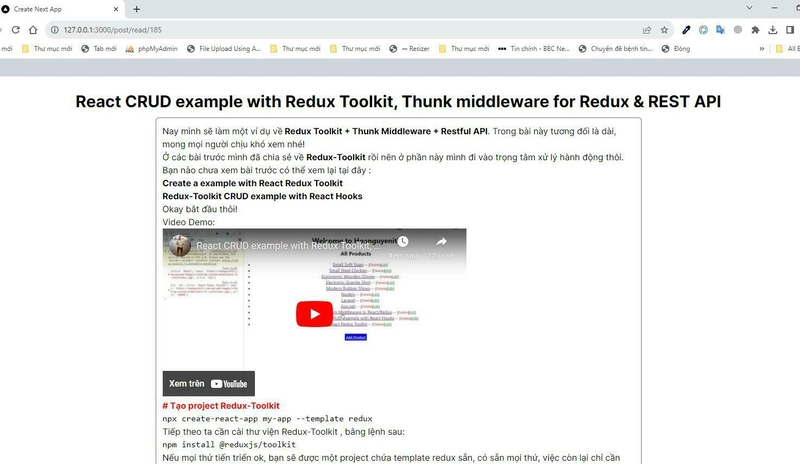
文章:使用 Next.Js 13 构建简单的 CRUD API
 后端开发教程 - Java、Spring Boot 实战 - msg200.com
