使用 Vue.js 和 Tailwindcss 编写一个 dribble 设计代码(工作演示)— 第 1 部分(共 2 部分)
使用 Vue.js 和 Tailwindcss 编写一个 dribble 设计代码(工作演示)— 第 1 部分(共 2 部分)
我的“每天一篇文章,直到封锁结束”中的第 5 篇文章
更新:这是第二部分
让我们从 dribble 中挑选一个小设计并使用 Vue.js 和 tailwindcss 对其进行编码,您将了解 Vue 的双向绑定如何工作,以及 tailwind 如何让您在完全灵活的情况下制作漂亮的应用程序,而无需手动编写任何 css。
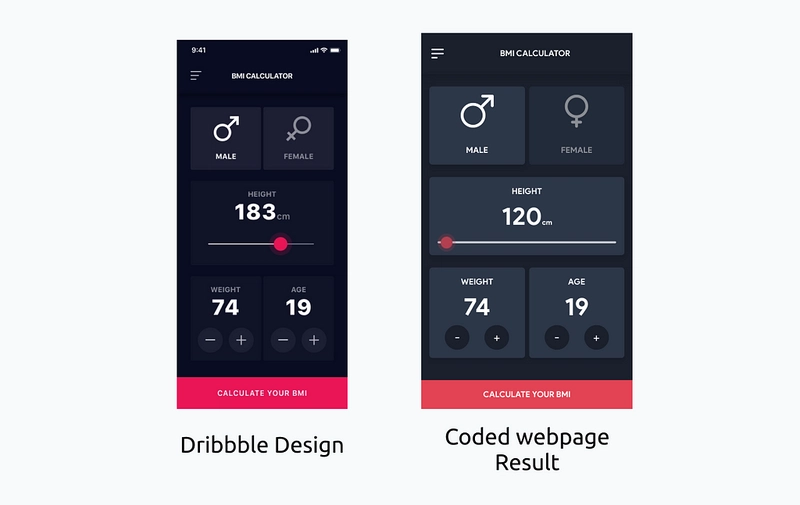
让我们选择一个易于实现的设计,这样文章就不会太长,而且直观、有趣、外观漂亮。我发现了这个设计,它可以通过让你选择性别、身高、体重和年龄来计算BMI。
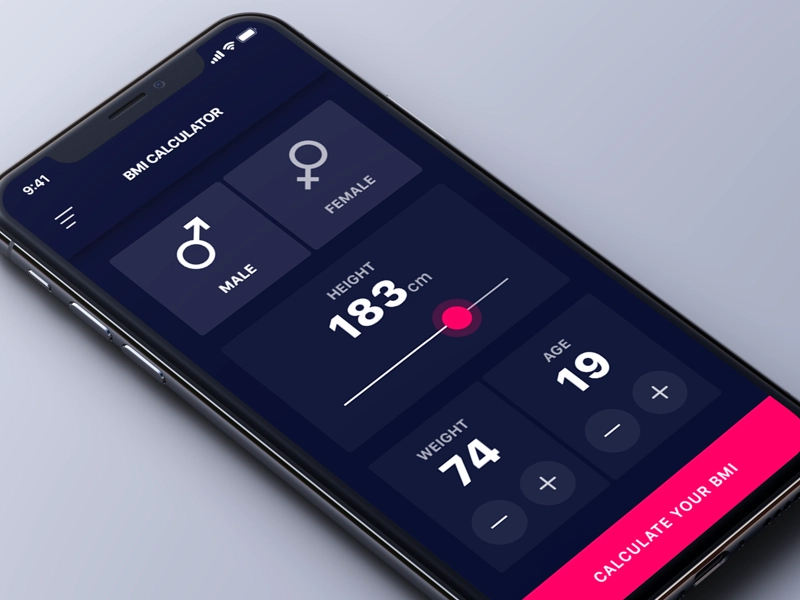
我将使用Nuxt.js ,它是Vue和tailwindcss的框架。
为什么选择 Vue 和 Nuxt?
Vue.js是一个渐进式框架,可让您快速构建 Web 应用。它支持双向绑定,并使用单文件组件,允许您创建自定义 HTML 标签(例如 或 等等)。它允许您将 HTML 标记拆分成更小的块,从而使代码更简洁、可读且更易于维护。Nuxt是一个为 Vue 而生的框架。为什么我们需要为框架而生框架呢?Nuxt 处理了大量网站的实际用例,开箱即用,非常实用。如果您选择了 Vue,最终可以减少样板代码的编写。如果您愿意,您仍然可以选择 Vue,我只是更喜欢 Nuxt,因为它的路由和文件夹结构。
为什么选择 Tailwindcss?
Tailwindcss是一个只包含底层 CSS 类的 CSS 框架,它不仅提供了成熟 CSS 框架的所有功能,还保留了 CSS 应有的灵活性和自由度。它不会像传统框架(例如 Bootstrap)那样强制你以受限的方式编写 CSS。简单来说,几乎每条 CSS 规则(你最常使用的规则)都有一个对应的类。从技术角度来看,这意味着它是一个非常庞大的框架,事实也确实如此。但是 purgeCss 可以帮你解决这个问题,它会删除所有多余的类,只保留 HTML 中使用的类(Nuxt.js 内置了 purgeCSS,因此你无需手动操作)。
步骤 1:让我们创建一个 Nuxt 项目并选择 TailwindCSS 作为我们的 UI 框架。
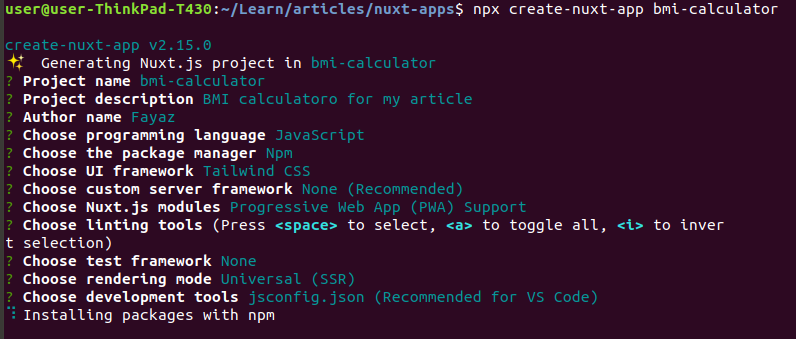
完成后,在你最喜欢的代码编辑器(我更喜欢 VS Code)中打开项目。你可以运行 npm run dev 命令,以开发模式启动项目,然后你会看到一个模板。删除 pages/index.vue 中的所有代码,并从 layouts/default.vue 中删除 CSS。layouts/default.vue 将作为项目的入口点,所有路由内容都将动态显示,你的路由将在 pages 文件夹中定义。pages 文件夹内的每个 .vue 文件都代表一个网页,而路由就是文件名。你可以在这里找到更多关于 nuxt 路由的信息,以及一个专门讲解 nuxt.js 的免费 udemy课程。
我们将在应用程序中有两个页面,一个是计算器,它将在网站打开时立即显示,一个是结果页面,我们已经在 pages 文件夹中为它创建了一个 index.vue 文件,添加另一个名为 result.vue 的文件,这将为我们的项目添加一条新路线,如 example.com/result。
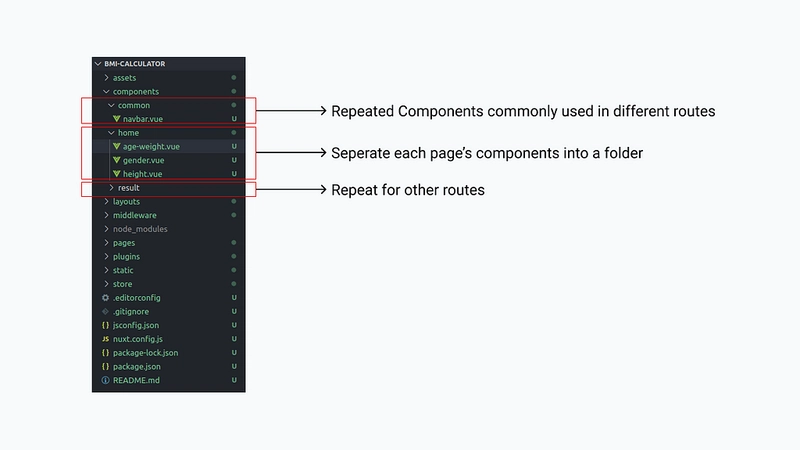
这就是在 nuxt.js 中创建路由的简单方法。项目结构如下。
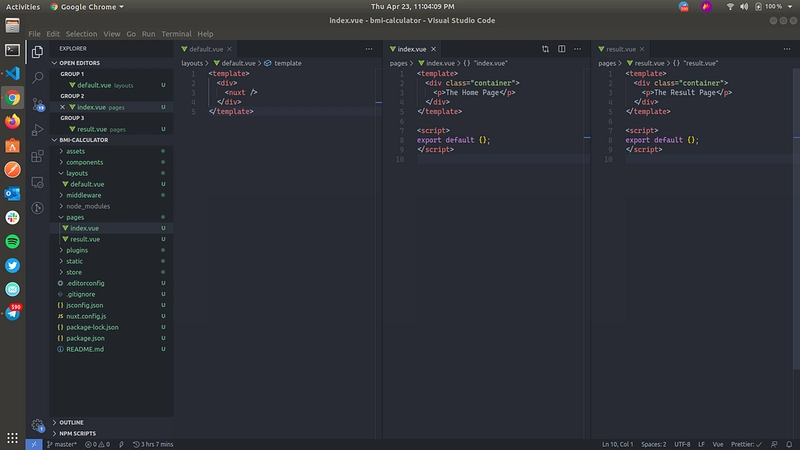
通过运行 npm run dev 启动项目,在浏览器中打开 localhost:3000,查看 index.vue 渲染的“主页”文本,尝试打开 localhost:3000/result,您将看到“结果页”,即渲染的 result.vue 页面。
default.vue 会在组件内部渲染这些路由。如果您希望某个组件在两个路由中都显示,只需将其添加到 default.vue 中即可,它会自动显示,无需在两个页面重复代码。这对于 n_avbar_、抽屉式导航栏、返回顶部按钮等非常有用。
第 2 步:让我们编写计算器/索引/主页的代码。
我们将首先将代码划分为不同的组件
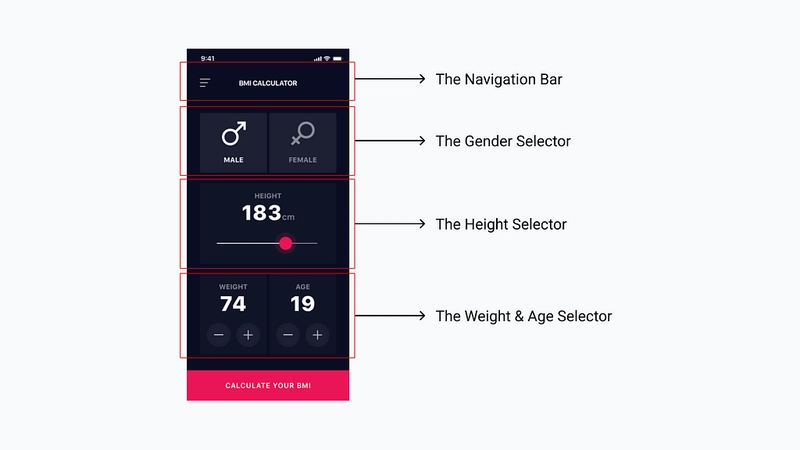
所以我们这里有四个不同的组件。导航栏会同时显示在首页和结果页中,所以我们只需在layout/default.vue中添加一次即可。其他三个组件会显示在首页/计算器页中。以下是我始终遵循的文件夹结构,以保持代码简洁易读。
步骤 3:编写组件代码
- 整个应用程序都有一个深色主题,所以让我们将 bg-gray-900 类应用到最顶层的 div,即 layouts/default.vue。
- 制作导航栏。它由一个 div 组成,中间有一个图标和一些文本,并带有一个厚厚的 box-shadow 阴影。我们将使用 CSS flex 来对齐内容,并使用 tailwindcss 的阴影类。以下 HTML 代码会为我们生成导航栏。
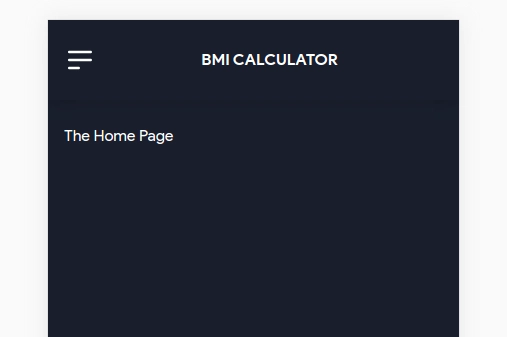
上面的代码无需任何自定义 CSS 即可生成此导航栏。基本上,我们有一个父 div,它包含两个子 div,一个带有 SVG 图标的 div,以及一个带有文本的 paragrarh 标签。我给它应用了 flex 和 items-center 属性,使它们在同一行上平分,并通过 items-center 属性将它们垂直居中对齐。
我将在我们的 layouts/default.vue 文件中添加导航栏组件,以便它在两种路线中都可用。
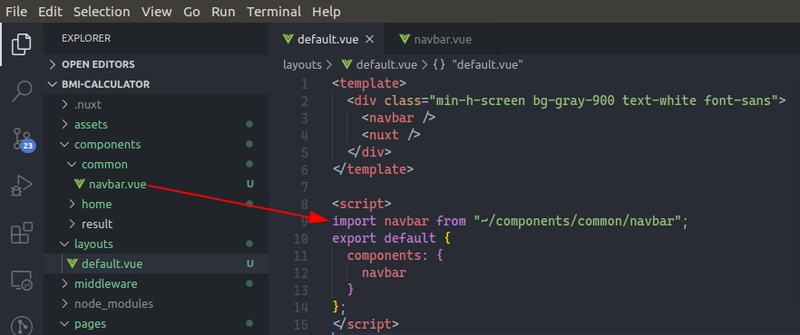
- Gender 组件有两个 div,我们将使用 css 网格,没有必要使用 css 网格,这也可以通过其他方式轻松实现,只是想为您解释 tailwindcss 功能。
以下是 CSS Grid 在 tailwindcss 中的工作方式,更多信息请点击此处。
| <template> | |
| <section class="grid grid-cols-2 gap-4"> | |
| <div class="rounded-md shadow-md bg-gray-800 h-48"></div> | |
| <div class="rounded-md shadow-md bg-gray-800 h-48"></div> | |
| </section> | |
| </template> |
| <template> | |
| <section class="grid grid-cols-2 gap-4"> | |
| <div class="rounded-md shadow-md bg-gray-800 h-48"></div> | |
| <div class="rounded-md shadow-md bg-gray-800 h-48"></div> | |
| </section> | |
| </template> |
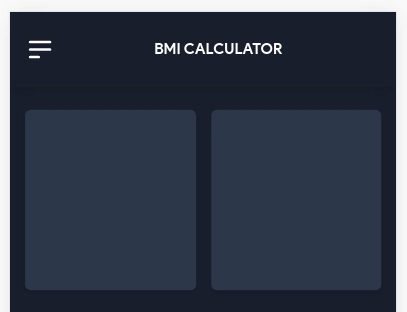
上面的代码生成了这个布局,它很简单,并且可以通过 tailwinds 响应助手进行响应,grid-cols-2 指定我们的布局将有两列,并且它们之间有 4 个单位的间隙,不再有列的边距黑客。
| <template> | |
| <section class="grid grid-cols-2 gap-2 mb-6"> | |
| <div class="rounded-md shadow-md bg-gray-800 p-4 w-full"> | |
| <svg | |
| class="w-16 h-16 mx-auto" | |
| fill="currentColor" | |
| stroke="currentColor" | |
| viewBox="0 0 384 384" | |
| > | |
| <path | |
| d="M383.793 13.938c-.176-1.38-.48-2.708-.984-3.954-.016-.03-.016-.074-.024-.113 0-.008-.008-.016-.015-.023-.555-1.313-1.313-2.504-2.168-3.61-.211-.261-.418-.52-.641-.765-.914-1.032-1.906-1.985-3.059-2.762-.03-.024-.07-.031-.101-.055-1.114-.734-2.344-1.289-3.633-1.726-.32-.114-.633-.211-.961-.297C370.855.266 369.465 0 368 0H256c-8.832 0-16 7.168-16 16s7.168 16 16 16h73.367l-95.496 95.496C208.406 107.13 177.055 96 144 96 64.602 96 0 160.602 0 240s64.602 144 144 144 144-64.602 144-144c0-33.04-11.121-64.383-31.504-89.871L352 54.625V128c0 8.832 7.168 16 16 16s16-7.168 16-16V16c0-.336-.078-.656-.098-.984a16.243 16.243 0 00-.109-1.079zM144 352c-61.762 0-112-50.238-112-112s50.238-112 112-112c29.902 0 58.055 11.64 79.223 32.734C244.359 181.945 256 210.098 256 240c0 61.762-50.238 112-112 112zm0 0" | |
| /> | |
| </svg> | |
| <p class="text-center mt-8 uppercase font-bold">male</p> | |
| </div> | |
| <div class="rounded-md bg-gray-800 p-4 w-full opacity-50"> | |
| <svg | |
| class="w-16 h-16 mx-auto" | |
| fill="currentColor" | |
| stroke="currentColor" | |
| viewBox="-56 0 384 384" | |
| > | |
| <path | |
| d="M272 136C272 61.008 210.992 0 136 0S0 61.008 0 136c0 69.566 52.535 127.016 120 134.977V304H88c-8.832 0-16 7.168-16 16s7.168 16 16 16h32v32c0 8.832 7.168 16 16 16s16-7.168 16-16v-32h32c8.832 0 16-7.168 16-16s-7.168-16-16-16h-32v-33.023c67.465-7.961 120-65.41 120-134.977zm-240 0C32 78.656 78.656 32 136 32s104 46.656 104 104-46.656 104-104 104S32 193.344 32 136zm0 0" | |
| /> | |
| </svg> | |
| <p class="text-center mt-8 uppercase font-bold">female</p> | |
| </div> | |
| </section> | |
| </template> | |
| <script> | |
| export default {}; | |
| </script> | |
| <style></style> |
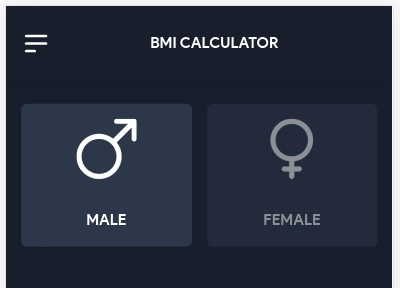
我们从flaticon中选择性别图标,并将它们添加到这些卡片中。最终效果如下。我给未选中的卡片添加了一点不透明度,类名为 opacity-75,以突出显示另一张卡片。
看起来不错,现在我们来设计高度组件。我使用了一个 HTML 范围滑块,并附带一些自定义 CSS,因为 TailwindCSS 不允许在此级别进行自定义。我制作了一个小图像作为滑块按钮,因为它带有一个带不透明度的边框半径,而我们目前还无法用 CSS 来实现。
| <template> | |
| <section class="rounded-md shadow-md bg-gray-800 p-4 text-center"> | |
| <p>HEIGHT</p> | |
| <p class="text-5xl font-bold"> | |
| {{ height }}<small class="text-sm">cm</small> | |
| </p> | |
| <input | |
| type="range" | |
| min="120" | |
| max="215" | |
| v-model="height" | |
| class="slider w-full h-1 rounded-lg outline-none opacity-75 transition-all duration-300 hover:opacity-100" | |
| /> | |
| </section> | |
| </template> | |
| <script> | |
| export default { | |
| data() { | |
| return { | |
| height: 120 | |
| }; | |
| } | |
| }; | |
| </script> | |
| <style> | |
| .slider { | |
| -webkit-appearance: none; | |
| } | |
| .slider::-webkit-slider-thumb { | |
| -webkit-appearance: none; | |
| appearance: none; | |
| width: 35px; | |
| height: 35px; | |
| border: 0; | |
| background: url("/slider.png"); | |
| cursor: pointer; | |
| } | |
| .slider::-moz-range-thumb { | |
| width: 35px; | |
| height: 35px; | |
| border: 0; | |
| background: url("/slider.png"); | |
| cursor: pointer; | |
| } | |
| </style> |
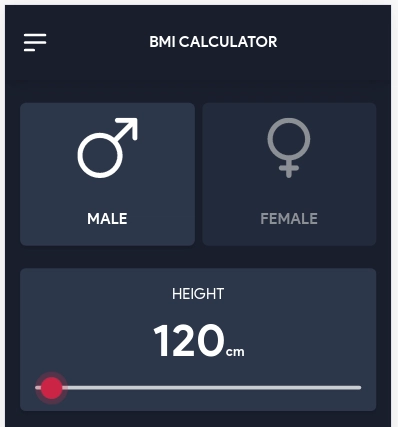
现在,我们的代码中已经实现了这个设计,虽然不是像素级的,但与设计完全匹配,我对结果还是很满意的。我添加了一个 v-model 指令,用于在用户滑动滑块时捕获滑块的值,并使用字符串插值在其上方显示该值{{height}}。这很好地展现了双向绑定的工作原理。
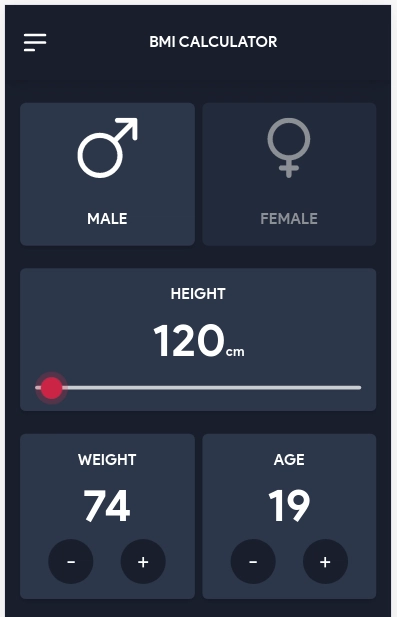
与具有两个相等 div 的性别组件类似,让我们制作一个组件来获取用户的年龄和体重。
| <template> | |
| <section class="grid grid-cols-2 gap-2 mb-6 text-center"> | |
| <div class="rounded-md shadow-md bg-gray-800 p-4 w-full"> | |
| <p class="uppercase font-bold">Weight</p> | |
| <p class="text-5xl font-bold">74</p> | |
| <div class="flex items-center justify-around"> | |
| <button class="rounded-full bg-gray-900 h-12 w-12 text-2xl">-</button> | |
| <button class="rounded-full bg-gray-900 h-12 w-12 text-2xl">+</button> | |
| </div> | |
| </div> | |
| <div class="rounded-md shadow-md bg-gray-800 p-4 w-full"> | |
| <p class="uppercase font-bold">Age</p> | |
| <p class="text-5xl font-bold">19</p> | |
| <div class="flex items-center justify-around"> | |
| <button class="rounded-full bg-gray-900 h-12 w-12 text-2xl">-</button> | |
| <button class="rounded-full bg-gray-900 h-12 w-12 text-2xl">+</button> | |
| </div> | |
| </div> | |
| </section> | |
| </template> | |
| <script> | |
| export default {}; | |
| </script> | |
| <style></style> |
到目前为止,我们已经完成了计算器的大部分工作,剩下要在标记中添加的只是底部的一个按钮。
我们将在底部添加一个固定按钮,它将计算并在第二页显示结果,我们将利用从我们的组件发出并在父级中捕获的事件。
index.vue 页面最终会呈现如下效果。我还在页面底部添加了一个按钮,用于完成第一页的编码。虽然像素并非完美,但我们已经取得了不错的进展。以下是目前提交的代码(项目完成后我可能会尽快更新)以及一个在线演示。
这篇文章已经够长了,因此我将把它分成两部分,并在今天晚些时候发布第二部分。
希望你喜欢。你可以在推特上关注我,了解第二部分的更新,我会继续在那里发布我的系列文章。
如果您需要任何帮助或对此有任何建议,请告诉我。
鏂囩珷鏉ユ簮锛�https://dev.to/fayaz/let-s-code-a-dribble-design-with-vue-js-tailwindcss-working-demo-part-1-of-2-3h9附言:祝大家斋月快乐,平安!
 后端开发教程 - Java、Spring Boot 实战 - msg200.com
