将 Stripe 集成到您的 Ruby on Rails 应用中
创建工作区
我们将首先创建一个 Ruby on Rails 应用程序
$ rails new tuto
$ cd tuto
$ bundle install
然后,我们将借助以下代码生成一个名为 Billing 的控制器rails generate
$ rails generate controller Billing
之后,我们将在config/routes.rb中添加路由:
root 'billing#index', as: :billing
最后,我们必须在app/controllers/billing_controller.rb中创建一个空的动作索引:
class BillingController < ApplicationController

  def index
  end

end
在app/views/billing 目录中,我们将创建一个 index.html.erb 文件,在其中添加一个按钮,用于显示“Stripe Checkout”模态框,以便我们将信用卡关联到用户。在本教程中,我将(一如既往地)使用 bootstrap 库。如果您也想使用它,请不要忘记将其添加到您的应用中。如果您想了解如何操作,可以阅读这篇文章。因此,在app/views/billing/index.html.erb 目录中:
<div class="container">
  <div class="row">
    <h1 class="col-md-12 mt-5 text-center">
      Are you ready to pay?
    </h1>
  </div>
  <div class="row">
    <div class="col-md-12 mt-4 text-center">
      <button class="btn btn-primary">Let's go </button>
    </div>
  </div>
</div>
现在,我们将保留这样的按钮,稍后我们将使用 Rails 语法对其进行更改。
使用 Devise 创建用户
现在,我们将借助“devise” gem 实现基本身份验证。我们希望只有已连接的用户才能访问结算页面。首先在Gemfile中添加以下行:
gem 'devise'
要设置设备,我们必须在终端中输入以下内容:
$ bundle install
$ rails g devise:install
运行这两个命令后,终端将显示配置 devise 的说明。它告诉我们必须在config/environments/development.rb中添加以下代码行:
config.action_mailer.default_url_options = { host: 'localhost', port: 3000 }
下一步是创建用户模型:
$ rails g devise User
$ rails db:migrate
就这样。我们用 devise 添加了身份验证。现在我们可以创建第一个用户了。我们需要在终端中运行“rails s”,然后转到以下页面:localhost:3000/users/sign_up。创建帐户后,它会自动将我们重定向到 localhost:3000 的根页面。
我们现在希望只有登录用户才能访问 localhost:3000。为此,我们需要在app/controllers/billing_conroller.rb中添加:
class BillingController < ApplicationController
  before_action :authenticate_user!

  def index
   @user=current_user.email
  end

end
因此,在计费控制器执行任何操作之前,它都会检查用户是否已登录。此外,在索引操作中,我添加了一个全局变量 @user,用于获取当前用户的邮箱地址。我将在app/views/billing/index.html.erb中使用它:
<div class="container">
  <div class="row">
    <div class="col-md-12 mt-4 text-center">
      <h1> Welcome  <%= @user %></h1>
    </div>
  </div>
  <div class="row">
    <h2 class="col-md-12 mt-5 text-center">
      Are you ready to pay?
    </h2>
  </div>
  <div class="row">
    <div class="col-md-12 mt-4 text-center">
      <button class="btn btn-primary">Let's go </button>
    </div>
  </div>
</div>
为了检查一切是否正常,我们将访问 localhost:3000 并清除 Cookie。刷新页面后,您应该会自动重定向到登录页面。
整合 Stripe
添加 Stripe 凭证
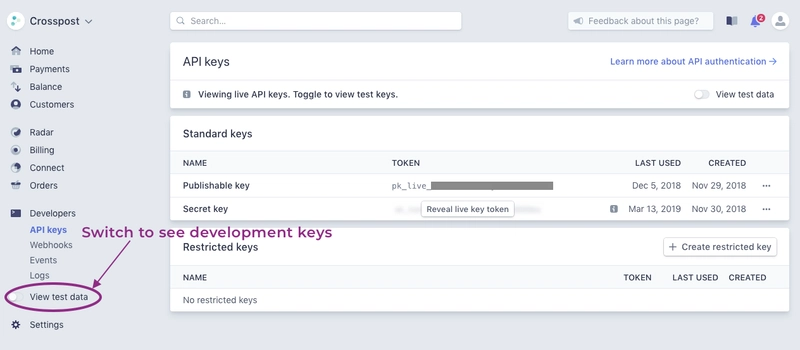
首先,您需要在 Stripe 上注册。然后,您可以在控制面板的“开发者” => “API 密钥”
下找到 Stripe 的开发密钥和生产密钥。您现在看到的密钥是生产密钥。要查看开发密钥,请点击“查看测试数据”。
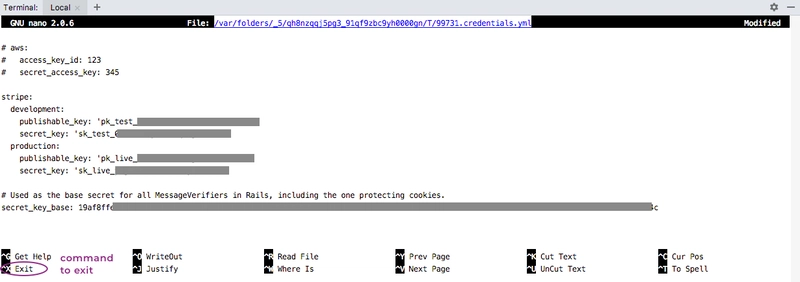
现在我们将密钥添加到 Rails 加密凭证中。为此,我使用 MacOS 和 Linux 上默认安装的 GNU nano 编辑器。
$ EDITOR=nano rails credentials:edit
在这里我们添加用于开发和生产的密钥。
stripe:
  development:
    publishable_key: 'pk_test_...'
    secret_key: 'sk_test_...'
  production:
    publishable_key: 'pk_live_...'
    secret_key: 'sk_live_...'
安装 Stripe
您还需要在app/views/layouts/application.html.erb中添加条纹结帐 javascript :
<%= javascript_include_tag 'https://checkout.stripe.com/checkout.js' %>
另外,在config/enviroments/development.rb中我们添加:
config.stripe.secret_key = Rails.application.credentials.stripe[:development][:secret_key]
config.stripe.publishable_key = Rails.application.credentials.stripe[:development][:publishable_key]
在config/enviroments/production.rb中:
config.stripe.secret_key = Rails.application.credentials.stripe[:production][:secret_key]
config.stripe.publishable_key = Rails.application.credentials.stripe[:production][:publishable_key]
最后,我们将在Gemfile中添加条纹宝石
gem 'stripe-rails'
并在终端中运行“bundle install”。
设置路线
现在我们返回config/routes.rb并添加到文件:
get '/card/new' => 'billing#new_card', as: :add_payment_method`
将卡片与用户关联
在app/controllers/billing_controller.rb中我们正在创建新的动作:
def new_card
    respond_to do |format|
      format.js
    end
  end
它会将我们引导至我们将在app/views/billing中创建的new_card.js.erb文件。因此,在app/views/billing/new_card.js.erb文件中:
var handler = StripeCheckout.configure({
    key: '<%= Rails.application.credentials.stripe[Rails.env.to_sym][:publishable_key] %>',
    //get a publishable key that we put in editor depending on environment: production or development
    locale: 'auto',
    //handle translation
    name: "upload.express",
    description: "Add your credit card information",
    email: "<%= current_user.email %>",
    panelLabel: "Add payment method",
    allowRememberMe: false,
    token: function (token) {
        var form = document.getElementById('billing-create-payment-method');
        //we will create element with this id in the next step
        var hiddenInput = document.createElement('input');
        hiddenInput.setAttribute('type', 'hidden');
        hiddenInput.setAttribute('name', 'stripeToken');
        hiddenInput.setAttribute('value', token.id);
        //creating an <input type="hidden" name="stripeToken" value="<id>"/>. We will need this information in the next steps to link a user to his card
        form.appendChild(hiddenInput);
        //adding this input when we use a form.
        form.submit();
    }
});

handler.open();

window.addEventListener('popstate', function() {
    handler.close();
});
然后我们将app/views/billing/index.html.erb中的按钮更改 为 id 为“billing-create-payment-method”的表单:
<%= form_tag id: "billing-create-payment-method" do  %>
        <%= link_to "Let's go", add_payment_method_path, remote: true, class: "btn btn-primary" %>
      <% end %>
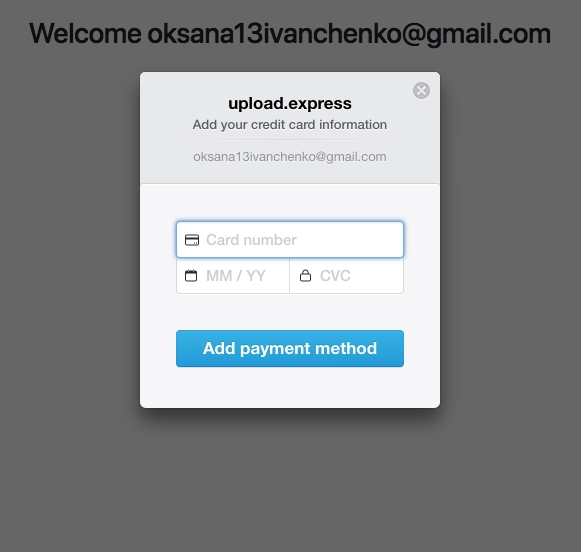
之后在终端中运行“rails s”,单击按钮后,我们应该看到如下内容:
快完成了!现在我们需要将当前用户与指定的卡片关联起来。为此,我们需要在 User 模型中添加一个字符串类型的新列 stripe_id,具体操作如下:
$ rails g migration AddStripeIdToUsers stripe_id:string
$ rails db:migrate
在config/routes.rb中我们创建了一条新路线:
post "/card" => "billing#create_card", as: :create_payment_method
现在,在app/controllers/billing_controller.rb中的控制器中,我们正在创建动作 create_card:
def create_card
    respond_to do |format|
      if current_user.stripe_id.nil?
        customer = Stripe::Customer.create({"email": current_user.email})
        #here we are creating a stripe customer with the help of the Stripe library and pass as parameter email.
        current_user.update(:stripe_id => customer.id)
        #we are updating current_user and giving to it stripe_id which is equal to id of customer on Stripe
      end

      card_token = params[:stripeToken]
      #it's the stripeToken that we added in the hidden input
      if card_token.nil?
        format.html { redirect_to billing_path, error: "Oops"}
      end
      #checking if a card was giving.

      customer = Stripe::Customer.new current_user.stripe_id
      customer.source = card_token
      #we're attaching the card to the stripe customer
      customer.save

      format.html { redirect_to success_path }
    end
  end
我们对app/views/billing/index.html.erb进行了一些修改,以便在提交表单时调用操作 create_card。
<%= form_tag create_payment_method_path, id: "billing-create-payment-method" do  %>
        <%= link_to "Let's go", add_payment_method_path, remote: true, class: "btn btn-primary" %>
      <% end %>
很快,我们将添加成功页面。创建一个路由、空操作和视图。
在config/routes.rb中:
get '/success' => 'billing#success', as: :success
在app/controllers/billing_controller.rb中:
def success
end
在app/views/billing/success.html.erb中:
<div class="container">
  <div class="row">
    <div class="col-md-12 mt-4 text-center">
      <h2>You successfully linked a credit card to your account</h2>
    </div>
  </div>
</div>
现在在终端“rails s”中运行。点击网站上的“开始”。为了测试,您可以使用卡号 4242 4242 4242 4242 以及随机 CVC 代码和日期。提交后,我们将被重定向到成功页面。如果我们在“客户”页面中访问 Stripe (别忘了切换到测试数据),我们应该会看到用户的电子邮件和卡信息。
现在我们需要让客户在注册卡后进行实际付款。这意味着我们必须订阅我们的客户。
订阅
首先,我们需要创建一个产品。最简单的方法是通过 Stripe 控制面板。然后,我们将为该产品添加两个定价方案。例如,在我们的产品 upload.express 中,您可以支付 7 欧元/月,或者 60 欧元/年。我们需要前往Stripe 控制面板 => 账单 => 产品,然后点击“新建”按钮。创建包含两个定价方案的产品。我建议您为定价方案的昵称选择明确的定义,例如“月度”和“年度”。如果您添加年度方案,请不要忘记将间隔设置为“年度”。要添加定价方案,您需要点击刚刚创建的产品,然后点击“添加定价方案”按钮。
现在,我们需要获取在应用中创建的定价计划。我们将在“success”页面上执行此操作。因此,在app/controllers/billing_controller.rb中的success 部分中:
def success
    @plans = Stripe::Plan.list.data
  end
现在我们需要让用户订阅他/她选择的套餐。因此,我们需要创建一个新的操作,将客户与套餐关联起来并创建订阅。
在config/root.rb中:
post '/subscription' => 'billing#subscribe', as: :subscribe
在app/views/billing/success.html.erb中我们添加:
<div class="row">
  <div class="col-md-12 mt-3 text-center">
    <h3>Now you need to choose your plan</h3>
  </div>
</div>
<!-- creating a form -->
<%=form_tag subscribe_path, method: :post do %>
<div class="row">
  <div class="col-md-4"></div>
  <div class="col-md-4 text-center">
    <div class="form-group">
      <select class="form-control" name="plan_id">
        <% @plans.each do |plan| %>
        <option value="<%= plan.id %>"><%= plan.amount/100 %>/€ <%= plan.nickname %></option>
        <!-- we pass id chosen by custmer as a value  to use it for subscription -->
        <%end%>
      </select>
    </div>
  </div>
  <div class="col-md-4"></div>
</div>
<div class="row">
  <div class="col-md-12 mt-2 text-center">
    <%= submit_tag 'Save changes', class: "btn btn-primary" %>
  </div>
</div>
<% end %>
在app/controllers/billnig_controller.rb中:
def subscribe
      if current_user.stripe_id.nil?
        redirect_to success_path, :flash => {:error => 'Firstly you need to enter your card'}
        return
      end
      #if there is no card

      customer = Stripe::Customer.new current_user.stripe_id
      #we define our customer

      subscriptions = Stripe::Subscription.list(customer: customer.id)
      subscriptions.each do |subscription|
        subscription.delete
      end
      #we delete all subscription that the customer has. We do this because we don't want that our customer to have multiple subscriptions

      plan_id = params[:plan_id]
      subscription = Stripe::Subscription.create({
                                                     customer: customer,
                                                     items: [{plan: plan_id}], })
   #we are creating a new subscription with the plan_id we took from our form

      subscription.save
      redirect_to success_path
    end
  end
一切就绪。现在我们要检查一下我们的应用。选择一个定价方案,然后提交。
要检查一切是否正常,请前往 Stripe,点击“控制面板” => “账单” => “订阅”。我们的订阅应该在这里。如果你更改了方案,并查看 Stripe,订阅信息也会随之更改。
就这样!你已将 Stripe 集成到你的 Rails 应用上。恭喜!
PS 这是我的第一篇技术文章,我希望它易于理解并且您喜欢它!
鏂囩珷鏉ユ簮锛�https://dev.to/ksushiva/integrate-stripe-in-your-ruby-on-rails-app-3dc4 后端开发教程 - Java、Spring Boot 实战 - msg200.com
