如何在 React 中使用 Firebase 上传图像。
作为一名 Web 开发者,为用户提供图片上传功能是理所当然的。我之所以写这篇文章,是因为在我的电商网站上实现这个功能让我非常沮丧,希望这篇文章能对那些正在尝试实现这个功能的 React 开发者有所帮助。
几乎所有电子商务和社交媒体网站都要求用户能够上传图像文件,因此这很重要
今天我们将学习如何使用 firebase 作为存储 API 让用户在 React 中上传单个图像。
先决条件:
-
使用 hooks 进行 React 表单处理
-
对 npm 包有基本的了解。
5.可选:unix 命令行。本教程中我会用到它。
概述:我们将创建一个表单,该表单将获取一个文件并将其保存到状态。将文件上传到 Firebase 存储,Firebase 将为我们提供该图像的自定义 URL,我们将该图像保存到具有键值对的对象中。标题和 imgUrl,imgUrl 将是 Firebase 存储提供给我们的字符串。
转到Firebase 控制台并创建一个新项目。如果您有一个 Firebase 帐户,您的控制台页面应该看起来像这样。
点击添加项目,然后点击我的第一个项目。然后你就可以输入你自己的项目名称了
然后你就可以输入你自己的项目名称
在该过程的第二部分,您将能够选择加入 Google Analytics。单击“继续”,并根据您决定的偏好设置进行操作。
如果您确实选择加入分析,那么请选择默认帐户。
现在你应该已经进入 Firebase 的登录页面了。在屏幕左侧点击“存储”。
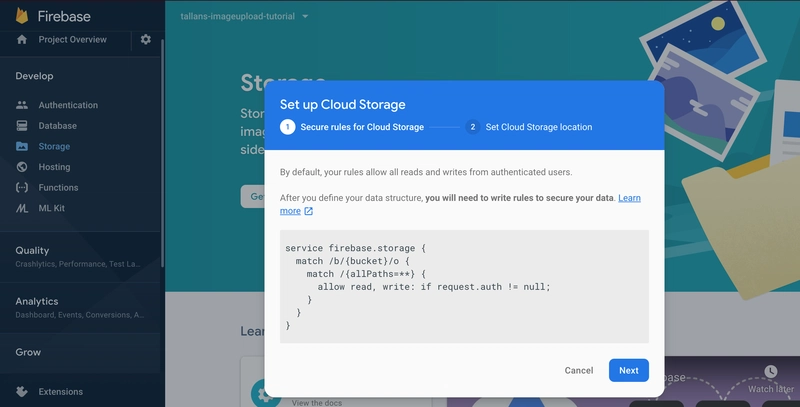
在存储内单击开始。您将看到像这样的代码块。
我们将在我们的 React 项目中创建一个地方,此代码将不属于其中。这是严格的 Firebase 端代码。
如果您阅读文本,您会注意到它被配置为使用经过身份验证的用户上传。由于为了简洁起见我们在没有授权的情况下执行此操作,请单击“下一步”。
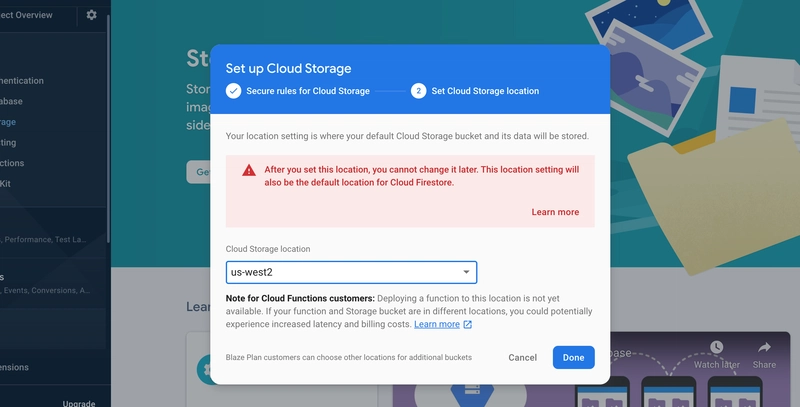
选择存储位置。理想情况下,此位置应该是用户最有可能使用您的项目的地方。
选择位置后,应创建一个默认存储桶来存储您的图像。
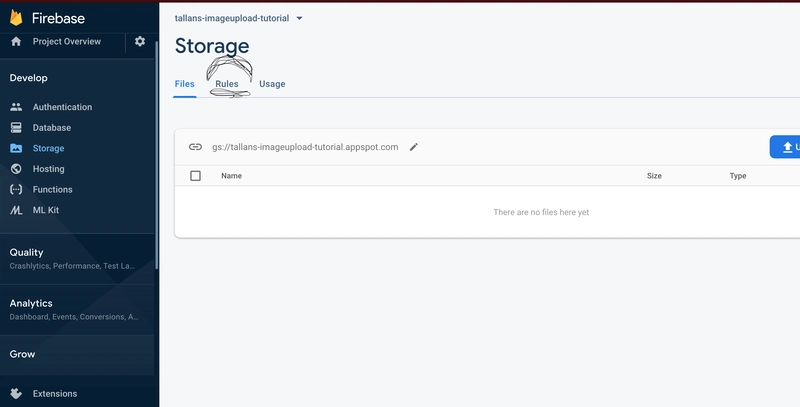
在刚刚创建的存储桶存储页面中,转到您的存储桶规则。
现在我们看到了之前的代码。让我们把这段代码改成无需授权就能工作。__这是让它工作起来的关键部分!!!!!!!!!
从此改变它。
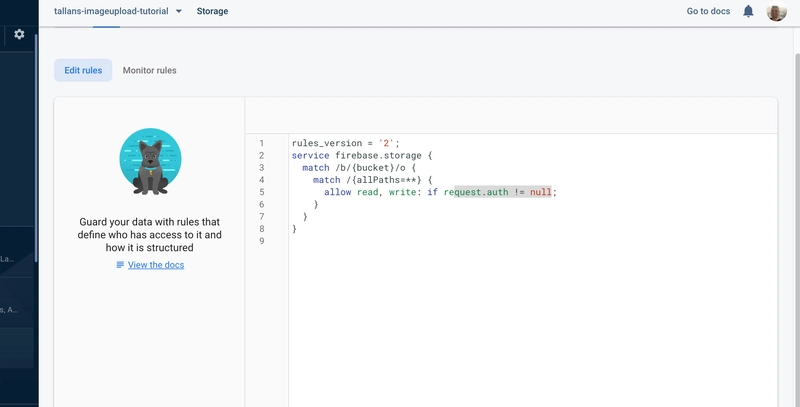
您必须使用 firebase auth 才能使该代码起作用。
到
rules_version = '2';
service firebase.storage {
  match /b/{bucket}/o {
    match /{allPaths=**} {

//this is the part we changed...
      allow read, write: if true;
    }
  }
}
系统应该会提示您发布更改。我知道这可能需要一天左右的时间才能生效。这就是为什么我们在本教程中首先执行此操作。
它可能很快就会发生,但对我来说,firebase 花了一段时间。
下一步是为我们的项目获取一个 webSDK,所以让我们注册这个应用程序。
前往导航栏左上角的项目概览。在该页面中,将其注册为 Web 应用,并为该应用指定一个昵称。
如果你向下滚动,你应该会看到一个 SDK 页面。
像这样:
<!-- The core Firebase JS SDK is always required and must be listed first -->
<script src="https://www.gstatic.com/firebasejs/7.5.0/firebase-app.js"></script>

<!-- TODO: Add SDKs for Firebase products that you want to use
     https://firebase.google.com/docs/web/setup#available-libraries -->
<script src="https://www.gstatic.com/firebasejs/7.5.0/firebase-analytics.js"></script>

<script>
  // Your web app's Firebase configuration
  var firebaseConfig = {
    apiKey: "super secret keys.....asgvegxgevergfvr",
    authDomain: "tallans-imageupload-tutorial.firebaseapp.com",
    databaseURL: "https://tallans-imageupload-tutorial.firebaseio.com",
    projectId: "tallans-imageupload-tutorial",
    storageBucket: "tallans-imageupload-tutorial.appspot.com",
    messagingSenderId: "super secret keys.....asgvegxgevergfvr",
    appId: "super secret app id....adsfa;lsdkjf",
    measurementId: "super secret as;dlkfjal;dskjf"
  };
  // Initialize Firebase
  firebase.initializeApp(firebaseConfig);
  firebase.analytics();
</script>
保持此页面打开,我们将返回到该页面,这是我们开始所需的 Firebase 端配置。我们将在我们的 React 应用程序中为 Firebase 腾出一个位置。
让我们制作一个反应应用程序。
create-react-app firebase-imageupload
用你喜欢的文本编辑器打开它。这不是必需的,但我将使用VS Code。
进入项目目录并确保一切正常。
cd firebase-imageupload && npm start
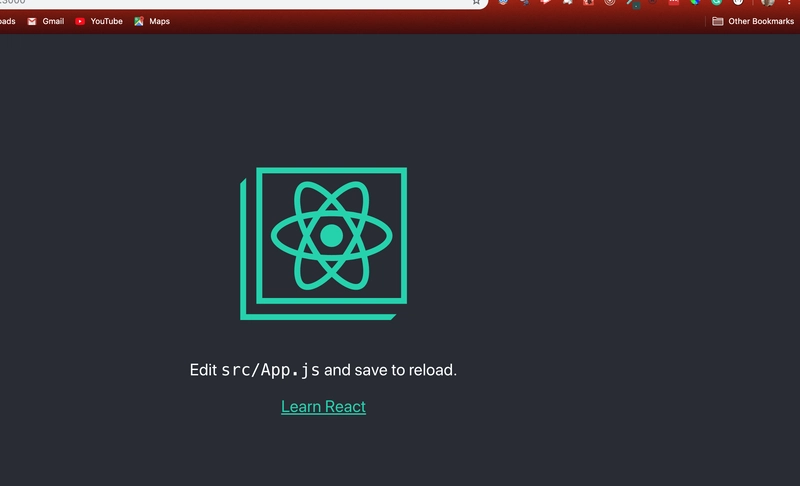
您应该会看到 React 附带的样板网页。
通过将 App.js 更改为以下内容,使您的反应应用程序变为空白。
import React from 'react';
import './App.css';

function App() {
  return (
    <div className="App">
      blank and ready for image upload.
    </div>
  );
}

export default App;
现在安装 firebase npm 包。
npm i firebase
让我们在 React 端为 Firebase 配置创建一个目录。将 index.js 文件添加到该目录
mkdir src/firebase && touch src/firebase/firebase.js
在 firebase.js 文件的顶部添加导入。
import firebase from 'firebase/app'
import 'firebase/storage'
在导入下方添加 firebase SDK。
firebase.js
 var firebaseConfig = {
    apiKey: "super secret keys.....asgvegxgevergfvr",
    authDomain: "tallans-imageupload-tutorial.firebaseapp.com",
    databaseURL: "https://tallans-imageupload-tutorial.firebaseio.com",
    projectId: "tallans-imageupload-tutorial",
    storageBucket: "tallans-imageupload-tutorial.appspot.com",
    messagingSenderId: "super secret keys.....asgvegxgevergfvr",
    appId: "super secret app id....adsfa;lsdkjf",
    measurementId: "super secret as;dlkfjal;dskjf"
  };
  // Initialize Firebase
  firebase.initializeApp(firebaseConfig);
//analytics is optional for this tutoral
  firebase.analytics();
在 firebase.initializeApp(firebaseConfig); 下面添加初始化存储作为变量
const storage = firebase.storage()
在文件底部让我们将所有内容一起导出。
export  {
   storage, firebase as default
 }
现在我们有一种方法可以通过整个 React 应用程序使用 Firebase 存储功能。
转到 App.js 并制作表单来获取文件和 type='file' 的输入字段
App.js
//add useState for handling the image as a file and then the image as a url from firebase
import React, {useState} from 'react'
import {storage} from "./firebase/firebase"
//add import for storage
function App() {
  return (
    <div className="App">
//form for handling file upload
      <form>
        <input
// allows you to reach into your file directory and upload image to the browser
          type="file"
        />
      </form>

    </div>
  );
}
现在在函数 app() { 和 return (
添加 useState
const allInputs = {imgUrl: ''}
    const [imageAsFile, setImageAsFile] = useState('')
    const [imageAsUrl, setImageAsUrl] = useState(allImputs)
我们已经准备好在表单中添加图片内容,例如标题、评论、帖子、描述等等。之后,我们将看看图片上传后会如何运作。
将图像 URL 添加为对象键:值、对以及我们将文件上传到字符串可能看起来很奇怪,但这就是我让它工作的方式,如果有人有更好的方法,请在评论中指出该资源。
现在我们需要使该函数将图像上传作为文件进行处理,以便我们可以将其暂存为对 Firebase 的发布请求。
console.log(imageAsFile)
 const handleImageAsFile = (e) => {
      const image = e.target.files[0]
      setImageAsFile(imageFile => (image))
  }
然后将函数添加到输入字段
 <input
   type="file"
   onChange={handleImageAsFile}
 />
现在从您的计算机目录中选择一个图像文件并查看其运行情况。
图像上传后检查控制台。option + command + j 是 chrome 中 devtools 的热键。
你应该看到类似这样的内容
现在我们需要为表单创建一个 onSubmit 函数来执行一些复杂的操作
-
使用来自外部 API 的辅助函数。
-
使用大量异步代码。
-
从 firebase 获取响应并将 imageUrl 作为字符串设置为状态中的对象。
制作函数的骨架
const handleFireBaseUpload = e => {
  e.preventDefault()
console.log('start of upload')
// async magic goes here...

}
我将添加 console.logs,以便您可以看到每个步骤并在问题发生时进行诊断。
让我们在表单中添加一个按钮,并在表单标签的顶部添加 onSubmit。
当您按下按钮时,它将控制台记录上传的开始。
表格将如下所示。
  <form onSubmit={handleFireBaseUpload}>
        <input
          type="file"
          onChange={handleImageAsFile}
        />
        <button>upload to firebase</button>
      </form>
让我们从一些错误处理开始
 // async magic goes here...
    if(imageAsFile === '' ) {
      console.error(`not an image, the image file is a ${typeof(imageAsFile)}`)
    }
如果您没有上传图像或者图像为空或未定义,错误消息将告诉您。
确保您位于控制台中将显示错误的部分,因为我们使用的是 console.error 而不是 console.log
现在我们可以开始上传过程了。
我们正在创建一个 uploadTask 变量,将其添加到 if 语句的正下方
const uploadTask = storage.ref(`/images/${imageAsFile.name}`).put(imageAsFile)
现在,如果您检查 Firebase 控制台,您将看到图像就在那里。
好的
现在,在 const uploadTask 下方,从 firebase 获取图像作为 imageUrl。
使用 uploadTask.on( //internet magic inside ) 方法
这将运行正在发生的事情的快照,我们将在 console.log 中记录它。
我们将在拍摄快照后添加一个错误处理程序。
使用匿名函数来完成其余工作...
小时候抓一个存储参考。
从firebase端的文件路径获取下载URL。
然后将 imageAsUrl 键设置为 firebase 提供的值。
这个函数将会是这样的。
//initiates the firebase side uploading
    uploadTask.on('state_changed',
    (snapShot) => {
      //takes a snap shot of the process as it is happening
      console.log(snapShot)
    }, (err) => {
      //catches the errors
      console.log(err)
    }, () => {
      // gets the functions from storage refences the image storage in firebase by the children
      // gets the download url then sets the image from firebase as the value for the imgUrl key:
      storage.ref('images').child(imageAsFile.name).getDownloadURL()
       .then(fireBaseUrl => {
         setImageAsUrl(prevObject => ({...prevObject, imgUrl: fireBaseUrl}))
       })
    })
这是一个巨大的事件序列,所以让我给你整个功能。
const handleFireBaseUpload = e => {
      e.preventDefault()
    console.log('start of upload')
    // async magic goes here...
    if(imageAsFile === '') {
      console.error(`not an image, the image file is a ${typeof(imageAsFile)}`)
    }
    const uploadTask = storage.ref(`/images/${imageAsFile.name}`).put(imageAsFile)
    //initiates the firebase side uploading
    uploadTask.on('state_changed',
    (snapShot) => {
      //takes a snap shot of the process as it is happening
      console.log(snapShot)
    }, (err) => {
      //catches the errors
      console.log(err)
    }, () => {
      // gets the functions from storage refences the image storage in firebase by the children
      // gets the download url then sets the image from firebase as the value for the imgUrl key:
      storage.ref('images').child(imageAsFile.name).getDownloadURL()
       .then(fireBaseUrl => {
         setImageAsUrl(prevObject => ({...prevObject, imgUrl: fireBaseUrl}))
       })
    })
    }
现在如果你使用 console.log imgAsUrl 你会看到这个
现在让我们将图像显示到屏幕上。
在表格下方输入此代码。
//end of form

<img src={imageAsUrl.imgUrl} alt="image tag" />

//closing tag for div
现在您可以上传图像了。如果您想为它们添加图像标题,您可以向 initState 对象添加键:。
您可以制作另一种形式并引用来自 firebase 的图像
致谢:
我依赖这个YouTube 视频,但它是在课堂上,我使用了钩子。
结论:
图像上传就像编程中的其他一切一样。随着时间和练习,它们会变得更容易。
firebase 是一款出色的开发工具,我鼓励您查看它的其他一些功能。
再次,如果有人知道更好的方法,请在下面的评论中列出。如果您有任何疑问,请不要害怕留下评论。
文章来源:https://dev.to/itnext/how-to-do-image-upload-with-firebase-in-react-cpj 后端开发教程 - Java、Spring Boot 实战 - msg200.com
