彻底学会使用装饰器
嗨,开发者们!你们好吗?希望大家都好。几周前,我开始深入研究装饰器究竟是如何工作的。我当然用过装饰器,尤其是在 Angular 和 Nest 中,但我从未费心去理解它们的工作原理。所以我决定开始动手实践一下。事实上,这比想象中要简单得多。
什么是@Decorators?
装饰器其实就是一个“典型的” Javascript/Typescript 函数,用于为声明添加额外的功能。我们所说的声明,指的是类、方法、参数、访问器(getter)和属性。现在,我们将逐一解释它们。
注意:你可能已经注意到,我们从未提及函数,这是因为主要问题在于处理函数的提升。任何试图将一个函数包装在另一个函数中的尝试都会破坏提升机制。
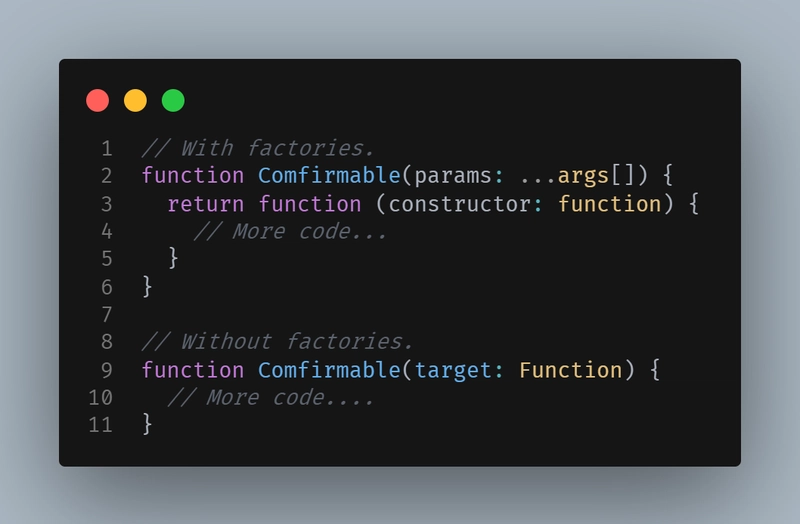
装饰器有两种类型:基本装饰器和工厂装饰器。如何区分它们呢?我通过下图来展示。
当我们使用工厂时是因为我们需要传递一些参数,而在另一个工厂中我们使用预定义的值。
开始吧!
现在我们要做的就是创建一个类来帮助我们理解装饰器的工作原理。
interface Note {
  id: number;
  title: string;
  text: string;
}

class NoteUI{
  notes: Note[] = [
    {
      id: 1,
      title: "Docker",
      text: "🐳 Beautiful platform."
    },
    {
      id: 2,
      title: "Firebase",
      text: "🔥 Beautiful platform"
    }
  ]
}
完美,这就是我们所需要的。
类装饰器。
类装饰器声明在类声明之前。类装饰器应用于类的构造函数,可用于观察、修改或替换类定义。
重要声明:如果您选择返回一个新的构造函数,则必须注意维护原始原型。运行时应用装饰器的逻辑不会为您执行此操作。
一些注意事项
- 类装饰器的表达式将在运行时作为函数调用,装饰类的构造函数作为其唯一参数。
- 如果类装饰器返回一个值,它将用提供的构造函数替换类声明。
例子
我们构建了一个装饰器,它添加了一个类型的属性Map和两个方法,一个用于插入,另一个用于删除。
function Store() {
  return function (constructor: Function) {
    // Set new entities in the class.
    constructor.prototype.entities = new Map();

    // Add method for insert new entities.
    constructor.prototype.addOne = function (entity: Record<string, string>) {
      constructor.prototype.entities.set(entity.id, entity);
    }

    // Add method for remove entities.
    constructor.prototype.removeOne = function (id: string | number) {
      constructor.prototype.entities.delete(id);
    }
  }
}
现在,我们在类中添加装饰器。
// Add decorator in the class.
@Store()
class NoteStore {}

const noteStore = new NoteStore();

// Add new entity.
noteStore.addOne({id:1, name:"Ivan"});

// Show all entities.
noteStore.entities.forEach(console.log);

// Delete a entity.
noteStore.removeOne(1);

// Show all entities.
noteStore.entities.forEach(console.log);
方法装饰器。
这些装饰器的特点是它们在方法之前声明。您必须了解,该声明将在运行时执行,并接收以下参数。
target:第一个参数包含此方法所在的类。key:成员(方法)的名称descriptor:成员的属性描述符。
采用前面的类(NoteController),我们添加以下方法。
// Create method decorator.
function Confirm(message: string): any {
  return function (
    target: Object,
    key: string | symbol,
    descriptor: PropertyDescriptor
  ) {
    let original = descriptor.value;

    descriptor.value = function (...args: any[]) {
      if (confirm(message)) return original.apply(this, args);
      return null;
    };
  };
}

class NoteUI {
  @Confirm("This item will be removed. Are you sure?")
  remove(element: HTMLElement | null): void {
    element?.remove();
  }
}
说明:此装饰器的功能是显示一个确认窗口,其中包含我们作为参数传递的消息,如果用户接受,则删除该元素,否则,什么也不会发生。
参数装饰器。
参数装饰器声明在参数声明之前。参数装饰器应用于类构造函数或方法声明的函数。
注意事项
- 参数装饰器不能在声明文件、重载或任何其他环境上下文(例如在声明类中)中使用。
- 参数装饰器只能用于观察方法中是否声明了参数。因此,参数装饰器的返回值会被忽略。
这次我没有找到一个完全有用的示例,所以没有添加任何内容。抱歉,兄弟。不过如果你有什么好的例子,请随时评论。
属性装饰器。
属性装饰器在属性声明之前声明。
接收以下参数。
- 目标:静态成员的类的构造函数,或实例成员的类的原型
- 键:字符串格式的属性名称。
export type CapitalizeForm = "All" | "First";

export function Capitalize(option: CapitalizeForm = "First") {
  return function (target: any, key: string | symbol) {
    // Get value of the property.
    let value = target[key];

    // Assign getter.
    const getter = function () {
      return value;
    };

    // Capitalize first letter.
    function capitalize(word: string): string {
      return word[0].toUpperCase() + word.slice(1);
    }

    // Assign setter.
    const setter = function (data: string) {
      // Capitalize all first letter of a word by each space
      if (option === "All") {
        value = data
          .split(" ")
          .map((word) => capitalize(word))
          .join(" ");
        return;
      }
      // Capitalize only first letter.
      value = capitalize(data);
    };

    // Define property.
    Object.defineProperty(target, key, {
      get: getter,
      set: setter,
      enumerable: true,
      configurable: true
    });
  };
}

class NoteUI {
  @Capitalize()
  message: string = "hi developers!";
}

const noteUI = new NoteUI();

// @Capitalize("First")
console.log(noteUI.message); // Hi developers!

// @Capitalize("All")
console.log(noteUI.message); // Hi Developers!
注意:属性装饰器不能在声明文件或任何其他环境上下文中使用(例如在声明类中)。
这个装饰器的作用是将文本字符串大写。我已经知道首字母或所有内容了。
访问器装饰器。
访问器装饰器声明在访问器声明之前。访问器装饰器应用于访问器的属性描述符,可用于观察、修改或替换访问器的定义。您需要理解,访问器只不过是我们类的一个 getter 方法。
注意:访问器装饰器不能在声明文件或任何其他环境上下文中使用(例如在声明类中)。
例子
//  Create a decorator.
export function Directory() {
  return function (
    target: any,
    key: string | symbol,
    descriptor: PropertyDescriptor
  ) {
    const original = descriptor.get;

    descriptor.get = function () {
      let result = original?.apply(this);
      result = Object.assign(
        {},
        ...result.map((item: any) => ({ [item.id]: item }))
      );
      return result;
    };

    return descriptor;
  };
}

class NoteUI {
  @Directory()
  get items() {
    return this.notes;
  }
}

const noteUI = new NoteUI();

console.log(note.items)
// { 1: { id: 1, title: "A title", text: "A description" } }
说明:此装饰器负责将数组转换为对象或目录。
好了,本文到此结束。想要成为装饰器高手还有很长的路要走,但这只是一个练习的问题。欢迎在评论区提出任何问题或建议。希望对朋友有所帮助。
 后端开发教程 - Java、Spring Boot 实战 - msg200.com

