复合模式 - 设计模式与前端的结合
组合设计模式是一种具有递归性质的结构化设计模式。本文将深入探讨它,希望不会重复太多。
我们将讨论以下几点:
- 这是啥?🤔
- 让我们看一个例子🚀
- 我们为什么需要它?😐
- 让我们看看一些代码!👩💻
这是啥?🤔
复合设计模式是一种结构设计模式,用于表示数据并将系统中的对象组成树状结构。
为了理解此模式的工作原理,有必要描述一些高级概念。
在我们的系统中,我们将使用单个对象或复合对象。
单个对象可以被认为是独立的对象,它将实现与预定义契约相匹配的类似行为。
复合对象由单个对象和/或其他复合对象组成。
🤯 还困惑吗?
让我们稍微分解一下。假设我们在商店买了一台打印机。它装在一个盒子里。打开盒子后,我们可以看到盒子里有一台打印机,但旁边还有另一个盒子。这个盒子里有一根电源线和一个用于打印机的 USB 适配器。
我们可以将打印机本身视为一个单一对象,而盒子则是一个复合对象。它包含一台打印机和另一个盒子。这个嵌套的盒子包含一根电源线和一个 USB 适配器,两者都是单一对象,因此这个盒子是一个复合对象。
希望这能让这个概念更清晰!☀️
这种结构允许我们通过单个公共接口递归地遍历树,因为它允许我们统一地处理单个对象和对象组合。
让我们看一个例子🚀
理解这个模式的最好方法肯定是看它的例子。
让我们想象一个假想的任务执行者。🤖
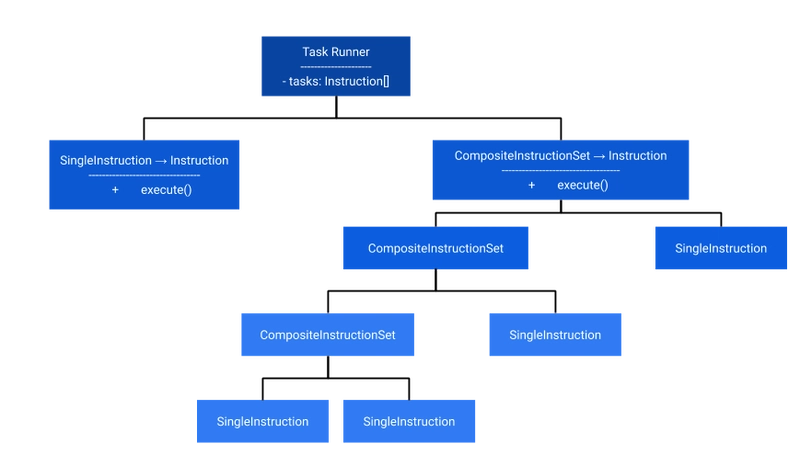
我们为该 Task Runner 提供一组Task Instructions。但每个 Task RunnerTask Instruction可能有Sub Task Instructions,并且每个 Task RunnerSub Task Instruction可能有自己的Sub Task Instructions。
我们已经看到,这有可能是一个递归结构。
我们不一定希望 Task Runner 在每次执行时都必须检查Instruction它是否是Composite Instruction Set或Single Instruction。
应该包含任务运行器不需要知道的或Composite Instruction Set的子项列表。Composite Instruction SetSingle Instruction
因此,为了解决这个问题,我们将定义一个通用Instruction接口,其中包含和实现的execute()方法。Composite Instruction SetSingle Instruction
Instructions任务运行器将遍历调用方法的列表execute()。
Single Instructions将执行他们的自定义逻辑,同时Composite Instruction Sets将遍历他们的子项并调用他们的execute()方法。
他们不需要知道他们的孩子是否是Composite或Single Instructions,并且任务运行器也不需要知道Instructions它需要运行的具体组成,从而提供了很大的灵活性!
下图说明了上述示例:
我们为什么需要它?😐
当我们拥有具有相似行为的不同类型的对象或包含具有相似行为的子对象时,就会出现核心问题。
在运行所需逻辑之前进行类型检查是不可取的,因为它会强制客户端代码与其正在处理的对象的结构紧密耦合,以便在需要时可能遍历子对象。
相反,我们希望我们的对象本身知道执行当前操作所需的逻辑,从而允许我们递归遍历树状结构,而不必担心树中每个叶节点的类型。
让我们看看一些代码!👩💻
以上面的 Task Runner 示例为例,我们将其放入代码中。
我们需要一个接口来定义Single Instructions和之间的共同行为Composite Instructions。
export interface Instruction {
    /**
     * Each instruction should have a name for
     * enhanced reporting and identification
     */
    name: string;

    /**
     * We want our execute method to return wether
     * it was executed successfully or not
     */
    execute(): boolean;
}
现在我们已经定义了接口,接下来我们将定义我们的SingleInstruction和CompositeInstructionSet类。
我们希望我们的SingleInstructions灵活且可扩展,以便开发人员能够创建 Task Runner 能够理解的自定义指令。
export abstract class SingleInstruction implements Instruction {
    name: string;

    constructor(name: string) {
        this.name = name;
    }

    abstract execute(): boolean;
}

export class CompositeInstructionSet implements Instruction {
    // Our composite instruction should have children
    // that can be any implementation of Instruction
    private children: Instruction[] = [];

    name: string;

    constructor(name: string) {
        this.name = name;
    }

    execute() {
        let successful = false;

        // We'll iterate through our children calling their execute method
        // We don't need to know if our child is a Composite Instruction Set
        // or just a SingleInstruction
        for (const child of this.children) {
            successful = child.execute();

            // If any of the child tasks fail, lets fail this one
            if (!successful) {
                return false;
            }
        }
    }

    // Our CompositeInstructionSet needs a public API to manage it's children
    addChild(child: Instruction) {
        this.children.push(child);
    }

    removeChild(child: Instruction) {
        this.children = this.children.filter(c => c.name !== child.name);
    }
}
为了举例,让我们创建一个始终return true输出日志的日志指令。
export class LogInstructon extends SingleInstruction {
    log: string;

    constructor(name: string, log: string) {
        super(name);

        this.log = log;
    }

    execute() {
        console.log(`${this.name}: ${this.log}`);
        return true;
    }
}
现在我们已经定义了任务指令的结构,让我们创建任务运行器本身。
export class TaskRunner {
    tasks: Instruction[];

    constructor(tasks: Instruction[]) {
        this.tasks = tasks;
    }

    runTasks() {
        for (const task of this.tasks) {
            task.execute();
        }
    }
}
就这么简单!任务运行器不需要知道或关心它正在处理的指令类型,只要它能够调用指令的execute()方法,就能把繁重的工作交给指令本身!
让我们看看实际的代码。
function main() {
    // Lets start by creating a SingleInstruction and our CompositeInstructionSet
    const startUpLogInstruction = new LogInstructon('Starting', 'Task runner booting up...');
    const compositeInstruction = new CompositeInstructionSet('Composite');

    // Now let's define some sub tasks for the CompositeInstructionSet
    const firstSubTask = new LogInstructon('Composite 1', 'The first sub task');
    const secondSubTask = new LogInstructon('Composite 2', 'The second sub task');

    // Let's add these sub tasks as children to the CompositeInstructionSet we created earlier
    compositeInstruction.addChild(firstSubTask);
    compositeInstruction.addChild(secondSubTask);

    // Now let's create our TaskRunner with our Tasks
    const taskRunner = new TaskRunner([startUpLogInstruction, compositeInstruction]);

    // Finally, we'll ask the TaskRunner to run the tasks
    taskRunner.runTasks();
    // Output:
    // Starting: Task runner booting up...
    // Composite 1: The first sub task
    // Composite 2: The second sub task
}
希望这段代码能让大家充分感受到这个设计模式的强大之处!
它可以用于各种树形数据系统,从购物车到包裹投递系统!
太棒了!🚀🚀🚀
希望您通过本文学到一些(更多? )有关复合模式的知识。
如果您有任何疑问,请随时在下面提问或在 Twitter 上联系我:@FerryColum。
文章来源:https://dev.to/coly010/the-composite-pattern-design-patterns-meet-the-frontend-445e 后端开发教程 - Java、Spring Boot 实战 - msg200.com
