如何使用 React 和 TypeScript 构建客户列表管理应用程序
作者选择技术教育基金作为Write for DOnations计划的一部分来接受捐赠。
介绍
TypeScript极大地改进了JavaScript开发者构建和编写应用程序(尤其是 Web 应用程序)代码的方式。TypeScript 被定义为 JavaScript 的超集,其行为与 JavaScript 完全相同,但还包含一些额外的功能,旨在帮助开发者构建更大、更复杂的程序,同时减少甚至消除错误。TypeScript 正日益流行;谷歌等大型公司已将其用于 Angular Web 框架。Nest.js后端框架也是使用 TypeScript 构建的。
提高开发人员生产力的方法之一是能够尽快实现新功能,而无需担心破坏生产环境中的现有应用。为了实现这一点,许多经验丰富的开发人员采用静态类型代码编写风格。像 TypeScript 这样的静态类型编程语言会强制每个变量与数据类型关联;例如字符串、整数、布尔值等等。使用静态类型编程语言的主要优势之一是类型检查在编译时完成,因此开发人员可以在很早的阶段发现代码中的错误。
React是一个开源 JavaScript 库,开发者可以使用它为可扩展的 Web 应用程序创建高端用户界面。React 为单页应用程序构建的出色性能和动态用户界面使其成为开发者的热门选择。
在本教程中,您将创建一个客户列表管理应用程序,它包含一个独立的 REST API 后端和一个使用 React 和 TypeScript 构建的前端。您将使用名为 的模拟 REST API 构建后端json-server。您将使用它快速设置 CRUD(创建、读取、更新和删除)后端。这样,您就可以专注于使用 React 和 TypeScript 处理应用程序的前端逻辑。
先决条件
要完成本教程,您需要:
-
本地安装Node.js(至少 v6 版本)和
npm(至少 v5.2 版本)。Node.js 是一个 JavaScript 运行时环境,允许您在浏览器之外运行代码。它预装了一个名为 的包管理器,可用于安装和更新包。要在 macOS 或 Ubuntu 18.04 上安装这些包,请按照如何在 macOS 上安装 Node.js 并创建本地开发环境npm中的步骤,或如何在 Ubuntu 18.04 上安装 Node.js 中的“使用 PPA 安装”部分进行操作。 -
Yarn 的本地安装;按照以下步骤在您的操作系统上安装 Yarn。
-
对 TypeScript 和JavaScript有基本的了解。
-
安装了文本编辑器;例如Visual Studio Code、Atom或Sublime Text。
第 1 步 - 安装 TypeScript 并创建 React 应用程序
在此步骤中,您将使用 Node 包管理器 ( ) 在您的计算机上全局安装 TypeScript 包npm。之后,您还将安装 React 及其依赖项,并通过运行开发服务器来检查您的 React 应用是否正常运行。
首先,打开终端并运行以下命令来安装 TypeScript:
npm install -g typescript
安装过程完成后,执行以下命令检查 TypeScript 的安装:
tsc -v
您将看到机器上安装的当前版本:
Output
Version 3.4.5
create-react-app接下来,您将使用该工具通过单个命令设置应用程序来安装React 应用程序。您将使用npx命令,它是 5.2 及更高版本附带的软件包运行工具npm。该create-react-app工具内置了对 TypeScript 的支持,无需任何额外配置。运行以下命令来创建并安装一个名为 的新 React 应用程序typescript-react-app:
npx create-react-app typescript-react-app --typescript
上述命令将创建一个名为 的新 React 应用程序typescript-react-app。该--typescript标志将 React 组件的默认文件类型设置为.tsx。
在完成本节之前,应用程序需要从一个端口迁移到另一个端口。为此,您需要为 React 应用程序安装一个名为React Router 的路由库及其对应的 TypeScript 定义。您将使用以下yarn命令安装此库和其他软件包。这样做是因为yarn速度更快,尤其是在安装 React 应用程序的依赖项时。进入新创建的项目文件夹,然后使用以下命令安装 React Router:
cd typescript-react-app
yarn add react-router-dom
现在你已经拥有了 React Router 包,它将在你的项目中提供路由功能。接下来,运行以下命令来安装 React Router 的 TypeScript 定义:
yarn add @types/react-router-dom
现在您将安装axios,这是一个基于承诺的浏览器 HTTP 客户端,以帮助您在应用程序中创建的不同组件执行 HTTP 请求的过程:
yarn add axios
安装过程完成后,使用以下命令启动开发服务器:
yarn start
您的应用程序将在 上运行http://localhost:3000。

您已成功安装 TypeScript,创建了一个新的 React 应用程序,并安装了 React Router,以便从应用程序的一个页面导航到另一个页面。在下一部分中,您将为应用程序设置后端服务器。
第 2 步 — 创建 JSON 服务器
在此步骤中,您将创建一个模拟服务器,以便您的 React 应用程序可以快速连接并使用其资源。需要注意的是,此后端服务不适用于生产环境中的应用程序。您可以使用 Nest.js、Express 或任何其他后端技术在生产环境中构建 RESTful API。json-server无论何时您需要创建原型并模拟后端服务器,它都是一个非常有用的工具。
您可以使用npm或yarn来安装json-server到您的机器上。这样,无论何时您需要使用它,它都可以从项目的任何目录中使用。打开一个新的终端窗口,并json-server在项目目录中运行以下命令进行安装:
yarn global add json-server
接下来,您将创建一个 JSON 文件,其中包含 REST API 将公开的数据。对于此文件中指定的对象(您将创建),将自动生成 CRUD 端点。首先,创建一个名为 的新文件夹server,然后将其移动到其中:
mkdir server
cd server
现在,使用nano创建并打开一个名为的新文件db.json:
nano db.json
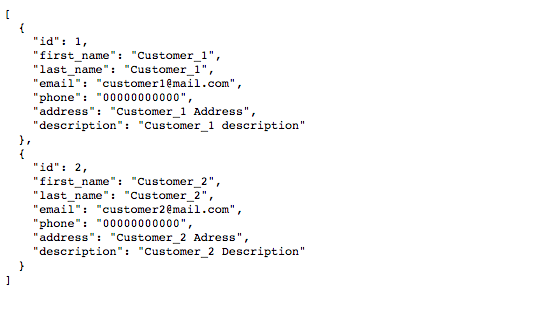
在文件中添加以下内容:
    {
        "customers": [
            {
                "id": 1,
                "first_name": "Customer_1",
                "last_name": "Customer_11",
                "email": "customer1@mail.com",
                "phone": "00000000000",
                "address": "Customer_1 Address",
                "description": "Customer_1 description"
            },
            {
                "id": 2,
                "first_name": "Customer_2",
                "last_name": "Customer_2",
                "email": "customer2@mail.com",
                "phone": "00000000000",
                "address": "Customer_2 Adress",
                "description": "Customer_2 Description"
            }
        ]
    }
JSON 结构由一个客户对象组成,该对象分配了两个数据集。每个客户包含七个属性:id、description、first_name、last_name、email、phone和address。
保存并退出文件。
默认情况下,json-server运行在 端口上3000——这与你的 React 应用程序运行的端口相同。为避免冲突,你可以更改 的默认端口json-server。为此,请转到应用程序的根目录:
cd ~/typescript-react-app
使用您喜欢的文本编辑器打开应用程序并创建一个名为的新文件json-server.json:
nano json-server.json
现在插入以下内容来更新端口号:
{
    "port": 5000
}
这将作为配置文件json-server,并确保服务器始终在其中指定的端口上运行。
保存并退出文件。
要运行服务器,请使用以下命令:
json-server --watch server/db.json
这将启动json-server端口5000。如果您在浏览器中导航至http://localhost:5000/customers,您将看到服务器显示您的客户列表。
为了简化运行的过程json-server,您可以使用以对象命名的新属性进行更新,如下package.json所示:serverscripts
{
...
  "scripts": {
    "start": "react-scripts start",
    "build": "react-scripts build",
    "test": "react-scripts test",
    "eject": "react-scripts eject",
    "server": "json-server --watch server/db.json"
  },
...
}
保存并退出文件。
现在,无论何时您想启动json-server,您只需yarn server从终端运行即可。
您已创建一个简单的 REST API,并将其用作此应用程序的后端服务器。您还创建了一个客户 JSON 对象,它将用作 REST API 的默认数据。最后,您为后端服务器配置了一个备用端口,该端口由 提供支持json-server。接下来,您将为您的应用程序构建可重用的组件。
第 3 步 - 创建可重用组件
在本节中,您将为应用程序创建所需的 React 组件。这将包括分别用于在数据库中创建、显示和编辑特定客户详细信息的组件。您还将为应用程序构建一些 TypeScript 接口。
首先,回到运行 React 应用程序的终端,并使用 停止开发服务器CTRL + C。接下来,导航到./src/以下文件夹:
cd ./src/
components然后,在其中创建一个名为的新文件夹并移动到新文件夹:
mkdir components
cd components
在新创建的文件夹中,创建一个customer文件夹,然后移入该文件夹:
mkdir customer
cd customer
现在创建两个名为Create.tsx和 的新文件Edit.tsx:
touch Create.tsx Edit.tsx
这些文件是 React 可重用组件,它们将呈现表单并分别保存用于创建和编辑客户详细信息的所有业务逻辑。
在文本编辑器中打开该Create.tsx文件并添加以下代码:
    import * as React from 'react';
    import axios from 'axios';
    import { RouteComponentProps, withRouter } from 'react-router-dom';

    export interface IValues {
        first_name: string,
        last_name: string,
        email: string,
        phone: string,
        address: string,
        description: string,
    }
    export interface IFormState {
        [key: string]: any;
        values: IValues[];
        submitSuccess: boolean;
        loading: boolean;
    }
这里,您已从 React Router 包中导入React、axios以及其他路由所需的组件。之后,您创建了两个名为 和 的新接口。TypeScriptIValues接口IFormState有助于定义应传递给对象的特定值类型,并在整个应用程序中强制一致性。这可以确保程序中不太可能出现错误。
接下来,您将构建一个Create扩展的组件。在文件中紧接着接口之后React.Component添加以下代码:Create.tsxIFormState
    class Create extends React.Component<RouteComponentProps, IFormState> {
        constructor(props: RouteComponentProps) {
            super(props);
            this.state = {
                first_name: '',
                last_name: '',
                email: '',
                phone: '',
                address: '',
                description: '',
                values: [],
                loading: false,
                submitSuccess: false,
            }
        }
    }
    export default withRouter(Create)
这里你用 Typescript 定义了一个 React 组件。在本例中,Create类组件接受props(“属性”的缩写) 类型的参数RouteComponentProps,并使用 类型的状态IFormState。然后,在构造函数中,你初始化了state对象,并定义了所有将代表客户渲染值的变量。
Create接下来,在类组件中,构造函数之后添加这些方法。您将使用这些方法来处理客户表单并处理输入字段中的所有更改:
              values: [],
              loading: false,
              submitSuccess: false,
          }
      }

      private processFormSubmission = (e: React.FormEvent<HTMLFormElement>): void => {
              e.preventDefault();
              this.setState({ loading: true });
              const formData = {
                  first_name: this.state.first_name,
                  last_name: this.state.last_name,
                  email: this.state.email,
                  phone: this.state.phone,
                  address: this.state.address,
                  description: this.state.description,
              }
              this.setState({ submitSuccess: true, values: [...this.state.values, formData], loading: false });
              axios.post(`http://localhost:5000/customers`, formData).then(data => [
                  setTimeout(() => {
                      this.props.history.push('/');
                  }, 1500)
              ]);
          }

          private handleInputChanges = (e: React.FormEvent<HTMLInputElement>) => {
              e.preventDefault();
              this.setState({
                  [e.currentTarget.name]: e.currentTarget.value,
          })
      }

    ...
    export default withRouter(Create)
    ...
该processFormSubmission()方法从应用程序状态中接收客户的详细信息,并使用 将其发布到数据库axios。handleInputChanges()用于React.FormEvent获取所有输入字段的值,并调用this.setState()来更新应用程序的状态。
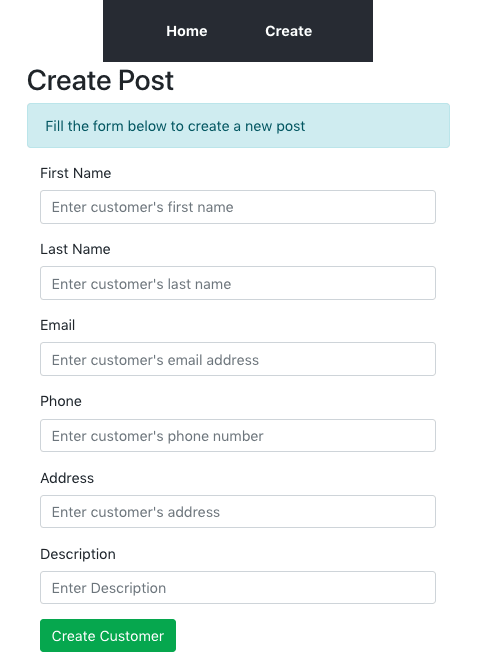
render()接下来,在类组件中Create紧接着该方法之后添加该方法handleInputchanges()。此render()方法将显示在应用程序中创建新客户的表单:
      public render() {
          const { submitSuccess, loading } = this.state;
          return (
              <div>
                  <div className={"col-md-12 form-wrapper"}>
                      <h2> Create Post </h2>
                      {!submitSuccess && (
                          <div className="alert alert-info" role="alert">
                              Fill the form below to create a new post
                      </div>
                      )}
                      {submitSuccess && (
                          <div className="alert alert-info" role="alert">
                              The form was successfully submitted!
                              </div>
                      )}
                      <form id={"create-post-form"} onSubmit={this.processFormSubmission} noValidate={true}>
                          <div className="form-group col-md-12">
                              <label htmlFor="first_name"> First Name </label>
                              <input type="text" id="first_name" onChange={(e) => this.handleInputChanges(e)} name="first_name" className="form-control" placeholder="Enter customer's first name" />
                          </div>
                          <div className="form-group col-md-12">
                              <label htmlFor="last_name"> Last Name </label>
                              <input type="text" id="last_name" onChange={(e) => this.handleInputChanges(e)} name="last_name" className="form-control" placeholder="Enter customer's last name" />
                          </div>
                          <div className="form-group col-md-12">
                              <label htmlFor="email"> Email </label>
                              <input type="email" id="email" onChange={(e) => this.handleInputChanges(e)} name="email" className="form-control" placeholder="Enter customer's email address" />
                          </div>
                          <div className="form-group col-md-12">
                              <label htmlFor="phone"> Phone </label>
                              <input type="text" id="phone" onChange={(e) => this.handleInputChanges(e)} name="phone" className="form-control" placeholder="Enter customer's phone number" />
                          </div>
                          <div className="form-group col-md-12">
                              <label htmlFor="address"> Address </label>
                              <input type="text" id="address" onChange={(e) => this.handleInputChanges(e)} name="address" className="form-control" placeholder="Enter customer's address" />
                          </div>
                          <div className="form-group col-md-12">
                              <label htmlFor="description"> Description </label>
                              <input type="text" id="description" onChange={(e) => this.handleInputChanges(e)} name="description" className="form-control" placeholder="Enter Description" />
                          </div>
                          <div className="form-group col-md-4 pull-right">
                              <button className="btn btn-success" type="submit">
                                  Create Customer
                              </button>
                              {loading &&
                                  <span className="fa fa-circle-o-notch fa-spin" />
                              }
                          </div>
                      </form>
                  </div>
              </div>
          )
      }
在这里,您创建了一个包含输入字段的表单,用于保存客户的first_name、last_name、email、phone、address和的值。每个输入字段都有一个在每次按键时运行的方法,使用从输入字段获取的值更新 React 。此外,根据应用程序的状态,一个名为 的布尔变量将控制应用程序在创建新客户之前和之后显示的消息。descriptionhandleInputChanges()statesubmitSuccess
您可以在此GitHub 存储库中查看此文件的完整代码。
保存并退出Create.tsx。
现在您已经向应用程序的组件文件添加了适当的逻辑Create,接下来您将继续为组件文件添加内容Edit。
打开文件夹Edit.tsx中的文件customer,首先添加以下内容以导入React、axios并定义 TypeScript 接口:
    import * as React from 'react';
    import { RouteComponentProps, withRouter } from 'react-router-dom';
    import axios from 'axios';

    export interface IValues {
        [key: string]: any;
    }
    export interface IFormState {
        id: number,
        customer: any;
        values: IValues[];
        submitSuccess: boolean;
        loading: boolean;
    }
与组件类似Create,您需要导入所需的模块并分别创建IValues和IFormState接口。IValues接口定义输入字段值的数据类型,而您将使用IFormState来声明应用程序状态对象的预期类型。
接下来,在接口块EditCustomer之后直接创建类组件,IFormState如下所示:
    ...
    class EditCustomer extends React.Component<RouteComponentProps<any>, IFormState> {
        constructor(props: RouteComponentProps) {
            super(props);
            this.state = {
                id: this.props.match.params.id,
                customer: {},
                values: [],
                loading: false,
                submitSuccess: false,
            }
        }
    }
    export default withRouter(EditCustomer)
此组件接受RouteComponentProps<any>和 的接口IFormState作为参数。之所以使用 加 的方式,<any>是RouteComponentProps因为 React Router 解析路径参数时,不会进行任何类型转换来确定数据类型是number还是string。由于您期望uniqueId客户的 参数为 ,因此使用 更安全any。
现在在组件内添加以下方法:
```
...
public componentDidMount(): void {
axios.get( http://localhost:5000/customers/${this.state.id}) .then(data => {
this.setState({ customer: data.data });
})
}
    private processFormSubmission = async (e: React.FormEvent<HTMLFormElement>): Promise<void> => {
        e.preventDefault();
        this.setState({ loading: true });
        axios.patch(`http://localhost:5000/customers/${this.state.id}`, this.state.values).then(data => {
            this.setState({ submitSuccess: true, loading: false })
            setTimeout(() => {
                this.props.history.push('/');
            }, 1500)
        })
    }

    private setValues = (values: IValues) => {
        this.setState({ values: { ...this.state.values, ...values } });
    }
    private handleInputChanges = (e: React.FormEvent<HTMLInputElement>) => {
        e.preventDefault();
        this.setValues({ [e.currentTarget.id]: e.currentTarget.value })
    }
...
}

export default withRouter(EditCustomer)
First, you add a `componentDidMount()` method, which is a lifecycle method that is being called when the component is created. The method takes the `id` obtained from the route parameter to identify a particular customer as a parameter, uses it to retrieve their details from the database and then populates the form with it. Furthermore, you add methods to process form submission and handle changes made to the values of the input fields.

Lastly, add the `render()` method for the `Edit` component:


    ```
   ...
        public render() {
            const { submitSuccess, loading } = this.state;
            return (
                <div className="App">
                    {this.state.customer &&
                        <div>
                            < h1 > Customer List Management App</h1>
                            <p> Built with React.js and TypeScript </p>

                            <div>
                                <div className={"col-md-12 form-wrapper"}>
                                    <h2> Edit Customer </h2>
                                    {submitSuccess && (
                                        <div className="alert alert-info" role="alert">
                                            Customer's details has been edited successfully </div>
                                    )}
                                    <form id={"create-post-form"} onSubmit={this.processFormSubmission} noValidate={true}>
                                        <div className="form-group col-md-12">
                                            <label htmlFor="first_name"> First Name </label>
                                            <input type="text" id="first_name" defaultValue={this.state.customer.first_name} onChange={(e) => this.handleInputChanges(e)} name="first_name" className="form-control" placeholder="Enter customer's first name" />
                                        </div>
                                        <div className="form-group col-md-12">
                                            <label htmlFor="last_name"> Last Name </label>
                                            <input type="text" id="last_name" defaultValue={this.state.customer.last_name} onChange={(e) => this.handleInputChanges(e)} name="last_name" className="form-control" placeholder="Enter customer's last name" />
                                        </div>
                                        <div className="form-group col-md-12">
                                            <label htmlFor="email"> Email </label>
                                            <input type="email" id="email" defaultValue={this.state.customer.email} onChange={(e) => this.handleInputChanges(e)} name="email" className="form-control" placeholder="Enter customer's email address" />
                                        </div>
                                        <div className="form-group col-md-12">
                                            <label htmlFor="phone"> Phone </label>
                                            <input type="text" id="phone" defaultValue={this.state.customer.phone} onChange={(e) => this.handleInputChanges(e)} name="phone" className="form-control" placeholder="Enter customer's phone number" />
                                        </div>
                                        <div className="form-group col-md-12">
                                            <label htmlFor="address"> Address </label>
                                            <input type="text" id="address" defaultValue={this.state.customer.address} onChange={(e) => this.handleInputChanges(e)} name="address" className="form-control" placeholder="Enter customer's address" />
                                        </div>
                                        <div className="form-group col-md-12">
                                            <label htmlFor="description"> Description </label>
                                            <input type="text" id="description" defaultValue={this.state.customer.description} onChange={(e) => this.handleInputChanges(e)} name="description" className="form-control" placeholder="Enter Description" />
                                        </div>
                                        <div className="form-group col-md-4 pull-right">
                                            <button className="btn btn-success" type="submit">
                                                Edit Customer </button>
                                            {loading &&
                                                <span className="fa fa-circle-o-notch fa-spin" />
                                            }
                                        </div>
                                    </form>
                                </div>
                            </div>
                        </div>
                    }
                </div>
            )
        }
在这里,您创建了一个表单来编辑特定客户的详细信息,然后使用应用程序状态获取的客户详细信息填充该表单中的输入字段。与Create组件类似,所有输入字段的更改都将由该方法处理handleInputChanges()。
您可以在此GitHub 存储库中查看此文件的完整代码。
保存并退出Edit.tsx。
要查看应用程序中创建的客户的完整列表,您需要在./src/components文件夹中创建一个新组件并将其命名为Home.tsx:
cd ./src/components
nano Home.tsx
添加以下内容:
    import * as React from 'react';
    import { Link, RouteComponentProps } from 'react-router-dom';
    import axios from 'axios';

    interface IState {
        customers: any[];
    }

    export default class Home extends React.Component<RouteComponentProps, IState> {
        constructor(props: RouteComponentProps) {
            super(props);
            this.state = { customers: [] }
        }
        public componentDidMount(): void {
            axios.get(`http://localhost:5000/customers`).then(data => {
                this.setState({ customers: data.data })
            })
        }
        public deleteCustomer(id: number) {
            axios.delete(`http://localhost:5000/customers/${id}`).then(data => {
                const index = this.state.customers.findIndex(customer => customer.id === id);
                this.state.customers.splice(index, 1);
                this.props.history.push('/');
            })
        }
    }
在这里,您从 React Router 导入了React、axios和其他必需的组件。您在Home组件中创建了两个新方法:
componentDidMount():组件挂载后,应用程序会立即调用此方法。它的作用是检索客户列表并更新主页。deleteCustomer():此方法将接受作为参数,并从数据库中id删除与该参数标识的客户的详细信息。id
现在添加render()方法来显示包含组件客户列表的表Home:
    public render() {
            const customers = this.state.customers;
            return (
                <div>
                    {customers.length === 0 && (
                        <div className="text-center">
                            <h2>No customer found at the moment</h2>
                        </div>
                    )}
                    <div className="container">
                        <div className="row">
                            <table className="table table-bordered">
                                <thead className="thead-light">
                                    <tr>
                                        <th scope="col">Firstname</th>
                                        <th scope="col">Lastname</th>
                                        <th scope="col">Email</th>
                                        <th scope="col">Phone</th>
                                        <th scope="col">Address</th>
                                        <th scope="col">Description</th>
                                        <th scope="col">Actions</th>
                                    </tr>
                                </thead>
                                <tbody>
                                    {customers && customers.map(customer =>
                                        <tr key={customer.id}>
                                            <td>{customer.first_name}</td>
                                            <td>{customer.last_name}</td>
                                            <td>{customer.email}</td>
                                            <td>{customer.phone}</td>
                                            <td>{customer.address}</td>
                                            <td>{customer.description}</td>
                                            <td>
                                                <div className="d-flex justify-content-between align-items-center">
                                                    <div className="btn-group" style={{ marginBottom: "20px" }}>
                                                        <Link to={`edit/${customer.id}`} className="btn btn-sm btn-outline-secondary">Edit Customer </Link>
                                                        <button className="btn btn-sm btn-outline-secondary" onClick={() => this.deleteCustomer(customer.id)}>Delete Customer</button>
                                                    </div>
                                                </div>
                                            </td>
                                        </tr>
                                    )}
                                </tbody>
                            </table>
                        </div>
                    </div>
                </div>
            )
        }
在此代码块中,您将从应用程序的状态中检索客户列表作为数组,对其进行迭代,并将其显示在 HTML 表中。您还添加了一个customer.id参数,该方法将使用该参数从列表中识别和删除特定客户的详细信息。
保存并退出Home.tsx。
通过使用接口定义组件和 props 的类型,您已为本应用程序创建的所有组件采用了静态类型原则。这是在 React 应用程序中使用 TypeScript 的最佳方法之一。
至此,您已完成应用程序所需的所有可重用组件的创建。现在,您可以使用迄今为止创建的所有组件的链接来更新应用程序组件。
第 4 步 - 设置路由并更新应用程序的入口点
在此步骤中,您将从 React Router 包中导入必要的组件,并配置App组件以根据加载的路由渲染不同的组件。这将允许您浏览应用程序的不同页面。例如,当用户访问某个路由时,/createReact Router 将使用指定的路径来渲染内容,并在定义用于处理该路由的相应组件中执行相应的逻辑。
导航至./src/App.tsx:
nano App.tsx
然后将其内容替换为以下内容:
    import * as React from 'react';
    import './App.css';
    import { Switch, Route, withRouter, RouteComponentProps, Link } from 'react-router-dom';
    import Home from './components/Home';
    import Create from './components/customer/Create';
    import EditCustomer from './components/customer/Edit';

    class App extends React.Component<RouteComponentProps<any>> {
      public render() {
        return (
          <div>
            <nav>
              <ul>
                <li>
                  <Link to={'/'}> Home </Link>
                </li>
                <li>
                  <Link to={'/create'}> Create Customer </Link>
                </li>
              </ul>
            </nav>
            <Switch>
              <Route path={'/'} exact component={Home} />
              <Route path={'/create'} exact component={Create} />
              <Route path={'/edit/:id'} exact component={EditCustomer} />
            </Switch>
          </div>
        );
      }
    }
    export default withRouter(App);
您从 React Router 包中导入了所有必要的组件,还导入了用于创建、编辑和查看客户详细信息的可重复使用组件。
保存并退出App.tsx。
该./src/index.tsx文件是此应用程序的入口点,并用于渲染应用程序。打开此文件并将 React Router 导入其中,然后将App组件包装在BrowserRouter:
    import React from 'react';
    import ReactDOM from 'react-dom';
    import './index.css';
    import App from './App';
    import { BrowserRouter } from 'react-router-dom';
    import * as serviceWorker from './serviceWorker';
    ReactDOM.render(
        <BrowserRouter>
            <App />
        </BrowserRouter>
        , document.getElementById('root')
    );
    serviceWorker.unregister();
React Router 使用BrowserRouter组件使您的应用程序了解导航,例如历史记录和当前路径。
编辑完成后Index.tsx,保存并退出。
最后,您将使用Bootstrap为您的应用程序添加一些样式。Bootstrap是一个流行的 HTML、CSS 和 JavaScript 框架,用于开发响应式、移动优先的 Web 项目。它允许开发人员构建美观的用户界面,而无需编写过多的 CSS。它配备了一个响应式网格系统,使网页在所有设备上都能呈现完美的外观。
要将 Bootstrap 和样式纳入您的应用程序,请将内容替换./src/App.css为以下内容:
    @import 'https://maxcdn.bootstrapcdn.com/bootstrap/4.0.0/css/bootstrap.min.css';

    .form-wrapper {
      width: 500px;
      margin: 0 auto;
    }
    .App {
      text-align: center;
      margin-top: 30px;
    }
    nav {
      width: 300px;
      margin: 0 auto;
      background: #282c34;
      height: 70px;
      line-height: 70px;
    }
    nav ul li {
      display: inline;
      list-style-type: none;
      text-align: center;
      padding: 30px;
    }
    nav ul li a {
      margin: 50px 0;
      font-weight: bold;
      color: white;
      text-decoration: none;
    }
    nav ul li a:hover {
      color: white;
      text-decoration: none;
    }
    table {
      margin-top: 50px;
    }
    .App-link {
      color: #61dafb;
    }
    @keyframes App-logo-spin {
      from {
        transform: rotate(0deg);
      }
      to {
        transform: rotate(360deg);
      }
    }
您在此处使用了 Bootstrap,通过为应用程序指定默认布局、样式和颜色来增强其外观和风格。您还添加了一些自定义样式,尤其是导航栏的样式。
保存并退出App.css。
在本节中,您已配置 React Router,使其根据用户访问的路由渲染相应的组件,并添加了一些样式,使应用程序对用户更具吸引力。接下来,您将测试应用程序实现的所有功能。
第5步 - 运行您的应用程序
现在您已经通过创建几个可重用的组件用 React 和 TypeScript 设置了此应用程序的前端,并且还使用构建了 REST API json-server,您可以运行您的应用程序。
导航回项目的根文件夹:
cd ~/typescript-react-app
接下来运行以下命令来启动您的应用程序:
yarn start
注意:请确保您的服务器仍在另一个终端窗口中运行。否则,请使用以下命令启动它yarn server:
导航到 ,http://localhost:3000从浏览器查看应用程序。然后点击“创建”按钮,填写客户的详细信息。
在输入字段中输入适当的值后,单击“创建客户”按钮提交表单。完成新客户创建后,应用程序将重定向回主页。

单击任意行的“编辑客户”按钮,您将被定向到承载该行相应客户的编辑功能的页面。
编辑客户的详细信息,然后单击“编辑客户”以更新客户的详细信息。
您已运行应用程序,确保所有组件正常运行。使用应用程序的不同页面,您已创建并编辑了客户条目。
结论
在本教程中,您使用React和TypeScript构建了一个客户列表管理应用。本教程中的流程与使用 JavaScript 构建 React 应用的传统方式有所不同。您充分利用了 TypeScript 的优势来完成这篇以前端为重点的教程。
要继续开发此项目,您可以将模拟后端服务器迁移到可用于生产的后端技术,例如Express或Nest.js 。此外,您还可以使用Passport.js身份验证库等不同工具添加更多功能(例如身份验证和授权),从而扩展本教程中构建的内容。
您可以在 GitHub 上找到该项目的完整源代码。

本作品采用Creative Commons Attribution-NonCommercial-ShareAlike 4.0 国际许可协议进行许可
鏂囩珷鏉ユ簮锛�https://dev.to/digitalocean/how-to-build-a-customer-list-management-app-with-react-and-typescript-39np