自定义和美化您的 Windows 终端(2022 版)
Windows Terminal 是一款面向频繁使用 Powershell 等命令行工具的开发者的现代终端应用。本文将向你展示如何自定义Windows Terminal 和 Powershell,以便与你的朋友和同事轻松便捷地沟通。
这是我们的最终结果👇

在我们开始之前,请从 Microsoft Store 下载 Windows Terminal。
目录:
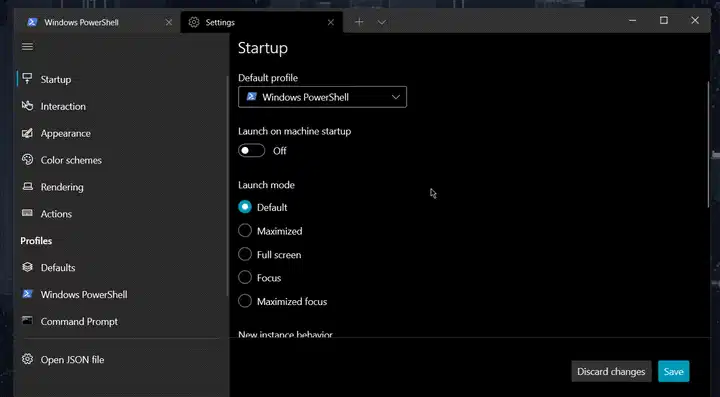
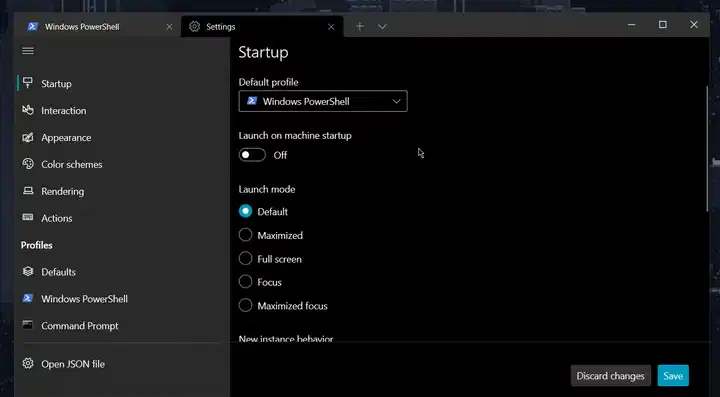
Windows 终端设置
Ctrl您可以通过+,快捷键或下拉菜单打开设置:

配色方案
我的配色方案是Sonokai Shusia的稍微修改版本。要安装配色方案:
- 在 Windows 终端中打开“设置”,然后按左下角的“打开 JSON 文件”按钮。它将
settings.json在记事本中打开。 -
在 中
settings.json,向下滚动找到"schemes"接受配色方案对象数组的字段。接下来,将我的配色方案对象粘贴到数组中第一个对象之前(注意,对象顺序无关紧要)。{ ... "schemes": [ { "name": "Sonokai Shusia", "background": "#2D2A2E", "black": "#1A181A", "blue": "#1080D0", "brightBlack": "#707070", "brightBlue": "#22D5FF", "brightCyan": "#7ACCD7", "brightGreen": "#A4CD7C", "brightPurple": "#AB9DF2", "brightRed": "#F882A5", "brightWhite": "#E3E1E4", "brightYellow": "#E5D37E", "cursorColor": "#FFFFFF", "cyan": "#3AA5D0", "foreground": "#E3E1E4", "green": "#7FCD2B", "purple": "#7C63F2", "red": "#F82F66", "selectionBackground": "#FFFFFF", "white": "#E3E1E4", "yellow": "#E5DE2D" }, ... ] } -
保存更改并返回 Windows 终端。前往“设置”→“Windows Powershell”配置文件→“外观”选项卡→“配色方案”,选择新的配色方案。然后,按“保存”。
如果你不喜欢我的自定义主题,可以看看Windows 终端主题网站。这里有 200 多个主题可供选择,而且你可以快速预览每个主题🌈。
书呆子字体
Nerd 字体是指包含大量字形(图标)的编程字体。在 Windows 终端中使用 Nerd 字体至关重要,因为普通的等宽字体无法正确呈现图标:

您使用的编程字体(例如 Cascadia Code、Fira Code)可能已经包含 Nerd 字体版本。点击此链接,查看可安装的已修复 Nerd 字体完整列表。
在我的设置中,我使用Fira Code Nerd Font。链接会下载一个包含许多 TrueType 字体文件的 ZIP 文件。只需安装名称类似于 的文件即可Fira Code XXXXX Nerd Font Complete Windows Compatible。
安装 Nerd Font 后:
- 关闭并重新打开 Windows 终端,以重新启动它。
- 转到设置 → “Windows Powershell” 配置文件 → “外观” 选项卡 → “字体”,然后选择新安装的 Nerd 字体:
现在,你的终端应该看起来更加赏心悦目了:
哦,我的时髦
Oh My Posh是一款提示符主题引擎,可以让你美化提示符字符串。此引擎要求你的终端使用Nerd 字体,因此请确保你已遵循上述步骤。
设置
-
从 Microsoft Store安装“应用安装程序”以获取
wingetWindows 程序包管理器 CLI。- ⚠ 需要 Windows 10 1809(版本 17763)或更高版本
- 查看Oh My Posh 的文档以了解其他安装选项。
-
重新启动 Windows 终端并运行
winget以检查包管理器是否正确安装。 -
在 Windows 终端中,运行
winget install JanDeDobbeleer.OhMyPosh -
重启 Windows 终端。接下来,尝试
oh-my-posh在 Powershell 中运行,看看它是否已正确安装。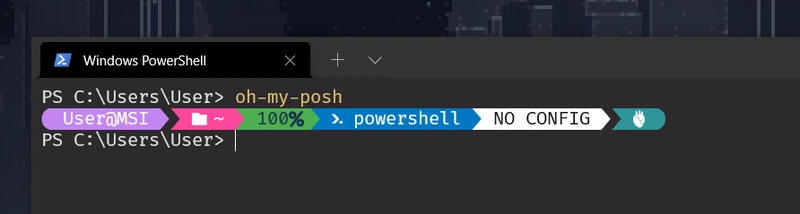
-
运行以下命令打开您的 Powershell 配置文件。
notepad $PROFILE如果记事本提示未找到“Microsoft.Powershell_profile.ps1”,并询问是否要创建该文件,请按“是”创建该文件。
-
在文件中粘贴以下代码并保存。这将在启动时加载 Oh My Posh 的默认主题。
oh-my-posh --init --shell pwsh --config ~/AppData/Local/Programs/oh-my-posh/themes/jandedobbeleer.omp.json | Invoke-Expression -
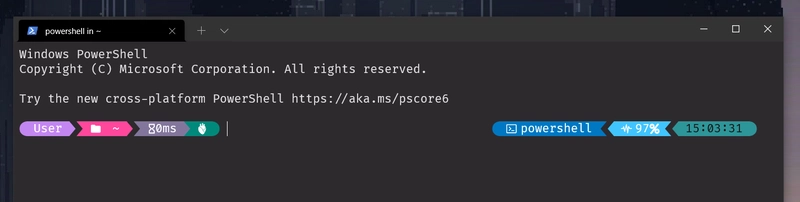
重启终端。Powershell 应该会自动加载 Oh My Posh。


更改主题
Oh My Posh 预装了超过 70 款主题,开箱即用。查看“主题”页面文档,查看预装主题库。
~\AppData\Local\Programs\oh-my-posh\themes如果您以前安装过 Oh My Posh,所有主题都位于winget。如果您使用了其他安装方法,请访问文档并选择您的安装方法,查看主题的位置。
假设您想使用powerlevel10k_rainbow预装主题:
-
notepad $PROFILE像我们之前所做的那样,打开 Windows 终端并在 Powershell 中运行。 -
在打开的文件中,更改后面的路径
--config以便使用powerlevel10k_rainbow.omp.json:oh-my-posh --init --shell pwsh --config ~/AppData/Local/Programs/oh-my-posh/themes/powerlevel10k_rainbow.omp.json | Invoke-Expression -
重启终端:


自定义主题
您可以通过编写自己的 JSON 文件轻松创建自己的主题。以下是一些有用的链接:
- 文档的“配置 → 常规”页面- 了解如何创建自定义主题
- Nerd Font 的速查表- 您可以使用的不同字形列表
我创建了一个名为的自定义主题,其灵感来自名为powerlevel10k_classicp10k_classic的预装主题。
| { | |
| "$schema": "https://raw.githubusercontent.com/JanDeDobbeleer/oh-my-posh/main/themes/schema.json", | |
| "blocks": [ | |
| { | |
| "alignment": "left", | |
| "newline": true, | |
| "segments": [ | |
| { | |
| "foreground": "lightYellow", | |
| "style": "plain", | |
| "template": " \uf0e7 ", | |
| "type": "root" | |
| }, | |
| { | |
| "background": "p:bg", | |
| "foreground": "lightCyan", | |
| "properties": { | |
| "mixed_threshold": 6, | |
| "style": "folder" | |
| }, | |
| "style": "plain", | |
| "template": "<transparent,p:bg>\ue0b0</> \uf07c {{ .Path }} ", | |
| "type": "path" | |
| }, | |
| { | |
| "background": "p:bg", | |
| "foreground": "green", | |
| "properties": { | |
| "branch_icon": "\ue725 ", | |
| "fetch_stash_count": true, | |
| "fetch_status": true, | |
| "fetch_upstream_icon": false | |
| }, | |
| "style": "plain", | |
| "template": "<p:separator-fg>\ue0b1 </>{{ .UpstreamIcon }}{{ .HEAD }}{{ .BranchStatus }}{{ if .Working.Changed }} \uf044 {{ .Working.String }}{{ end }}{{ if and (.Working.Changed) (.Staging.Changed) }} |{{ end }}{{ if .Staging.Changed }} \uf046 {{ .Staging.String }}{{ end }}{{ if gt .StashCount 0 }} \uf692 {{ .StashCount }}{{ end }} ", | |
| "type": "git" | |
| }, | |
| { | |
| "foreground": "p:bg", | |
| "style": "plain", | |
| "template": "\ue0b0 ", | |
| "type": "text" | |
| } | |
| ], | |
| "type": "prompt" | |
| }, | |
| { | |
| "segments": [ | |
| { | |
| "background": "p:bg", | |
| "foreground": "#689f63", | |
| "invert_powerline": true, | |
| "powerline_symbol": "\ue0b2", | |
| "properties": { | |
| "fetch_version": true | |
| }, | |
| "style": "powerline", | |
| "template": " \uf898 {{ .Full }} <p:separator-fg>\ue0b3</>", | |
| "type": "node" | |
| }, | |
| { | |
| "background": "p:bg", | |
| "foreground": "#FFDE57", | |
| "invert_powerline": true, | |
| "powerline_symbol": "\ue0b2", | |
| "properties": { | |
| "display_mode": "files", | |
| "fetch_virtual_env": false | |
| }, | |
| "style": "powerline", | |
| "template": " \ue235 {{ .Full }} <p:separator-fg>\ue0b3</>", | |
| "type": "python" | |
| }, | |
| { | |
| "background": "p:bg", | |
| "background_templates": [ | |
| "{{ if gt .Code 0 }}red{{ end }}" | |
| ], | |
| "foreground_templates": [ | |
| "{{ if gt .Code 0 }}white{{ else }}green{{ end }}" | |
| ], | |
| "invert_powerline": true, | |
| "powerline_symbol": "\ue0b2", | |
| "properties": { | |
| "always_enabled": true | |
| }, | |
| "style": "powerline", | |
| "template": " {{ if gt .Code 0 }}\uf071{{ else }}\uf00c{{ end }} ", | |
| "type": "exit" | |
| } | |
| ], | |
| "type": "rprompt" | |
| } | |
| ], | |
| "palette": { | |
| "bg": "#3f3f3f", | |
| "separator-fg": "#919191" | |
| }, | |
| "version": 2 | |
| } |
使用我的主题:
-
访问GitHub Gist 链接并单击右上角的“下载 ZIP”按钮。
-
解压
p10k_classic.omp.json到您选择的位置。例如,我们将其放在根文件夹 (~)。 -
打开 Windows 终端并
notepad $PROFILE在 Powershell 中运行。 -
在打开的文件中,更改路径以便
--config使用~/p10k_classic.omp.jsonoh-my-posh --init --shell pwsh --config ~/p10k_classic.omp.json | Invoke-Expression -
重启终端:


温菲奇
另外,我们将安装winfetch,这是一个可以打印系统信息的命令行工具。它是neofetch的绝佳替代品,后者仅适用于 Linux。
设置
此 wiki 页面列出了几种安装 winfetch 的方法。我们使用推荐的第一个方法:PSGallery。
-
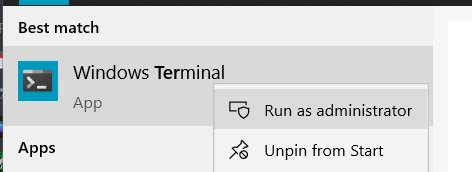
以管理员身份运行 Windows 终端。在“开始”菜单中搜索“Windows 终端”,右键单击该项目,然后点击“以管理员身份运行”。
-
在 Powershell 中运行以下命令:
Install-Script -Name pwshfetch-test-1对于遇到的任何提示,请选择“是”。
-
运行
notepad $PROFILE打开Powershell配置文件,在最后添加以下一行代码:Set-Alias winfetch pwshfetch-test-1 -
重启终端。然后运行
winfetch查看是否正确安装。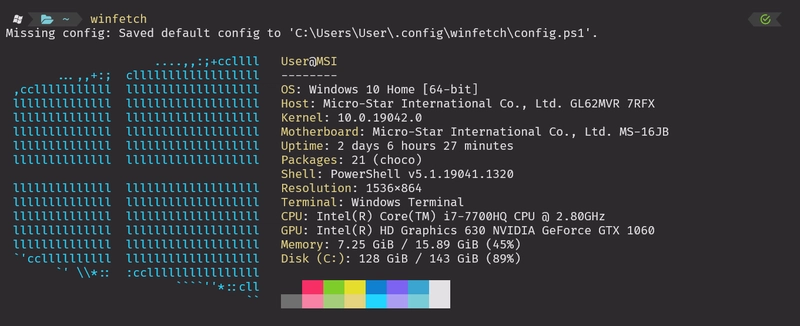


默认的 winfetch 配置保存在~\.config\winfetch\config.ps1。查看“配置”wiki 页面,查看所有可用的配置选项。
自定义图像
左侧的 Windows 徽标可以更改为自定义“图像”(更像是低分辨率像素艺术,因为 Windows 终端无法呈现全分辨率图像)。
例如,我想显示我的 GitHub 个人资料图片,这是一幅 8 位 Luigi 艺术作品:

-
保存此图像并将其放置在您选择的位置。例如,我将其保存在根文件夹 (
~) 中,并将其命名为luigi.png。 -
在记事本中打开
~\.config\winfetch\config.ps1。将前两个变量更改为以下内容:# ===== WINFETCH CONFIGURATION ===== $image = "C:\Users\User\luigi.png" # ABSOLUTE path $noimage = $false⚠ 我使用了绝对路径,
$image因为我电脑上的 Winfetch 无法处理相对路径 (~/luigi.png)。我的根文件夹的完整路径是C:\Users\User。 -
保存文件并
winfetch在 Powershell 中运行: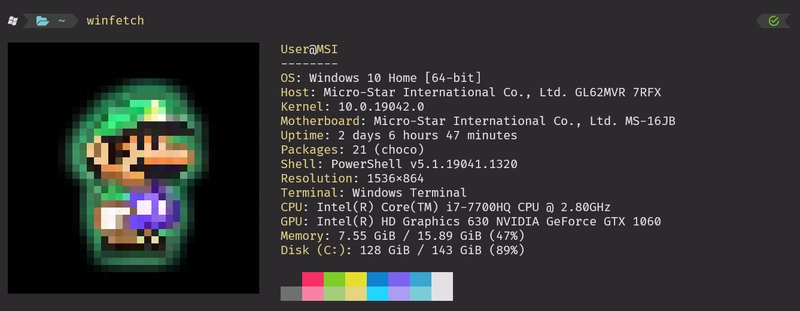

更多配置
默认情况下,winfetch 仅显示 C 盘的信息。要显示所有可用驱动器,请打开~\.config\winfetch\config.ps1并取消注释以下字段:
# Configure which disks are shown
# $ShowDisks = @("C:", "D:")
# Show all available disks
$ShowDisks = @("*")
您还可以显示内存(RAM)和磁盘使用情况的条形图:
# Configure how to show info for levels
# Default is for text only.
# 'bar' is for bar only.
# 'textbar' is for text + bar.
# 'bartext' is for bar + text.
# $cpustyle = 'bar'
$memorystyle = 'bartext'
$diskstyle = 'bartext'
# $batterystyle = 'bartext'
这是我们的最终结果:

以上就是美化终端所需的全部步骤🌈。现在是时候在朋友和同事面前炫耀一番了!😁
感谢阅读!如果觉得有用,别忘了点赞和分享这篇文章哦🙌
文章来源:https://dev.to/ansonh/customize-beautify-your-windows-terminal-2022-edition-541l