学习 Python:从零到大师

首先,什么是 Python?根据 Python 创始人 Guido van Rossum 的说法,Python 是:
“高级编程语言,其核心设计理念是代码的可读性和允许程序员用几行代码表达概念的语法。”
对我来说,学习 Python 的首要原因是它实际上是一门优美的编程语言。用它编写代码、表达想法非常自然。
另一个原因是,Python 编程的应用非常广泛:数据科学、Web 开发和机器学习都在这里大放异彩。Quora、Pinterest 和 Spotify 都使用 Python 进行后端 Web 开发。那么,让我们来了解一下 Python 吧。
基础知识
1.变量
你可以把变量想象成存储值的单词。就这么简单。
在 Python 中,定义变量并赋值非常简单。假设你想将数字 1 存储在一个名为“one”的变量中。我们来做一下:
one = 1
这有多简单?你只需将值 1 赋给变量“one”即可。
two = 2
some_number = 10000
你可以将任何其他值赋给你想要的变量。如上表所示,变量“ two ”存储整数2,“ some_number ”存储10,000。
除了整数,我们还可以使用布尔值(True / False)、字符串、浮点数和许多其他数据类型。
# booleans
true_boolean = True
false_boolean = False

# string
my_name = "Leandro Tk"

# float
book_price = 15.80
2. 控制流:条件语句
“ If ” 使用表达式来判断语句的真假。如果为真,则执行“if”语句中的内容。例如:
if True:
  print("Hello Python If")

if 2 > 1:
  print("2 is greater than 1")
2大于1 ,因此执行“打印”代码。
如果“ if ”表达式为假,则执行“ else ”语句。
if 1 > 2:
  print("1 is greater than 2")
else:
  print("1 is not greater than 2")
1不大于2 ,因此将执行“ else ”语句内的代码。
您还可以使用“ elif ”语句:
if 1 > 2:
  print("1 is greater than 2")
elif 2 > 1:
  print("1 is not greater than 2")
else:
  print("1 is equal to 2")
3. 循环/迭代器
在 Python 中,我们可以用不同的形式进行迭代。我将讨论其中两种:while和for。
While循环:当语句为 True 时,块内的代码将被执行。因此,此代码将打印从1到10 的数字。
num = 1

while num <= 10:
    print(num)
    num += 1
while循环需要一个“循环条件”。如果条件为 True,则继续迭代。在本例中,当num为时,11循环条件等于False。
为了更好地理解它,还有另一段基本代码:
loop_condition = True

while loop_condition:
    print("Loop Condition keeps: %s" %(loop_condition))
    loop_condition = False
循环条件是,True因此它会不断迭代——直到我们将其设置为False。
For 循环:将变量“ num ”应用到代码块中,“ for ”语句将为您迭代该代码块。此代码将打印与while代码相同的内容:从1到10。
for i in range(1, 11):
  print(i)
看到了吗?很简单。范围从第 th 个元素开始1,直到11第 th 个元素(10就是10第 th 个元素)。
列表:集合 | 数组 | 数据结构
假设你想在一个变量中存储整数 1。但现在你可能想存储 2,还有 3、4、5……
我有没有其他方法来存储我想要的所有整数,而不是用数百万个变量?你猜对了——确实有另一种方法来存储它们。
List是一个可用于存储值列表(例如您想要的这些整数)的集合。那么让我们使用它:
my_integers = [1, 2, 3, 4, 5]
这真的很简单。我们创建一个数组并将其存储在my_integer中。
但也许你会问:“我怎样才能从这个数组中获取一个值?”
好问题。List有一个概念叫index。第一个元素的索引为 0(零)。第二个元素的索引为 1,以此类推。你懂的。
为了更清晰地理解,我们可以用索引来表示数组和每个元素。我可以这样画:
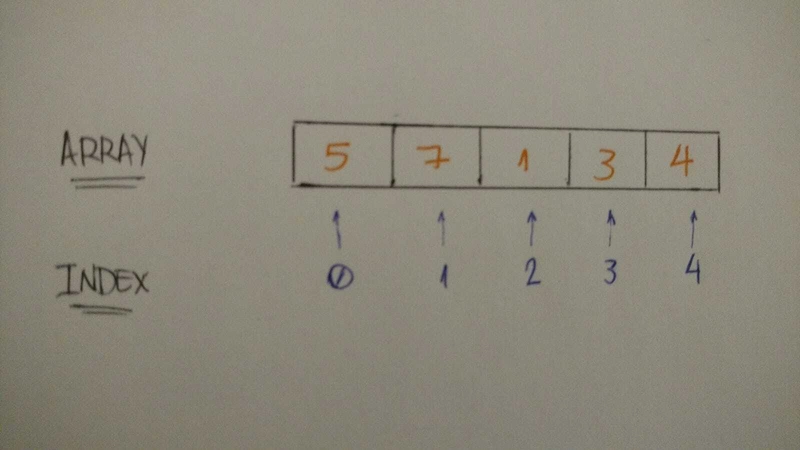
使用Python语法,也很简单理解:
my_integers = [5, 7, 1, 3, 4]
print(my_integers[0]) # 5
print(my_integers[1]) # 7
print(my_integers[4]) # 4
想象一下,你不想存储整数,只想存储字符串,比如亲戚姓名列表。我的代码如下:
relatives_names = [
  "Toshiaki",
  "Juliana",
  "Yuji",
  "Bruno",
  "Kaio"
]

print(relatives_names[4]) # Kaio
它的工作方式与整数相同。很棒。
我们刚刚学习了Lists索引的工作原理。但我还需要向你展示如何向数据结构中添加元素List(向列表中添加一项)。
向 a 添加新值的最常用方法List是append。让我们看看它是如何工作的:
bookshelf = []
bookshelf.append("The Effective Engineer")
bookshelf.append("The 4 Hour Work Week")
print(bookshelf[0]) # The Effective Engineer
print(bookshelf[1]) # The 4 Hour Work Week
append非常简单。你只需要将元素(例如“高效工程师”)作为append参数即可。
好了,关于 就说这么多Lists。我们来谈谈另一个数据结构。
字典:键值数据结构
现在我们知道了Lists可以用整数作为索引。但是如果我们不想使用整数作为索引怎么办?我们可以使用一些数据结构,例如数字、字符串或其他类型的索引。
让我们来了解一下Dictionary数据结构。Dictionary是键值对的集合。它看起来是这样的:
dictionary_example = {
  "key1": "value1",
  "key2": "value2",
  "key3": "value3"
}
键是指向值的索引。我们如何访问值呢?你猜对了——使用键。我们来试试:Dictionary
dictionary_tk = {
  "name": "Leandro",
  "nickname": "Tk",
  "nationality": "Brazilian"
}

print("My name is %s" %(dictionary_tk["name"])) # My name is Leandro
print("But you can call me %s" %(dictionary_tk["nickname"])) # But you can call me Tk
print("And by the way I'm %s" %(dictionary_tk["nationality"])) # And by the way I'm Brazilian
我创建了一个Dictionary关于我的信息。我的姓名、昵称和国籍。这些属性是Dictionary 关键。
当我们学习了如何List使用索引访问时,我们还使用索引(上下文中的键Dictionary)来访问存储在中的值Dictionary。
在示例中,我使用 中存储的所有值打印了一条关于我的短语Dictionary。很简单,对吧?
另一个很酷的功能Dictionary是我们可以使用任何值。在Dictionary我创建的键中,我想添加键“age”和我的真实整数年龄:
dictionary_tk = {
  "name": "Leandro",
  "nickname": "Tk",
  "nationality": "Brazilian",
  "age": 24
}

print("My name is %s" %(dictionary_tk["name"])) # My name is Leandro
print("But you can call me %s" %(dictionary_tk["nickname"])) # But you can call me Tk
print("And by the way I'm %i and %s" %(dictionary_tk["age"], dictionary_tk["nationality"])) # And by the way I'm Brazilian
这里我们有一个键(年龄)值(24)对,使用字符串作为键,整数作为值。
就像我们在 中所做的那样Lists,让我们学习如何向 中添加元素Dictionary。键**指向一个值**是 的重要组成部分Dictionary。当我们讨论向其中添加元素时,这一点也同样适用:
dictionary_tk = {
  "name": "Leandro",
  "nickname": "Tk",
  "nationality": "Brazilian"
}

dictionary_tk['age'] = 24

print(dictionary_tk) # {'nationality': 'Brazilian', 'age': 24, 'nickname': 'Tk', 'name': 'Leandro'}
我们只需要为key分配一个值。没什么复杂的,对吧?Dictionary
迭代:循环遍历数据结构
正如我们在Python 基础中学到的,List迭代非常简单。我们Python开发人员通常使用For循环。让我们来做一下:
bookshelf = [
  "The Effective Engineer",
  "The 4 hours work week",
  "Zero to One",
  "Lean Startup",
  "Hooked"
]

for book in bookshelf:
    print(book)
因此,对于书架上的每本书,我们(可以对其进行任何操作)都会打印出来。非常简单直观。这就是 Python。
对于哈希数据结构,我们也可以使用for循环,但我们应用key :
dictionary = { "some_key": "some_value" }

for key in dictionary:
    print("%s --> %s" %(key, dictionary[key]))

# some_key --> some_value
这是一个如何使用它的示例。对于key中的每个dictionary ,我们print及其key对应的value。
另一种方法是使用该iteritems方法。
dictionary = { "some_key": "some_value" }

for key, value in dictionary.items():
    print("%s --> %s" %(key, value))

# some_key --> some_value
我们确实将这两个参数命名为key和value,但这不是必须的。我们可以随意命名它们。让我们看看:
dictionary_tk = {
  "name": "Leandro",
  "nickname": "Tk",
  "nationality": "Brazilian",
  "age": 24
}

for attribute, value in dictionary_tk.items():
    print("My %s is %s" %(attribute, value))

# My name is Leandro
# My nickname is Tk
# My nationality is Brazilian
# My age is 24
我们可以看到,我们使用了属性作为 的参数Dictionary key,并且它正常工作。太棒了!
类和对象
一点理论:
对象是现实世界中物体的表示,例如汽车、狗或自行车。对象有两个主要特征:数据和行为。
汽车拥有数据,例如车轮数量、车门数量和座位容量,它们还表现出行为:它们可以加速、停止、显示剩余燃料量以及许多其他事情。
在面向对象编程中,我们将数据视为属性,将行为视为方法。再次强调:
数据 → 属性和行为 → 方法
类是创建单个对象的蓝图。在现实世界中,我们经常会发现许多具有相同类型的对象。例如汽车。它们都具有相同的品牌和型号(并且都具有引擎、车轮、车门等等)。每辆汽车都基于同一套蓝图制造,并且具有相同的组件。
Python 面向对象编程模式:开启
Python作为面向对象的编程语言,有这些概念:类和对象。
类是其对象的蓝图和模型。
再说一遍,类只是一个模型,或者说是一种定义属性和行为的方式(正如我们在理论部分讨论的那样)。例如,车辆类有其自身的属性,这些属性定义了哪些对象是车辆。车轮数量、油箱类型、座位容量和最大速度都是车辆的属性。
考虑到这一点,让我们看一下类的 Python 语法:
class Vehicle:
    pass
我们用 class 语句来定义类——就是这样。很简单,不是吗?
对象是类的实例。我们通过命名类来创建实例。
car = Vehicle()
print(car) # <__main__.Vehicle instance at 0x7fb1de6c2638>
这car是该类的一个对象(或实例)。 Vehicle
记住,我们的车辆类有四个属性:车轮数量、油箱类型、座位容量和最大速度。我们在创建车辆对象时设置所有这些属性。因此,我们在这里定义类,以便在启动时接收数据:
class Vehicle:
    def __init__(self, number_of_wheels, type_of_tank, seating_capacity, maximum_velocity):
        self.number_of_wheels = number_of_wheels
        self.type_of_tank = type_of_tank
        self.seating_capacity = seating_capacity
        self.maximum_velocity = maximum_velocity
我们使用init 方法。我们称之为构造函数方法。因此,当我们创建车辆对象时,我们可以定义这些属性。想象一下,我们喜欢特斯拉 Model S,并且我们想要创建这种对象。它有四个轮子,使用电力驱动,可容纳五个座位,最高速度为 250 公里/小时(155 英里/小时)。让我们创建这个对象:
tesla_model_s = Vehicle(4, 'electric', 5, 250)
四轮+电动“坦克型”+五座+最高时速250公里/小时。
所有属性都已设置。但是我们如何访问这些属性的值呢?我们向对象发送一条消息,询问它们。我们称之为方法。这是对象的行为。让我们来实现它:
class Vehicle:
    def __init__(self, number_of_wheels, type_of_tank, seating_capacity, maximum_velocity):
        self.number_of_wheels = number_of_wheels
        self.type_of_tank = type_of_tank
        self.seating_capacity = seating_capacity
        self.maximum_velocity = maximum_velocity

    def number_of_wheels(self):
        return self.number_of_wheels

    def set_number_of_wheels(self, number):
        self.number_of_wheels = number
这是两个方法的实现:number_of_wheels和set_number_of_wheels。我们称之为getter& setter。因为第一个方法获取属性值,第二个方法为该属性设置新值。
在 Python 中,我们可以使用@property( decorators) 来定义getters和setters。让我们通过代码来看一下:
class Vehicle:
    def __init__(self, number_of_wheels, type_of_tank, seating_capacity, maximum_velocity):
        self.number_of_wheels = number_of_wheels
        self.type_of_tank = type_of_tank
        self.seating_capacity = seating_capacity
        self.maximum_velocity = maximum_velocity

    @property
    def number_of_wheels(self):
        return self.number_of_wheels

    @number_of_wheels.setter
    def number_of_wheels(self, number):
        self.number_of_wheels = number
我们可以将这些方法用作属性:
tesla_model_s = Vehicle(4, 'electric', 5, 250)
print(tesla_model_s.number_of_wheels) # 4
tesla_model_s.number_of_wheels = 2 # setting number of wheels to 2
print(tesla_model_s.number_of_wheels) # 2
这与定义方法略有不同。方法的作用类似于属性。例如,当我们设置新的车轮数量时,我们不会将 2 作为参数,而是将值 2 设置为。这是一种编写代码的number_of_wheels方法。pythonic gettersetter
但是我们也可以使用其他方法,例如“ make_noise ”方法。让我们看看:
class Vehicle:
    def __init__(self, number_of_wheels, type_of_tank, seating_capacity, maximum_velocity):
        self.number_of_wheels = number_of_wheels
        self.type_of_tank = type_of_tank
        self.seating_capacity = seating_capacity
        self.maximum_velocity = maximum_velocity

    def make_noise(self):
        print('VRUUUUUUUM')
当我们调用此方法时,它只返回一个字符串“VRRRRUUUUM”。
tesla_model_s = Vehicle(4, 'electric', 5, 250)
tesla_model_s.make_noise() # VRUUUUUUUM
封装:隐藏信息
封装是一种限制直接访问对象数据和方法的机制。但与此同时,它却方便了对数据(对象方法)的操作。
封装可以用来隐藏数据成员和成员函数。根据这个定义,封装意味着对象的内部表示通常隐藏在对象定义之外。——维基百科
对象的所有内部表示都对外部隐藏。只有对象本身可以与其内部数据进行交互。
首先,我们需要了解实例变量和方法是如何工作的public。non-public
公共实例变量
对于 Python 类,我们可以在构造函数方法中初始化public instance variable。让我们看看这个:
在构造函数方法中:
class Person:
    def __init__(self, first_name):
        self.first_name = first_name
这里我们将first_name值作为参数应用于public instance variable。
tk = Person('TK')
print(tk.first_name) # => TK
在课堂内:
class Person:
    first_name = 'TK'
这里,我们不需要应用first_name作为参数,并且所有实例对象都将具有class attribute用初始化的TK。
tk = Person()
print(tk.first_name) # => TK
太棒了!我们现在已经学会了使用public instance variables和class attributes。这部分另一个有趣的地方public是我们可以管理变量值。这是什么意思呢? 我们object可以管理它的变量值:Get和Set变量值。
记住这个Person类,我们想给它的变量设置另一个值first_name:
tk = Person('TK')
tk.first_name = 'Kaio'
print(tk.first_name) # => Kaio
好了。我们只需将另一个值 ( kaio) 赋给first_name实例变量,它就会更新该值。就这么简单。既然它是一个public变量,我们就可以这么做。
非公共实例变量
我们在这里不使用术语“私有”,因为在 Python 中没有哪个属性真正是私有的(通常不需要做大量的工作)。—— PEP 8
作为,我们可以在构造函数方法中或类中public instance variable 定义。语法区别在于:对于 ,在名称前使用下划线 ( ) 。non-public instance variablenon-public instance variables_variable
Python 中不存在只能从对象内部访问的“私有”实例变量。然而,大多数 Python 代码都遵循一个约定:以下划线为前缀的名称(例如 _spam)应被视为 API 的非公开部分(无论它是函数、方法还是数据成员)。—— Python 软件基金会
以下是一个例子:
class Person:
    def __init__(self, first_name, email):
        self.first_name = first_name
        self._email = email
你看到这个email变量了吗?我们是这样定义 a 的non-public variable :
tk = Person('TK', 'tk@mail.com')
print(tk._email) # tk@mail.com
我们可以访问和更新它。非公开变量只是一种约定,应该被视为 API 的非公开部分。
因此,我们使用一个允许我们在类定义中执行此操作的方法。让我们实现两个方法(email和update_email)来理解它:
class Person:
    def __init__(self, first_name, email):
        self.first_name = first_name
        self._email = email

    def update_email(self, new_email):
        self._email = new_email

    def email(self):
        return self._email
现在我们可以non-public variables使用这些方法进行更新和访问了。让我们看看:
tk = Person('TK', 'tk@mail.com')
print(tk.email()) # => tk@mail.com
tk._email = 'new_tk@mail.com'
print(tk.email()) # => tk@mail.com
tk.update_email('new_tk@mail.com')
print(tk.email()) # => new_tk@mail.com
公共方法
有了public methods,我们也可以在我们的类之外使用它们:
class Person:
    def __init__(self, first_name, age):
        self.first_name = first_name
        self._age = age

    def show_age(self):
        return self._age
让我们测试一下:
tk = Person('TK', 25)
print(tk.show_age()) # => 25
太好了——我们可以毫无问题地使用它。
非公共方法
但是non-public methods我们做不到。让我们实现相同的Person类,但现在使用show_age non-public method下划线 ( _)。
class Person:
    def __init__(self, first_name, age):
        self.first_name = first_name
        self._age = age

    def _show_age(self):
        return self._age
现在,我们将尝试non-public method使用我们的对象来调用它:
tk = Person('TK', 25)
print(tk._show_age()) # => 25
我们可以访问和更新它。非公开方法只是一种约定,应该被视为 API 的非公开部分。
下面是一个如何使用它的示例:
class Person:
    def __init__(self, first_name, age):
        self.first_name = first_name
        self._age = age

    def show_age(self):
        return self._get_age()

    def _get_age(self):
        return self._age

tk = Person('TK', 25)
print(tk.show_age()) # => 25
这里我们有 a_get_age non-public method和 a show_age public method。 ashow_age可以在我们的对象中使用(在类之外),而 a_get_age只能在类定义内部使用(在show_age方法内部)。不过,还是那句话:这只是惯例。
封装摘要
通过封装,我们可以确保对象的内部表示对外部是隐藏的。
遗传:行为和特征
某些物体具有一些共同点:它们的行为和特征。
比如,我从父亲那里继承了一些性格和行为,比如他的眼睛和头发,以及他的急躁和内向。
在面向对象编程中,类可以从另一个类继承共同的特征(数据)和行为(方法)。
让我们看另一个例子并用 Python 实现它。
ElectricCar类从常规Car类继承了这些相同的属性。
class Car:
    def __init__(self, number_of_wheels, seating_capacity, maximum_velocity):
        self.number_of_wheels = number_of_wheels
        self.seating_capacity = seating_capacity
        self.maximum_velocity = maximum_velocity
我们的Car类实现了:
my_car = Car(4, 5, 250)
print(my_car.number_of_wheels)
print(my_car.seating_capacity)
print(my_car.maximum_velocity)
一旦启动,我们就可以使用所有instance variables创建的内容。很好。
在 Python 中,我们将 a 作为参数应用于parent class。ElectricCarchild class类可以继承自我们的Car类。
class ElectricCar(Car):
    def __init__(self, number_of_wheels, seating_capacity, maximum_velocity):
        Car.__init__(self, number_of_wheels, seating_capacity, maximum_velocity)
就这么简单。我们不需要实现任何其他方法,因为这个类已经拥有了它(继承自Car类)。我们来证明一下:
my_electric_car = ElectricCar(4, 5, 250)
print(my_electric_car.number_of_wheels) # => 4
print(my_electric_car.seating_capacity) # => 5
print(my_electric_car.maximum_velocity) # => 250
美丽的。
就是这样!
我们学习了很多有关 Python 基础知识的知识:
-
Python变量如何工作
-
Python 条件语句的工作原理
-
Python 循环(while 和 for)的工作原理
-
如何使用列表:集合 | 数组
-
字典键值集合
-
我们如何迭代这些数据结构
-
对象和类
-
属性作为对象的数据
-
方法作为对象的行为
-
使用 Python getters 和 setters 以及属性装饰器
-
封装:隐藏信息
-
遗传:行为和特征
恭喜!你完成了这篇关于 Python 的密集内容。
如果你想要完整的 Python 课程,学习更多实际编程技能并构建项目,不妨试试“一个月 Python 训练营”。到时候见☺
想要了解更多关于我学习和掌握编程的历程的故事和帖子,请关注我的出版物《文艺复兴开发者》。
玩得开心,继续学习,并始终坚持编码。
鏂囩珷鏉ユ簮锛�https://dev.to/teekay/learning-python-from-zero-tohero-151h