构建你的 Pokédex:第 1 部分 - NgRX 简介
介绍
初始配置
假后端
NgRX 安装
角度材料
宝可梦服务
NgRX
页面/浏览量
题外话:风格
结论
更多,更多,更多……
这篇文章是系列文章的一部分,我将在其中描述如何使用 NGRX 从初学者到忍者构建你的 Pokédex ,如果你想阅读更多内容,你可以阅读以下文章:
- 第一部分:构建你的宝可梦图鉴:NGRX 简介
- 第 2 部分:构建你的 Pokédex:@ngrx/entity
- 第 3 部分:构建你的 Pokédex:使用 create* 函数改进 NgRX
- 第 4 部分:构建你的 Pokédex:@ngrx/data
- 第 5 部分:构建你的 Pokédex:测试 NgRX
介绍
在这篇文章中,我们将使用Angular框架和NgRX作为状态管理库来开发一个pokédex 。
建议您了解如何在中级水平上管理 Angular,并了解什么是状态管理库,以便正确理解这篇文章,因为在这个系列中,我们将展示如何开发一个具体的例子(Pokédex),这可以作为您对 NgRX 学习的补充。
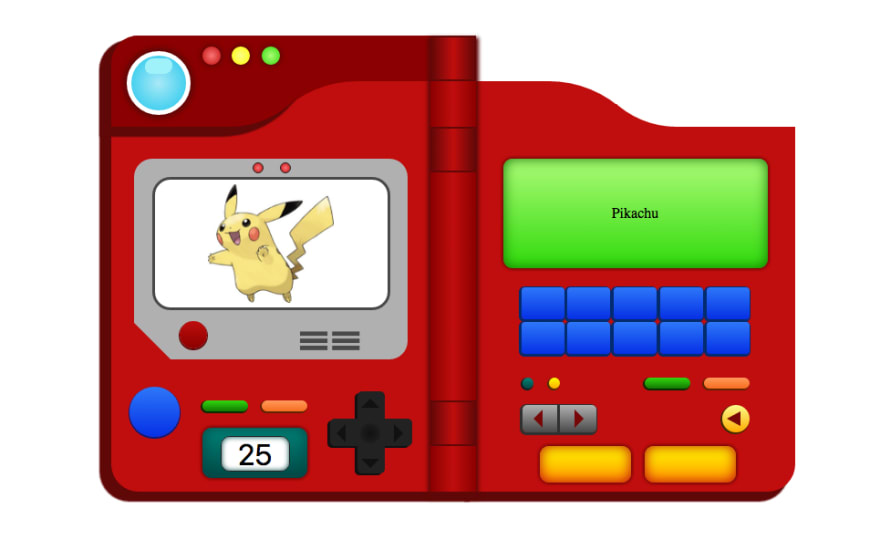
首先,沿着这些柱子建造的结果如下面的 GIF 所示。

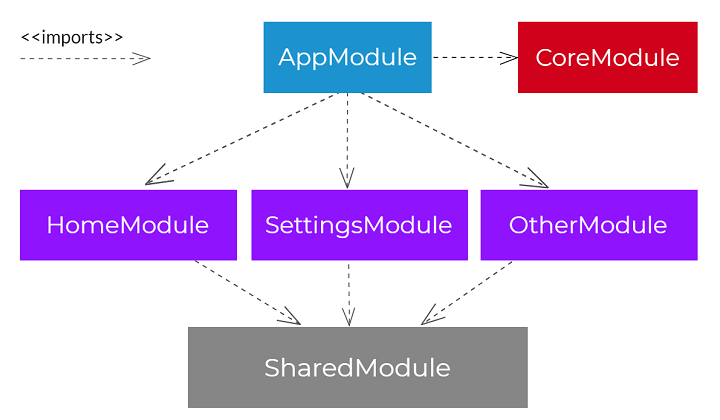
我们的项目的目录结构如下所示(您可以阅读AngularAcademy关于 Angular 架构的文章:

应用程序的结构分为两个明显不同的部分:
- 共享。我们将在这里放置所有模块之间共享的元素,例如管道、指令、服务、模型和状态。
- 状态。状态又被划分为子状态,这些子状态使我们能够管理存储应用程序状态的数据结构。在我们的应用程序中,我们只有一个名为 Pokemon 的状态,其中存储了与 Pokemon 相关的信息。
- 视图。您可以在这里找到应用程序的视图/页面。该应用程序按模块构建:
- CoreModule . 应用程序所必需的服务,需要在初始阶段实例化。
- SharedModule . 所有功能模块之间共享的模块。
- FeatureModules:按应用程序中的功能组织起来的模块。在我们的具体应用中,我们只有一个功能模块 (PokemonModule)。
初始配置
本教程的第一步是使用 CLI 创建一个新的 Angular 项目。然后,会显示创建项目的结果以及所使用的具体版本。
ng new ngrx-pokedex
ng --version

     _                      _                 ____ _     ___
    / \   _ __   __ _ _   _| | __ _ _ __     / ___| |   |_ _|
   / △ \ | '_ \ / _` | | | | |/ _` | '__|   | |   | |    | |
  / ___ \| | | | (_| | |_| | | (_| | |      | |___| |___ | |
 /_/   \_\_| |_|\__, |\__,_|_|\__,_|_|       \____|_____|___|
                |___/


Angular CLI: 8.0.6
Node: 10.15.0
OS: linux x64
Angular: 8.0.3
... animations, common, compiler, compiler-cli, core, forms
... language-service, platform-browser, platform-browser-dynamic
... router

Package                           Version
-----------------------------------------------------------
@angular-devkit/architect         0.800.6
@angular-devkit/build-angular     0.800.6
@angular-devkit/build-optimizer   0.800.6
@angular-devkit/build-webpack     0.800.6
@angular-devkit/core              8.0.6
@angular-devkit/schematics        8.0.6
@angular/cli                      8.0.6
@ngtools/webpack                  8.0.6
@schematics/angular               8.0.6
@schematics/update                0.800.6
rxjs                              6.4.0
typescript                        3.4.5
webpack                           4.30.0
tsconfig.json && 环境
在我使用 TypeScript 的项目中,我喜欢配置path来访问 的子目录,shared而无需使用多层向后缩进 ( ../../ ..)。 该tsconfig.json文件允许您轻松地为路由配置这些别名。
{
  "compileOnSave": false,
  "compilerOptions": {
    "baseUrl": "src",
    "outDir": "./dist/out-tsc",
    "sourceMap": true,
    "declaration": false,
    "downlevelIteration": true,
    "experimentalDecorators": true,
    "module": "esnext",
    "moduleResolution": "node",
    "importHelpers": true,
    "target": "es2015",
    "typeRoots": ["node_modules/@types"],
    "lib": ["es2018", "dom"],
    "resolveJsonModule": true,
    "paths": {
      "@shared/*": ["app/shared/*"],
      "@services/*": ["app/shared/services/*"],
      "@states/*": ["app/shared/states/*"],
      "@views/*": ["app/views/*"],
      "@models/*": ["app/shared/interfaces/*"],
      "@environments/*": ["environments/*"]
    }
  }
}
另一方面,我认为尽快配置开发环境中的环境变量至关重要,以避免在决定从开发阶段转入生产阶段后再执行此任务。因此,我们开发的伪后端的路径将在environment.ts文件中定义,如下所示:
export const environment = {
  production: false,
  backendUrl: 'api/pokemons/'
};
假后端
我们将不再开发在数据库或内存上执行 CRUD 操作的后端,而是in-memory-web-api使用该模块。这使我们能够通过 REST 模拟操作。
该模块拦截原本会转到远程服务器的 AngularHttp和HttpClient请求,并将它们重定向到您控制的内存数据存储。
创建一个InMemoryDataService实现的类InMemoryDbService。
至少,我们必须实现createDb一个方法来创建一个“数据库”哈希,其键是集合名称,值是要返回或更新的集合对象数组。此外,我还实现了一个genId方法,为来自假服务器的每个新 Pokemon 生成一个唯一的 ID。
npm i angular-in-memory-web-api
import { InMemoryDbService } from 'angular-in-memory-web-api';
import { pokemons as pokemonsDB } from '../mock/pokemons';

export class InMemoryDataService implements InMemoryDbService {
  createDb() {
    const pokemons = pokemonsDB;
    return { pokemons };
  }
  genId(): number {
    return Math.round(Math.random() * 1000000);
  }
}
数据来自具有以下结构的模拟文件:
export const pokemons = [
  {
    id: 1,
    photo: 1,
    name: 'bulbasaur',
    types: ['grass', 'poison'],
    height: 7,
    weight: 69,
    description:
      'For some time after its birth, it grows by gaining nourishment from the seed on its back.'
  },
  {
    id: 2,
    photo: 2,
    name: 'ivysaur',
    types: ['grass', 'poison'],
    height: 10,
    weight: 130,
    description:
      'When the bud on its back starts swelling, a sweet aroma wafts to indicate the flowers coming bloom.'
  },
  ...
 ];
最后,服务器会为每个 Pokemon 存储一张静态图像。这些图像存储在路径中,assets/images/pokemon/并使用photo字段进行标识。
HttpClientInMemoryWebApiModule在您的根目录中通过AppModule.imports调用forRoot此服务类和可选配置对象的静态方法注册您的数据存储服务实现:
import { AppComponent } from './app.component';
import { BrowserModule } from '@angular/platform-browser';
import { HttpClientInMemoryWebApiModule } from 'angular-in-memory-web-api';
import { HttpClientModule } from '@angular/common/http';
import { InMemoryDataService } from './shared/services/in-memory-data.service';
import { NgModule } from '@angular/core';

@NgModule({
  declarations: [AppComponent],
  imports: [
    BrowserModule,
    HttpClientModule,
    HttpClientInMemoryWebApiModule.forRoot(InMemoryDataService)
  ],
  providers: [],
  bootstrap: [AppComponent]
})
export class AppModule {}
此内存 Web API 服务处理 HTTP 请求,并以 RESTy Web API 的方式返回 HTTP 响应对象的 Observable。它原生支持以下形式的 URI 模式::base/:collectionName/:id?
例子:
  // for requests to an `api` base URL that gets heroes from a 'heroes' collection
  GET api/heroes          // all heroes
  GET api/heroes/42       // the hero with id=42
  GET api/heroes?name=^j  // 'j' is a regex; returns heroes whose name starting with 'j' or 'J'
  GET api/heroes.json/42  // ignores the ".json"
内存中的 Web API 服务根据您在设置期间定义的“数据库”(一组命名集合)处理这些请求。
NgRX 安装
@ngrx/商店
Store 是受 Redux 启发,基于 RxJS 为 Angular 应用提供状态管理功能。Store 是一个受控状态容器,旨在帮助您在 Angular 上编写高性能、一致的应用程序。
关键概念:
- 操作描述从组件和服务分派的独特事件。
- 状态变化由称为 reducer 的纯函数处理,该函数采用当前状态和最新操作来计算新状态。
- 选择器是用于选择、派生和组成状态片段的纯函数。
- 通过商店访问的状态、状态的可观察对象和动作的观察者。
您只需要安装以下包:
npm install @ngrx/store
@ngrx/效果
Effects 是 Store 的一个由 RxJS 支持的副作用模型。Effect 使用流来提供新的操作源,以减少基于外部交互(例如网络请求、Web 套接字消息和基于时间的事件)的状态。
介绍
在基于服务的 Angular 应用中,组件负责直接通过服务与外部资源交互。而效果提供了一种与这些服务交互并将它们与组件隔离的方法。效果可用于处理各种任务,例如获取数据、执行产生多个事件的长时间运行的任务,以及其他组件无需明确了解这些交互的外部交互。
关键概念
- 效果将副作用与组件隔离开来,允许选择状态和分派操作的更纯粹的组件。
- Effects 运行长期运行的服务,监听从 Store 发送的每个操作的可观察对象。
- 效果会根据感兴趣的操作类型过滤这些操作。这是通过使用运算符来完成的。
- 效果执行同步或异步的任务并返回新的动作。
您只需要安装以下包:
npm install @ngrx/effects
@ngrx/store-devtools
Store Devtools 为 Store 提供开发人员工具和仪器。
配置该工具的步骤如下:
- 安装包:
npm install @ngrx/store-devtools。 - 安装Chrome / Firefox扩展。
- 在
AppModule向模块导入中添加仪器时使用StoreDevtoolsModule.instrument:
import { StoreDevtoolsModule } from '@ngrx/store-devtools';
import { environment } from '../environments/environment'; // Angular CLI environemnt

@NgModule({
  imports: [
    StoreModule.forRoot(reducers),
    // Instrumentation must be imported after importing StoreModule (config is optional)
    StoreDevtoolsModule.instrument({
      maxAge: 25, // Retains last 25 states
      logOnly: environment.production, // Restrict extension to log-only mode
    }),
  ],
})
export class AppModule {}
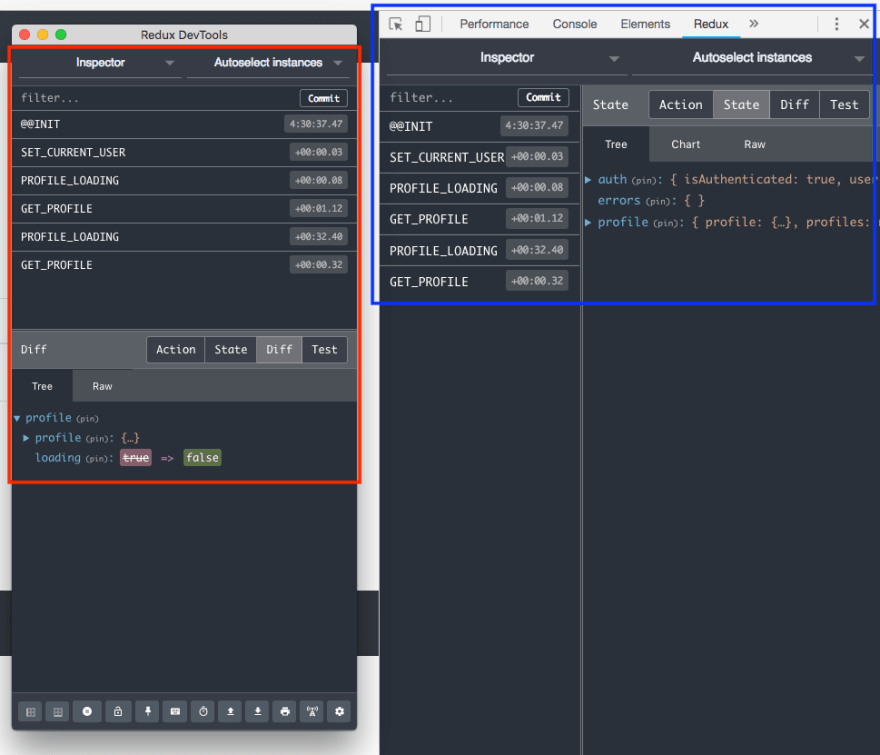
完成这些步骤后,打开浏览器元素检查器,您将看到一个新的 Redux 标签页。在这个新标签页中,您可以看到已触发的操作以及应用程序的状态。

共享模块和核心模块
按照Angular 团队构建 Angular 应用程序架构的说明,将定义两个模块:
- SharedModule。此模块导入和导出在功能模块中共享的模块。请注意,
@angular/material已导入一组属于 的模块,这些模块本来可以在名为 的特定模块中导入和导出shared.material.module。但是,为了简化问题,它直接从 模块导出SharedModule。导入 模块是必要的StoreModule,因为它负责在应用程序中加载存储。最后,导入与表单相关的模块以构建用户界面。 - CoreModule。
StoreModule在此模块中,使用和模块初始化reducers和effectsEffectsModule。
import {
  MatButtonModule,
  MatCardModule,
  MatFormFieldModule,
  MatIconModule,
  MatInputModule,
  MatProgressSpinnerModule,
  MatSelectModule,
  MatSnackBarModule,
  MatToolbarModule
} from '@angular/material';

import { BrowserAnimationsModule } from '@angular/platform-browser/animations';
import { CommonModule } from '@angular/common';
import { FlexLayoutModule } from '@angular/flex-layout';
import { FormsModule } from '@angular/forms';
import { NgModule } from '@angular/core';
import { ReactiveFormsModule } from '@angular/forms';
import { StoreModule } from '@ngrx/store';

const MaterialModules = [
  MatInputModule,
  MatButtonModule,
  MatFormFieldModule,
  MatSelectModule,
  MatIconModule,
  MatCardModule,
  MatToolbarModule,
  MatSnackBarModule,
  MatProgressSpinnerModule
];
@NgModule({
  declarations: [],
  imports: [CommonModule, ReactiveFormsModule],
  exports: [
    CommonModule,
    FormsModule,
    ReactiveFormsModule,
    StoreModule,
    FlexLayoutModule,
    ...MaterialModules,
    BrowserAnimationsModule
  ]
})
export class SharedModule {}
import { CommonModule } from '@angular/common';
import { EffectsModule } from '@ngrx/effects';
import { HttpClientModule } from '@angular/common/http';
import { NgModule } from '@angular/core';
import { PokemonEffects } from '@states/pokemon/pokemon.effects';
import { PokemonService } from '@services/pokemon.service';
import { StoreModule } from '@ngrx/store';
import { reducers } from './shared/states/root.reducer';

@NgModule({
  declarations: [],
  imports: [
    CommonModule,
    HttpClientModule,
    StoreModule.forRoot(reducers),
    EffectsModule.forRoot([PokemonEffects])
  ],
  providers: [PokemonService],
  exports: []
})
export class CoreModule {}
角度材料
Angular Material 的安装非常简单,因为我们只需要安装以下软件包:
npm install @angular/material
npm install @angular/flex-layout
npm install @angular/cdk
宝可梦服务
如果我们必须使用 NGRX 服务,我们会删除所有与应用程序状态相关的逻辑。传统上,在 Angular 中开发服务时,会有一组属性来模拟应用程序的子状态。
使用 NGRX 后,问题大大减少,因为所有与状态管理相关的逻辑都委托给了 Store,从而从服务中消失了。实际上,我们的Pokemon.service服务可以看作是一个更大的服务,它封装了与服务相关的逻辑,HttpClient因为它的唯一任务就是与后端通信。
import { HttpClient } from '@angular/common/http';
import { Injectable } from '@angular/core';
import { Observable } from 'rxjs';
import { Pokemon } from '@shared/interfaces/pokemon.interface';
import { environment } from '@environments/environment';

@Injectable({
  providedIn: 'root'
})
export class PokemonService {
  constructor(private http: HttpClient) {}

  public getAll(): Observable<Pokemon[]> {
    return this.http.get<Pokemon[]>(environment.backendUrl);
  }

  public delete(id: string): Observable<Pokemon> {
    return this.http.delete<Pokemon>(`${environment.backendUrl}/${id}`);
  }

  public add(pokemon: Pokemon): Observable<Pokemon> {
    return this.http.post<Pokemon>(environment.backendUrl, pokemon);
  }

  public update(pokemon: Partial<Pokemon>): Observable<Pokemon> {
    return this.http.put<Pokemon>(`${environment.backendUrl}`, pokemon);
  }
}
如果不需要包含与数据相关的方法,则无需构建类。因此,我们决定创建一个接口,其中每个 Pokemon 的属性都按如下所示进行建模。
export interface Pokemon {
  id: number;
  name: string;
  description: string;
  height: number;
  weight: number;
  photo: string;
}
NgRX
NgRx是一个用于在 Angular 中构建响应式应用的框架。NgRx 提供状态管理、副作用隔离、实体集合管理、路由器绑定、代码生成和开发者工具,可提升开发者构建各种类型应用时的体验。
NgRX由以下概念组成:
- 状态。这里定义了
state我们想要建模的,理想情况下是设计组成完整状态的子状态。 - 操作。可在商店执行或产生影响的操作列表。
- Reducers . 转换状态的方法(由于使用了不变性,因此会创建新状态)。
- 选择器。允许在 store 的子状态上创建可观察对象的方法。选择器非常有用,因为它们允许仅在每个组件中我们感兴趣的 fragment 上创建可观察对象,而无需观察整个 store。
- 效果。 那些不修改存储的方法被合并到这里。在我们的例子中,我们将使用它来创建通知,无论操作是否执行成功。此外,当服务的操作执行成功或失败时,效果用于触发相应的操作。
因此,该@shared/state/pokemon目录由以下文件组成:
该index.ts文件仅用于提高 pokemon 目录中导入的详细程度。
export * from './pokemon.actions';
export * from './pokemon.state';
export * from './pokemon.effects';
export * from './pokemon.reducer';
export * from './pokemon.selector';
状态模型
pokemon我们现在在文件中创建一些状态模型。
@共享/接口/store.interface.ts
import { PokemonState } from '@shared/states/pokemon';

export interface AppStore {
  pokemon: PokemonState;
}
口袋妖怪状态由我们在下面定义的两个属性组成:
- ids。它是一个按特定顺序包含对象键的数字数组。在本篇文章中,我们不会使用此数组,它由一个
@ngrx/entity模块提供,我们将在下一篇文章中讲解。 - 实体。它是一个键值对象,其中键是一个对应于每个 Pokemon 的 ID 的字符串。这样,我们就可以通过键直接访问每个 Pokemon,而无需在数组中搜索。
import { Pokemon } from '@shared/interfaces/pokemon.interface'
export interface PokemonState {
  ids: number[];
  entities: { [key: string]: Pokemon };
}
行动
我们首先要定义的是可以在商店中执行的操作集。传统的操作是由众所周知的缩写 CRUD 组成的。每个操作都由两个额外的操作补充,即 XX_SUCCESS 和 XX_FAILED 操作。
这样,不带后缀的操作将用作与后端通信的服务执行的触发器。
根据服务返回的值,将触发 SUCCESS 或 FAILED 操作。
如果触发了 SUCCESS 操作,则将执行修改 store 的相关 reducer,并发送一条通知,告知操作已成功执行。另一方面,如果触发了 FAILED 操作,则不需要修改 store,而是发送一条通知,告知发生了错误。
因此,我们定义的动作集及其对应的命名空间[Pokemon]如下:
export enum PokemonActionTypes {
  ADD = '[Pokemon] Add',
  ADD_SUCCESS = '[Pokemon] Add success',
  ADD_FAILED = '[Pokemon] Add failed',
  LOAD_POKEMONS = '[Pokemon] Load pokemon',
  LOAD_POKEMONS_SUCCESS = '[Pokemon] Load pokemon success',
  LOAD_POKEMONS_FAILED = '[Pokemon] Load pokemon failed',
  UPDATE = '[Pokemon] Update',
  UPDATE_SUCCESS = '[Pokemon] Update success',
  UPDATE_FAILED = '[Pokemon] Update failed',
  DELETE = '[Pokemon] Delete',
  DELETE_SUCCESS = '[Pokemon] Delete success',
  DELETE_FAILED = '[Pokemon] Delete failed'
}
实现该接口的类Action用于构建 NgRX 生态系统中的每个操作。payload每个类的构造函数中都指定了 。这payload是修改状态的 Reducer 的参数。
类AddSuccess作为示例显示。type属性用于定义该类对应的操作类型。最后,payload与此操作关联的是Pokemon来自后端的 。
export class AddSuccess implements Action {
  readonly type = PokemonActionTypes.ADD_SUCCESS;

  constructor(public pokemon: Pokemon) {}
}
该pokemon.actions.ts文件如下所示:
import { Action } from '@ngrx/store';
import { Pokemon } from '@models/pokemon.interface';

export enum PokemonActionTypes {
  ADD = '[Pokemon] Add',
  ADD_SUCCESS = '[Pokemon] Add success',
  ADD_FAILED = '[Pokemon] Add failed',
  LOAD_POKEMONS = '[Pokemon] Load pokemon',
  LOAD_POKEMONS_SUCCESS = '[Pokemon] Load pokemon success',
  LOAD_POKEMONS_FAILED = '[Pokemon] Load pokemon failed',
  UPDATE = '[Pokemon] Update',
  UPDATE_SUCCESS = '[Pokemon] Update success',
  UPDATE_FAILED = '[Pokemon] Update failed',
  DELETE = '[Pokemon] Delete',
  DELETE_SUCCESS = '[Pokemon] Delete success',
  DELETE_FAILED = '[Pokemon] Delete failed'
}

export class LoadPokemon implements Action {
  readonly type = PokemonActionTypes.LOAD_POKEMONS;

  constructor() {}
}

export class LoadPokemonSuccess implements Action {
  readonly type = PokemonActionTypes.LOAD_POKEMONS_SUCCESS;

  constructor(public payload: Array<Pokemon>) {}
}
export class LoadPokemonFailed implements Action {
  readonly type = PokemonActionTypes.LOAD_POKEMONS_FAILED;

  constructor(public message: string) {}
}

export class Add implements Action {
  readonly type = PokemonActionTypes.ADD;

  constructor(public pokemon: Pokemon) {}
}

export class AddSuccess implements Action {
  readonly type = PokemonActionTypes.ADD_SUCCESS;

  constructor(public pokemon: Pokemon) {}
}
export class AddFailed implements Action {
  readonly type = PokemonActionTypes.ADD_FAILED;

  constructor(public message: string) {}
}

export class Delete implements Action {
  readonly type = PokemonActionTypes.DELETE;

  constructor(public id: number) {}
}
export class DeleteSuccess implements Action {
  readonly type = PokemonActionTypes.DELETE_SUCCESS;

  constructor(public id: number) {}
}
export class DeleteFailed implements Action {
  readonly type = PokemonActionTypes.DELETE_FAILED;

  constructor(public message: string) {}
}

export class Update implements Action {
  readonly type = PokemonActionTypes.UPDATE;

  constructor(public pokemon: Pokemon) {}
}
export class UpdateSuccess implements Action {
  readonly type = PokemonActionTypes.UPDATE_SUCCESS;

  constructor(public pokemon: Pokemon) {}
}
export class UpdateFailed implements Action {
  readonly type = PokemonActionTypes.UPDATE_FAILED;

  constructor(public message: string) {}
}

export type PokemonActions =
  | LoadPokemonSuccess
  | Add
  | AddSuccess
  | AddFailed
  | Delete
  | DeleteSuccess
  | DeleteFailed
  | Update
  | UpdateSuccess
  | UpdateFailed;
Reducers
NgRx 中的 Reducer 负责处理应用程序中从一个状态到下一个状态的转换。Reducer 函数通过根据操作类型确定要处理的操作来处理这些转换。
在 NgRX 生态系统中,只需要导出一个函数来 reduce 到CoreModule。在我们的具体问题中,这个函数就是pokemonReducer。在函数 reducer 中,定义了状态变化。
该函数具有以下签名:
export function pokemonInitialState(): PokemonState {
  return {
    ids: [],
    entities: {}
  };
}

export function pokemonReducer(
  state: PokemonState = pokemonInitialState(),
  action: PokemonActions
): PokemonState
其中接收两个参数:
- state。修改前的当前状态。如果没有当前状态,则使用函数中定义的初始状态。
- 动作。将要对状态执行的操作。
Reduce 函数由一个必须返回switch新的内容组成。PokemonState
switch (action.type) {
    case PokemonActionTypes.LOAD_POKEMONS_SUCCESS:
      return {
        ...state,
        entities: arrayToObject(action.payload)
      };

    case PokemonActionTypes.ADD_SUCCESS:
      return {
        ...state,
        entities: {
          ...state.entities,
          [action.pokemon.id]: action.pokemon
        }
      };

    case PokemonActionTypes.DELETE_SUCCESS:
      const entities = { ...state.entities };
      delete entities[action.id];
      return {
        ...state,
        entities
      };

    case PokemonActionTypes.UPDATE_SUCCESS:
      return {
        ...state,
        entities: {
          ...state.entities,
          [action.pokemon.id]: action.pokemon
        }
      };

    default:
      return state;
  }
请注意,修改状态的情况是“SUCCESS”,其中扩展运算符](https://developer.mozilla.org/en-US/docs/Web/JavaScript/Reference/Operators/Spread_syntax)用于构建新状态。
例如,ADD_SUCCESS 案例返回一个新对象,该新对象由当前状态(... state)和属性的修改entities组合而成。属性是由修改了位置的旧对象与新的对象entities组合而成的新对象。state.entitiesaction.pokemon.idaction.pokemon
值得注意的是,接收到的有效载荷对象将由一个名为的属性组成,pokemon该属性是从创建的操作中作为参数传递的对象。
case PokemonActionTypes.ADD_SUCCESS:
      return {
        ...state,
        entities: {
          ...state.entities,
          [action.pokemon.id]: action.pokemon
        }
      };
该pokemon.reducer.ts文件如下所示。该arrayToObject函数是一个将数组转换为对象的辅助函数
import { PokemonActionTypes, PokemonActions } from './pokemon.actions';

import { PokemonState } from './pokemon.state';

export function pokemonInitialState(): PokemonState {
  return {
    ids: [],
    entities: {}
  };
}

function arrayToObject(array) {
  return array.reduce((obj, item) => {
    obj[item.id] = item;
    return obj;
  }, {});
}

export function pokemonReducer(
  state: PokemonState = pokemonInitialState(),
  action: PokemonActions
): PokemonState {
  switch (action.type) {
    case PokemonActionTypes.LOAD_POKEMONS_SUCCESS:
      return {
        ...state,
        entities: arrayToObject(action.payload)
      };

    case PokemonActionTypes.ADD_SUCCESS:
      return {
        ...state,
        entities: {
          ...state.entities,
          [action.pokemon.id]: action.pokemon
        }
      };

    case PokemonActionTypes.DELETE_SUCCESS:
      const entities = { ...state.entities };
      delete entities[action.id];
      return {
        ...state,
        entities
      };

    case PokemonActionTypes.UPDATE_SUCCESS:
      return {
        ...state,
        entities: {
          ...state.entities,
          [action.pokemon.id]: action.pokemon
        }
      };

    default:
      return state;
  }
}
选择器
选择器是用于获取存储状态切片的纯函数。@ngrx/store 提供了一些辅助函数来优化此选择。选择器在选择状态切片时提供了许多功能。
- 便携的
- 记忆化
- 作品
- 可测试
- 类型安全
NgRX 提供了两个函数来创建选择器:
- CreateFeatureSelector。此函数允许我们为子状态创建选择器。
- 此函数允许我们使用两个参数创建选择器:1. 选择器;2. 定义我们要选择的值的函数。
在我们的 Pokédex 中,我们只需要一个选择器(加载所有口袋妖怪),如果我们有一个包含每个口袋妖怪详细信息的页面,我们可以创建一个名为的特定选择器selectById。
该pokemon.selector.ts文件如下所示。
import { createFeatureSelector, createSelector } from '@ngrx/store';

import { PokemonState } from './pokemon.state';

export const selectPokemonState = createFeatureSelector<PokemonState>(
  'pokemon'
);

export const selectAll = createSelector(
  selectPokemonState,
  state => Object.values(state.entities)
);
效果
这些效果是我们实现宝可梦图鉴的基础,因为我们委托了决定为此目的触发哪些动作的责任。以下是与加载宝可梦相关的效果示例,以作说明。
loadAllPokemon $正在监听动作的出现LOAD_POKEMONS(该动作将从组件中调度)。从现在开始,NgRX需要具备RxJS 库的最低限度的知识,因为它将与可观察流配合使用。
首先,switchMap使用运算符,它允许丢弃来自发行方的值序列,以便每个时刻仅管理一个流。这时,PokemonService服务将从Observable<Pokemon[]>后端返回一个。如果后端操作成功,则会触发操作,其中有效LoadPokemonSuccess载荷是 pokemon 数组。另一方面,如果后端发生错误,则会触发操作,其中有效载荷LoadPokemonFailed是服务器错误消息。
  @Effect()
  loadAllPokemon$: Observable<any> = this.actions$.pipe(
    ofType(PokemonActions.PokemonActionTypes.LOAD_POKEMONS),
    switchMap(() =>
      this.pokemonService.getAll().pipe(
        map(pokemons => new PokemonActions.LoadPokemonSuccess(pokemons)),
        catchError(error => of(new PokemonActions.LoadPokemonFailed(error)))
      )
    )
  );
在我们的例子中,通过创建两个分别监听 SUCCESS 和 FAILED 操作的效果,问题得到了简化。在这两个效果中,始终显示相同的通知消息。
@Effect({ dispatch: false })
  successNotification$ = this.actions$.pipe(
    ofType(...this.POKEMON_ACTIONS_SUCCESS),
    tap(() =>
      this.snackBar.open('SUCCESS', 'Operation success', {
        duration: 2000
      })
    )
  );
  @Effect({ dispatch: false })
  failedNotification$ = this.actions$.pipe(
    ofType(...this.POKEMON_ACTIONS_FAILED),
    tap(() =>
      this.snackBar.open('FAILED', 'Operation failed', {
        duration: 2000
      })
    )
  );
值得注意的是,该参数dispatch: false已经指示给Effect装饰器,因为每个效果默认都会触发一个动作;如果没有定义,它会在最后触发相同的动作,这会导致无限循环。
这两种效果都会监听特定类型(POKEMON_ACTIONS_SUCCESS或)的动作,并使用 Angular Material 的服务POKEMON_ACTIONS_FAILED触发通知。snackBar
不要等待存储被修改的 SUCCESS 操作的效果,因为这正是我们之前定义的 reducer 执行的任务。
最后得到的pokemon.effects.ts文件就是下面显示的文件。
import * as PokemonActions from '@states/pokemon/pokemon.actions';

import { Actions, Effect, ofType } from '@ngrx/effects';
import { Observable, of } from 'rxjs';
import { catchError, map, switchMap, tap } from 'rxjs/operators';

import { Injectable } from '@angular/core';
import { MatSnackBar } from '@angular/material';
import { Pokemon } from '@shared/interfaces/pokemon.interface';
import { PokemonService } from '@services/pokemon.service';

@Injectable()
export class PokemonEffects {
  constructor(
    private actions$: Actions,
    private pokemonService: PokemonService,
    public snackBar: MatSnackBar
  ) {}

  POKEMON_ACTIONS_SUCCESS = [
    PokemonActions.PokemonActionTypes.ADD_SUCCESS,
    PokemonActions.PokemonActionTypes.UPDATE_SUCCESS,
    PokemonActions.PokemonActionTypes.DELETE_SUCCESS,
    PokemonActions.PokemonActionTypes.LOAD_POKEMONS_SUCCESS
  ];

  POKEMON_ACTIONS_FAILED = [
    PokemonActions.PokemonActionTypes.ADD_FAILED,
    PokemonActions.PokemonActionTypes.UPDATE_FAILED,
    PokemonActions.PokemonActionTypes.DELETE_FAILED,
    PokemonActions.PokemonActionTypes.LOAD_POKEMONS_FAILED
  ];

  @Effect()
  loadAllPokemon$: Observable<any> = this.actions$.pipe(
    ofType(PokemonActions.PokemonActionTypes.LOAD_POKEMONS),
    switchMap(() =>
      this.pokemonService.getAll().pipe(
        map(pokemons => new PokemonActions.LoadPokemonSuccess(pokemons)),
        catchError(error => of(new PokemonActions.LoadPokemonFailed(error)))
      )
    )
  );

  @Effect()
  addPokemon$: Observable<any> = this.actions$.pipe(
    ofType(PokemonActions.PokemonActionTypes.ADD),
    switchMap((action: any) =>
      this.pokemonService.add(action.pokemon).pipe(
        map((pokemon: Pokemon) => new PokemonActions.AddSuccess(pokemon)),
        catchError(error => of(new PokemonActions.AddFailed(error)))
      )
    )
  );

  @Effect()
  deletePokemon$: Observable<any> = this.actions$.pipe(
    ofType(PokemonActions.PokemonActionTypes.DELETE),
    switchMap(({ id }) =>
      this.pokemonService.delete(id).pipe(
        map(() => new PokemonActions.DeleteSuccess(id)),
        catchError(error => of(new PokemonActions.DeleteFailed(error)))
      )
    )
  );

  @Effect()
  updatePokemon$: Observable<any> = this.actions$.pipe(
    ofType(PokemonActions.PokemonActionTypes.UPDATE),
    switchMap(({ pokemon }) =>
      this.pokemonService.update(pokemon).pipe(
        map(() => new PokemonActions.UpdateSuccess(pokemon)),
        catchError(error => of(new PokemonActions.UpdateFailed(error)))
      )
    )
  );

  @Effect({ dispatch: false })
  successNotification$ = this.actions$.pipe(
    ofType(...this.POKEMON_ACTIONS_SUCCESS),
    tap(() =>
      this.snackBar.open('SUCCESS', 'Operation success', {
        duration: 2000
      })
    )
  );
  @Effect({ dispatch: false })
  failedNotification$ = this.actions$.pipe(
    ofType(...this.POKEMON_ACTIONS_FAILED),
    tap(() =>
      this.snackBar.open('FAILED', 'Operation failed', {
        duration: 2000
      })
    )
  );
}
根系减缩剂
最后,同样重要的是,我们需要一个root.reducer文件来加载应用程序的所有子状态。在我们的具体情况下,我们只需要pokemon.reducer。
import { pokemonReducer } from './pokemon/pokemon.reducer';

export const reducers = { pokemon: pokemonReducer };
页面/浏览量
现在,我们将开始构建应用程序的可视化部分。请记住,应用程序状态的所有管理都委托给了 NgRX,因此我们无需担心任何组件的状态更改。
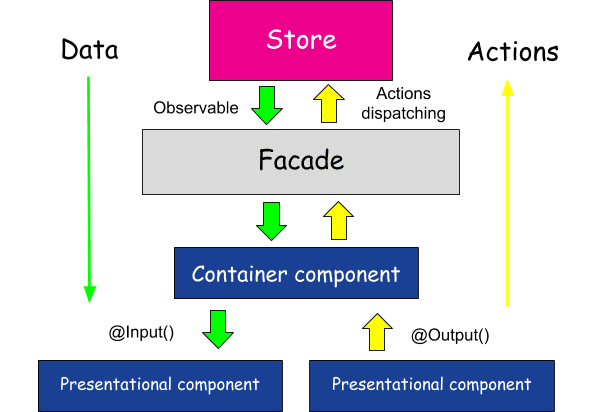
这一事实大大简化了我们的页面/视图,因为我们只需要定义两种类型的组件:
- SmartComponents
dispatch. 通过方法或使用选择器与 store 一起执行任务的组件。 - DummyComponents . 仅需向 SmartComponent 显示数据和管理事件的组件。
此架构在ng-conf中已作为稳定架构提出。下图展示了我们所使用的架构,其中我们省略了Facade 模式,因为对于我们的具体问题而言,它并非必需,因为我们只有一个模块。
视图目录的结构如下:

回到我们的具体问题(Pokédex),PokemonComponent 是智能组件,另一方面,与列表和表单相关的组件是虚拟组件。
我们的 Pokemon 模块的启动器是自己的,app.component它非常简单,正如我接下来向您展示的。
<div style="text-align:center">
  <h1>Welcome to ngrx-pokedex by Carlos Caballero!</h1>
</div>
<app-pokemon></app-pokemon>
口袋妖怪模块
Pokemon Module 只负责加载组成应用程序的三个组件,当然还有下面显示的 SharedModule。
import { CommonModule } from '@angular/common';
import { NgModule } from '@angular/core';
import { PokemonComponent } from './pokemon.component';
import { PokemonFormComponent } from './pokemon-form/pokemon-form.component';
import { PokemonListComponent } from './pokemon-list/pokemon-list.component';
import { SharedModule } from '@shared/shared.module';

const COMPONENTS = [
  PokemonListComponent,
  PokemonComponent,
  PokemonFormComponent
];

@NgModule({
  declarations: COMPONENTS,
  imports: [CommonModule, SharedModule],
  exports: COMPONENTS
})
export class PokemonModule {}
口袋妖怪组件(智能组件)
Pokemon 组件通过方法和选择器与状态进行交互dispatch。与组件虚拟对象的通信则通过属性[pokemon]和事件的onUpdate、onAdd和onDelete进行onSelect。
<app-pokemon-form
  [pokemon]="pokemon"
  (update)="onUpdate($event)"
  (add)="onAdd($event)"
></app-pokemon-form>
<app-pokemon-list
  [pokemons]="pokemons$ | async"
  (delete)="onDelete($event)"
  (select)="onSelect($event)"
></app-pokemon-list>
该app-pokemon-list组件接收一个口袋妖怪列表,这些口袋妖怪会通过选择器持续订阅到商店selectAll。管道async负责执行subscribe和unsubscribe口袋妖怪的任务,因此组件虚拟器接收口袋妖怪列表,并只专注于执行正确显示它们的任务。
该组件的构造函数负责使用LoadPokemon如下代码所示的动作加载所有口袋妖怪:
constructor(private store$: Store<AppStore>) {
  this.store$.dispatch(new PokemonActions.LoadPokemon());
}
CRUD 操作以非常简单的方法执行:
public onDelete(pokemon: Pokemon) {
  this.store$.dispatch(new PokemonActions.Delete(pokemon.id));
}
public onSelect(pokemon: Pokemon) {
  this.pokemon = pokemon;
}
public onUpdate(pokemon: Pokemon) {
  this.store$.dispatch(new PokemonActions.Update(pokemon));
}
public onAdd(pokemon: Pokemon) {
  this.store$.dispatch(new PokemonActions.Add(pokemon));
}
该组件的代码如下:
import * as PokemonActions from '@states/pokemon/pokemon.actions';
import * as PokemonSelectors from '@states/pokemon/pokemon.selector';

import { ChangeDetectionStrategy, Component } from '@angular/core';

import { AppStore } from '@shared/interfaces/store.interface';
import { Observable } from 'rxjs';
import { Pokemon } from '@shared/interfaces/pokemon.interface';
import { Store } from '@ngrx/store';

@Component({
  selector: 'app-pokemon',
  templateUrl: './pokemon.component.html',
  changeDetection: ChangeDetectionStrategy.OnPush
})
export class PokemonComponent {
  public pokemon: Pokemon = {} as Pokemon;
  public pokemons$: Observable<any> = this.store$.select(
    PokemonSelectors.selectAll
  );
  public onDelete(pokemon: Pokemon) {
    this.store$.dispatch(new PokemonActions.Delete(pokemon.id));
  }
  public onSelect(pokemon: Pokemon) {
    this.pokemon = pokemon;
  }

  public onUpdate(pokemon: Pokemon) {
    this.store$.dispatch(new PokemonActions.Update(pokemon));
  }
  public onAdd(pokemon: Pokemon) {
    this.store$.dispatch(new PokemonActions.Add(pokemon));
  }
  constructor(private store$: Store<AppStore>) {
    this.store$.dispatch(new PokemonActions.LoadPokemon());
  }
}
PokemonForm 组件(添加/更新 Pokemon)
PokemonForm 组件专注于执行操作add和update。
<mat-card class="container">
  <form [formGroup]="pokemonForm">
    <div
      class="form-element"
      fxLayout
      fxLayout.xs="column"
      fxLayoutAlign="center"
      fxLayoutGap="10px"
    >
      <mat-form-field>
        <mat-label>Name</mat-label>
        <input
          required
          formControlName="name"
          class="form-control"
          placeholder="Pikachu"
          type="text"
          matInput
        />
      </mat-form-field>
      <mat-form-field>
        <mat-label>Height</mat-label>
        <input
          matInput
          required
          formControlName="height"
          class="form-control"
          placeholder="0.5"
          type="text"
        />
      </mat-form-field>

      <mat-form-field>
        <mat-label>Weight</mat-label>
        <input
          matInput
          required
          formControlName="weight"
          class="form-control"
          placeholder="9.5"
          type="text"
        />
      </mat-form-field>
      <mat-form-field>
        <mat-label>Description</mat-label>
        <input
          matInput
          required
          formControlName="description"
          class="form-control"
          placeholder="Description"
          type="text"
        />
      </mat-form-field>
      <mat-form-field>
        <mat-label>Photo</mat-label>
        <mat-select required formControlName="photo" class="form-control">
          <mat-option *ngFor="let photo of photos" [value]="photo.id">{{
            photo.name
          }}</mat-option>
        </mat-select>
      </mat-form-field>
    </div>
    <div class="example-button-row">
      <button
        type="button"
        mat-raised-button
        color="primary"
        (click)="addPokemon()"
        [disabled]="!pokemonForm.valid"
      >
        Add pokemon!
      </button>
      <button
        type="button"
        mat-raised-button
        color="accent"
        (click)="updatePokemon()"
        [disabled]="!pokemonForm.valid"
      >
        Update pokemon!
      </button>
    </div>
  </form>
</mat-card>
该组件只需要关注与视图相关的内容:表单验证。
组件之间的通信是通过 完成的EventEmitter。另一方面,此组件从 smartComponent 接收一个 Pokemon,因为您可以从 中选择要编辑的 Pokemon PokemonList。
import {
  ChangeDetectionStrategy,
  Component,
  EventEmitter,
  Input,
  OnChanges,
  OnInit,
  Output
} from '@angular/core';
import { FormBuilder, FormGroup, Validators } from '@angular/forms';

import { Pokemon } from '@shared/interfaces/pokemon.interface';

@Component({
  selector: 'app-pokemon-form',
  templateUrl: './pokemon-form.component.html',
  changeDetection: ChangeDetectionStrategy.OnPush
})
export class PokemonFormComponent implements OnInit, OnChanges {
  pokemonForm: FormGroup;
  @Input() pokemon: Pokemon = {} as Pokemon;
  @Output() add: EventEmitter<Pokemon> = new EventEmitter<Pokemon>();
  @Output() update: EventEmitter<Pokemon> = new EventEmitter<Pokemon>();

  photos = [
    {
      id: 1,
      name: 'bulbasaur'
    },
    {
      id: 2,
      name: 'ivysaur'
    },
   ...
  ];
  constructor(private formBuilder: FormBuilder) {}

  ngOnInit() {
    this.initForm(this.pokemon);
  }
  ngOnChanges() {
    this.initForm(this.pokemon);
  }

  private initForm(pokemon: Partial<Pokemon> = {}) {
    this.pokemonForm = this.formBuilder.group({
      name: [pokemon.name, Validators.required],
      description: [pokemon.description, Validators.required],
      height: [pokemon.height, Validators.required],
      weight: [pokemon.weight, Validators.required],
      photo: [pokemon.photo, Validators.required]
    });
  }

  public addPokemon() {
    const pokemon: Pokemon = { ...this.pokemonForm.value };
    this.add.emit(pokemon);
    this.initForm();
  }

  public updatePokemon() {
    const pokemon = {
      ...this.pokemon,
      ...this.pokemonForm.value
    };
    this.update.emit(pokemon);
    this.initForm();
  }
}
PokemonList 组件(删除/选择 Pokemon)
最后,该PokemonList组件负责与 smartComponent 通信以执行delete和select操作。该组件与上一个组件非常相似。在这种情况下,我们只需专注于显示 Pokemon 列表,而不必担心应用程序的状态。
<div fxLayout="row wrap">
  <div
    *ngFor="let pokemon of pokemons; trackBy: trackByFn"
    fxFlex="27%"
    class="pokemon"
  >
    <mat-card class="example-card">
      <mat-card-header>
        <mat-card-title> {{ pokemon.name }}</mat-card-title>
        <mat-card-subtitle> {{ pokemon.description }} </mat-card-subtitle>
      </mat-card-header>

      <mat-card-content>
        <img
          mat-card-image
          src="assets/images/pokemon/{{ pokemon.photo }}.png"
        />
        <ul>
          <li>Height: {{ pokemon.height }}</li>
          <li>Weight: {{ pokemon.weight }}</li>
        </ul>
      </mat-card-content>
      <mat-card-actions>
        <button mat-raised-button color="warn" (click)="deletePokemon(pokemon)">
          DELETE
        </button>
        <button
          mat-raised-button
          color="primary"
          (click)="selectPokemon(pokemon)"
        >
          SELECT
        </button>
      </mat-card-actions>
    </mat-card>
  </div>
</div>
import {
  ChangeDetectionStrategy,
  Component,
  EventEmitter,
  Input,
  Output
} from '@angular/core';

import { Pokemon } from '@shared/interfaces/pokemon.interface';

@Component({
  selector: 'app-pokemon-list',
  templateUrl: './pokemon-list.component.html',
  styleUrls: ['./pokemon-list.component.css'],
  changeDetection: ChangeDetectionStrategy.OnPush
})
export class PokemonListComponent {
  @Input() pokemons: any[] = [];
  @Output() delete: EventEmitter<any> = new EventEmitter();
  @Output() select: EventEmitter<any> = new EventEmitter();

  constructor() {}

  public deletePokemon(pokemon: Pokemon) {
    this.delete.emit(pokemon);
  }
  public selectPokemon(pokemon: Pokemon) {
    this.select.emit(pokemon);
  }

  trackByFn(_, item) {
    return item.id;
  }
}
题外话:风格
最后,我们使用 Flex-Layout 和 Angular Material 设计了这个应用程序,使用了Indigo-pink从 Angular 文件配置的主题styles.css。
@import '@angular/material/prebuilt-themes/indigo-pink.css';

.example-button-row button,
.example-button-row a {
  text-align: center;
  margin-right: 8px;
}
结论
在这篇文章中,我们构建了一个小示例,其中展示了大型 SPA 应用程序架构的基本要点:
- 解耦可视化组件的状态管理。
- 高效、轻松地创建国家管理要素。
- 创建关注相关内容的组件:视图。
- 组件根据是否会与应用程序的状态进行通信,分为SmartComponent和DummyComponent。
本系列的以下文章将涵盖一些有趣的主题,例如:
- 自动创建状态,因为使用@ngrx/entity 非常重复。
- 将通过封装使用 Facade 模式
@ngrx/data。 - 测试应用程序的状态。
真正重要的是概念,而不是所使用的技术或库。因此,对于那些刚开始构建大型 Angular 应用并需要应用架构原则的人来说,这篇文章应该作为指南。
更多,更多,更多……
这篇文章的GitHub 分支是https://github.com/Caballerog/ngrx-pokedex/tree/ngrx-part1
文章来源:https://dev.to/angular/build-your-pokedex-part-1-introduction-to-ngrx-cgm