使用 Angular 🛡️ 和 Firebase 🔥 创建作品集网站(第二部分)
在本节中,我假设您已经了解 Angular、NPM 和 Git(并且您已按照第一部分中提到的步骤操作)。
此外,还有很多其他教程教您如何设置,我就不赘述了。😅
如果您克隆此项目的 repo,并添加您的环境详细信息,您可以跳过接下来几节的大部分内容(只是为了节省您的一些时间)。
🛡️🛡️ 创建 Angular 应用程序 🛡️🛡️
通过查看入门指南中的Angular 文档,可以了解此过程的大部分内容。
🚧🚧🚧 生成角度项目 🚧🚧🚧
假设你已经设置好了一切,你可以轻松地使用Angular CLI来设置一个 Angular 项目。
只需为你的应用创建一个目录 📂,在当前目录中打开终端并运行:
ng new <your-app-name-here>
这个命令几乎为您完成所有事情,您需要做的就是按照提示进行操作,并确保添加一个app-routing.module.ts文件。
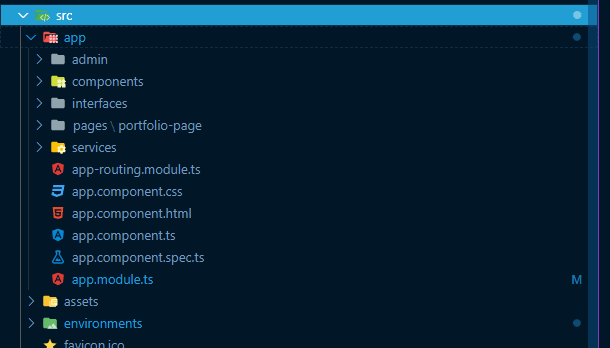
这将为你的应用程序提供基本外壳,它应该看起来像这样: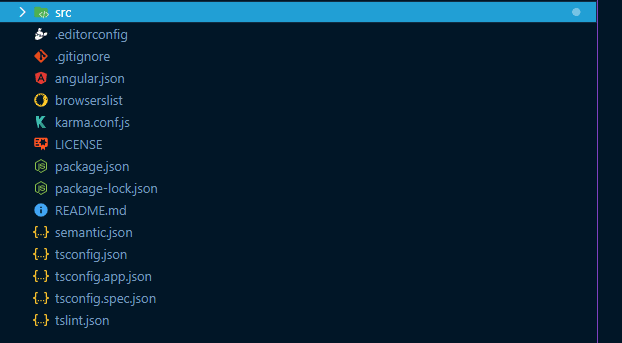
当您在这里时,继续在/app目录内创建以下目录:
- 行政
- 成分
- 接口
- 页面
- 服务
🔌🔌🔌 安装依赖项🔌🔌🔌
该项目有 3 个主要依赖项,即:
让我们看看如何安装它们。🚀🚀🚀
1.安装 Firebase
导航到您在本教程上一节中创建的 Firebase 项目。👀
将 Firebase 添加到您的网络应用。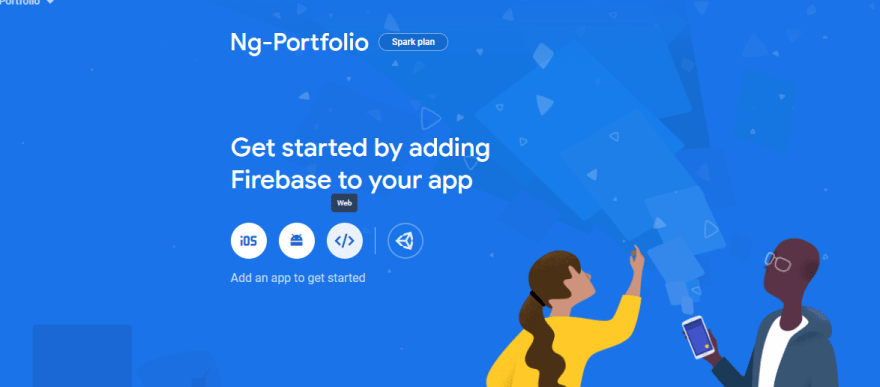
提供应用名称。
请务必选择“Firebase Hosting”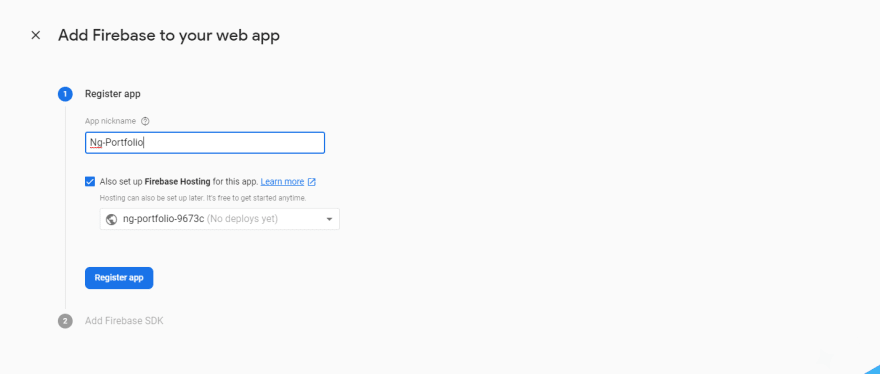
安装 Firebase CLI。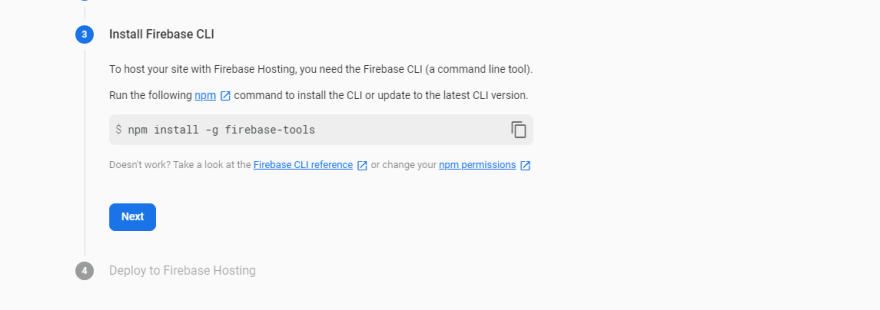
检索托管详细信息。实际托管应用程序时需要这些信息。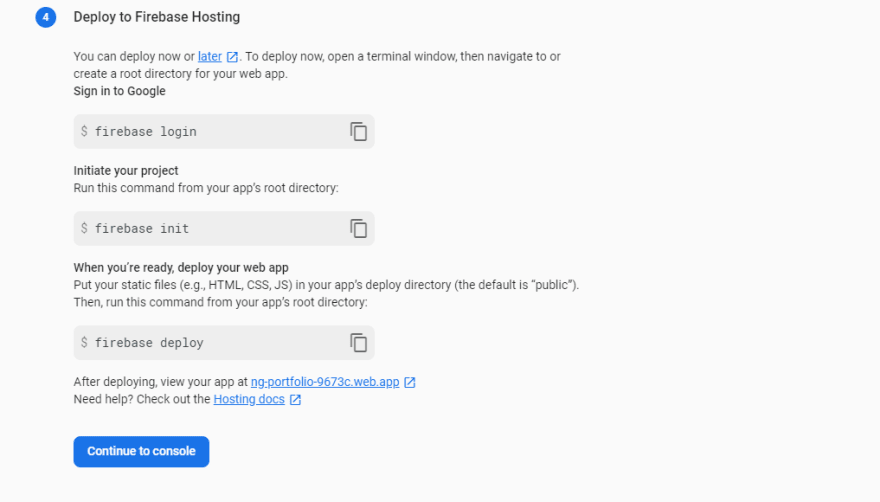
2.安装 AngularFire
使用您之前打开的终端(希望在您的应用程序内)运行以下命令:
ng add @angular/fire
3.安装语义UI
这篇教程太长了,不适合放在一起,不过有一篇文章可以指导你如何将 Semantic UI 与 Angular 集成。作者对此的解释非常精彩。💪
📄📄📄 创建页面 📄📄📄
这些是用户将导航到的页面。“页面”一词具有误导性,因为它只是一个被视为页面的组件。
在目录中打开一个终端/pages并使用以下命令创建一个页面(组件):
ng generate component portfolio-page
您将得到一个包含以下内容的文件夹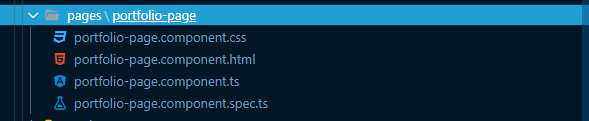
在里面portfolio-page.component.html粘贴以下内容:
<app-header></app-header>
<app-about-me></app-about-me>
<app-projects-list></app-projects-list>
<app-skills-list></app-skills-list>
<app-tools-list></app-tools-list>
<app-contact-form></app-contact-form>
这将用作您的投资组合的主页,所有组件都将添加到此页面内。
你的 IDE 可能会亮起来,但请放心,我们将在接下来的几个步骤中生成组件。😉
🧬🧬🧬 创建接口 🧬🧬🧬
接口是为整个应用程序中将要交互的数据创建“蓝图”的好方法。
普通用户实际上只需要一个用于联系表单组件的接口。这将决定表单中输入的数据的形式以及写入数据库的数据。
在您的/interfaces目录中,创建一个名为的文件contact-form.interface.ts并向其中添加以下内容:
export interface IContactForm {
  id?: string;
  name: string;
  email: string;
  message: string;
  contactNumber?: string;
  read: boolean;
  date: Date;
}
这将在我们的联系表单组件中使用。
🛰️🛰️🛰️ 创建服务🛰️🛰️🛰️
服务基本上负责组件和数据源之间的数据传输。
我们只需要一项服务即可获取并显示您的投资组合数据。
要生成服务,请导航到您的/services目录并运行以下命令:
ng generate service data
在您的文件中data.service.ts,添加以下代码:
import { Injectable } from '@angular/core';
import { AngularFirestore } from '@angular/fire/firestore';
import { IContactForm } from '../interfaces/contact-form.interface';

@Injectable({
  providedIn: 'root'
})
export class DataService {

  constructor(
    private firestore: AngularFirestore
  ) { }

  public createCollection(path: string) {
    return this.firestore.collection(path).valueChanges();
  }

  public saveContactDetails(details: IContactForm) {
    const { name, email, message, contactNumber } = details;
    return this.firestore.collection('email-list')
      .add({
        name,
        email,
        message,
        contactNumber,
        read: false,
        date: new Date()
      });
  }
}
🧱🧱🧱 创建组件🧱🧱🧱
组件是应用程序的基本构建块,可以添加到其他组件(页面)以形成完整的应用程序。
要创建我们在中添加的组件portfolio-page.component.html,请在目录中打开一个终端components并运行:
ng g c about-me
ng g c contact-form
ng g c header
ng g c projects-list
ng g c skills-list
ng g c tools-list
您最终应该得到如下所示的组件目录:
对于以下每个组件文件,向其中添加以下代码:
关于我
关于我.组件.html 关于我.组件.ts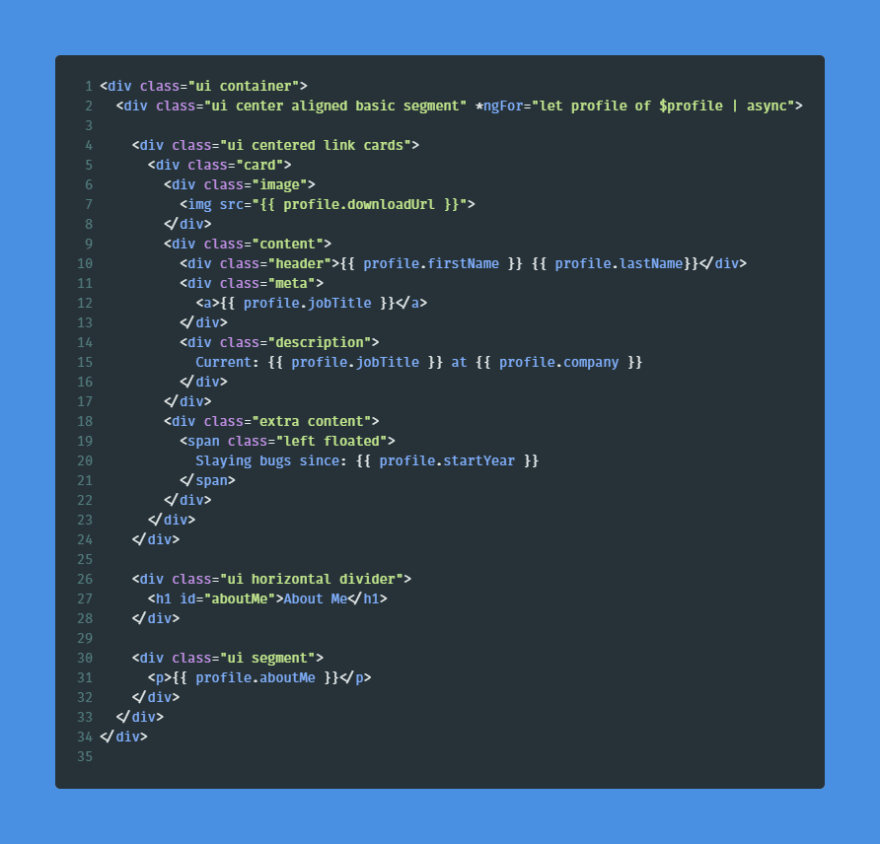

标题
header.component.html header.component.ts 您的简历链接是您在上一教程中上传到 Firebase 存储的简历下载链接。

项目列表
项目列表.组件.html 项目列表.组件.ts

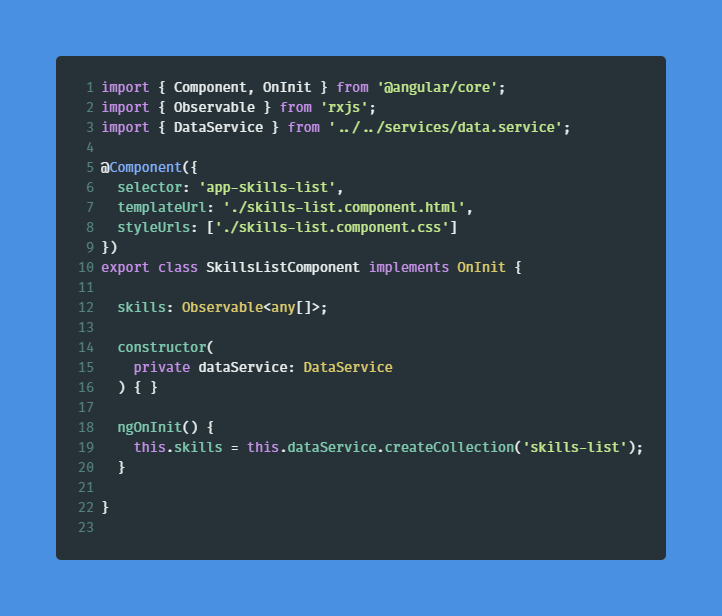
技能列表
技能列表.组件.html 技能列表.组件.ts
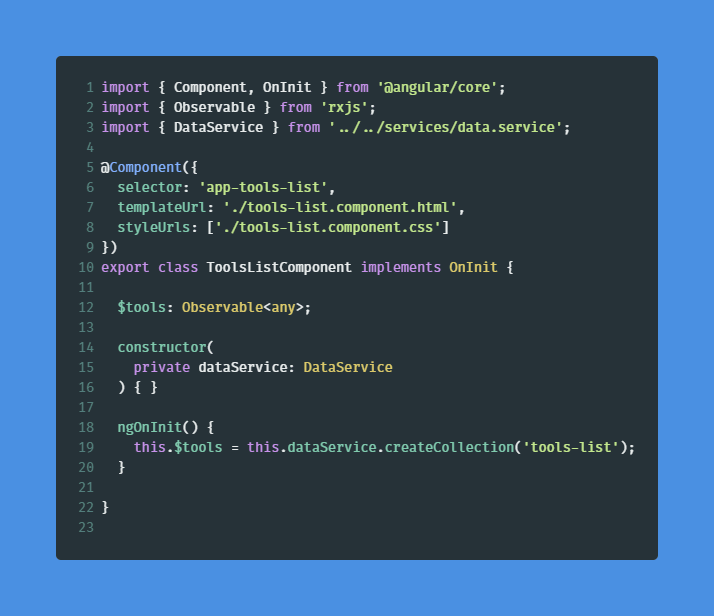
工具列表
工具列表.组件.html 工具列表.组件.ts
联系表格
联系表单包含更多代码,因此我将改为包含代码,以便您可以复制并粘贴它:
联系表单.组件.html
<div class="ui container">
  <div class="ui horizontal divider">
    <h1>Contact Me</h1>
  </div>
  <form [ngClass]="formClassState" [formGroup]="contactMeForm" (ngSubmit)="sendEmail()">
    <div class="ui success message" *ngIf="!hideSuccess()">
      <div class="header">Message Submitted</div>
      <p>Your message has been sent.</p>
    </div>
    <h2 id="contact">Get In Touch</h2>
    <div class="fields">
      <div class="field">
        <label>
          Name
          <input placeholder="First Name" formControlName="name" type="text">
        </label>

        <div *ngIf="contactMeForm.get('name').invalid && (contactMeForm.get('name').dirty || contactMeForm.get('name').touched)" class="ui negative message">
          <div class="header">
            There were some errors with your name entry
          </div>
          <ul class="list">
            <li>Name is required.</li>
            <li>Name must consist of at least 2 letters.</li>
          </ul>
        </div>
      </div>

      <div class="field">
        <label>
          Email Address
          <input placeholder="Email" formControlName="email" type="email">
        </label>
        <div *ngIf="contactMeForm.get('email').invalid && (contactMeForm.get('email').dirty || contactMeForm.get('email').touched)" class="ui negative message">
          Must be a valid email.
        </div>
      </div>
    </div>

    <div class="fields">
      <div class="field">
        <label>
          Contact Number (Optional)
          <input placeholder="Contact Number" formControlName="contactNumber" type="text" maxlength="10">
        </label>
        <div *ngIf="contactMeForm.get('contactNumber').invalid && (contactMeForm.get('contactNumber').dirty || contactMeForm.get('contactNumber').touched)" class="ui negative message">
          <div class="header">
            Must be a valid contact number.
          </div>
          <ul class="list">
            <li>Contact number must be 10 digits.</li>
          </ul>
        </div>
      </div>
    </div>

    <div class='fields'>
      <div class="field">
        <label>
          Message
          <textarea placeholder="Enter your message here ..." formControlName="message"></textarea>
        </label>

        <div *ngIf="contactMeForm.get('message').invalid && (contactMeForm.get('message').dirty || contactMeForm.get('message').touched)" class="ui negative message">
          <div class="header">
            Message does not appear to be valid.
          </div>
          <ul class="list">
            <li>Message must be a <strong>minimum</strong> length of 10 characters.</li>
            <li>Message must be a <strong>maximum</strong> length of 200 characters.</li>
          </ul>
        </div>
      </div>
    </div>

    <button class="ui primary button" type="submit" [disabled]="!contactMeForm.valid">Send Email</button>
    <div class="ui error message"></div>
  </form>
</div>
联系表单.组件.ts
import { Component, OnInit } from '@angular/core';
import { FormControl, FormGroup, Validators } from '@angular/forms';
import { DataService } from '../../services/data.service';

@Component({
  selector: 'app-contact-form',
  templateUrl: './contact-form.component.html',
  styleUrls: ['./contact-form.component.css']
})
export class ContactFormComponent implements OnInit {

  isLoading = false;
  isSuccessful = false;
  formClassState = 'ui equal width form segment';

  contactMeForm = new FormGroup({
    name: new FormControl('', [
      Validators.required,
      Validators.minLength(2)
    ]),
    contactNumber: new FormControl('', [
      Validators.maxLength(10),
      Validators.pattern('^(\\+\\d{1,2}\\s)?\\(?\\d{3}\\)?[\\s.-]?\\d{3}[\\s.-]?\\d{4}$')
    ]),
    email: new FormControl('', [
      Validators.required,
      Validators.email
    ]),
    message: new FormControl('', [
      Validators.required,
      Validators.minLength(10),
      Validators.maxLength(200)
    ])
  });

  constructor(private dataService: DataService) { }

  ngOnInit() {
  }

  public sendEmail() {
    this.toggleLoading();
    this.dataService.saveContactDetails(this.contactMeForm.value)
      .then(() => {
        this.toggleSuccess();
      })
      .catch(err => {
        console.error('An error has occurred: ', err.message);
      })
      .finally(() => {
        this.contactMeForm.reset();
        if (!this.isSuccessful) {
          this.toggleLoading();
        }
      });
  }

  public toggleLoading() {
    if (this.isLoading) {
      this.isLoading = false;
      this.formClassState = 'ui equal width form segment';
    } else {
      this.isLoading = true;
      this.formClassState = 'ui equal width form loading segment';
    }
  }

  public toggleSuccess() {
    if (this.isSuccessful) {
      this.isSuccessful = false;
      this.formClassState = 'ui equal width form segment';
    } else {
      this.isSuccessful = true;
      this.formClassState = 'ui equal width form segment success';
    }
  }

  public hideSuccess(): boolean {
    return this.contactMeForm.touched;
  }

}
🗝️🗝️🗝️ 创建管理模块 🗝️🗝️🗝️
我们需要创建管理模块,这可以通过导航到管理目录并运行以下命令来完成:
ng generate module admin --routing=true
导航回您的app.module.ts并确保包含以下内容:
import { BrowserModule } from '@angular/platform-browser';
import { NgModule } from '@angular/core';

import { AppRoutingModule } from './app-routing.module';
import { AppComponent } from './app.component';
import { AboutMeComponent } from './components/about-me/about-me.component';
import { ContactFormComponent } from './components/contact-form/contact-form.component';
import { HeaderComponent } from './components/header/header.component';
import { ProjectsListComponent } from './components/projects-list/projects-list.component';
import { SkillsListComponent } from './components/skills-list/skills-list.component';
import { ToolsListComponent } from './components/tools-list/tools-list.component';
import { PortfolioPageComponent } from './pages/portfolio-page/portfolio-page.component';
import { ReactiveFormsModule } from '@angular/forms';
import { AngularFirestoreModule } from '@angular/fire/firestore';
import { AngularFireAuthModule } from '@angular/fire/auth';
import { AngularFireModule } from '@angular/fire';
import { environment } from '../environments/environment';
import { AngularFireStorageModule } from '@angular/fire/storage';

@NgModule({
  declarations: [
    AppComponent,
    AboutMeComponent,
    ContactFormComponent,
    HeaderComponent,
    ProjectsListComponent,
    SkillsListComponent,
    ToolsListComponent,
    PortfolioPageComponent
  ],
  imports: [
    BrowserModule,
    AppRoutingModule,
    ReactiveFormsModule,
    AngularFireModule.initializeApp(environment.firebaseConfig),
    AngularFirestoreModule,
    AngularFireAuthModule,
    AngularFireStorageModule
  ],
  providers: [],
  bootstrap: [AppComponent]
})
export class AppModule { }
您app-routing.module.ts想添加以下内容:
import { NgModule } from '@angular/core';
import { Routes, RouterModule } from '@angular/router';
import { PortfolioPageComponent } from '../app/pages/portfolio-page/portfolio-page.component';


const routes: Routes = [
  { path: '', component: PortfolioPageComponent },
  { path: 'home', component: PortfolioPageComponent },
  { path: 'auth', loadChildren: './admin/admin.module#AdminModule' },
  { path: '**', component: PortfolioPageComponent }
];

@NgModule({
  imports: [RouterModule.forRoot(routes)],
  exports: [RouterModule]
})
export class AppRoutingModule { }
我们现在已经延迟加载了我们的管理模块。💪
我们现在将像创建应用程序时一样创建一些目录。这将允许我们为管理员提供一个单独的部分,允许您创建、编辑和删除技能。此外,还将有一个消息页面,用于查看用户提交的电子邮件。
您最终应该得到以下应用程序结构:
🧬🧬🧬 创建管理界面 🧬🧬🧬
在目录中/admin/interfaces,继续创建以下接口文件:
表单字段.接口.ts
export interface IFormFields {
  label: string;
  formControlName: string;
  placeholder?: string;
}
表单模式.接口.ts
import { IFormFields } from './form-fields.interface';

export interface IFormModal {
  title: string;
  buttonText: string;
  isVisible: boolean;
  isEditing: boolean;
  formFields: Array<IFormFields>;
}
配置文件.接口.ts
export interface IProfile {
  id?: string;
  firstName: string;
  lastName: string;
  jobTitle: string;
  company: string;
  startYear: string;
  aboutMe: string;
}
🛰️🛰️🛰️ 创建管理服务🛰️🛰️🛰️
管理员用户具有提升的权限,因此我们需要创建两个服务:
- auth(用于身份验证)
- 数据(用于数据传输)
在/admin/services目录中运行以下命令:
ng g service auth
ng g service data
将代码添加到以下服务中。
授权服务
import { Injectable } from '@angular/core';
import { AngularFireAuth } from '@angular/fire/auth';

@Injectable({
  providedIn: 'root'
})
export class AuthService {

  constructor(
    private firebaseAuth: AngularFireAuth
  ) { }

  public async login(email: string, password: string): Promise<firebase.auth.UserCredential> {
    return await this.firebaseAuth.auth.signInWithEmailAndPassword(email, password);
  }

  public async logout(): Promise<void> {
    return await this.firebaseAuth.auth.signOut();
  }
}
数据.服务.ts
import { Injectable } from '@angular/core';
import { AngularFirestore, AngularFirestoreCollection } from '@angular/fire/firestore';
import { map } from 'rxjs/operators';

@Injectable({
  providedIn: 'root'
})
export class DataService {

  constructor(
    private firestore: AngularFirestore
  ) { }

  public createCollection(collectionName: string): AngularFirestoreCollection {
    return this.firestore.collection(collectionName);
  }

  public getData(profileCollectionRef: AngularFirestoreCollection) {
    return profileCollectionRef.snapshotChanges().pipe(
      map(actions => {
        return actions.map(action => {
          const data = action.payload.doc.data();
          const id = action.payload.doc.id;
          return { id, ...data };
        });
      })
    );
  }

  public saveDownloadURL(documentId: string, downloadUrl: string, profileCollectionRef: AngularFirestoreCollection) {
    profileCollectionRef.doc(documentId).update({ downloadUrl });
  }

  public getMessagesCount() {
    return this.firestore.collection('email-list', message => message.where('read', '==', false)).valueChanges();
  }

}
一旦我们连接好组件,数据就应该立即生效。✨
💂💂💂 创建管理员授权保护 💂💂💂
这将有助于防止未经授权访问您的管理页面。
要生成防护,请导航到guards目录并运行以下命令:
ng g guard auth
请务必选择canActivate并粘贴以下代码到auth.guard.ts文件中:
import { Injectable } from '@angular/core';
import { CanActivate, ActivatedRouteSnapshot, RouterStateSnapshot, UrlTree, Router } from '@angular/router';
import { Observable } from 'rxjs';
import { first, map } from 'rxjs/operators';
import { AngularFireAuth } from '@angular/fire/auth';

@Injectable({
  providedIn: 'root'
})
export class AuthGuard implements CanActivate {
  constructor(
    private firebaseAuth: AngularFireAuth,
    private router: Router
  ) {}

  canActivate(
    next: ActivatedRouteSnapshot,
    state: RouterStateSnapshot): Observable<boolean | UrlTree> | Promise<boolean | UrlTree> | boolean | UrlTree {

    return this.firebaseAuth.authState.pipe(
      first(),
      map(user => {
        if (user) {
          return true;
        }
        this.router.navigate(['/']);
        return false;
      })
    );
  }

}
这将仅允许在您的 Firebase 控制台上经过身份验证的用户访问管理页面。
📄📄📄 创建管理页面 📄📄📄
现在我们应该熟悉生成新组件的过程,所以我将跳过命令。
我们将在目录中创建 3 个组件/admin/pages并
创建:
admin-pageauth-pagemessages-page
在相应的页面中添加如下代码:
管理页面.组件.html
<app-header></app-header>
<app-admin-about-me></app-admin-about-me>
<app-projects-page></app-projects-page>
<app-skills-page></app-skills-page>
<app-tools-page></app-tools-page>
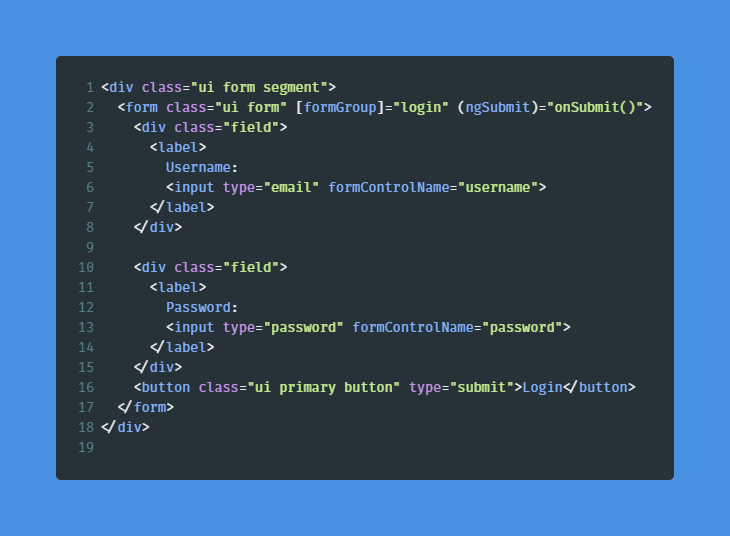
auth-page.component.html
授权页面.组件.ts

消息页面.组件.html
<app-header></app-header>
<app-admin-messages></app-admin-messages>
最终页面文件夹应该如下所示:
🧱🧱🧱 创建管理组件🧱🧱🧱
所有管理组件都与您之前创建的组件非常相似,但具有一些额外的功能。
您需要创建以下内容:
admin-about-meadmin-messagesadmin-projects-listadmin-skills-listadmin-tools-listform-modalheader
管理员-关于我.component.html

管理员-关于我.component.ts

管理消息.组件.html

管理消息.组件.ts

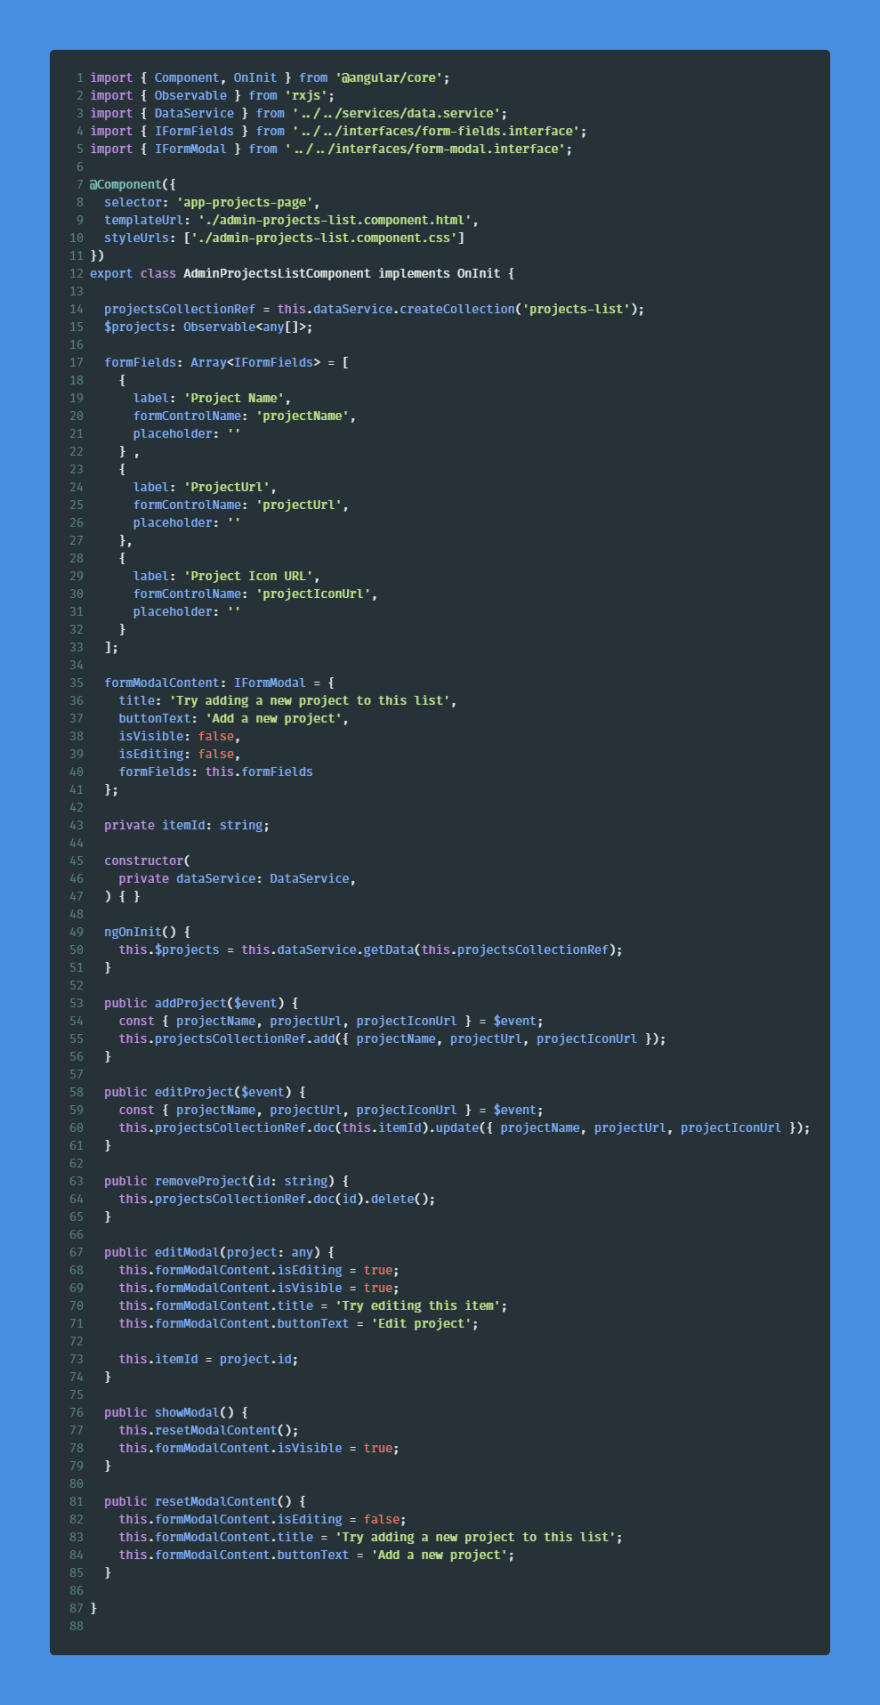
管理项目列表.component.html

管理项目列表.component.html
管理员技能列表.component.html

管理员技能列表.component.ts

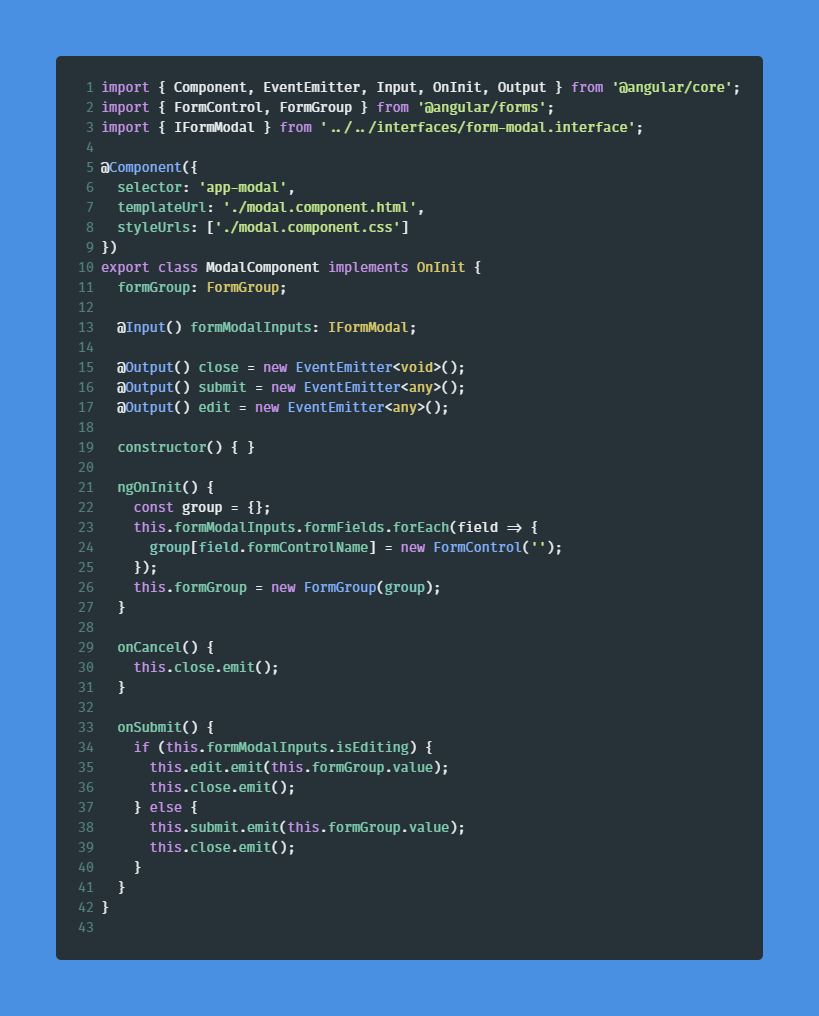
表单模式.组件.html

表单模式.组件.ts
标头.组件.html

标头.组件.ts

抱歉,我把所有截图都放上来了,而不是直接复制粘贴的代码。我更希望你把代码打出来,感受一下你正在创建的组件。😅
🌍🌍🌍 设置环境 🌍🌍🌍
快完成了!让我们设置环境文件,以便连接到 Firebase!
您需要导航到您的 Firebase 项目并选择“项目设置”: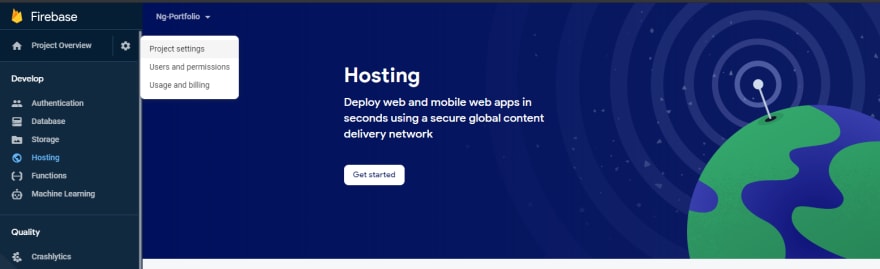
复制配置内容:
并将其粘贴到您的environment.ts和environment.prod.ts文件中:
环境.ts
export const environment = {
  production: false,
  firebaseConfig: {
    apiKey: "<credentials>,
    authDomain: "<credentials>",
    databaseURL: "<credentials>",
    projectId: "<credentials>",
    storageBucket: "<credentials>",
    messagingSenderId: "<credentials>",
    appId: "<credentials>"
  }
};
环境.产品.ts
export const environment = {
  production: true,
  firebaseConfig: {
    apiKey: "<credentials>,
    authDomain: "<credentials>",
    databaseURL: "<credentials>",
    projectId: "<credentials>",
    storageBucket: "<credentials>",
    messagingSenderId: "<credentials>",
    appId: "<credentials>"
  }
};
🚀🚀🚀 构建和部署 🚀🚀🚀
我们现在处于终局之战……
让我们通过运行来尝试我们的应用程序,ng serve它不应该有任何错误,但您应该看到一个带有几个标题的空白页:
导航到该/auth部分并输入您正在使用的经过身份验证的帐户的电子邮件和密码:
如果您正确输入了密码,您将可以访问管理页面: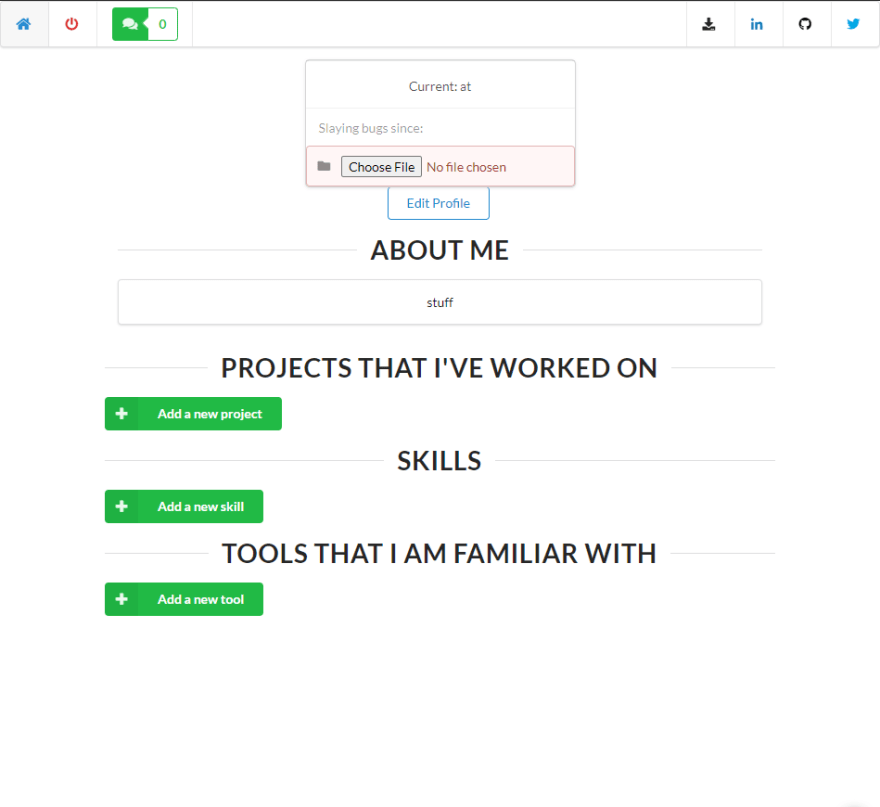
这会非常简单,但你可以继续添加一些内容。👍
现在我们知道一切正常,让我们部署我们的应用程序。
🔥🔥🔥 Firebase 初始化🔥🔥🔥
在终端中运行以下命令:
firebase login
系统将提示您输入密码,然后 cli 将处理其余部分。
firebase init

请务必选择Firestore and Hosting
选择一个现有应用程序,并确保选择您在本教程前半部分创建的应用程序: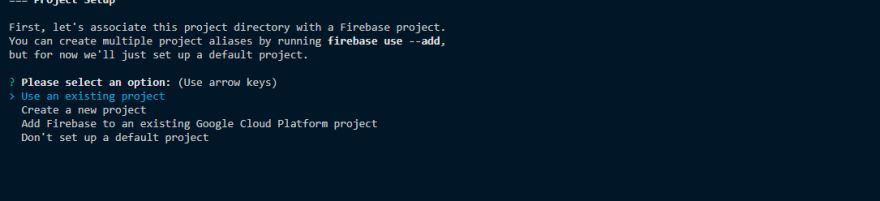
确保公共目录与构建中的“outputPath”相同angular.json
最后确保将其配置为单页应用程序
🧱🧱🧱吴建🧱🧱🧱
/dist在构建应用程序之前,请务必删除该目录:
ng build --prod
这将为我们创建一个生产版本:
🚀🚀🚀 Firebase 部署 🚀🚀🚀
现在您的应用已成功构建,让我们将其部署到 Firebase!
在包含构建项目的目录中打开终端并运行以下命令:
firebase deploy --only hosting
成功完成后,您将能够单击链接并查看您的投资组合网站的托管版本!
🎉🎉🎉 大功告成!!!🎉🎉🎉
这是一段疯狂的旅程,希望这些内容对你有所帮助。
别忘了查看我的Github,和我一起合作完成这个项目……我计划在不久的将来添加更酷的功能,并做出一些很棒的改动😜