React:如何使用 React Context 创建可重用表单
表单在 Web 应用中非常常见。作为一名开发者,我们总是需要反复创建表单。React 的乐趣在于,我们可以将这类常见的表单模式转化为可复用的组件,从而简化开发过程,缩短代码编写时间。
这是针对那些已经知道以下内容的人:
并希望了解React Context,它“提供了一种通过组件树传递数据的方法,而无需在每个级别手动传递 props”。如果您认为Redux 很烂,那么请继续阅读,因为 Context 是 Redux 的替代品。
如果您遇到问题,可以在此处查看完成的代码或在下面发表评论。
让我们从创建一个 React 应用程序开始。
你可以创建自己的 React 应用,但我建议你克隆这个仓库。我添加了一些 CSS,因为这里就不解释了。git clone https://github.com/trishalim/react-reusable-form-tutorial-boilerplate.git
进入该目录并npm install运行npm start。
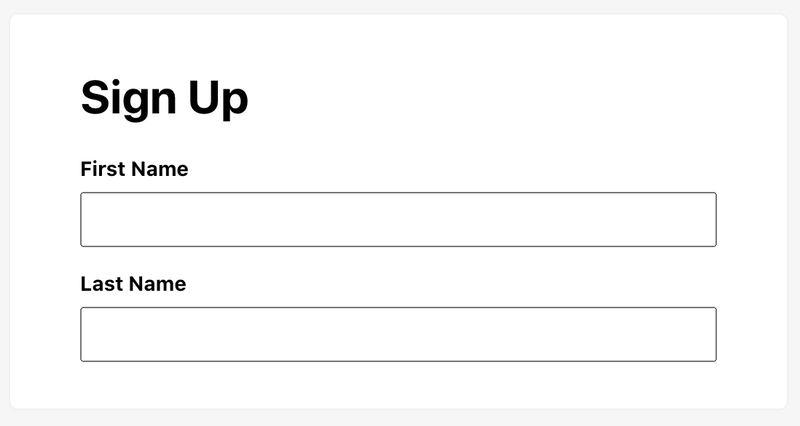
创建一个名为 FormInput 的可重用组件
创建一个名为的新文件,FormInput.js其代码如下:
import './FormInput.css';
import { useState } from 'react';

function FormInput(props) {
  const { label } = props;

  const [value, setValue] = useState('');
  const onChange = (event) => {
    setValue(event.target.value);
  };

  return (
    <div className="FormInput">
      <label>{label}</label>
      <input
        type="text"
        value={value}
        onChange={onChange}
      />
    </div>
  )
}

export default FormInput;
该组件具有自定义label道具,并通过状态处理输入值的变化。
App.js通过添加以下代码来使用这个新组件:
<FormInput label="First Name" />
<FormInput label="Last Name" />
不要忘记导入:import FormInput from './FormInput';
如果我们的 FormInput 组件能够处理不同类型的字段,那就很有用了。因此,让我们添加一个typeprop 来允许自定义类型。
function FormInput(props) {
  // Set default type to "text"
  const { label, type = 'text' } = props;

  const [value, setValue] = useState('');
  const onChange = (event) => {
    setValue(event.target.value);
  };

  return (
    <div className="FormInput">
      <label>{label}</label>
      <input
        type={type}
        value={value}
        onChange={onChange}
      />
    </div>
  )
}
让我们添加电子邮件和密码字段到App.js。
<FormInput label="Email Address" type="email" />
<FormInput label="Password" type="password" />
将状态移动到 App.js。
我们希望能够检索表单的值。目前,App我们无法知道表单的当前状态。让我们解决这个问题。
在 中添加表单状态App。
import { useState } from 'react';

const [form, setForm] = useState({
  firstName: '',
  lastName: '',
  emailAddress: '',
  password: ''
});
向 中添加一些新的 props FormInput。移除 中的 state 和 change handlers FormInput。这些会被移动到父组件App。最终你应该只得到这些:
function FormInput(props) {
  const {
    label,
    type = 'text',
    name,
    value,
    onChange
  } = props;

  return (
    <div className="FormInput">
      <label>{label}</label>
      <input
        type={type}
        name={name}
        value={value}
        onChange={onChange}
      />
    </div>
  )
}
由于我们刚刚value从中删除了状态和更改处理程序FormInput,因此我们必须从中添加它们App并将它们作为道具传递。
<FormInput
  label="First Name"
  name="firstName"
  value={form.firstName}
  onChange={handleFormChange} />
对姓氏、电子邮件和密码字段执行相同操作。
<FormInput
  label="Last Name"
  name="lastName"
  value={form.lastName}
  onChange={handleFormChange} />
<FormInput
  label="Email Address"
  type="email"
  name="emailAddress"
  value={form.emailAddress}
  onChange={handleFormChange} />
<FormInput
  label="Password"
  type="password"
  name="password"
  value={form.password}
  onChange={handleFormChange} />
是时候定义我们的变更处理程序了handleFormChange。这里我们修改form状态,但仅限于发生更改的字段。例如,如果您在 First Name 字段中输入内容,form.firstName则会更新。
  const handleFormChange = (event) => {
    // Clone form because we need to modify it
    const updatedForm = {...form};

    // Get the name of the field that caused this change event
    // Get the new value of this field
    // Assign new value to the appropriate form field
    updatedForm[event.target.name] = event.target.value;

    console.log('Form changed: ', updatedForm);

    // Update state
    setForm(updatedForm);
  };
现在打开浏览器,尝试一下表单。在任意字段中输入内容时,都应该能够在控制台上看到变化。这意味着我们的状态输入功能App已经生效了!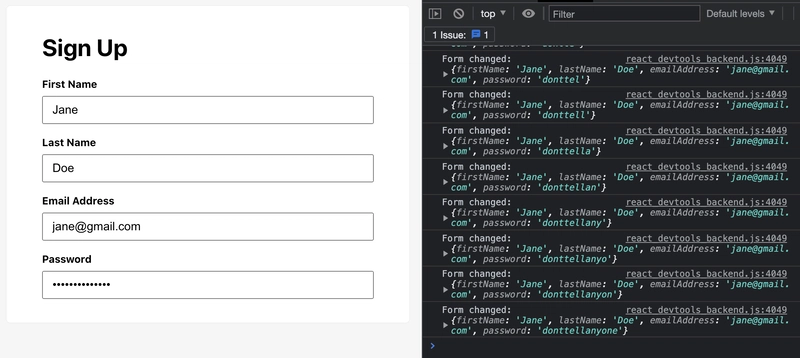
利用一些 ES6 魔法,我们可以将其缩短为:
const handleFormChange = (event) => {
  // Get the name of the field that caused this change event
  // Get the new value of this field
  const { name, value } = event.target;

  // Assign new value to the appropriate form field
  const updatedForm = {
    ...form,
    [name]: value
  };

  console.log('Form changed: ', updatedForm);

  // Update state
  setForm(updatedForm);
};
现在我们的代码仍然很长。🙄 好消息:所有用于App处理表单状态的逻辑都可以重用!
创建可重用的表单组件
还记得我们刚刚添加的代码App吗?让我们把它们全部移到一个新Form组件中。
import { useState } from 'react';
import './Form.css';

function Form(props) {
  const { children } = props;

  const [form, setForm] = useState({
    firstName: '',
    lastName: '',
    emailAddress: '',
    password: ''
  });

  const handleFormChange = (event) => {
    // Get the name of the field that caused this change event
    // Get the new value of this field
    const { name, value } = event.target;

    // Assign new value to the appropriate form field
    const updatedForm = {
      ...form,
      [name]: value
    };

    console.log('Form changed: ', updatedForm);

    // Update state
    setForm(updatedForm);
  };

  return (
    <form className="Form">
      {children}
    </form>
  );
}

export default Form;
我们有childrenprops,以便我们稍后可以写类似这样的内容:
<Form>
  <FormInput />
  <FormInput />
  <FormInput />
</Form>
其结果是:
<form className="form">
  <FormInput />
  <FormInput />
  <FormInput />
</form>
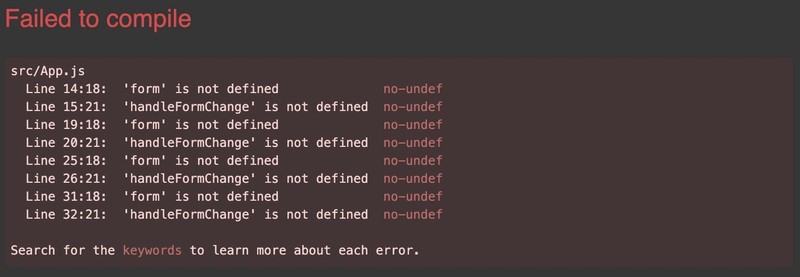
App不应再有任何字段,仅包含return语句。删除form、setForm和handleFormChange。这将导致错误:
form和handleFormChange现在是 undefined,因为我们将它们移到了Form。我们需要能够以某种方式访问这些字段。这就是 React Context 的作用所在。
使用 React Context 访问表单状态和 handleFormChange
Context提供了另一种将 props 传递给子代、孙代、曾孙代等的方式 - 而不必在每个级别都传递它们。
首先,我们在 中声明并初始化一个 Context Form.js。请确保导出它,因为我们将在其他组件中使用它。
import React from 'react';

export const FormContext = React.createContext({
  form: {},
  handleFormChange: () => {}
});
这些是我们想要与Form的孩子分享的领域。
通过包装的返回值将它们从 传递Form到:App{children}Form.js
<FormContext.Provider value={{
  form,
  handleFormChange
}}>
  {children}
</FormContext.Provider>
这样,孩子们就可以访问form和了handleFormChange。在中App,请确保导入:import Form, { FormContext } from './Form';
包装所有FormInput组件:
<Form>
  <FormContext.Consumer>
    {({form, handleFormChange}) => (
      <>
        <FormInput
          label="First Name"
          name="firstName"
          value={form.firstName}
          onChange={handleFormChange} />
        <FormInput
          label="Last Name"
          name="lastName"
          value={form.lastName}
          onChange={handleFormChange} />
        <FormInput
          label="Email Address"
          type="email"
          name="emailAddress"
          value={form.emailAddress}
          onChange={handleFormChange} />
        <FormInput
          label="Password"
          type="password"
          name="password"
          value={form.password}
          onChange={handleFormChange} />
      </>
    )}
  </FormContext.Consumer>
</Form>
注意,这里我们使用了FormContext.Consumer。这意味着我们正在使用来自 FormContext 的一些数据。在 中Form,我们传递了数据,因此FormContext.Provider。
检查你的浏览器并尝试一下表单。状态应该会反映出来。你会像之前一样在控制台中看到它。
行为没有改变,但现在我们的代码复用性更强了。而且你已经学会了如何使用 Context!🎉
让我们的代码更短,更具可重用性!
我们的代码仍然很长而且重复。对于每个FormInput,我们都必须编写value={form.xxx}和onChange={handleFormChange}。
我们可以把这个逻辑移到FormInput。我们不再需要FormContext在 中使用App,而是可以在 中使用FormInput。这就是 Context 相对于 props 的优点。字段可以在多个层级上访问。
在 中FormInput,我们使用FormContext。这是使用 Context 的另一种方法:
const formContext = useContext(FormContext);
const { form, handleFormChange } = formContext;
不要忘记导入:import { useContext } from 'react';import { FormContext } from './Form';
现在我们可以访问form状态了,我们可以从中设置输入值:value={form[name]}
以及变更处理程序:onChange={handleFormChange}
这里我们不再需要value道具。onChange
你FormInput.ts看起来应该是这样的:
import './FormInput.css';
import { useContext } from 'react';
import { FormContext } from './Form';

function FormInput(props) {
  const {
    label,
    type = 'text',
    name,
  } = props;

  const formContext = useContext(FormContext);
  const { form, handleFormChange } = formContext;

  return (
    <div className="FormInput">
      <label>{label}</label>
      <input
        type={type}
        name={name}
        value={form[name]}
        onChange={handleFormChange}
      />
    </div>
  )
}

export default FormInput;
由于FormInput现在处理 FormContext 的使用,我们可以删除很多代码App.js:
import './App.css';
import Form from './Form';
import FormInput from './FormInput';

function App() {
  return (
    <div className="App">
      <h1>Sign Up</h1>

      <Form>
        <FormInput
          label="First Name"
          name="firstName" />
        <FormInput
          label="Last Name"
          name="lastName" />
        <FormInput
          label="Email Address"
          type="email"
          name="emailAddress" />
        <FormInput
          label="Password"
          type="password"
          name="password" />
      </Form>
    </div>
  );
}

export default App;
看起来真棒!🤩 确保它仍然按预期工作。
最后一件事!
目前,Form始终具有相同的字段firstName, lastName, emailAddress, password。我们需要能够自定义它。
在 中Form,添加一个名为 的新道具formInitialValues并将其用作默认状态:const [form, setForm] = useState(formInitialValues);
在 中App,确保我们传递了新的 prop:
<Form formInitialValues={{
  firstName: '',
  lastName: '',
  emailAddress: '',
  password: ''
}}>
太棒了!它还能正常工作吗?如果可以,我们继续添加另一个表单。
创建另一个表单,看看现在有多容易!
这是我创建的登录表单:
<Form formInitialValues={{
  username: '',
  password: ''
}}>
  <FormInput
    label="Username"
    name="username" />
  <FormInput
    label="password"
    name="Password"
    type="password" />
</Form>
就是这样!
您也可以在此处下载完成的代码。
您可以继续添加更多代码来改进这一点:
- 添加提交按钮。
- 为 FormInput添加一个
required布尔值 prop。如果没有值,则显示错误消息。 - 自定义验证和错误消息。
- 其他输入字段如
<select>。
如果您在任何步骤中遇到问题,请在下方告诉我。我很乐意为您提供帮助!
如果您喜欢这个并且想了解更多关于我的信息,请访问我的网站并下载我的网站模板。
文章来源:https://dev.to/trishathecookie/react-creating-a-reusable-form-using-react-context-5eof 后端开发教程 - Java、Spring Boot 实战 - msg200.com
