如何:在 React 中构建协作实时任务列表
为了悼念奇妙清单 (Wunderlist)的关闭,我想今天大家可以学习如何构建这个功能 - https://todo-zeta.now.sh/ - 一个简单、协作且实时的任务列表服务。用户可以创建新列表并与朋友/同事分享,共同完成。

我们将在前端使用功能性 React,并使用Supabase作为我们的数据库和实时引擎(完整披露:我是 Supabase 的联合创始人)。(什么是 supabase?)
如果您想跳过前面的内容,可以在这里找到最终的源代码:https://github.com/supabase/supabase/tree/master/examples/react-todo-list
否则,让我们深入研究一下...
1)创建你的项目基础
为此我使用了create-react-app npx create-react-app my-todo-app
然后继续重新构建您的项目,使其看起来像这样:

index.js将是我们创建新列表的入口点,TodoList.js将是我们创建的列表,我们将从中获取所有数据Store.js。
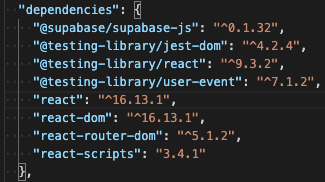
然后将这些依赖项添加到package.json:
并通过运行来安装它们npm install
2)index.js
在我们的基础路由器中添加渲染功能:
import { render } from 'react-dom'

render(
  <div className="App">
    <Router>
      <Switch>
        <Route exact path="/" component={Home} />
        {/* Additional Routes go here */}
      </Switch>
    </Router>
  </div>,
  document.body
)
接下来您需要设置主要组件:
const newList = async (history) => {
  const list = await createList(uuidv4())
  history.push(`/?uuid=${list.uuid}`)
}

const Home = (props) => {
  const history = useHistory()
  const uuid = queryString.parse(props.location.search).uuid

  if (uuid) return TodoList(uuid)
  else {
    return (
      <div className="container">
        <div className="section">
          <h1>Collaborative Task Lists</h1>
          <small>
            Powered by <a href="https://supabase.io">Supabase</a>
          </small>
        </div>
        <div className="section">
          <button
            onClick={() => {
              newList(history)
            }}
          >
            new task list
          </button>
        </div>
      </div>
    )
  }
}
这里的关键部分是,当点击创建列表按钮时,我们会使用一个随机生成的 uuid,然后使用和createList(uuidv4())将其作为查询参数附加到当前 url 。这样做是为了让用户可以从 url 栏复制并分享 url。useHistory()history.push(...)
另外,当新用户从他们的朋友那里收到一个 url 时 - 应用程序知道使用给定的 uuid 从数据库中查找特定的任务列表,你可以在这里看到:
  const uuid = queryString.parse(props.location.search).uuid
  if (uuid) return TodoList(uuid)
index.js <- 我省略了一些无聊的代码,因此从这里获取其余的代码来完成你的索引文件。
3)Store.js
现在我们将研究如何实时设置、获取和监听您的数据,以便您可以向协作用户显示新的和已完成的任务,而无需他们刷新页面。
import { useState, useEffect } from 'react'
import { createClient } from '@supabase/supabase-js'

const supabase = createClient(
  process.env.REACT_APP_SUPABASE_URL,
  process.env.REACT_APP_SUPABASE_KEY
)
您将需要.env在项目根目录中创建一个文件来存储这些变量:
REACT_APP_SUPABASE_URL=<my-url>
REACT_APP_SUPABASE_KEY=<my-key>
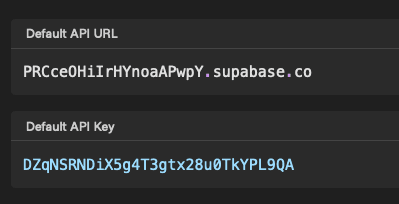
要获取您的 Supabase 凭证,请转到app.supabase.io,创建一个新的组织和项目,然后导航到 API 页面,您将在其中找到您的密钥:
现在导航到 SQL 选项卡,我们将在其中创建两个表Lists并Tasks使用内置的 SQL 解释器:

运行这两个查询来创建表:
CREATE TABLE lists (
  uuid text,
  id bigserial PRIMARY KEY,
  inserted_at timestamp without time zone DEFAULT timezone('utc' :: text, now()) NOT NULL,
  updated_at timestamp without time zone DEFAULT timezone('utc' :: text, now()) NOT NULL
);

CREATE TABLE tasks (
  task_text text NOT NULL,
  complete boolean DEFAULT false,
  id bigserial PRIMARY KEY,
  list_id bigint REFERENCES lists NOT NULL,
  inserted_at timestamp without time zone DEFAULT timezone('utc' :: text, now()) NOT NULL,
  updated_at timestamp without time zone DEFAULT timezone('utc' :: text, now()) NOT NULL
);
现在,在中Store.js,我们可以填写createList从中调用的方法index.js:
export const createList = async (uuid) => {
  try {
    let { body } = await supabase.from('lists').insert([{ uuid }])
    return body[0]
  } catch (error) {
    console.log('error', error)
  }
}
您可以前往Store.js获取其余代码,但此处需要注意的其他要点是:
我们如何订阅您的任务列表的实时变化:
        supabase
          .from(`tasks:list_id=eq.${list.id}`)
          .on('INSERT', (payload) => handleNewTask(payload.new))
          .on('UPDATE', (payload) => handleNewTask(payload.new))
          .subscribe()
以及我们如何使用 useState() 和 useEffect 来管理状态。一开始理解起来可能有点棘手,所以请务必阅读“使用Effect Hook”来理解它们是如何组合在一起的。
对于 TodoList 组件,我们将首先从商店导入:
import { useStore, addTask, updateTask } from './Store'
然后你可以像使用其他状态变量一样使用它们:
export const TodoList = (uuid) => {
  const [newTaskText, setNewTaskText] = useState('')
  const { tasks, setTasks, list } = useStore({ uuid })

  return (
    <div className="container">
      <Link to="/">back</Link>
      <h1 className="section">My Task List</h1>
      <div className="section">
        <label>Sharing url: </label>
        <input type="text" readonly value={window.location.href} />
      </div>
      <div className={'field-row section'}>
        <form
          onSubmit={(e) => {
            e.preventDefault()
            setNewTaskText('')
          }}
        >
          <input
            id="newtask"
            type="text"
            value={newTaskText}
            onChange={(e) => setNewTaskText(e.target.value)}
          />
          <button type="submit" onClick={() => addTask(newTaskText, list.id)}>
            add task
          </button>
        </form>
      </div>
      <div className="section">
        {tasks
          ? tasks.map((task) => {
              return (
                <div key={task.id} className={'field-row'}>
                  <input
                    checked={task.complete ? true : ''}
                    onChange={(e) => {
                      tasks.find((t, i) => {
                        if (t.id === task.id) {
                          tasks[i].complete = !task.complete
                          return true
                        }
                      })
                      setTasks([...tasks])
                      updateTask(task.id, { complete: e.target.checked })
                    }}
                    type="checkbox"
                    id={`task-${task.id}`}
                  ></input>
                  <label htmlFor={`task-${task.id}`}>
                    {task.complete ? <del>{task.task_text}</del> : task.task_text}
                  </label>
                </div>
              )
            })
          : ''}
      </div>
    </div>
  )
}
如果你已经完成了所有准备工作,你应该能够运行npm run start并导航到localhost:3000查看它的运行情况
完整源代码可在 GitHub 上获取
Supabase是一家开源公司和社区,因此我们的所有代码都可以在github.com/supabase上找到
免责声明:此演示不附带任何类型的用户身份验证,虽然不能直接访问其他用户的列表,但您必须假设您或您的用户在其任务列表中输入的任何内容都是公开可用的信息。
鏂囩珷鏉ユ簮锛�https://dev.to/awalias/howto-build-collaborative-realtime-task-lists-in-react-4k52