使用骨架加载加速你的用户体验☠️
CSS
添加动画
页面加载时消失
你是否见过页面加载时,只看到灰色条而不是实际内容的加载画面?这种加载画面被称为骨架加载画面,Facebook、Google、Slack、YouTube、Dev.to 等公司都在使用这种画面。
在本文中,我们邀请了 80 位参与者,让他们分别评估自己在看到空白页、骨架页和旋转页时的加载时间。他们认为骨架页最快,其次是旋转页,最后是空白页。让我们一起来创建一个骨架页吧!😀
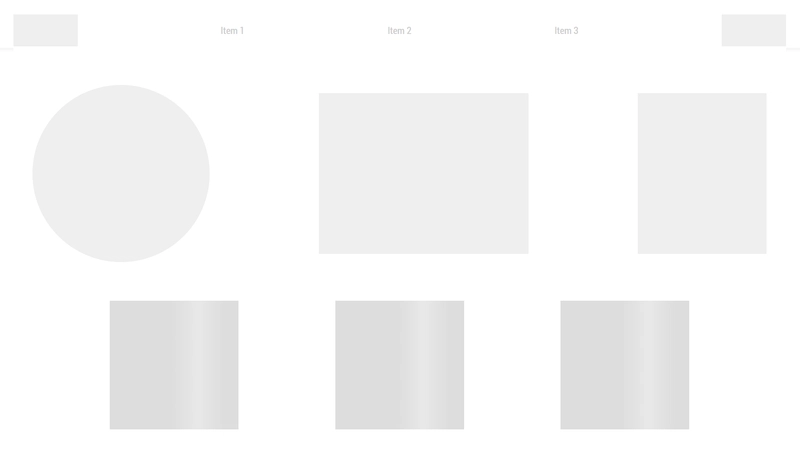
我们将要构建的内容(0.5 视图):
CSS
您可以使用图像来显示骨架,但这会产生额外的数据开销。而且它缺乏响应性。更好的选择是纯粹使用 HTML 和 CSS 来构建屏幕。
在此示例中,我们将为网上商店构建一个骨架屏幕。该骨架屏幕将包含以下内容:
- 包含 5 个项目的导航栏
- 带有一个圆圈和两个正方形的标题
- 3 个产品
如果您想知道我正在使用的奇怪的 CSS 命名约定是什么,我尝试对我的 CSS 使用BEM命名约定!
让我们从设置 HTML 开始,此部分应放在正文的第一个项目处:
   <section class="skeleton">
      <div class="skeleton__navbar">
        <div class="skeleton__nav-item"></div>
        <div class="skeleton__nav-box">
          <div class="skeleton__nav-text">Item 1</div>
          <div class="skeleton__nav-text">Item 2</div>
          <div class="skeleton__nav-text">Item 3</div>
        </div>
        <div class="skeleton__nav-item"></div>
      </div>
      <div class="skeleton__header">
        <div class="skeleton__circle"></div>
        <div class="skeleton__img"></div>
        <div class="skeleton__info"></div>
      </div>
      <div class="skeleton__products">
        <div class="skeleton__product"></div>
        <div class="skeleton__product"></div>
        <div class="skeleton__product"></div>
      </div>
    </section>
然后我们创建一个单独的 CSS 文件,将其放在文档的头部,这样骨架 div 和 css 就会在页面的其余部分之前加载。
我们的骨架的起始样式:
.skeleton {
  z-index: 100;
  position: fixed;
  left: 50%;
  transform: translate(-50%, 0);
  width: 100%;
  height: 100%;
  background-color: white;
}

@media (min-width: 1200px) {
  .skeleton {
    max-width: 1200px;
  }
}
让我们添加一些原始 CSS 变量和导航栏:
:root {
  --grey: #eee;
  --text: #ccc;
}

.skeleton {
  z-index: 100;
  position: fixed;
  left: 50%;
  transform: translate(-50%, 0);
  width: 100%;
  height: 100%;
  background-color: white;
}

@media (min-width: 1200px) {
  .skeleton {
    max-width: 1200px;
  }
}

.skeleton__navbar {
  width: 100%;
  height: 100px;
  background: white;
  display: flex;
  align-items: flex-end;
  justify-content: space-between;
}

.skeleton__nav-item {
  width: 100px;
  height: 50px;
  background-color: var(--grey);
}

.skeleton__nav-box {
  height: 50px;
  display: flex;
  flex-grow: 1;
  justify-content: space-evenly;
  align-items: center;
}

.skeleton__nav-text {
  color: var(--text);
}
然后我们将用渐变替换变量并添加其他元素。
:root {
  --gradient: linear-gradient(90deg, #ddd 0px, #e8e8e8 40px, #ddd 80px);
  --grey: #eee;
  --text: #ccc;
}

.skeleton {
  z-index: 100;
  position: fixed;
  left: 50%;
  transform: translate(-50%, 0);
  width: 100%;
  height: 100%;
  background-color: white;
}

@media (min-width: 1200px) {
  .skeleton {
    max-width: 1200px;
  }
}

.skeleton__navbar {
  width: 100%;
  height: 100px;
  background: white;
  display: flex;
  align-items: flex-end;
  justify-content: space-between;
}

.skeleton__nav-item {
  width: 100px;
  height: 50px;
  background-color: var(--grey);
}

.skeleton__nav-box {
  height: 50px;
  display: flex;
  flex-grow: 1;
  justify-content: space-evenly;
  align-items: center;
}

.skeleton__nav-text {
  color: var(--text);
}

.skeleton__header {
  margin-top: 2rem;
  width: 100%;
  display: flex;
  align-items: center;
  justify-content: space-between;
  padding: 2rem;
}

.skeleton__circle {
  width: 275px;
  height: 275px;
  background-color: var(--grey);
  border-radius: 50%;
}

.skeleton__img {
  width: 325px;
  height: 250px;
  background-color: var(--grey);
}

.skeleton__info {
  width: 200px;
  height: 250px;
  background-color: var(--grey);
}

.skeleton__products {
  margin-top: 2rem;
  display: flex;
  justify-content: space-evenly;
}

.skeleton__product {
  width: 200px;
  height: 200px;
  background-color: var(--grey);
}
好了,基本骨架搞定!接下来添加动画
添加动画
对于动画,我们需要添加一个随时间改变位置的渐变。
:root {
  --gradient: linear-gradient(90deg, #ddd 0px, #e8e8e8 40px, #ddd 80px);
  --animation: shine 1.6s infinite linear;
}

.skeleton__product {
  width: 200px;
  height: 200px;
  background-image: var(--gradient);
  animation: var(--animation);
  background-size: 300px;
}

@keyframes shine {
  0% {
    background-position: -100px;
  }
  40%,
  100% {
    background-position: 200px;
  }
}
现在将它附加到其余元素,我们就完成了!
:root {
  --gradient: linear-gradient(90deg, #ddd 0px, #e8e8e8 40px, #ddd 80px);
  --grey: #eee;
  --text: #ccc;
  --animation: shine 1.6s infinite linear;
  --animation-header: shine-header 1.6s infinite linear;
}

.skeleton {
  z-index: 100;
  position: fixed;
  left: 50%;
  transform: translate(-50%, 0);
  width: 100%;
  height: 100%;
  background-color: white;
}

@media (min-width: 1200px) {
  .skeleton {
    max-width: 1200px;
  }
}

.skeleton__navbar {
  width: 100%;
  height: 100px;
  background: white;
  display: flex;
  align-items: flex-end;
  justify-content: space-between;
}

.skeleton__nav-item {
  width: 100px;
  height: 50px;
  background-image: var(--gradient);
  animation: var(--animation);
  background-size: 275px;
}

.skeleton__nav-box {
  height: 50px;
  display: flex;
  flex-grow: 1;
  justify-content: space-evenly;
  align-items: center;
}

.skeleton__nav-text {
  color: var(--text);
}

.skeleton__header {
  margin-top: 2rem;
  width: 100%;
  display: flex;
  align-items: center;
  justify-content: space-between;
  padding: 2rem;
}

.skeleton__circle {
  width: 275px;
  height: 275px;
  background-image: var(--gradient);
  animation: var(--animation-header);
  background-size: 300px;
  border-radius: 50%;
}

.skeleton__img {
  width: 325px;
  height: 250px;
  background-image: var(--gradient);
  animation: var(--animation-header);
  background-size: 300px;
}

.skeleton__info {
  width: 200px;
  height: 250px;
  background-image: var(--gradient);
  animation: var(--animation-header);
  background-size: 300px;
}

.skeleton__products {
  margin-top: 2rem;
  display: flex;
  justify-content: space-evenly;
}

.skeleton__product {
  width: 200px;
  height: 200px;
  background-image: var(--gradient);
  animation: var(--animation);
  background-size: 300px;
}

@media (max-width: 1200px) {
  .skeleton__navbar,
  .skeleton__header,
  .skeleton__products {
    flex-direction: column;
  }

  .skeleton__navbar {
    align-items: flex-start;
  }

  .skeleton__nav-box,
  .skeleton__nav-text,
  .skeleton__img,
  .skeleton__info,
  .skeleton__products {
    display: none;
  }

  .skeleton__nav-item {
    width: 100%;
  }

@keyframes shine {
  0% {
    background-position: -100px;
  }
  40%,
  100% {
    background-position: 200px;
  }
}

@keyframes shine-header {
  0% {
    background-position: -100px;
  }
  40%,
  100% {
    background-position: 270px;
  }
}
页面加载时消失
接下来,我们必须在页面加载时显示骨架,并在页面准备好时将其删除。
首先将主体设置为具有内联样式的隐藏溢出,因此它会在所有其他样式表之前加载:
<body style="overflow: hidden;">
然后在你的主 JavaScript 文件中,为窗口添加一个 EventListener,用于监听页面加载。加载完成后,移除骨架,并将溢出部分归还给主体!😄
window.addEventListener("load", () => {
  document.body.style.overflow = "visible";
  elements.skeleton.style.display = "none";
});
就这些!祝你搭建骨架愉快!✌️
请务必关注我以获取更多技巧。🧠
文章来源:https://dev.to/sanderdebr/speed-up-your-ux-with-sculpture-loading-18ja 后端开发教程 - Java、Spring Boot 实战 - msg200.com
