自定义 React useFetch() 钩子用于通过重新验证获取数据
本指南将向您展示如何创建一个简单的反应钩子来获取数据(带有重新验证)。
🤨 为什么是这个钩子?
当为您的反应应用程序获取数据时,您通常会同时使用useState和useEffect,并使用诸如loading、data和之类的值,error例如本例中,此钩子有助于将该功能抽象为一个可以在任何地方多次使用的简单钩子。
设置项目
我们将使用create-react-apptypescript 的锅炉模板,并且我们将使用的唯一外部库axios用于数据提取。
打开终端并输入以下命令。
yarn create react-app use-fetch --template typescript
# for npm
npx create-react-app use-fetch --template typescript
进入目录并安装axios
cd use-fetch
yarn add axios
# for npm
npm install axios
在目录中src删除以下文件(因为不需要它们)
- 应用程序.css
- App.test.tsx
🎣 自定义useFetch钩子
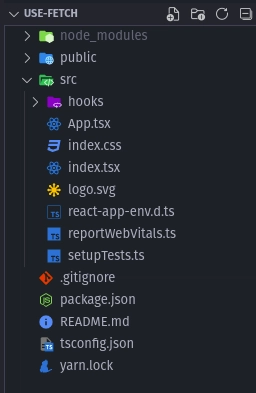
在目录中src创建另一个名为的目录hooks,这是我们的钩子所在的位置。
cd src
mkdir hooks
您的文件结构应该看起来像这样。
在目录中hooks创建一个名为的文件useFetch.tsx。
在文件中输入以下内容useFetch。
import { useState, useEffect, useCallback } from "react";
import axios from "axios";

interface UseFetchProps {
  url: string;
}

const useFetch = ({ url }: UseFetchProps) => {
  const [data, setData] = useState<any>();
  const [error, setError] = useState(false);

  // function to fetch data
  const fetch = useCallback(async () => {
    setError(false);
    try {
      const fetchedData = await axios.get(url);
      setData(fetchedData.data);
    } catch {
      setError(true);
    }
  }, [url]);

  useEffect(() => {
    // on first load fetch data
    fetch();
  }, [fetch]);

  return {
    data,
    error,
    revalidate: fetch,
  };
};

export default useFetch;
该钩子接受一个 prop url,即我们要从中获取数据的 API URL。它有两个状态data和 ,error分别用于存储从 API 获取的数据和检查错误。
我们创建了一个单独的函数来获取调用的数据fetch并将其包装在一个useCallback钩子中,访问此处了解我们使用钩子的原因useCallback。
然后我们只需使用一个钩子,在钩子安装后立即useEffect运行该函数即可。fetch
钩子返回data,error并且revalidate这是fetch我们想要以编程方式重新验证数据时的函数。
😎 使用钩子
要使用钩子,我们只需导入它并提取它的值。
在App.tsx
import useFetch from "./hooks/useFetch";
import logo from "./logo.svg";

function App() {
  const { error, data, revalidate } = useFetch({
    url: "https://random-data-api.com/api/users/random_user?size=5",
  });

  if (!data) {
    return <h2>Loading...</h2>;
  }

  if (error) {
    return <h2>Error fetching users</h2>;
  }

  return (
    <div className="App">
      <img src={logo} alt="react logo" />
      <h1 className="title">useFetch()</h1>
      <button onClick={revalidate}>revalidate</button>
      <div className="items">
        {data.map((el: any) => (
          <div className="item" key={el.uid}>
            <img
              src={`https://avatars.dicebear.com/api/big-smile/${el.first_name}.svg`}
              alt={`${el.username} profile`}
              className="item__img"
            />
            <div className="item__info">
              <p className="name">
                {el.first_name} {el.last_name}{" "}
                <span className="username">(@{el.username})</span>
              </p>
              <p className="job">{el.employment.title}</p>
              <p
                className={`status ${
                  el.subscription.status.toLowerCase() === "active"
                    ? "success"
                    : el.subscription.status.toLowerCase() === "blocked"
                    ? "danger"
                    : "warn"
                }`}
              >
                {el.subscription.status}
              </p>
            </div>
          </div>
        ))}
      </div>
    </div>
  );
}

export default App;
⏰ 添加间隔重新验证
您可能需要每 5 秒从您的 API 获取一次数据以进行重新验证(确保您的数据是最新的)。
我们需要对useFetch钩子进行一些修改。让我们添加更多道具。
interface UseFetchProps {
  url: string;
  revalidate?: boolean;
  interval?: number;
}
revalidate将是一个布尔值,用于检查我们是否要实现间隔重新验证,interval将是每次重新验证之间所花费的时间(以秒为单位)。
...
const useFetch = ({ url, revalidate, interval }: UseFetchProps) => {
...
我们将创建一个名为的状态,revalidateKey该状态将在每个时间间隔进行更改,并添加到依赖项数组中。将其添加到依赖项数组将确保每次更改时都会运行useEffect其中的函数。useEffectrevalidateKey
为了改变revalidateKey,我们将创建一个useEffect具有的新setInterval。
...
const [revalidateKey, setRevalidateKey] = useState("");
...
useEffect(() => {
    const revalidateInterval = setInterval(() => {
      if (revalidate) {
        setRevalidateKey(Math.random().toString());
      }
      // if no interval is given, use 3 seconds
    }, (interval ? interval : 3) * 1000);
    return () => clearInterval(revalidateInterval);
  }, [interval, revalidate]);
我们的useFetch钩子看起来应该是这样的。
const useFetch = ({ url, revalidate, interval }: UseFetchProps) => {
  const [revalidateKey, setRevalidateKey] = useState("");
  const [data, setData] = useState<any>();
  const [error, setError] = useState(false);

  // function to fetch data
  const fetch = useCallback(async () => {
    setError(false);
    try {
      const fetchedData = await axios.get(url);
      setData(fetchedData.data);
    } catch {
      setError(true);
    }
  }, [url]);

  useEffect(() => {
    const revalidateInterval = setInterval(() => {
      if (revalidate) {
        setRevalidateKey(Math.random().toString());
      }
      // if no interval is given, use 3 seconds
    }, (interval ? interval : 3) * 1000);
    return () => clearInterval(revalidateInterval);
  }, [interval, revalidate]);

  useEffect(() => {
    // on first load fetch data and when revalidateKey changes
    fetch();
  }, [fetch, revalidateKey]);

  return {
    data,
    error,
    revalidate: fetch,
  };
};
使用useFetch钩子✨
const { error, data, revalidate } = useFetch({
    url: "https://random-data-api.com/api/users/random_user?size=5",
    revalidate: false,
    // fetch every 5 seconds
    interval: 5,
  });
⚠️ Graphql 支持
此钩子仅使用GET方法,而 Graphql 使用POST方法进行数据获取。为了使钩子更具动态性,您可以添加更多属性,例如isGraphqland query,isGraphql它们将是一个布尔值,用于检查其是 Graphql 还是 REST,因此您可以在钩子中使用条件axios.post()来代替axios.get()andquery进行 graphql 查询。
感谢您的阅读🙏🏾,如果您有任何问题、补充或删减,请在下面评论。
完整的源代码链接如下👇👇
文章来源:https://dev.to/brimble/custom-react-usefetch-hook-for-data-fetching-with-revalidation-f7k 后端开发教程 - Java、Spring Boot 实战 - msg200.com
