React 样式组件速查表
近几年,在 React.js 应用开发中使用样式化组件 (Styled Components) 变得越来越流行,它之所以如此受欢迎,主要是因为它在为应用编写样式时提供了更好的开发者体验。传统上,你会使用一份冗长的 CSS 样式表,将所有样式集中放在一个地方。你经常遇到的问题是 CSS 名称冲突以及由于特殊性问题导致的样式问题。除了样式化组件之外,许多其他解决方案也可以解决这些问题,例如 BEM、Sass 和 CSS 模块,它们各有优缺点。本文不会讨论哪种组件最好,而是提供一份样式化组件的速查表。我还制作了一个关于此的视频。
让我将来想要使用样式化组件的四个原因是:
1] 作用域级别样式,即组件和样式被分组在一起,因此您无需费力寻找破坏 UI 的样式。2
] 使用变量并能够将 props 注入组件。是的,它是动态的,可以使用编程逻辑!
3] 无需浪费时间思考独特的类名。4
] 易于学习。
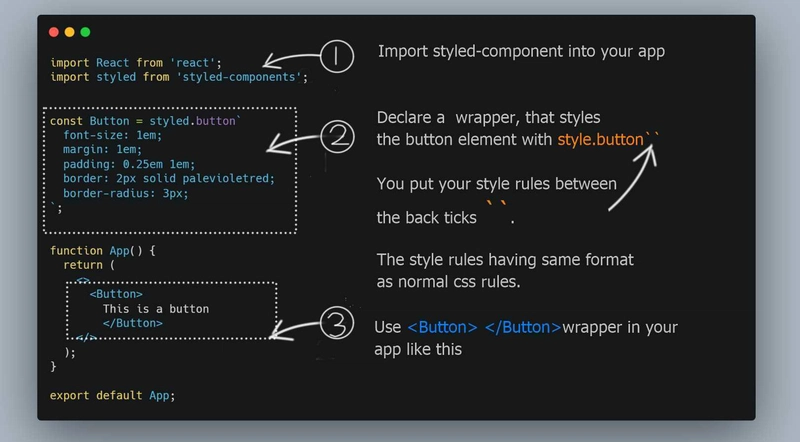
让我们看看如何编写你的第一个样式组件
从上面三个步骤可以看出,这很简单。你可能会觉得声明有点奇怪,因为我们在调用 styled 组件函数时使用了反引号。
const Button = styled.button`color:red;`
但这实际上与进行普通函数调用并传递数组相同:
const Button = styled.button([`color:red;`])
调用函数时不使用括号,而是将参数放在反引号之间,这种做法被称为带标签的模板字面量,这是 JavaScript 的一个特性。在解释带标签的模板字面量时,总会有一个数组类型的参数。
要查看一些示例并阅读有关标记模板文字的更多信息,请转到 Wes Bos 文章
从 Wes Bos 的文章中,你了解到可以将变量注入到带标签的模板字面量中。因此,在样式化组件中,你可以执行以下操作:
let primary_color='red';
const Button = styled.button`color:${primary_color};`
这就是赋予样式化组件超能力的原因,你可以用它做各种各样的技巧。
这是针对首次使用样式组件的初学者的备忘单
以下代码片段可帮助您入门并充分利用样式化组件。本速查表中的代码示例假设您已使用 npx create-react-app 创建了一个基本应用。
1]安装
npm install styled-components
yarn add styled-components
2]导入到你的脚本中
// then, just import it into your script like:
import styled from "styled-components"
3]元素的基本样式,例如h1,h2,div,input,span等
//Declare wrapper for a h2 element with styling like this
const Headline = styled.h2`
  color: black;
  border-bottom:1px solid black;
`
function App() {
  //Use Headline wrapper component in your app
  return (
    <Headline>
      The Headline goes here
    </Headline>
  )
}
所有 html 元素都有方法,因此您可以<diV>使用 来设置样式styled.div,或者<input>使用styled.input
4] 通过在前面添加“&”来包含伪类,例如 :hover、:focus、:active 等。例如&:hover {.....}
    const Button = styled.button`
        width:100px;
        color:white;
        background-color: green;

        //Add hover styling
        &:hover {
            background-color:gray;
        }

    };`
5] 在您的样式组件中包含媒体查询。
    const Wrapper = styled.div`
    width:50vw;

    //Make it full width on smaller screens
    @media screen and (max-width: 800px) {
        background-color: lightgray;
        width:100vw;

    }
    `
6] 在样式组件中扩展样式 - 您可以使用基本样式,然后使用新的样式规则进行扩展
// Base style for heading
const Headline = styled.h1`
  border-bottom:2px solid gray;
  color: blue;
`;

//Extend base style to overide color
const HeadlineGreen = styled(Headline)`
  color: green;
`;

function App() {
  return (
    <>

      <Headline>
        Standard Blue headline
      </Headline>
      <HeadlineGreen>
        Extended green headline
      </HeadlineGreen>
    </>
  );
}
如果你仔细查看 HeadlineGreen 声明,你会发现我们将 Headline 作为参数传递,即
const HeadlineGreen = styled(Headline)`.....`
7] 你仍然可以使用类并为选择器编写样式,就像普通的 CSS 样式一样
//Style everything inside the wrapper with css selectors
const Wrapper = styled.div`
  width:100%;

  .big-heading {
      border-bottom:2px solid blue;
      color: blue;
  }
  button.primary {
    width:100px;
    height:50px;
    background-color:green;
    color:white;
  }
`

function App() {
  return (
    <Wrapper>
      <h2 className='big-heading'>
        Standard Blue headline
      </h2>
      <button className='primary'>
        A plain Button
      </button>
    </Wrapper>
  );
}
export default App;
8] 你可以将 props 传递给你的样式组件
const Headline = styled.h1`
  color: ${props => props.color};
`
function App() {
  return (
    <>
      {/* We are passing color as a prop, we also set its value to pink*/}
      <Headline color="pink">
        Standard Blue headline
      </Headline>
    </>
  );
}
export default App;
在上面的代码中,我们根据传入的 color 属性的 props 动态设置了 Headline 的颜色。你可以像下面这样编写代码片段来访问 props:${props => props.color}在 JSX 中,我们这样设置:<Headline color="pink">.....</Headline>
9] 如何应用目标全局样式<body>以及<html>在何处放置重置样式。
import styled,{createGlobalStyle} from 'styled-components';
// Remember to import createGlobalStyle as above

const GlobalStyle = createGlobalStyle`
    * {
        margin: 0;
        padding: 0;
    }

    body {
        background: teal;
        font-family: Open-Sans, Helvetica, Sans-Serif;
    }
`;

function App() {
  return (
    <> {/*Place the GlobalStyle tag at the very top of your app component tree.*/}
      <GlobalStyle />
      <h1>
        This is a landing page
      </h1>
    </>
  );
}
请记住从 styled-components 导入 createGlobalStyle,如下所示:import styled,{createGlobalStyle} from 'styled-components';。您可以将标签放在应用程序组件树的最顶部。
希望您喜欢使用样式组件
所以我希望这份关于样式组件的入门速查表能帮助你在下一个项目中顺利上手。记住,这只是冰山一角。你可以用它做很多事情。
文章来源:https://dev.to/keefdrive/styled-components-cheat-sheet-58nd 后端开发教程 - Java、Spring Boot 实战 - msg200.com
