使用 🍃 MongoDB Atlas、💙 Microsoft Azure ML/AI 和 ⚡ 无服务器功能构建自定义 WordPress Nodejs 应用程序!
🛡
🎛
Ⓦ
⚡
🤖
🎯
TL;DR我正在为企业客户构建一个自定义的 WordPress 仪表板,它由 Node.js 之上的 React.js 提供支持,并使用 MongoDB Atlas 作为数据库。
此仪表板使用了多项 Microsoft Azure 服务,例如认知服务、Azure 应用服务,以及无服务器 ⚡ Azure Functions。在本文中,您将学习如何基于它构建一个小模块,以及我选择这些技术栈、应用和产品的原因。
🚀 我的一位企业客户拥有一家大型网络和媒体公司,并建立了一个大型 WordPress 网站。他最近向我咨询是否可以构建一个自定义 WordPress 仪表板(基于WordPress REST API),以帮助他通过机器学习和人工智能做出明智的业务决策。
🤔 随着 JavaScript 席卷全球,WordPress 通过创建 Gutenberg项目来适应这一趋势——我想到了一个架构/堆栈,其中 WordPress 将成为我们的内容层,一个熟悉的、经过实战检验的环境,可以使用 JavaScript 构建的自定义仪表板很好地完成其工作。
😲 当你需要构建一个现代 JavaScript 应用程序时,你会发现自己身处各种不同的框架、工具和开发工作流程之中。JavaScript 生态系统在过去几年中发展迅速。如今我们有很多不错的选择。
🎟 所以,在研究了一番各种方案之后,我决定在 Node.js 上使用 React.js 来构建自定义 WordPress 仪表盘。虽然该项目目前处于构思阶段,但我认为有必要在这里分享一些我们的目标,以明确我选择该技术栈背后的背景。
🛡
自定义 WordPress 仪表板目标
假设你拥有一家大型网络公司,超过 500 家酒店(分布在三个不同的国家/地区)使用你的服务来支持他们的会议厅、IT 会议以及网站和博客等在线物业管理。我的客户就是这样做的。
其中大部分功能由一个庞大的多站点 WordPress 实例提供支持,该实例管理酒店、网站、在线预订、注册、活动、门票、评论和留言等所有内容。此外,还有其他系统运行不同的软件,可以通过 REST API 生成内容。
我们着手创建一个自定义 WordPress 仪表板,心中有很多目标,但我列出了其中一些与本文相关的目标。看看我目前为止构建的内容,它们全部基于无服务器 Azure 函数——非常棒。
👀 高级数据报告
自定义仪表板将报告所有高级数据,例如我的客户投资组合(超过 500 家酒店)的实时销售情况、基于实体/时间和基于日期的细分数据。
这就是他旗下每个品牌每日、每周、每月的业绩表现。所有这些数据都被输入到MongoDB Atlas中。稍后会详细介绍。
⚡无服务器自动化
大多数模块都基于无服务器架构构建——这在本例中带来了巨大的优势。所有自动化功能始终保持运行,并且按使用量付费,即按实际使用量付费。
初步粗略估计,此解决方案比始终运行服务器虚拟机节省 34%。我们使用Azure Functions实现这种无服务器自动化。
🔥 IoT(物联网)中心
我的客户大约有 200 名 IT 经理,他们拥有支持物联网的设备,可以为多个在线项目提供数据。这个自定义仪表板也包含这些数据,以便做出更明智的决策,并将整个注册、管理和维护团队的中心连接到一个地方。
您可能已经猜到了,该项目利用Microsoft Azure 的IoT Hub来连接、监控和管理所有 IoT 资产。
🤖 机器学习和人工智能
为了通过机器学习让这个仪表板变得具有人工智能,我们使用了 Microsoft Azure 的许多不同服务。
有大量的数据集被输入到ML Studio,它随后帮助我们预测不同的决策,如空间管理、IT 事件的低注册趋势,以及这些事情发生的原因和时间等问题。
虽然机器学习部分超出了本文的范围,但我仍然计划接触一些我已经能够通过 Azure 的认知服务实现的出色的人工智能。
🕰 直播和实时
这个自定义仪表板最重要的一点是它是实时的。这意味着我需要一个能够处理如此海量数据并保持高可用性的托管数据库。
但同时,它是为了管理目的,不会对 WordPress 网站产生任何影响。这是此仪表板的一个关键系统设计决策。我的意思是,我们可以用这个自定义仪表板进行各种实验,但它不应该对运行多站点 WordPress 实例的数据库/服务器产生任何影响。
🎛
MongoDB 和 MongoDB Atlas
对于这个自定义的 WordPress 仪表板,我使用MongoDB Atlas作为 DBaaS(数据库即服务)。我非常高兴。当我第一次告诉大家我将使用 MongoDB 时,许多开发人员都心存疑虑。

大多数问题都在于,为什么要添加另一个数据库来增加复杂性?为什么不直接使用 WordPress 数据库呢?为了回答这些问题以及其他问题,我列出了一系列我使用MongoDB Atlas的理由。
♨ 不喜欢 RDBMS
我个人不喜欢关系型数据库。大多数时候,它们会妨碍我构建应用程序。我不得不完全脱离正在构建的应用程序,思考未来的数据库,并设计一个好的数据库模式,但这总是会给我的开发工作流程带来不利影响。这充其量是违反直觉的——至少对我来说是这样。
💸 HDD 很便宜 | CPU/RAM 不便宜
旧数据库的设计大多以节省磁盘空间等为目的。这导致了大量问题,例如规范化、索引,并使分片、自动扩展和复制变得更加困难。
如今,磁盘空间非常便宜。另一方面,CPU/RAM 却不便宜,如果你最终做出了错误的选择,你的系统管理成本可能会迅速飙升。
比如,你想创建一个自定义仪表板,但你的系统设计架构师却因为选择系统设计方式而浪费了你两名系统管理员的时间。同样,我的客户想要一个托管解决方案,而不需要雇佣一个 IT/DevOps 团队——至少对于一个实验性的自定义仪表板来说是这样。
🍀 MongoDB 的专业版
- 无模式。灵活的模式,成就优势。我无需改变任何东西,我常规的应用开发工作流程,创建一个基于 Node.js 的应用,处理 JSON 类型的数据,只需将其输入 MongoDB 即可。
- 工作流程一致性。以我自定义仪表板的呈现方式创建文档。销售、视频、对话、评论、评价、注册等数据在前端和后端,甚至在数据库中都具有类似的呈现方式。我通过中间件管理第三方数据。这种一致性转化为简洁的代码。
- 易于扩展。它使用副本集扩展读取。使用分片(自动平衡)扩展写入。只需启动另一台机器即可。最重要的是,MongoDB 无需通过 RDBMS 进行垂直扩展,而是允许您以不同的一致性级别进行水平扩展。这是一个很大的优势。➕
- 成本。当然取决于使用哪种 RDBMS,但 MongoDB 是免费的,并且可以在 Linux 上运行,非常适合在更便宜的商品套件上运行。
🍃 为什么选择MongoDB Atlas?
好吧,现在我知道 MongoDB 是正确的数据库选择,托管数据库有很多不同的选择。我可以通过 DigitalOcean 在我的 Linux 机器上自行托管,使用 AWS/Azure 等云服务提供商,或者选择专门针对 MongoDB 的 DBaaS 服务。
但我想要一个快速、安全且可托管的 MongoDB 解决方案,以便能够随着我们在这个自定义 WordPress 仪表板中附加的模块数量的增长而轻松扩展。这就是MongoDB Atlas。
MongoDB Atlas是一个云托管的 MongoDB 服务,由构建数据库的团队设计和运营。而且,我相信他们遵循最佳运维实践,因为他们是 MongoDB 的最初构建者。
我希望这个自定义仪表板能够自主管理、无服务器运行,而使用 MongoDB Atlas 让我无需担心软件补丁、备份以及新数据库更新所需的可靠配置设置。这又是一个很大的优势。➕
此外,MongoDB Atlas 支持跨平台、跨区域以及跨云提供商,这使得它成为一个更好的选择。我认为每个集群都带有两个副本集,可以随时扩展。
🔋 MongoDB 指南针
既然我们要使用 MongoDB,那么拥有一个可以探索数据库、查看更改、调试等等的工具就再好不过了。为此,MongoDB 再次率先推出了一款名为MongoDB Compass的产品。一起来看看吧。
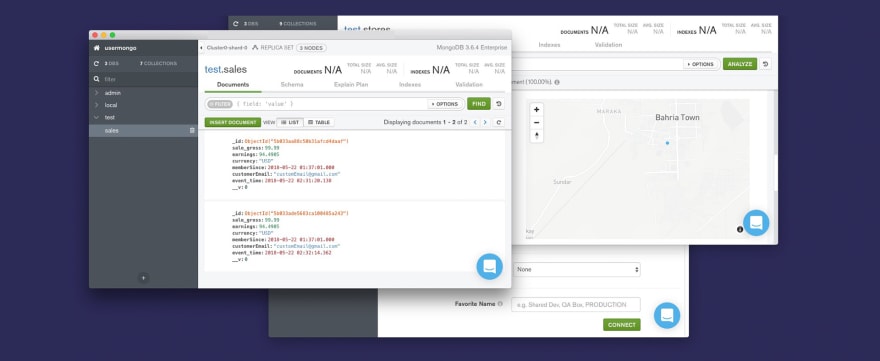 我建议您继续下载MongoDB Compass。
它绝对是可视化 MongoDB 数据库的最佳工具。它的功能如下:
- 可视化和探索:查看您的数据库,了解事物的状况,甚至可视化地图/坐标等内容。
- 插入、修改和删除:您还可以直接从 MongoDB Compass 对数据库执行 CRUD 操作。让测试更加轻松。
- 调试和优化:最后,在一个优秀的数据库图形用户界面 (GUI) 中,分析数据、进行调试,甚至找出性能问题。如果您使用 MongoDB,那么这个工具是必备的。
- 可扩展:最棒的是,您可以构建自己的插件来扩展 MongoDB Compass。这里有关于如何构建您自己的 Compass 插件的文档。
- 企业版:MongoDB Compass 有几种版本:社区版(免费)和企业版(授权)——企业版可以让您可视化 DB 模式。
✅ MongoDB Atlas 入门
让我们开始构建一个简单的模块,它是我正在构建的自定义 WordPress 仪表板的一部分。在这个模块中,我们将收集所有与销售相关的数据。为此,我们需要一个 MongoDB 实例,我们在这里使用 MongoDB Atlas。
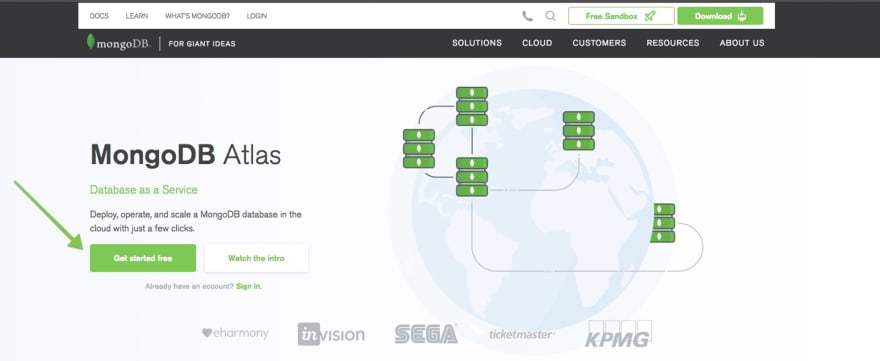
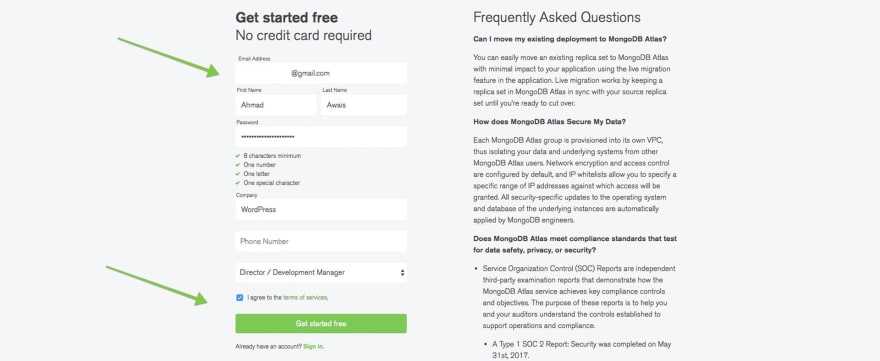
步骤#1:转到MongoDB Atlas →
前往MongoDB Atlas网站,注册一个完全免费的、托管在 AWS 上的 MongoDB 实例,该实例包含共享 RAM 和 512 MB 存储空间。点击Get Started Free按钮。
步骤#2:在 MongoDB Atlas 注册→
现在就用你的邮箱 ID 注册并填写详细信息吧。更棒的是,你可以注册并使用免费的 MongoDB Atlas 托管数据库实例,甚至不需要你添加信用卡。
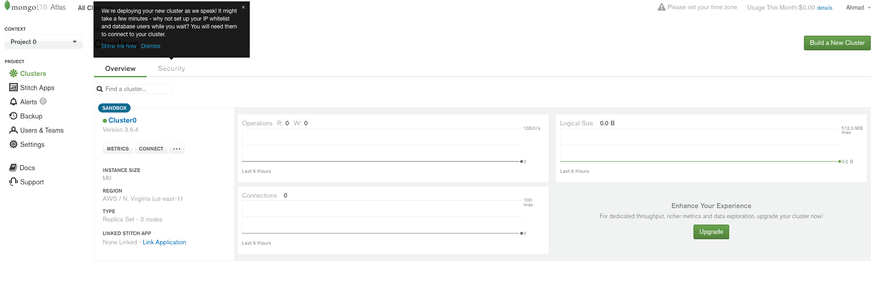
步骤#3:创建集群
现在,您将被重定向到一个页面,其中包含有关您即将创建的新 MongoDB 集群的大量信息。建议您查看这些信息,然后单击Create Cluster底部的按钮继续操作,如下图所示。

步骤#4:创建数据库用户/密码
您的数据库创建只需一分钟。完成后,请前往Security>MongoDB Users并点击+ ADD NEW USER右侧的按钮,为您的数据库创建新用户。为了方便本篇介绍,我们将其他所有设置保留为默认设置。
我正在设置用户/密码,usermongo但你知道得更多。
步骤#5:将IP添加到访问白名单
为了能够访问您的 MongoDB Atlas 数据库,您需要使用托管应用程序的服务器 IP 设置 IP 白名单。身份验证超出了我在这里讨论的范围,因此出于演示的目的,我们只允许所有人访问(这在生产环境中实际上是一个糟糕的做法)。
因此,再次转到Security>IP Whitelist并单击+ ADD IP ADDRESS右侧的按钮,最后单击ALLOW ACCESS FROM ANYWHERE按钮以允许匿名访问。

步骤#6:通过 MongoDB Compass 连接
现在我们已经创建了数据库的 IP 访问和用户,我们可以获取连接字符串并使用它通过 MongoDB Compass 应用程序连接到我们的数据库。
转到Connect并选择Connect with MongoDB Compass并下载指南针(如果还没有下载),复制 URI 连接字符串。最后,打开指南针,它应该能够检测到剪贴板中的连接字符串,并允许它连接到你的数据库。
现在,您就可以可视化数据库、分析其性能,甚至运行完整的 CRUD 操作了。太棒了!💯

现在我们已经创建了 MongoDB Atlas,并将其与 MongoDB Compass 连接起来,我们可以继续并开始构建我们的 Node.js 应用程序。
Ⓦ
WordPress REST API — FTW!
这个基于 WordPress 的 Node.js 自定义仪表板通过WordPress REST API与 WordPress 实例交互。由于这是一个 Node.js 应用,我使用了一个很棒的库,wpapi由K Adam White编写。他还构建了一个express基于 WordPress 的演示应用。我在构建这个自定义仪表板时受到了它的启发。所以,你会在这里看到很多相关的内容。
🚀 基于 WordPress 的自定义路由器express
路由器已设置express。这是使用 WordPress 和 Express 的基本错误处理程序和路由器模板。
| 'use strict'; | |
| var express = require('express'); | |
| var router = express.Router(); | |
| var siteInfoMiddleware = require('../middleware/site-info'); | |
| // Set global site info on all routes | |
| router.use(siteInfoMiddleware); | |
| // Public Routes | |
| // ============= | |
| router.get('/', require('./index')); | |
| router.get('/page/:page', require('./index')); | |
| router.get('/:slug', require('./single')); | |
| router.use('/tags/:tag', require('./tag')); | |
| router.use('/categories/:category', require('./category')); | |
| // Catch 404 and forward to error handler. | |
| router.use(function (req, res, next) { | |
| var err = new Error('Not Found'); | |
| err.status = 404; | |
| next(err); | |
| }); | |
| // Error Handling | |
| // ============== | |
| // Development error handler will print stacktrace. | |
| function developmentErrorRoute(err, req, res, next) { | |
| res.status(err.status || 500); | |
| res.render('error', { | |
| message: err.message, | |
| error: err | |
| }); | |
| } | |
| // Production error handler. No stacktraces leaked to user. | |
| function friendlyErrorRoute(err, req, res, next) { | |
| res.status(err.status || 500); | |
| res.render('error', { | |
| message: err.message, | |
| error: {} | |
| }); | |
| } | |
| // Configure error-handling behavior | |
| if (router.get('env') === 'development') { | |
| router.use(developmentErrorRoute); | |
| } else { | |
| router.use(friendlyErrorRoute); | |
| } | |
| module.exports = router; |
🎚express基于 Basic 的实现
我并没有把所有东西都托管在 WordPress 上,但最初的计划就是这么做。如果你想这么做,为了方便和并行,你需要使用RSVP.hash工具查询所有信息来构建索引。为此,你应该这样做。
| 'use strict'; | |
| var wp = require( '../services/wp' ); | |
| var contentService = require( '../services/content-service' ); | |
| var pageNumbers = require( '../services/page-numbers' ); | |
| var pageTitle = require( '../services/page-title' ); | |
| var RSVP = require( 'rsvp' ); | |
| function getHomepage( req, res, next ) { | |
| var pages = pageNumbers( req.params.page ); | |
| RSVP.hash({ | |
| archiveBase: '', | |
| pages: pages, | |
| title: pageTitle(), | |
| // Primary page content | |
| posts: wp.posts().page( pages.current ), | |
| sidebar: contentService.getSidebarContent() | |
| }).then(function( context ) { | |
| if ( req.params.page && ! context.posts.length ) { | |
| // Invalid pagination: 404 | |
| return next(); | |
| } | |
| res.render( 'index', context ); | |
| }).catch( next ); | |
| } | |
| module.exports = getHomepage; |
🦏 身份验证已完成
对于此设置,您还需要通过提供身份验证数据来验证您的 Node.js 应用,这些数据wpapi可以像这样处理。请注意,如果您没有使用正确的权限和环境变量设置,这并非最佳做法。
| var WP = require( 'wordpress-rest-api' ); | |
| var _ = require( 'lodash' ); | |
| var config = _.pick( require( './config' ).wordpress, [ | |
| // Whitelist valid config keys | |
| 'username', | |
| 'password', | |
| 'endpoint' | |
| ]); | |
| var wp = new WP( config ); | |
| module.exports = wp; |
🦁 网站内容积累
最后,您可以通过创建一个处理递归获取的内容服务来使用所有内容
- 分页集合的所有页面。
- 您的 WordPress 网站的信息。
- 按字母顺序排列的类别列表。
- 来自内容缓存的特定类别(由 slug 指定)。
- 按字母顺序排列的标签列表。
- 内容缓存中的特定标签(由 slug 指定)
- 其他内容需要具有与 WP 相同的某些功能。
其代码看起来有点像这样。
| 'use strict'; | |
| var wp = require( './wp' ); | |
| var cache = require( './content-cache' ); | |
| var _ = require( 'lodash' ); | |
| var RSVP = require( 'rsvp' ); | |
| /** | |
| * Recursively fetch all pages of a paged collection | |
| * | |
| * @param {Promise} request A promise to a WP API request's response | |
| * @returns {Array} A promise to an array of all matching records | |
| */ | |
| function all( request ) { | |
| return request.then(function( response ) { | |
| if ( ! response._paging || ! response._paging.next ) { | |
| return response; | |
| } | |
| // Request the next page and return both responses as one collection | |
| return RSVP.all([ | |
| response, | |
| all( response._paging.next ) | |
| ]).then(function( responses ) { | |
| return _.flatten( responses ); | |
| }); | |
| }); | |
| } | |
| function siteInfo( prop ) { | |
| var siteInfoPromise = cache.get( 'site-info' ); | |
| if ( ! siteInfoPromise ) { | |
| // Instantiate, request and cache the promise | |
| siteInfoPromise = wp.root( '/' ).then(function( info ) { | |
| return info; | |
| }); | |
| cache.set( 'site-info', siteInfoPromise ); | |
| } | |
| // Return the requested property | |
| return siteInfoPromise.then(function( info ) { | |
| return prop ? info[ prop ] : info; | |
| }); | |
| } | |
| /** | |
| * Get an alphabetized list of categories | |
| * | |
| * All archive routes display a sorted list of categories in their sidebar. | |
| * We generate that list here to ensure the sorting logic isn't duplicated | |
| * across routes. | |
| * | |
| * @method sortedCategories | |
| * @return {Array} An array of category objects | |
| */ | |
| function sortedCategories() { | |
| return all( wp.categories() ).then(function( categories ) { | |
| return _.chain( categories ) | |
| .sortBy( 'slug' ) | |
| .value(); | |
| }); | |
| } | |
| function sortedCategoriesCached() { | |
| var categoriesPromise = cache.get( 'sorted-categories' ); | |
| if ( ! categoriesPromise ) { | |
| categoriesPromise = sortedCategories(); | |
| cache.set( 'sorted-categories', categoriesPromise ); | |
| } | |
| return categoriesPromise; | |
| } | |
| /** | |
| * Get a specific category (specified by slug) from the content cache | |
| * | |
| * The WP API doesn't currently support filtering taxonomy term collections, | |
| * so we have to request all categories and filter them down if we want to get | |
| * an individual term. | |
| * | |
| * To make this request more efficient, it uses sortedCategoriesCached. | |
| * | |
| * @method categoryCached | |
| * @param {String} slug The slug of a category | |
| * @return {Promise} A promise to the category with the provided slug | |
| */ | |
| function categoryCached( slug ) { | |
| return sortedCategoriesCached().then(function( categories ) { | |
| return _.findWhere( categories, { | |
| slug: slug | |
| }); | |
| }); | |
| } | |
| /** | |
| * Get a specific tag (specified by slug) from the content cache | |
| * | |
| * The WP API doesn't currently support filtering taxonomy term collections, | |
| * so we have to request all tags and filter them down if we want to get an | |
| * individual term. | |
| * | |
| * To make this request more efficient, it uses the cached sortedTags promise. | |
| * | |
| * @method tagCached | |
| * @param {String} slug The slug of a tag | |
| * @return {Promise} A promise to the tag with the provided slug | |
| */ | |
| function tagCached( slug ) { | |
| return sortedTagsCached().then(function( tags ) { | |
| return _.findWhere( tags, { | |
| slug: slug | |
| }); | |
| }); | |
| } | |
| /** | |
| * Get an alphabetized list of tags | |
| * | |
| * @method sortedTags | |
| * @return {Array} An array of tag objects | |
| */ | |
| function sortedTags() { | |
| return all( wp.tags() ).then(function( tags ) { | |
| return _.chain( tags ) | |
| .sortBy( 'slug' ) | |
| .value(); | |
| }); | |
| } | |
| function sortedTagsCached() { | |
| var tagsPromise = cache.get( 'sorted-tags' ); | |
| if ( ! tagsPromise ) { | |
| tagsPromise = sortedTags(); | |
| cache.set( 'sorted-tags', tagsPromise ); | |
| } | |
| return tagsPromise; | |
| } | |
| function getSidebarContent() { | |
| return RSVP.hash({ | |
| categories: sortedCategoriesCached(), | |
| tags: sortedTagsCached() | |
| }); | |
| } | |
| module.exports = { | |
| // Recursively page through a collection to retrieve all matching items | |
| all: all, | |
| // Get (and cache) the top-level information about a site, returning the | |
| // value corresponding to the provided key | |
| siteInfo: siteInfo, | |
| sortedCategories: sortedCategories, | |
| sortedCategoriesCached: sortedCategoriesCached, | |
| categoryCached: categoryCached, | |
| tagCached: tagCached, | |
| sortedTags: sortedTags, | |
| sortedTagsCached: sortedTagsCached, | |
| getSidebarContent: getSidebarContent | |
| }; |
🛠 自定义路线和销售数据
最后,我创建了不少自定义路由,可以从中获取各种销售相关数据。对于我现有的特定架构,我再次使用了该RSVP.hash实用程序,以实现便捷性和并行性。它的效果非常好。
| var WPAPI = require( 'wpapi' ); | |
| var RSVP = require('rsvp'); | |
| // Using the RSVP.hash utility for convenience and parallelism | |
| RSVP.hash({ | |
| categories: wp.categories().slug( 'it-services' ), | |
| tags1: wp.tags().slug('hotel-name'), | |
| tags2: wp.tags().slug('march-events') | |
| }).then(function( results ) { | |
| // Combine & map .slug() results into arrays of IDs by taxonomy | |
| var tagIDs = results.tags1.concat( results.tags2 ) | |
| .map(function( tag ) { return tag.id; }); | |
| var categoryIDs = results.categories | |
| .map(function( cat ) { return cat.id; }); | |
| return wp.posts() | |
| .tags( tags ) | |
| .categories( categories ); | |
| }).then(function( posts ) { | |
| // These posts are all fiction, either magical realism or historical: | |
| console.log( posts ); | |
| }); |
一旦我获得了该数据,我就会将其与购买的订单请求一起发送到 Paddle.com 进行处理,以便可以通过无服务器⚡ Azure Functions 将其添加到我们的 MongoDB 实例中。
| // Registering custom routes. | |
| site.itSales = site.registerRoute( 'sales/v1', '/resource/(?P<some_part>\\d+)' ); | |
| site.itSales().somePart( 7 ); // => myplugin/v1/resource/7 | |
| // Query Parameters & Filtering Custom Routes. | |
| site.handler = site.registerRoute( 'sales/v1', 'receipts/(?P<id>)', { | |
| // Listing any of these parameters will assign the built-in | |
| // chaining method that handles the parameter: | |
| params: [ 'before', 'after', 'author', 'parent', 'post' ] | |
| }); | |
| // Yields from the custom data of buyers. | |
| site.handler().post( 8 ).author( 92 ).before( dateObj )... // Sent to paddle. |
对于某些人来说这可能看起来很奇怪,但 WordPress 允许您设置自定义帖子类型和自定义分类法,这就是我在这里使用的,但是,上面的代码并不是确切的实现,而是与我通过类别和标签使用的方法类似的方法。
这些数据会发送到 PaddlePaddle,并进行大量缓存,这样我们在测试自定义仪表盘时,WordPress 实例就不会受到任何负载。我还编写了一个小data-refresh模块,可以根据需要从所选的 WordPress 实例中获取数据。
⚡
Microsoft Azure 和 Azure Functions
在构建这个自定义 WordPress 仪表板时,我希望确保仪表板的每个模块都以无服务器应用的形式存在,并包含多个无服务器功能。这个决定的初衷是为了尽可能降低仪表板的成本。
👀 三个选项
目前主要的云服务提供商有三大:Microsoft Azure、Google Cloud Platform和Amazon Web Services。它们各自都提供无服务器函数,分别称为 Azure Functions、GCP Cloud Functions 和 AWS Lambdas。
📘 选择 Azure
Azure 拥有最大的云架构和全球影响力之一。50 个 Azure 区域,比任何云提供商都多,在对这三个区域进行测试之后,我发现 Azure 功能在阿联酋的响应时间最短(因为我的客户业务位于阿联酋以外)。
此外,事实上我们正在使用 Azure ML Studio、AI 认知服务和虚拟机来托管该项目的部分内容,因此使用 Azure 函数来实现无服务器架构是完全合理的。
Azure Functions 入门
让我们开始使用 Azure Functions。我将带您完成创建一个简单的无服务器 Azure Functions 的过程,该 Functions 将通过 HTTP 请求触发,并在其中处理 Paddle.com 发送给我们的销售信息。
⚙ 我们正在建造什么?!
- 我正在构建一个基于 JavaScript 和特别是 Node.js 代码的无服务器 Azure 函数。
GET此 Azure 功能将由来自我们的第三方支付解决方案(即 Paddle.com)的简单 HTTP 请求触发- 一旦 Paddle.com 上有销售,它就会触发一个 webhook,其中包含与我们的销售、数量、商品、收入以及 WordPress 发送给 Paddle 的一些会员相关数据相关的信息。
- 使用 WordPress REST API,我添加了一些与购买产品的用户相关的自定义数据,例如 WordPress DB 中的用户 ID、哪个 WordPress 网站有此销售以及此类用户的元信息。
- 当 Azure 函数收到此
GET请求时,它会处理信息,取出我需要在 MongoDB Atlas Cluster 中保留的内容,并形成一个准备保存在数据库中的 JavaScript 对象。 - 然后,azure 函数通过名为mongoose的 npm 包连接到 MongoDB Atlas 实例,在连接数据库后,我创建一个 DB 模型/模式,然后将这些数据保存到 MongoDB Atlas 集群中。
- 此后,Azure 函数就一直在那里等待下一次销售,我的客户只需为 Azure 函数的执行时间和执行次数付费。(其中每月 100 万是免费的😮)。
现在,这只是对正在发生的事情的一个概括,我在这里跳过了很多步骤,比如身份验证,这超出了本文的讨论范围。您应该始终设置身份验证和验证,以确保流程的规范性,并避免任何超支。所以,让我们继续构建它吧。
步骤#1:设置Microsoft Azure和VSCode
我希望您已经设置好Azure帐户。由于我们需要存储空间来托管用于 Azure Functions 的 Node.js 文件,您需要使用信用卡订阅,并且需要付费(第一个月您可能会获得 200 美元的免费信用额度,之后费用也相当低)。因此,请继续进行以下设置:
- ✅ 设置一个Microsoft Azure帐户并使用信用卡进行结算。
- ✅ 安装Visual Studio Code(嘘。我正在制作VSCode 课程)。
- ✅ 在你的 VSCode 上安装Azure Functions 扩展。
- 💡 要启用本地调试,请安装Azure Functions Core Tools。
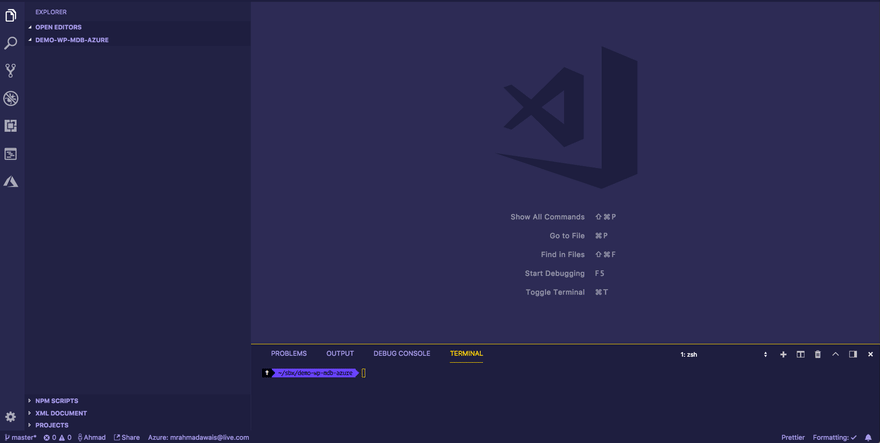
- 🗂 创建一个新目录并在 VSCode 中打开它。
如果你想知道我使用的是哪种主题和字体,那就是紫色阴影💜——有关更多信息,请查看我使用的软件和硬件。
步骤#2:创建一个新的函数应用程序项目
现在让我们创建一个新的函数应用项目。使用 VSCode 非常简单。您只需前往活动栏中的 Azure 扩展资源管理器。从那里访问选项FUNCTIONS卡并点击第一个Create New Project图标。
这将创建一个演示项目,其中包含启动所需的基本文件,并会为您初始化一个 Git 仓库。我会继续制作一些基于 gif 的演示,以方便您使用。
步骤#3:创建 HTTP 触发的 Azure 函数
现在我们已经创建了一个函数应用项目,接下来让我们创建一个 HTTP 触发的无服务器 Azure 函数。为此,请转到活动栏中的 Azure 扩展资源管理器。从那里访问选项FUNCTIONS卡,然后单击第二个图标Create Function。
为了演示方便,我选择简化身份验证部分,因此选择匿名访问。我们的 Azure 函数名称为,HttpTriggerJS以便您可以在项目中找到以该名称创建的新目录。该目录应包含两个文件,functions.json即index.js
⚡函数是 Azure Functions 中的一个基本概念。您可以使用自己选择的语言为函数编写代码,并将代码和配置文件保存在同一文件夹中。
🛠 该配置名为function.json,包含 JSON 配置数据。它定义了函数绑定和其他配置设置。运行时使用此文件来确定要监视的事件以及如何将数据传入函数执行并从函数执行中返回数据。有关此文件的更多信息,请参阅此处的官方文档。
function.json以下是创建的示例文件。
| { | |
| "disabled": false, | |
| "bindings": [ | |
| { | |
| "authLevel": "anonymous", | |
| "type": "httpTrigger", | |
| "direction": "in", | |
| "name": "req" | |
| }, | |
| { | |
| "type": "http", | |
| "direction": "out", | |
| "name": "res" | |
| } | |
| ] | |
| } |
| { | |
| "disabled": false, | |
| "bindings": [ | |
| { | |
| "authLevel": "anonymous", | |
| "type": "httpTrigger", | |
| "direction": "in", | |
| "name": "req" | |
| }, | |
| { | |
| "type": "http", | |
| "direction": "out", | |
| "name": "res" | |
| } | |
| ] | |
| } |
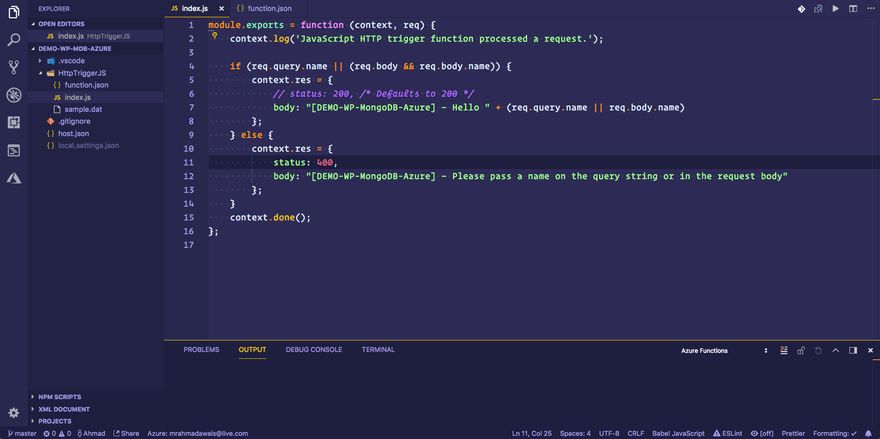
然后,有一个index.js文件包含可用于测试 Azure 函数的基本代码。它接收一个参数name并将其打印给您,或者显示一个要求输入该参数的错误。
| module.exports = function (context, req) { | |
| context.log('JavaScript HTTP trigger function processed a request.'); | |
| if (req.query.name || (req.body && req.body.name)) { | |
| context.res = { | |
| // status: 200, /* Defaults to 200 */ | |
| body: "Hello " + (req.query.name || req.body.name) | |
| }; | |
| } | |
| else { | |
| context.res = { | |
| status: 400, | |
| body: "Please pass a name on the query string or in the request body" | |
| }; | |
| } | |
| context.done(); | |
| }; |
步骤#4:部署并测试您的 Azure 函数
现在我们已经创建了一个可以通过GETHTTP 请求触发的 Azure 函数,让我们继续使用 VSCode 部署它并使用Postman API Explorer 对其进行测试。
要部署该功能,请转到活动栏中的 Azure 扩展资源管理器。从那里访问选项FUNCTIONS卡,然后单击第三个图标Deploy to Function App。
它会询问你一系列问题,比如你的应用名称是什么,可以使用任何独特的名称。我使用了demo-wp-mdb-azureVSCode,然后使用它来创建一个资源组,将与函数应用相关的资源、它的存储(用于保存文件)以及创建的 Azure 函数组合在一起,最后返回一个公共 URL。
然后我继续访问这个 URL,它name根据代码要求输入参数,然后当我name使用 Postman 应用程序发送参数时,它响应了Hello Ahmad Awais。👍
VSCode 还要求我将函数扩展应用程序版本更新为 Beta 版,我选择了“是”——因为这将帮助我使用 Node.js v8 进行 async/await。
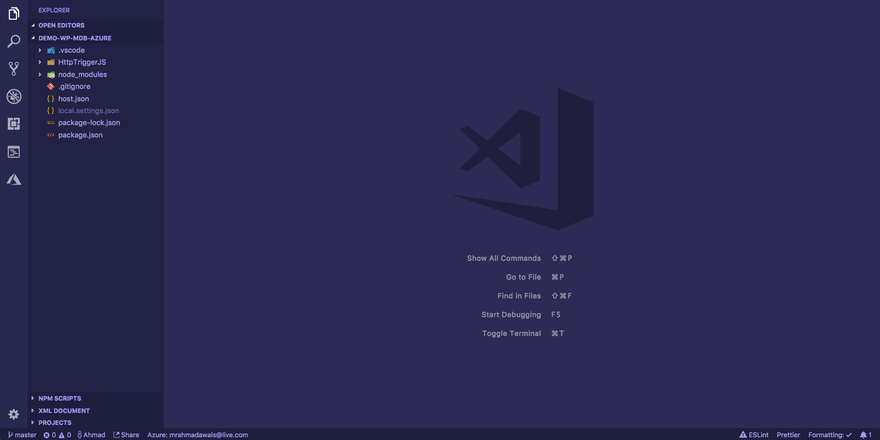
步骤#5:创建package.json并安装mongoose
现在我们的 Azure 函数已启动并运行。让我们package.json在项目根目录中创建一个文件并安装mongoose。我们需要它来连接 MongoDB Atlas 集群并将数据保存到其中。
Mongoose 提供了一个直观的、基于模式的解决方案来建模你的应用程序数据。它内置了类型转换、验证、查询构建、业务逻辑钩子等开箱即用的功能。它非常棒。💯

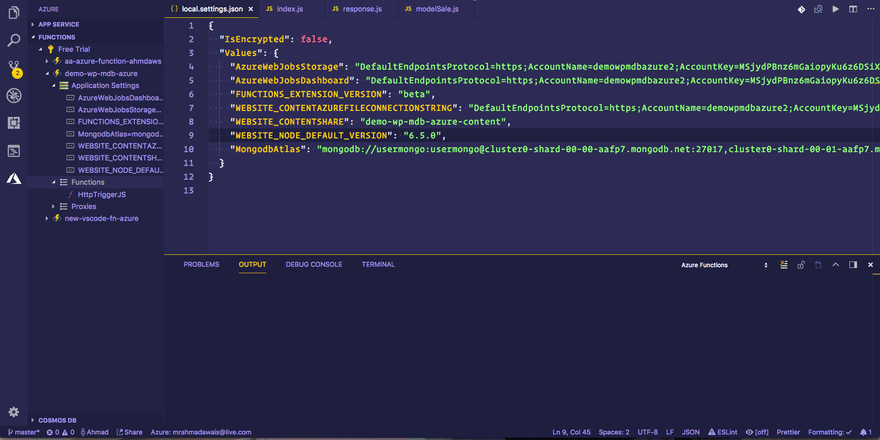
步骤#6:添加 MongoDB 连接的应用程序设置
现在我们几乎可以开始编写应用程序的代码了。但在此之前,我们需要一个连接字符串来连接到我们的 MongoDB Atlas 集群(就像我们之前连接 MongoDB Compass 一样)。此连接字符串是私有的,请勿将其提交到 git 仓库。
💯 此连接字符串属于local.settings.json项目根目录中的文件。让我们首先下载设置,然后MongoDBAtlas使用我们的连接字符串添加设置(从 MongoDB Atlas 仪表板获取此字符串)并上传应用程序设置。
为此,请转到活动栏中的 Azure 扩展资源管理器。从那里访问选项FUNCTIONS卡并选择您的订阅,然后选择您的 Azure 函数应用程序,demo-wp-mdb-azure然后右键单击Application Settings以选择Download remote settings…下载并Upload local settings…在将连接字符串添加到设置后上传设置MongoDBAtlas。
步骤#7:更新Azure Function的节点版本
在代码中,我打算使用Azure Functions 默认版本 1 附带的 Node.js中不可用的async/ 。在步骤 4 中,VSCode 要求我将 Azure Functions 的运行时版本更新到 Beta 版本,我照做了。这样就可以在 Azure Functions 上支持最新的 Node.js 版本了。awaitv6.5.0
因此,我们只需WEBSITE_NODE_DEFAULT_VERSION在本地设置中更新应用程序设置并将其更新到远程设置。
步骤#8:创建 MongoDB 模型/模式
在将任何数据保存到 MongoDB Atlas 集群之前,让我们创建一个modelSale.js文件,其中包含我们打算保存在数据库中的模型模式。这是一个非常简单的模式实现,我建议您阅读一下如何使用 MongoDB 来实现[mongoose](http://mongoosejs.com/docs/guide.html)这一点。
该文件几乎是不言自明的。
| /** | |
| * Model: Sale | |
| */ | |
| const mongoose = require('mongoose'); | |
| mongoose.Promise = global.Promise; | |
| // Sale Schema. | |
| const saleSchema = new mongoose.Schema({ | |
| sale_gross: Number, | |
| earnings: Number, | |
| currency: String, | |
| memberSince: Date, | |
| customerEmail: String, | |
| event_time: { | |
| type: Date, | |
| default: Date.now | |
| }, | |
| }); | |
| // Export the model. | |
| module.exports = mongoose.model('Sale', saleSchema); |
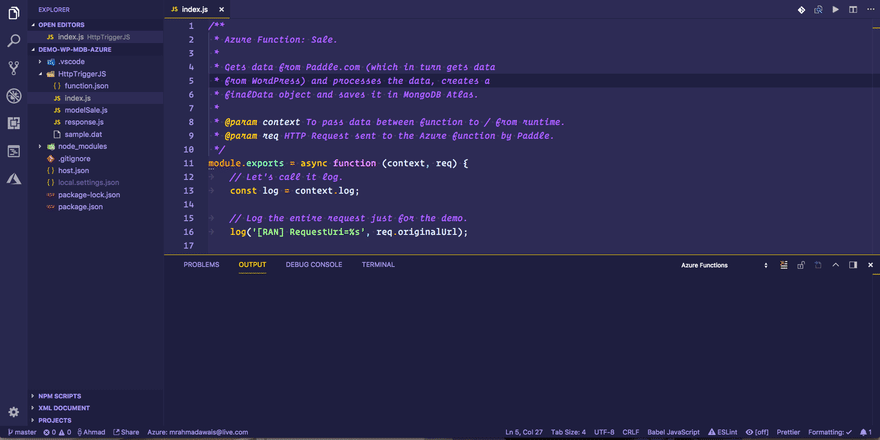
步骤#9:使用 Node.js 编写 ⚡Azure 函数
现在让我们编写 Azure 函数的代码。index.js为了方便演示,我把所有主要代码都添加到了文件中。此外,我将使用context 对象作为第一个参数,请务必阅读相关内容。其他所有内容均在下面的代码片段中进行了说明。
这只是本文的演示代码。它执行以下操作:
- ✅ 从 Paddle.com 获取数据
- ⚡ 通过我们在应用程序设置中添加的连接字符串连接到 MongoDB Atlas。
- 📘 在数据库内使用定义的 DB 模式,
test在其中创建sales包含我们的销售文档的集合。 - ⚙ 验证数据并创建一个
finalData对象,该对象将保存在 MongoDB Atlas 集群中。太棒了!!! 200🥅 最后,如果一切顺利,则使用状态代码响应 Paddle webhook ,然后进行context.done()舞蹈。
所有内容都通过内联文档进行了详细解释。
| /** | |
| * Azure Function: Sale. | |
| * | |
| * Gets data from Paddle.com (which in turn gets data | |
| * from WordPress) and processes the data, creates a | |
| * finalData object and saves it in MongoDB Atlas. | |
| * | |
| * @param context To pass data between function to / from runtime. | |
| * @param req HTTP Request sent to the Azure function by Paddle. | |
| */ | |
| module.exports = async function (context, req) { | |
| // Let's call it log. | |
| const log = context.log; | |
| // Log the entire request just for the demo. | |
| log('[RAN] RequestUri=%s', req.originalUrl); | |
| /** | |
| * Azure function Response. | |
| * | |
| * Processes the `req` request from Paddle.com | |
| * and saves the data to MongoDB Atlas while | |
| * responding the `res` response. | |
| */ | |
| // Database interaction. | |
| const mongoose = require('mongoose'); | |
| const DATABASE = process.env.MongodbAtlas; | |
| // Connect to our Database and handle any bad connections | |
| mongoose.connect(DATABASE); | |
| mongoose.Promise = global.Promise; // Tell Mongoose to use ES6 promises | |
| mongoose.connection.on('error', (err) => { | |
| context.log(`ERROR→ ${err.message}`); | |
| }); | |
| // Sale Schema. | |
| require('./modelSale'); | |
| const Sale = mongoose.model('Sale'); | |
| // Create a Response. | |
| if (req.query.customFieldName) { // Simple authentication for the purpose of demo. | |
| // Build the data we need. | |
| const sale_gross = req.query.p_sale_gross || '0'; | |
| const earnings = JSON.parse(req.query.p_earnings)['16413'] || '0' | |
| const currency = req.query.p_currency || 'USD'; | |
| const memberSince = req.query.memberSince || new Date(); | |
| const customerEmail = req.query.customerEmail || ''; | |
| const event_time = new Date(); | |
| log('[OUTPUT]—— sale_gross: ' + sale_gross); | |
| log('[OUTPUT]—— earnings: ' + earnings); | |
| log('[OUTPUT]—— currency: ' + currency); | |
| const finalData = { | |
| sale_gross: sale_gross, | |
| earnings: earnings, | |
| currency: currency, | |
| memberSince: memberSince, | |
| customerEmail: customerEmail, | |
| event_time: event_time, | |
| } | |
| // Save to db. | |
| const sale = await (new Sale(finalData)).save(); | |
| log("[OUTPUT]—— SALE SAVED: ", sale); | |
| // Respond with 200. | |
| context.res = { | |
| status: 200, | |
| body: "Thank You for the payment! " + (req.query.customFieldName || req.body.customFieldName) | |
| }; | |
| } else { | |
| context.res = { | |
| status: 400, | |
| body: "Please pass a name on the query string or in the request body" | |
| }; | |
| } | |
| // Informs the runtime that your code has finished. You must call context.done, or else the runtime never knows that your function is complete, and the execution will time out. | |
| // @link: https://docs.microsoft.com/en-us/azure/azure-functions/functions-reference-node#contextdone-method | |
| context.done(); | |
| }; |
| /** | |
| * Azure Function: Sale. | |
| * | |
| * Gets data from Paddle.com (which in turn gets data | |
| * from WordPress) and processes the data, creates a | |
| * finalData object and saves it in MongoDB Atlas. | |
| * | |
| * @param context To pass data between function to / from runtime. | |
| * @param req HTTP Request sent to the Azure function by Paddle. | |
| */ | |
| module.exports = async function (context, req) { | |
| // Let's call it log. | |
| const log = context.log; | |
| // Log the entire request just for the demo. | |
| log('[RAN] RequestUri=%s', req.originalUrl); | |
| /** | |
| * Azure function Response. | |
| * | |
| * Processes the `req` request from Paddle.com | |
| * and saves the data to MongoDB Atlas while | |
| * responding the `res` response. | |
| */ | |
| // Database interaction. | |
| const mongoose = require('mongoose'); | |
| const DATABASE = process.env.MongodbAtlas; | |
| // Connect to our Database and handle any bad connections | |
| mongoose.connect(DATABASE); | |
| mongoose.Promise = global.Promise; // Tell Mongoose to use ES6 promises | |
| mongoose.connection.on('error', (err) => { | |
| context.log(`ERROR→ ${err.message}`); | |
| }); | |
| // Sale Schema. | |
| require('./modelSale'); | |
| const Sale = mongoose.model('Sale'); | |
| // Create a Response. | |
| if (req.query.customFieldName) { // Simple authentication for the purpose of demo. | |
| // Build the data we need. | |
| const sale_gross = req.query.p_sale_gross || '0'; | |
| const earnings = JSON.parse(req.query.p_earnings)['16413'] || '0' | |
| const currency = req.query.p_currency || 'USD'; | |
| const memberSince = req.query.memberSince || new Date(); | |
| const customerEmail = req.query.customerEmail || ''; | |
| const event_time = new Date(); | |
| log('[OUTPUT]—— sale_gross: ' + sale_gross); | |
| log('[OUTPUT]—— earnings: ' + earnings); | |
| log('[OUTPUT]—— currency: ' + currency); | |
| const finalData = { | |
| sale_gross: sale_gross, | |
| earnings: earnings, | |
| currency: currency, | |
| memberSince: memberSince, | |
| customerEmail: customerEmail, | |
| event_time: event_time, | |
| } | |
| // Save to db. | |
| const sale = await (new Sale(finalData)).save(); | |
| log("[OUTPUT]—— SALE SAVED: ", sale); | |
| // Respond with 200. | |
| context.res = { | |
| status: 200, | |
| body: "Thank You for the payment! " + (req.query.customFieldName || req.body.customFieldName) | |
| }; | |
| } else { | |
| context.res = { | |
| status: 400, | |
| body: "Please pass a name on the query string or in the request body" | |
| }; | |
| } | |
| // Informs the runtime that your code has finished. You must call context.done, or else the runtime never knows that your function is complete, and the execution will time out. | |
| // @link: https://docs.microsoft.com/en-us/azure/azure-functions/functions-reference-node#contextdone-method | |
| context.done(); | |
| }; |
步骤#10:重新部署Azure函数
现在让我们重新部署 Azure 函数。为此,请转到活动栏中的 Azure 扩展资源管理器。从那里访问选项FUNCTIONS卡并单击第三个Deploy to Function App图标。
步骤#11:通过 Paddle 的 Webhook 测试 Azure 函数
看起来我们差不多完成了。剩下的就是通过 Paddle.com 触发一个虚拟的 webhook 来测试我们的 Azure 函数。我们开始吧。另外,等一切正常后,我们来看看数据在 MongoDB Compass 中的样子。
哇,哼!好多啊。很高兴它成功了。🎉
🤔 那么,刚才发生了什么?!
准备好迎接这个冗长的内容吧。我Sales在正在构建的自定义 WordPress 仪表板应用中创建了模块的一小部分。我使用了 MongoDB Atlas 和 Compass,然后通过 VSCode 的 Function App 创建了 Microsoft ⚡Azure Function,使用环境变量 secret 作为应用程序字符串和 MongoDB 连接字符串部署了该应用,更新了 Node.js 版本,并通过 Paddle.com 的一个虚拟 Webhook 触发了该函数(就像在发生销售时触发一样),将数据(来自 Paddle + WordPress)发送到我们的 Azure Function,再从那里发送到 MongoDB Atlas。结果成功了,哈哈!
🤖
机器学习与人工智能
机器学习和人工智能一直是软件技术领域令人着迷的话题,但我们在 WordPress 或 WP 社区中很少谈论这个话题。
我准备通过为我的客户精选的几个 WordPress 网站添加一些小改进来改变这种状况,并打算使用这个自定义 WordPress 仪表板进行探索。
我之前讨论过这个话题并分享了我正在做的事情,看看我正在为 WordPress 构建的这个小型人工智能插件,并将其与不同的 Azure 认知服务集成。
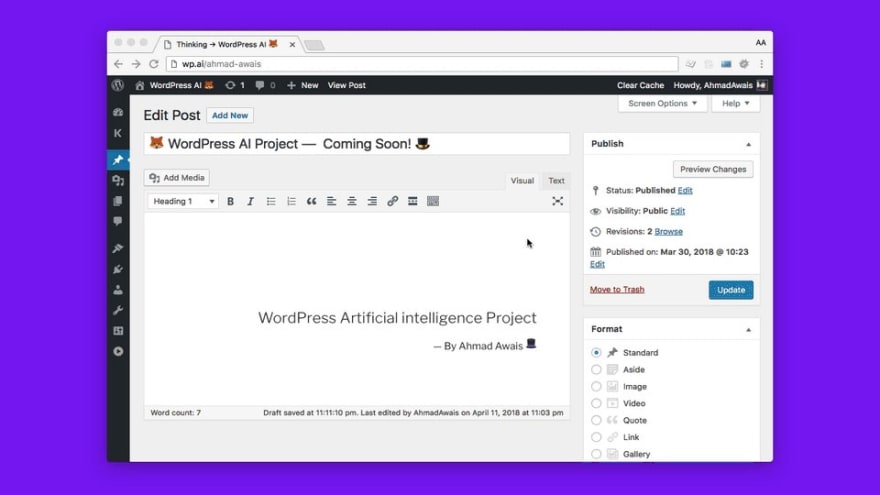
 🦊我正在做的 @WordPress AI #人工智能项目 的预览。📺
观看 → AhmdA.ws/WPAI_
👌 认知服务 API
🎩 Microsoft @Azure
☘️ @MongoDB Atlas
🚀 Automation FTW
@Azure Advocates @JeffSand @mlynn @photoMatt @iamSRK 🙌
🙏 转发2018年4月12日 上午00:15
36 60


我在另一篇文章的视频中解释了这一点,你可以在这里找到:构建 WordPress 人工智能插件 →
我已经用这个wpapi包在这个仪表板上实现了类似的结果。首先,我将图像上传到认知服务,然后在得到确认后,我将其发送到 WordPress,并通过 WordPress REST API 上传,图片描述由计算机视觉 AI 生成。
| /** | |
| * Get Image Alt Recognition with Computer Vision | |
| * using Azure Cognitive Services. | |
| */ | |
| var WPAPI = require('wpapi'); | |
| var wp = new WPAPI({ | |
| endpoint: 'http://src.wordpress-develop.dev/wp-json' | |
| }); | |
| /** | |
| * Handle Image Alt Generation. | |
| */ | |
| function processImage() { | |
| // ********************************************** | |
| // *** Update or verify the following values. *** | |
| // ********************************************** | |
| // Replace <Subscription Key> with your valid subscription key. | |
| var subscriptionKey = "<Subscription Key>"; | |
| // You must use the same region in your REST call as you used to get your | |
| // subscription keys. For example, if you got your subscription keys from | |
| // westus, replace "westcentralus" in the URI below with "westus". | |
| // | |
| // Free trial subscription keys are generated in the westcentralus region. | |
| // If you use a free trial subscription key, you shouldn't need to change | |
| // this region. | |
| var uriBase = | |
| "https://westcentralus.api.cognitive.microsoft.com/vision/v2.0/analyze"; | |
| // Request parameters. | |
| var params = { | |
| "visualFeatures": "Categories,Description,Color", | |
| "details": "", | |
| "language": "en", | |
| }; | |
| // Display the image. | |
| var sourceImageUrl = document.getElementById("inputImage").value; | |
| document.querySelector("#sourceImage").src = sourceImageUrl; | |
| // Make the REST API call. | |
| $.ajax({ | |
| url: uriBase + "?" + $.param(params), | |
| // Request headers. | |
| beforeSend: function (xhrObj) { | |
| xhrObj.setRequestHeader("Content-Type", "application/json"); | |
| xhrObj.setRequestHeader( | |
| "Ocp-Apim-Subscription-Key", subscriptionKey); | |
| }, | |
| type: "POST", | |
| // Request body. | |
| data: '{"url": ' + '"' + sourceImageUrl + '"}', | |
| }) | |
| .done(function (data) { | |
| // Show formatted JSON on webpage. | |
| $("#responseTextArea").val(JSON.stringify(data, null, 2)); | |
| // Extract and display the caption and confidence from the first caption in the description object. | |
| if (data.description && data.description.captions) { | |
| var caption = data.description.captions[0]; | |
| if (caption.text && caption.confidence >= 0.5) { | |
| const imgDescription = caption.text; | |
| // ⬆️ Upload to WordPress. | |
| wp.media() | |
| // Specify a path to the file you want to upload, or a Buffer | |
| .file(sourceImageUrl) | |
| .create({ | |
| title: imgDescription, | |
| alt_text: imgDescription, | |
| caption: imgDescription, | |
| description: imgDescription | |
| }) | |
| .then(function (response) { | |
| // Your media is now uploaded: let's associate it with a post | |
| var newImageId = response.id; | |
| return wp.media().id(newImageId).update({ | |
| post: associatedPostId | |
| }); | |
| }) | |
| .then(function (response) { | |
| console.log('Media ID #' + response.id); | |
| console.log('is now associated with Post ID #' + response.post); | |
| }); | |
| } | |
| } | |
| }) | |
| .fail(function (jqXHR, textStatus, errorThrown) { | |
| // Display error message. | |
| var errorString = (errorThrown === "") ? "Error. " : | |
| errorThrown + " (" + jqXHR.status + "): "; | |
| errorString += (jqXHR.responseText === "") ? "" : | |
| jQuery.parseJSON(jqXHR.responseText).message; | |
| alert(errorString); | |
| }); | |
| }; |
| /** | |
| * Get Image Alt Recognition with Computer Vision | |
| * using Azure Cognitive Services. | |
| */ | |
| var WPAPI = require('wpapi'); | |
| var wp = new WPAPI({ | |
| endpoint: 'http://src.wordpress-develop.dev/wp-json' | |
| }); | |
| /** | |
| * Handle Image Alt Generation. | |
| */ | |
| function processImage() { | |
| // ********************************************** | |
| // *** Update or verify the following values. *** | |
| // ********************************************** | |
| // Replace <Subscription Key> with your valid subscription key. | |
| var subscriptionKey = "<Subscription Key>"; | |
| // You must use the same region in your REST call as you used to get your | |
| // subscription keys. For example, if you got your subscription keys from | |
| // westus, replace "westcentralus" in the URI below with "westus". | |
| // | |
| // Free trial subscription keys are generated in the westcentralus region. | |
| // If you use a free trial subscription key, you shouldn't need to change | |
| // this region. | |
| var uriBase = | |
| "https://westcentralus.api.cognitive.microsoft.com/vision/v2.0/analyze"; | |
| // Request parameters. | |
| var params = { | |
| "visualFeatures": "Categories,Description,Color", | |
| "details": "", | |
| "language": "en", | |
| }; | |
| // Display the image. | |
| var sourceImageUrl = document.getElementById("inputImage").value; | |
| document.querySelector("#sourceImage").src = sourceImageUrl; | |
| // Make the REST API call. | |
| $.ajax({ | |
| url: uriBase + "?" + $.param(params), | |
| // Request headers. | |
| beforeSend: function (xhrObj) { | |
| xhrObj.setRequestHeader("Content-Type", "application/json"); | |
| xhrObj.setRequestHeader( | |
| "Ocp-Apim-Subscription-Key", subscriptionKey); | |
| }, | |
| type: "POST", | |
| // Request body. | |
| data: '{"url": ' + '"' + sourceImageUrl + '"}', | |
| }) | |
| .done(function (data) { | |
| // Show formatted JSON on webpage. | |
| $("#responseTextArea").val(JSON.stringify(data, null, 2)); | |
| // Extract and display the caption and confidence from the first caption in the description object. | |
| if (data.description && data.description.captions) { | |
| var caption = data.description.captions[0]; | |
| if (caption.text && caption.confidence >= 0.5) { | |
| const imgDescription = caption.text; | |
| // ⬆️ Upload to WordPress. | |
| wp.media() | |
| // Specify a path to the file you want to upload, or a Buffer | |
| .file(sourceImageUrl) | |
| .create({ | |
| title: imgDescription, | |
| alt_text: imgDescription, | |
| caption: imgDescription, | |
| description: imgDescription | |
| }) | |
| .then(function (response) { | |
| // Your media is now uploaded: let's associate it with a post | |
| var newImageId = response.id; | |
| return wp.media().id(newImageId).update({ | |
| post: associatedPostId | |
| }); | |
| }) | |
| .then(function (response) { | |
| console.log('Media ID #' + response.id); | |
| console.log('is now associated with Post ID #' + response.post); | |
| }); | |
| } | |
| } | |
| }) | |
| .fail(function (jqXHR, textStatus, errorThrown) { | |
| // Display error message. | |
| var errorString = (errorThrown === "") ? "Error. " : | |
| errorThrown + " (" + jqXHR.status + "): "; | |
| errorString += (jqXHR.responseText === "") ? "" : | |
| jQuery.parseJSON(jqXHR.responseText).message; | |
| alert(errorString); | |
| }); | |
| }; |
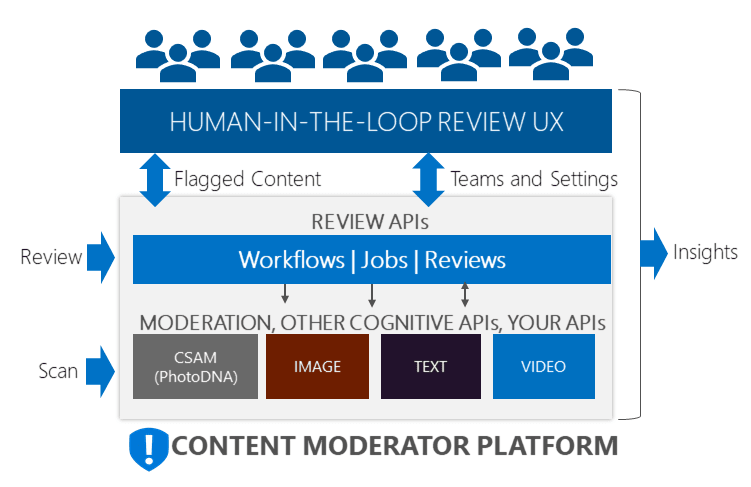
👀 内容审核自动化
我们的想法之一是将 Azure 的 AI/ML 技术用作内容审核平台,该平台提供内置的人机交互和机器学习功能,帮助审核图片、文本和视频。这项工作仍在进行中,但非常有趣,您绝对应该关注一下。
🕵 WordPress 语法(纳粹)智能
你们都习惯一遍又一遍地打错别字。我也是。最酷的事情莫过于像必应和谷歌这样的搜索引擎可以帮你检查拼写,校对搜索查询。
如果 WordPress 有这个功能会怎么样?!——所以,我开始工作并最终在 WordPress 管理区域中实现了相同的功能,用于在帖子标题中输入拼写错误或我关心的多个拼写错误时使用。

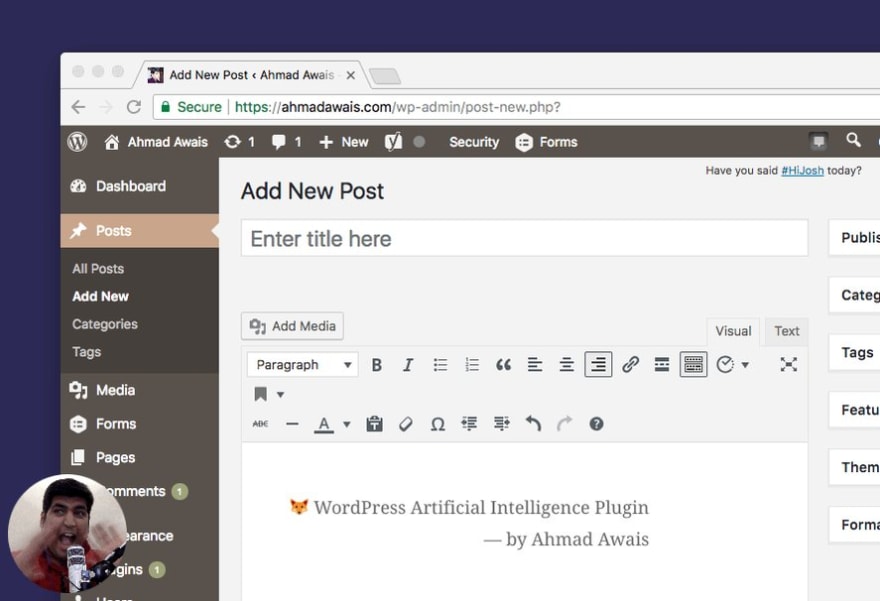


我激动得按捺不住,所以左下角就有我了。满满的惊喜!🙌👐👏👊💪🎶☝😌🎧
🎯
现在轮到你了!
我真的希望您喜欢所有这些现代 JavaScript 框架、AI/ML 产品和无服务器功能之间的潜在集成。
这个项目非常有趣。我想如果你尝试一下这个技术栈,你也能获得如此多的乐趣。所以,你可以在 WordPress 环境中尝试一下MongoDB Atlas——或许还可以将所有这些功能附加到一系列无服务器函数中。
✍️ 我写了 7,000 个单词/代码/gif,介绍如何使用@nodejs @reactjs 构建@WordPress应用程序——周末好读。➡️ AhmdA.ws/WPMongoDBAzure 🍃 @MongoDB Atlas作为 DBaaS 💙 Microsoft @Azure作为应用程序主机 ⚡ 无服务器@Azure Functions FTW 💸 Sales @PaddleHQ Webhooks 🙏 #Retweet
2018年6月7日下午15:25
67190


如果您在 Twitter 上分享此帖子,这对我来说意义重大→也欢迎通过@MrAhmadAwais 对我说👋。
平安!✌
链接:https://dev.to/mrahmadawais/building-a-custom-wordpress-nodejs-app-with--mongodb-atlas--microsoft-azure-mlai-and--serverless-functions-3eec