使用 HTML、CSS 和 vanilla JS 实现 Windows 10 日历悬停效果
谢谢!😁
目录
介绍
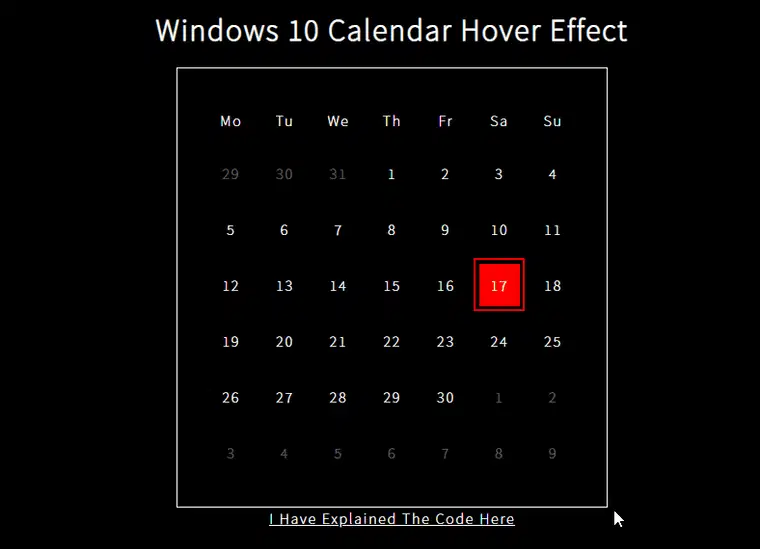
欢迎各位开发者回来!在本系列的第三部分也是最后一部分中,我将向您讲解如何创建您自己的 Windows 10 日历版本。其实现逻辑与网格悬停效果逻辑有 80% 相似。
因此,如果您在任何时候感觉不明白,我建议您先阅读本系列的第二部分,然后再返回这里。话虽如此,让我们先来看看最终效果!
ℹ这篇文章有点详细,但那是针对初学者的,如果你已经熟悉 JS,并且了解 Grid 悬停逻辑,那么你可以快速浏览代码来了解发生了什么。
观察
- 毫无疑问,这里使用了网格悬停效果,但在光标周围的每个方向上都有多个元素的边框突出显示,即元素后面的元素也会突出显示
- 日期没有按钮悬停效果
- 网格悬停效果不适用于活动日期(今天的日期)元素。
- 活动日期的边框和背景之间默认存在间隙。如果选择了其他日期,则该间隙将被消除。
- 单击的日期为非活动日期,将仅显示彩色边框
- 活动元素的边框被照亮
入门
您可能已经猜到了,我将从网格效果代码开始。
网格的前 7 个元素是周名称和休息日期。由于日历一次显示 42 个日期,因此我win-btn在 中添加了 42 个元素win-grid。有些日期处于非活动状态,而其中一个日期处于活动状态,因此我相应地添加了类别。
HTML
<html>

<head>
  <title>Windows 10 calendar hover effect</title>
</head>

<body>
  <h1>Windows 10 Calendar hover effect</h1>
  <div class="win-grid">
    <p class="week" id="1">Mo</p>
    <p class="week" id="2">Tu</p>
    <p class="week" id="3">We</p>
    <p class="week" id="4">Th</p>
    <p class="week" id="5">Fr</p>
    <p class="week" id="6">Sa</p>
    <p class="week" id="7">Su</p>
    <div class="win-btn win-btn-inactive" id="40">29</div>
    <div class="win-btn win-btn-inactive" id="41">30</div>
    <div class="win-btn win-btn-inactive" id="42">31</div>
    <div class="win-btn" id="1">1</div>
    <div class="win-btn" id="2">2</div>
    <div class="win-btn" id="3">3</div>
    <div class="win-btn" id="4">4</div>
    <div class="win-btn" id="5">5</div>
    <div class="win-btn" id="6">6</div>
    <div class="win-btn" id="7">7</div>
    <div class="win-btn" id="8">8</div>
    <div class="win-btn" id="9">9</div>
    <div class="win-btn" id="10">10</div>
    <div class="win-btn" id="11">11</div>
    <div class="win-btn" id="12">12</div>
    <div class="win-btn" id="13">13</div>
    <div class="win-btn" id="14">14</div>
    <div class="win-btn" id="15">15</div>
    <div class="win-btn" id="16">16</div>
    <div class="win-btn win-btn-active" id="17">17</div>
    <div class="win-btn" id="18">18</div>
    <div class="win-btn" id="19">19</div>
    <div class="win-btn" id="20">20</div>
    <div class="win-btn" id="21">21</div>
    <div class="win-btn" id="22">22</div>
    <div class="win-btn" id="23">23</div>
    <div class="win-btn" id="24">24</div>
    <div class="win-btn" id="25">25</div>
    <div class="win-btn" id="26">26</div>
    <div class="win-btn" id="27">27</div>
    <div class="win-btn" id="28">28</div>
    <div class="win-btn" id="29">29</div>
    <div class="win-btn" id="30">30</div>
    <div class="win-btn win-btn-inactive" id="31">1</div>
    <div class="win-btn win-btn-inactive" id="32">2</div>
    <div class="win-btn win-btn-inactive" id="33">3</div>
    <div class="win-btn win-btn-inactive" id="34">4</div>
    <div class="win-btn win-btn-inactive" id="35">5</div>
    <div class="win-btn win-btn-inactive" id="36">6</div>
    <div class="win-btn win-btn-inactive" id="37">7</div>
    <div class="win-btn win-btn-inactive" id="38">8</div>
    <div class="win-btn win-btn-inactive" id="39">9</div>
  </div>
</body>

</html>
在 CSS 内部,我们将网格中的列数更改为 7,并添加以下类:win-btn-inactive,,win-btn-active。win-btn-selected
CSS
@import url("https://fonts.googleapis.com/css2?family=Noto+Sans+JP:wght@100&display=swap");

* {
  box-sizing: border-box !important;
  color: white;
  text-transform: capitalize !important;
  font-family: "Noto Sans JP", sans-serif;
  letter-spacing: 2px;
}

body {
  background-color: black;
  display: flex;
  flex-flow: column wrap;
  justify-content: center;
  align-items: center;
}

.win-grid {
  border: 1px solid white;
  display: grid;
  grid-template-columns: repeat(7, 1fr);
  grid-gap: 0.2rem;
  align-items: stretch;
  text-align: center;
  padding: 2rem;
  cursor: default;
}

.win-btn {
  padding: 1rem;
  text-align: center;
  border-radius: 0px;
  border: 3px solid transparent;
}

/* Today's Date */
.win-btn-active {
  background: red;
}

/* Other Month's Date */
.win-btn-inactive {
  color: #ffffff5f;
}

/* Clicked Date */
.win-btn-selected {
  border: 3px solid red;
}

button:focus {
  outline: none;
}
除了事件监听器之外,JS 代码几乎相同win-btn。我们不再需要那些了。另外,由于我们向元素添加了更多类,我们不能直接比较className网格悬停事件中的……我们需要检查元素的 中是否存在该类classList。
JS
const offset = 69;
const angles = []; //in deg
for (let i = 0; i <= 360; i += 45) {
  angles.push((i * Math.PI) / 180);
}
let nearBy = [];

function clearNearBy() {
  nearBy.splice(0, nearBy.length).forEach((e) => (e.style.borderImage = null));
}

const body = document.querySelector(".win-grid");

body.addEventListener("mousemove", (e) => {
  const x = e.x; //x position within the element.
  const y = e.y; //y position within the element.

  clearNearBy();
  nearBy = angles.reduce((acc, rad, i, arr) => {
    const cx = Math.floor(x + Math.cos(rad) * offset);
    const cy = Math.floor(y + Math.sin(rad) * offset);
    const element = document.elementFromPoint(cx, cy);

    if (element !== null) {
      console.log("cursor at ", x, y, "element at ", cx, cy, element.id);
      if (
        element.classList.contains("win-btn") &&
        acc.findIndex((ae) => ae.id === element.id) < 0
      ) {
        const brect = element.getBoundingClientRect();
        const bx = x - brect.left; //x position within the element.
        const by = y - brect.top; //y position within the element.
        if (!element.style.borderImage)
            element.style.borderImage = `radial-gradient(${offset * 2}px ${offset * 2}px at ${bx}px ${by}px ,rgba(255,255,255,0.7),rgba(255,255,255,0.1),transparent ) 9 / 1px / 0px stretch `;
        return [...acc, element];
      }
    }
    return acc;
  }, []);
});

body.onmouseleave = (e) => {
  clearNearBy();
};
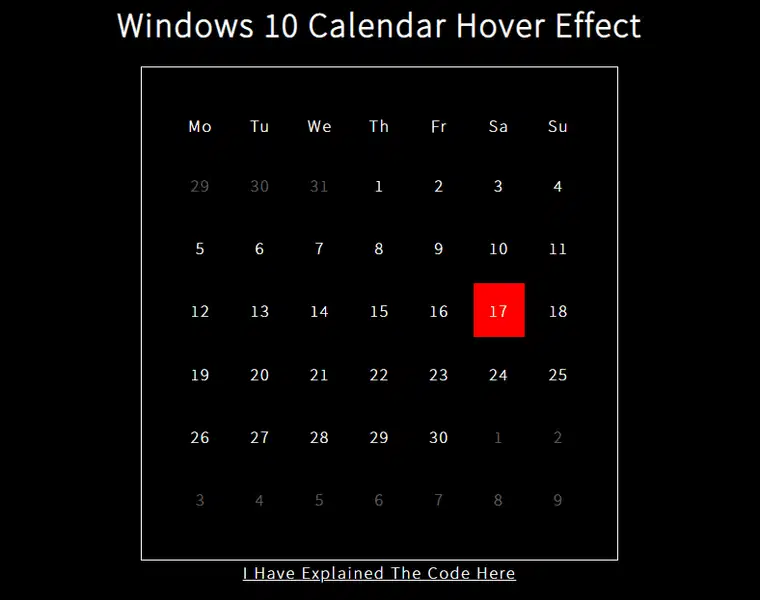
这就是我们的初始日历的样子
微调网格效果
如你所见,网格效果已经生效,但我们需要修复一些 bug,并进行一些状态管理。让我们逐一分析每个 bug,并讨论相应的解决方案。
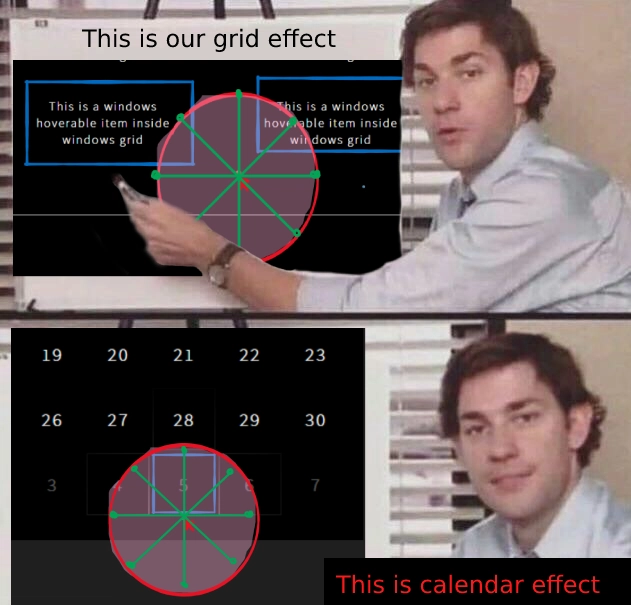
问题 1 - 非常靠近光标的元素未突出显示
很奇怪吧!当光标非常非常接近某个元素时,它的目标就win-grid只有该元素,所以理想情况下所有附近的元素都应该高亮显示。但是这里发生了什么,你能猜出原因吗?
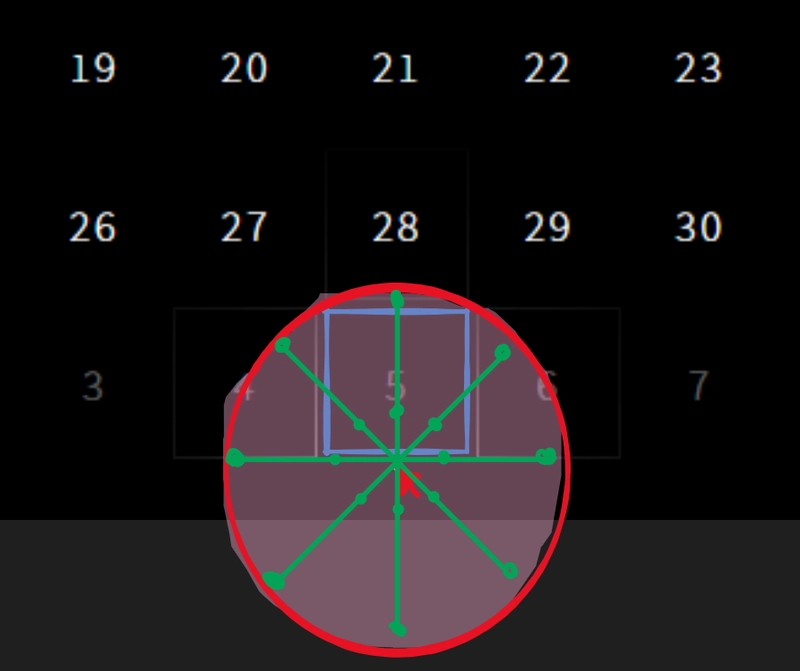
对于那些还没明白的人来说,这个offset值比附近的元素大,因此,显示为蓝色的元素没有被高亮显示!为了解决这个问题,我们需要将偏移值减小到更近的值……但是,如果偏移量小于元素的尺寸,它如何到达附近的8个元素呢?
解决方案 1
我们可以做的是,在每条偏移线上定位两个点,而不仅仅是定位端点。第一个点可能非常靠近中心,而第二个点则仅仅是端点。
在撰写本文时,我意识到还有一些优化的空间!在网格效果中,我们计算了 8 个值,而按照我的新方法,我们需要计算 16 个值!正如您所见,我们可以跳过一些“首点”的计算,即那些靠近中心的点,它们的主要目的是检测极其接近的元素。
因此,我们只需要计算 4 个 nearBy 点,这样每次鼠标移动总共需要计算 12 个点,而不是 8 个。
问题 2 - 活动日期的边框和背景之间的差距
这听起来可能不是什么大问题,但仔细想想,你会怎么做?我们想到的最明显的想法是将每个win-btn元素包裹在一个容器中div,并对外部容器元素应用边框效果。
但这样做会增加 DOM 中的元素数量,此外,我们还必须在代码中更改检测的元素。
因此,每次移动光标时,我们都会获取附近的win-btn元素,然后必须更改其父元素的样式。我们还需要添加鼠标移动到容器元素上的场景,以及对添加到 DOM 中的新元素进行此类小事件处理。
这样,我们只是添加了越来越多的事件监听器,而这些事件监听器是可以避免的……
解决方案 2
有一个 CSS 属性可以帮助我们实现我们想要的效果。它叫做background-origin。
根据 MDN 文档,该background-originCSS 属性设置背景的原点:从边框开始、边框内或填充内。
默认值为 border-box,表示背景从边框结束处开始。
我们将使用content-boxvalue ,因为它允许我们使用盒子模型的填充区域作为边框和背景之间的间隙!
剩余逻辑
现在唯一剩下的就是处理选定日期的次要状态。我们需要记住之前选择的元素,以便当选择新的日期时,首先清除前一个元素的边框,然后添加新的边框。
我们要做的是创建一个具有边框样式的 CSS 类,并根据需要在元素中添加或删除该类。
/* Clicked Date */
.win-btn-selected {
  border: 3px solid red;
}
如果选择了活动日期以外的任何日期,活动日期的背景将扩展到边框(与其通常的行为一样)。因此,我们也将为此创建一个类 ; ,win-btn-active-unselected它将 改background-origin回border-box。
/* Today's Date when some other date is clicked*/
.win-btn-active-unselected {
    background-origin: border-box;
}
最终代码
CSS
@import url("https://fonts.googleapis.com/css2?family=Noto+Sans+JP:wght@100&display=swap");

* {
  box-sizing: border-box !important;
  color: white;
  text-transform: capitalize !important;
  font-family: "Noto Sans JP", sans-serif;
  letter-spacing: 2px;
}

body {
  background-color: black;
  display: flex;
  flex-flow: column wrap;
  justify-content: center;
  align-items: center;
}

.win-grid {
  border: 1px solid white;
  display: grid;
  grid-template-columns: repeat(7, 1fr);
  grid-gap: 0.2rem;
  align-items: stretch;
  text-align: center;
  padding: 2rem;
  cursor: default;
}

.win-btn {
  padding: 1rem;
  text-align: center;
  border-radius: 0px;
  border: 3px solid transparent;
  background-origin: content-box;
}

/* Today's Date */
.win-btn-active {
  display: flex;
  justify-content: center;
  align-items: center;
  padding: 0.2rem;
    border: 3px solid red;
  background: center linear-gradient(red, red) no-repeat;
    background-origin: content-box;
}

/* Today's Date when some other date is clicked*/
.win-btn-active-unselected {
    background-origin: border-box;
}

/* Other Month's Date */
.win-btn-inactive {
  color: #ffffff5f;
}

/* Clicked Date */
.win-btn-selected {
  border: 3px solid red;
}

.win-btn:hover {
  border: 3px solid rgba(255, 255, 255, 0.4);
}

.win-btn-active:hover {
  border: 3px solid hsl(0, 90%, 75%);
}

.win-btn-selected:hover {
  border: 3px solid hsl(0, 70%, 50%) !important;
}

button:focus {
  outline: none;
}
JS
const offset = 69;
const borderWidth = 3;
const angles = []; //in  rad
for (let i = 0; i <= 2; i += 0.25) {
  angles.push(Math.PI * i);
}
let nearBy = [];
let activeBtn = document.querySelector(".win-btn-active");
let lastClicked = null;

document.querySelectorAll(".win-btn").forEach((btn) => {
  btn.onclick = (e) => {
    //clear effects from last clicked date and set lastClicked to current item
    if (lastClicked) {
      lastClicked.classList.remove("win-btn-selected");
    }
    lastClicked = e.currentTarget;

    activeBtn.classList.toggle(
      "win-btn-active-unselected",
      e.currentTarget.id !== activeBtn.id
    );
    e.currentTarget.classList.add("win-btn-selected");
  };
});

function clearNearBy() {
  nearBy.splice(0).forEach((e) => (e.style.borderImage = null));
}

const body = document.querySelector(".win-grid");

body.addEventListener("mousemove", (e) => {
  let x = e.clientX; //x position of cursor.
  let y = e.clientY; //y position of cursor

  clearNearBy();

  nearBy = angles.reduce((acc, rad, index, arr) => {
    const offsets = [offset * 0.35, offset * 1.105];

    const elements = offsets.reduce((elementAccumulator, o, i, offsetArray) => {
      if (index % 2 === 0 && i === 0) return elementAccumulator;
      const cx = Math.floor(x + Math.cos(rad) * o);
      const cy = Math.floor(y + Math.sin(rad) * o);
      const element = document.elementFromPoint(cx, cy);
      // console.log("element at", x, y, cx, cy, offsets, (rad * 180) / Math.PI);
      if (
        element &&
        element.classList.contains("win-btn") &&
        !element.classList.contains("win-btn-active") &&
        !element.classList.contains("win-btn-selected") &&
        elementAccumulator.findIndex((ae) => ae.id === element.id) < 0
      ) {
        const brect = element.getBoundingClientRect();
        const bx = x - brect.left; //x position within the element.
        const by = y - brect.top; //y position within the element.
        const gr = Math.floor(offset * 1.7);
        if (!element.style.borderImage)
          element.style.borderImage = `radial-gradient(${gr}px ${gr}px at ${bx}px ${by}px ,rgba(255,255,255,0.3),rgba(255,255,255,0.1),transparent ) 9 / ${borderWidth}px / 0px stretch `;
        console.log("element at", offsets, (rad * 180) / Math.PI, element);

        return [...elementAccumulator, element];
      }
      return elementAccumulator;
    }, []);

    return acc.concat(elements);
  }, []);
});

body.onmouseleave = (e) => {
  clearNearBy();
};
快速代码解释
-
我没有将度数转换为弧度,而是直接
angles以弧度计算(0、PI/4、PI/ 2、3PI /4 ... 2PI)。 -
win-btn的classList style` 属性event handler takes care of the currently selected element. One small change I have done here is that I use the,property to add and remove classes instead of manually changing the CSS styles using the因为我们想要更改的属性具有静态值,而不像 border-image 在光标位置具有径向渐变。classList.toggle()
如果第二个参数的计算结果为 false,则该
classList.toggle()方法将从元素中删除该类,否则将该类添加到元素中。 -
由于我们在给定角度下检查线上 2 个点
offset(上图中的绿线)处的元素,我将偏移值存储到名为 的数组中offsets。
这样做是为了我们可以遍历这 2 个值并检查每个值处的元素。这样,我们可以扩展此方法来计算 2 个以上的点并检测特定角度值的更多元素;对于本例,2 个偏移值就可以了。
因此该offsets.reduce()方法仅返回那 2 个元素。我已将元素选择和样式代码移到offsets.reduce()方法内部,以避免仅为了设置样式而对元素进行另一次迭代。
如果特定角度没有元素,则elements数组将为空。
注意:我使用的偏移值几乎与原始效果一致,并且是基于反复试验得出的。您可以尝试调整这些值以获得您喜欢的效果。
- 最后只需将其添加
elements到累加器并返回。
谢谢!😁
至此,我们完成了“重现 Windows 效果”系列
欢迎在下面的评论区发表任何建议、疑问或其他反馈。另外,也请告诉我,你理解这三篇文章的难易程度如何。
其他资源
您可以参考下面提到的附加资源,以更好地理解 CSS 和 JS。
文章来源:https://dev.to/jashgopani/windows-10-calendar-hover-effect-using-html-css-and-vanilla-js-57pb 后端开发教程 - Java、Spring Boot 实战 - msg200.com
