#!/usr/bin/env node
const{Command}=require("commander");const{deploy}=require("./deploy");const{destroy}=require("./destroy");const{initProject}=require("./init");const{deployGithub}=require("./deployGithub");constprogram=newCommand();program.name("pulstack").description("Deploy static site to AWS S3 or GitHub using Pulumi instantly").version("0.1.0");program.command("deploy").description("Deploy static site to AWS or GitHub Pages").requiredOption("-d, --dir <path>","Path to static site files").option("-e, --env <name>","Environment/stack name","dev").option("-t, --target <provider>","Target platform: aws | github-pages","aws").action(async (opts)=>{consttarget=opts.target;if (target==="github-pages"){awaitdeployGithub(opts.dir);}elseif (target==="aws"){awaitdeploy(opts.dir,opts.env);}else{console.error(`❌ Unsupported target: ${target}`);process.exit(1);}});program.command("init").description("Initialize project and config").option("--github","Initialize for GitHub Pages").action(async (opts)=>{awaitinitProject({github:opts.github});});program.command("destroy").description("Destroy project").action(async ()=>{awaitdestroy();});program.parse();
constfs=require("fs");constpath=require("path");constprompts=require("prompts");const{LocalWorkspace}=require("@pulumi/pulumi/automation");const{execSync}=require("child_process");functioncheckCLI(command,name){try{execSync(command,{stdio:"ignore"});console.log(`✅ ${name} CLI is installed`);returntrue;}catch{console.error(`❌ ${name} CLI is not installed. Please install it first.`);returnfalse;}}functioncheckPulumiLogin(){try{constuser=execSync("pulumi whoami",{stdio:"pipe"}).toString().trim();console.log(`🔐 Logged in as ${user}`);returntrue;}catch{console.error("⚠️ Pulumi CLI is not logged in. Run `pulumi login` and try again.");returnfalse;}}functioncheckAwsConfigured(){try{constidentity=execSync("aws sts get-caller-identity",{stdio:"pipe"}).toString();constparsed=JSON.parse(identity);console.log(`🧾 AWS Configured for Account: ${parsed.Account}, ARN: ${parsed.Arn}`);returntrue;}catch{console.error("❌ AWS CLI is not configured. Run `aws configure` with your IAM credentials first.");returnfalse;}}asyncfunctioninitProject(options={}){constuseGitHub=options.github||false;console.log("🔍 Checking environment...");constPulumiCheck=checkCLI("pulumi version","Pulumi");if (!PulumiCheck)process.exit(1);if (useGitHub){const{repoName,description,deployDir,stackName,githubToken}=awaitprompts([{type:"text",name:"repoName",message:"GitHub repo name:",initial:path.basename(process.cwd()),},{type:"text",name:"description",message:"Repo description:",},{type:"text",name:"deployDir",message:"Directory to deploy (e.g., ./build):",initial:"./build",},{type:"text",name:"stackName",message:"Stack name:",initial:"github-pages",},{type:"password",name:"githubToken",message:"Enter your github token",},]);constgithubConfig={projectName:repoName,description,deployDir,stackName,githubToken,target:"github",};fs.writeFileSync("config.json",JSON.stringify(githubConfig,null,2));console.log("✅ GitHub Pages project initialized and saved to config.json");return;}// For AWS S3 setupconsthasAws=checkCLI("aws --version","AWS");constisPulumiLoggedIn=checkPulumiLogin();constisAwsConfigured=checkAwsConfigured();if (!hasAws||!isPulumiLoggedIn||!isAwsConfigured){process.exit(1);}constresponse=awaitprompts([{type:"text",name:"projectName",message:"Project name:",initial:"Pulumi",},{type:"text",name:"stackName",message:"Stack name:",initial:"dev",},{type:"text",name:"projectDescription",message:"Project Description:",initial:"This is a cool project",},{type:"text",name:"region",message:"AWS region:",initial:"us-east-1",},{type:"confirm",name:"generateSite",message:"Create a sample index.html?",initial:true,},]);constconfig={projectName:response.projectName,stackName:response.stackName,projectDescription:response.projectDescription,region:response.region,target:"aws",};fs.writeFileSync("config.json",JSON.stringify(config,null,2));console.log("📦 Saved all config → config.json");// Create sample static siteconstpublicDir=path.join(process.cwd(),"public");if (response.generateSite&&!fs.existsSync(publicDir)){fs.mkdirSync(publicDir);fs.writeFileSync(path.join(publicDir,"index.html"),`<html><body><h1>Pulumi is awesome broo!🔥</h1></body></html>`);console.log("🌐 Created sample static site in ./public/");}// Initialize Pulumi stack for AWS onlyconststack=awaitLocalWorkspace.createOrSelectStack({stackName:response.stackName,projectName:response.projectName,program:async ()=>{},});awaitstack.setConfig("aws:region",{value:response.region});console.log("✅ Pulumi stack initialized!");}module.exports={initProject};
运行后:
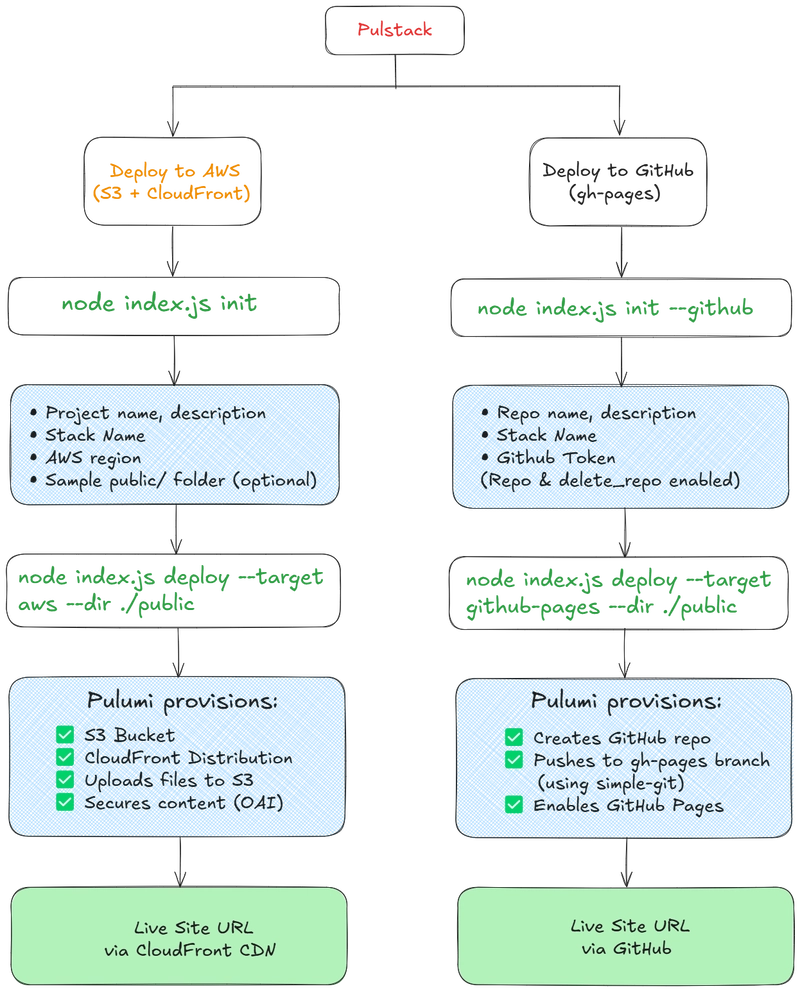
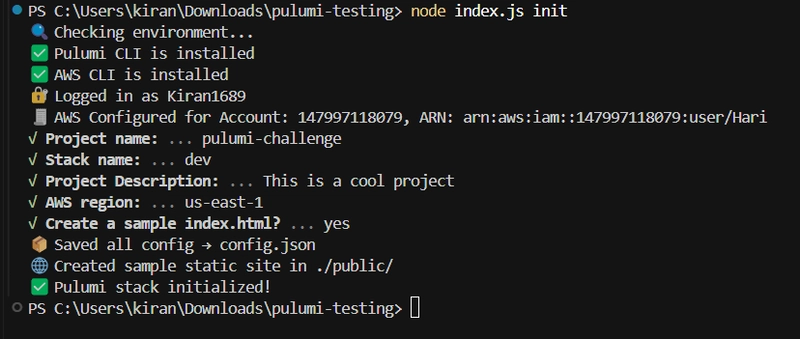
node index.js init
# or
node index.js init --github
确保 IAM 用户拥有必要的权限,并且 GitHub 令牌也拥有repo必要的delete权限。访问我的 GitHub 仓库,查看所有必需的权限。
📁 pulumiProgram.js – 基础设施即代码
在这里,我将所有 AWS 基础设施定义为代码。
// pulumiProgram.js"use strict";constaws=require("@pulumi/aws");constpulumi=require("@pulumi/pulumi");//const mime = require("mime");constfs=require("fs");constpath=require("path");functioncreatePulumiProgram(staticDir){returnasync ()=>{// Create a bucket and expose a website index documentconstconfig=JSON.parse(fs.readFileSync("config.json","utf-8"));constbucketName=config.projectName;letsiteBucket=newaws.s3.BucketV2(bucketName,{});letsiteBucketWebsiteConfig=newaws.s3.BucketWebsiteConfigurationV2("s3-website-bucket-config",{bucket:siteBucket.id,indexDocument:{suffix:"index.html",},});newaws.s3.BucketPublicAccessBlock("public-access-block",{bucket:siteBucket.id,blockPublicAcls:true,blockPublicPolicy:true,ignorePublicAcls:true,restrictPublicBuckets:true,});// Create CloudFront Origin Access Identityconstoai=newaws.cloudfront.OriginAccessIdentity("pulumi-oai",{comment:`Access Identity for ${bucketName}`,});// Upload files from the staticDirconstfiles=fs.readdirSync(staticDir);for (constfileoffiles){constfilePath=path.join(staticDir,file);constcontentType=getMimeType(file);newaws.s3.BucketObject(file,{bucket:siteBucket,source:newpulumi.asset.FileAsset(filePath),contentType,});}constaddFolderContents=(staticDir,prefix)=>{for (letitemoffs.readdirSync(staticDir)){letfilePath=path.join(staticDir,item);letisDir=fs.lstatSync(filePath).isDirectory();// This handles adding subfolders and their contentif (isDir){constnewPrefix=prefix?path.join(prefix,item):item;addFolderContents(filePath,newPrefix);continue;}letitemPath=prefix?path.join(prefix,item):item;itemPath=itemPath.replace(/\\/g,'/');// convert Windows paths to something S3 will recognizeletobject=newaws.s3.BucketObject(itemPath,{bucket:siteBucket.id,source:newpulumi.asset.FileAsset(filePath),// use FileAsset to point to a filecontentType:getMimeType(filePath),// set the MIME type of the file});}}// Attach bucket policy for OAInewaws.s3.BucketPolicy("pulumi-bucket-policy",{bucket:siteBucket.bucket,policy:pulumi.all([siteBucket.bucket,oai.iamArn]).apply(([bucket,iamArn])=>JSON.stringify({Version:"2012-10-17",Statement:[{Effect:"Allow",Principal:{AWS:iamArn},Action:"s3:GetObject",Resource:`arn:aws:s3:::${bucket}/*`,},],})),});// Upload static filesconstuploadFiles=(dir,prefix="")=>{for (constitemoffs.readdirSync(dir)){constfilePath=path.join(dir,item);conststat=fs.statSync(filePath);if (stat.isDirectory()){uploadFiles(filePath,path.join(prefix,item));}else{constrelativePath=path.join(prefix,item).replace(/\\/g,"/");newaws.s3.BucketObject(relativePath,{bucket:siteBucket.id,source:newpulumi.asset.FileAsset(filePath),contentType:getMimeType(filePath),});}}};uploadFiles(staticDir);// CloudFront Distributionconstdistribution=newaws.cloudfront.Distribution("pulumi-cdn",{enabled:true,defaultRootObject:"index.html",origins:[{originId:siteBucket.arn,domainName:siteBucket.bucketRegionalDomainName,s3OriginConfig:{originAccessIdentity:oai.cloudfrontAccessIdentityPath,},},],defaultCacheBehavior:{targetOriginId:siteBucket.arn,viewerProtocolPolicy:"redirect-to-https",allowedMethods:["GET","HEAD"],cachedMethods:["GET","HEAD"],forwardedValues:{queryString:false,cookies:{forward:"none"},},compress:true,},priceClass:"PriceClass_100",restrictions:{geoRestriction:{restrictionType:"none",},},viewerCertificate:{cloudfrontDefaultCertificate:true,},});return{bucketName:siteBucket.bucket,cloudfrontUrl:distribution.domainName.apply((domain)=>`https://${domain}`),};};}// Simple mime type guesserfunctiongetMimeType(file){if (file.endsWith(".html"))return"text/html";if (file.endsWith(".css"))return"text/css";if (file.endsWith(".js"))return"application/javascript";if (file.endsWith(".json"))return"application/json";if (file.endsWith(".png"))return"image/png";if (file.endsWith(".jpg")||file.endsWith(".jpeg"))return"image/jpeg";return"text/plain";}module.exports={createPulumiProgram};
🪣 S3 Bucket Creation:首先,我们创建一个 S3 存储桶来托管静态文件。
🚫 Blocking Public Access(For Security):为了保持私密性,我们默认阻止所有公共访问。