关于树形数据结构你需要知道的一切

这篇文章最初发表于iamtk.co。
当你第一次学习编码时,通常会学习数组作为“主要数据结构”。
最终,你还会学习关于hash tables。如果你正在攻读计算机科学学位,你必须选修数据结构课程。你还将学习关于linked lists、queues和的知识stacks。这些数据结构被称为“线性”数据结构,因为它们都有一个逻辑起点和逻辑终点。
当我们开始学习trees和 时graphs,可能会非常困惑。我们并不以线性方式存储数据。这两种数据结构都以特定的方式存储数据。
这篇文章旨在帮助您更好地理解树数据结构并澄清您对此可能存在的任何困惑。
在本文中,我们将了解:
-
什么是树
-
树木的例子
-
它的术语和工作原理
-
如何在代码中实现树结构。
让我们开始这次学习之旅吧。:)
定义
开始编程时,通常对线性数据结构的理解比对树和图等数据结构的理解更好。
树是众所周知的非线性数据结构。它们不以线性方式存储数据,而是按层次结构组织数据。
让我们深入了解现实生活中的例子!
当我说以分层的方式时,我的意思是什么?
想象一棵包含各代人关系的家谱树:祖父母、父母、子女、兄弟姐妹等。我们通常按层次结构组织家谱。
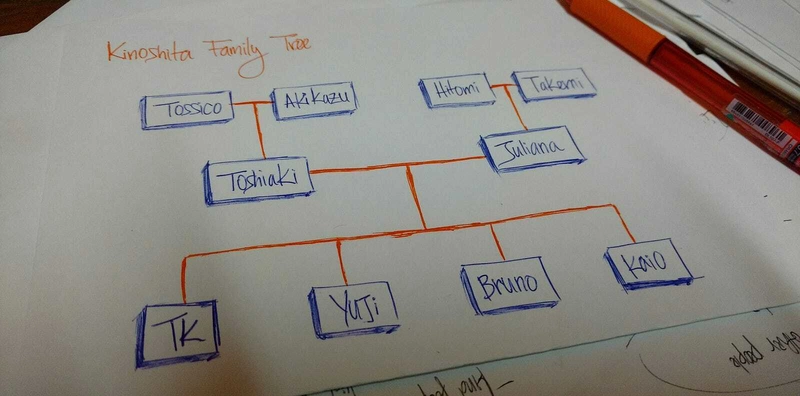
上面的图画是我的家谱。Tossico, Akikazu, Hitomi,和Takemi是我的祖父母。
Toshiaki是Juliana我的父母。
TK, Yuji, Bruno,Kaio是我父母(我和我的兄弟)的孩子。
组织结构是层次结构的另一个例子。

在 HTML 中,文档对象模型 (DOM) 以树的形式运行。
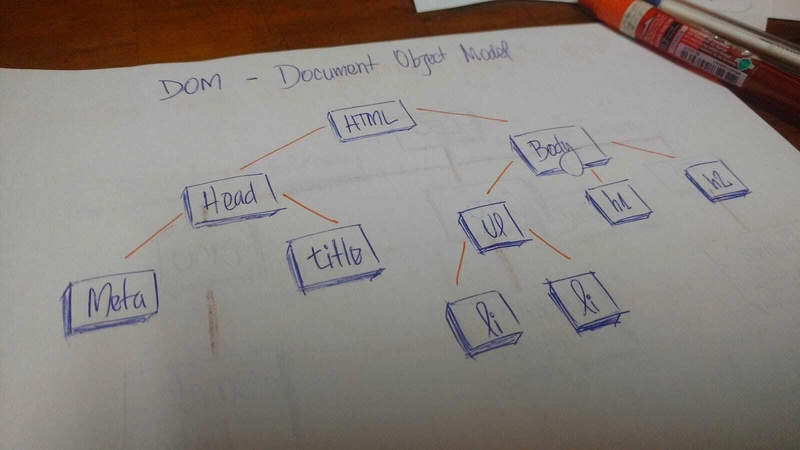
标签HTML包含其他标签。我们有一个head标签和一个body标签。这些标签包含特定元素。head标签包含meta和title标签。body标签包含显示在用户界面中的元素,例如h1,,,,等等a。li
技术定义
Atree是名为 的实体的集合nodes。节点通过 连接edges。每个节点node包含一个value或data,并且它可能包含也可能不包含child node 。

first node的称为tree。root如果root node被另一个 连接node,root则 为parent node, 所连接的node为child。

所有这些都Tree nodes通过称为 的链接连接起来edges。它是 的重要组成部分trees,因为它管理着 之间的关系nodes。
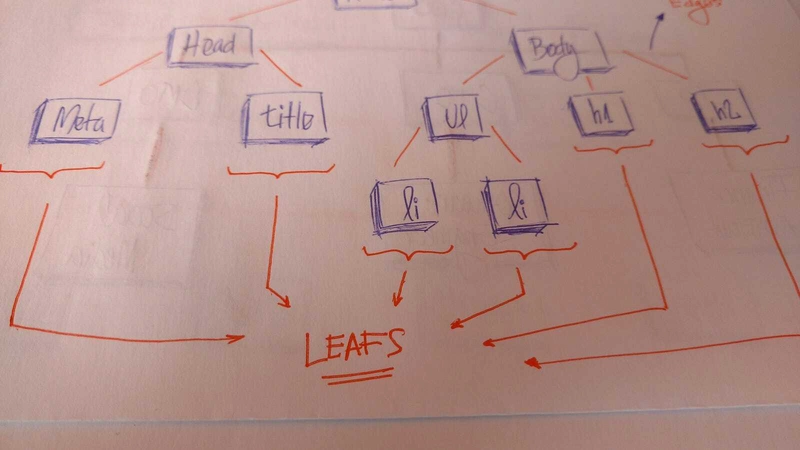
Leavesnodes是a 上的最后一个节点tree.,它们是没有子节点的节点。像真正的树一样,我们有root,,,branches最后是leaves。
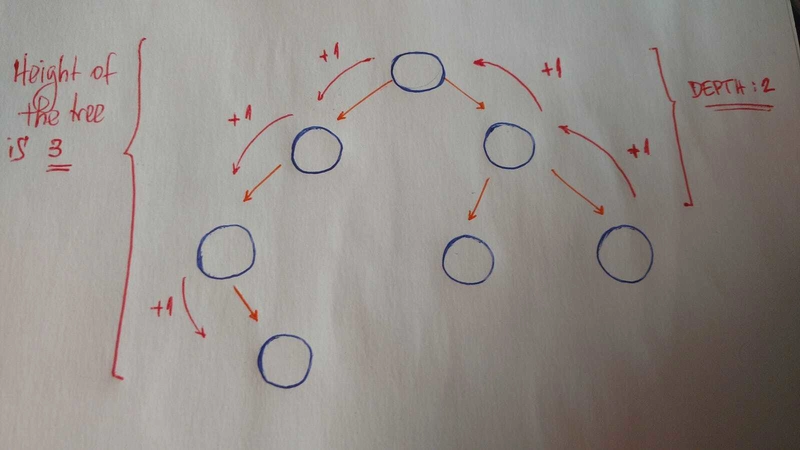
需要理解的其他重要概念是height和depth。
heighta 的是tree到 a 的最长路径的长度leaf。
deptha 的是node到其 的路径的长度root。
术语摘要
-
**根**是最顶层
node的tree -
**边缘**是两个
nodes -
**孩子**是一个
node有parent node -
**父级**是
node具有edgechild node -
**叶子**是
node没有child node的tree -
**高度**是到达
leaf -
**深度**是到达其
root
二叉树
现在我们将讨论一种特定类型的tree。我们称之为binary tree。
在计算机科学中,二叉树是一种树形数据结构,其中每个节点最多有两个子节点,分别称为左子节点和右子节点。——维基百科
让我们看一个例子binary tree。
让我们编写一个二叉树
在实现 时,我们需要记住的第一件事binary tree是 是 的集合nodes。每个node都有三个属性:value、left_child和right_child。
我们如何实现一个binary tree用这三个属性初始化的简单方法?
让我们来看看。
class BinaryTree:
    def __init__(self, value):
        self.value = value
        self.left_child = None
        self.right_child = None
就是这里,我们的binary tree班级。
实例化对象时,我们将value(节点的数据)作为参数传递。查看left_child和right_child。两者都设置为None。
为什么?
因为当我们创建 时node,它没有任何子项。我们只有node data。
让我们测试一下:
tree = BinaryTree('a')
print(tree.value) # a
print(tree.left_child) # None
print(tree.right_child) # None
就是这样。
我们可以将string' a'作为传递value给我们的Binary Tree node。如果我们打印value,,left_child和right_child,我们就可以看到这些值。
让我们进入插入部分。我们需要在这里做什么?
我们将实现一种方法,将新的内容插入node到right和中left。
规则如下:
-
如果当前
node没有left child,我们只需创建一个新的node并将其设置为当前节点的left_child。 -
如果它确实具有
left child,我们创建一个新节点并将其放在当前left child的位置。将此分配left child node给新节点的left child。
让我们把它画出来。:)
代码如下:
def insert_left(self, value):
    if self.left_child == None:
        self.left_child = BinaryTree(value)
    else:
        new_node = BinaryTree(value)
        new_node.left_child = self.left_child
        self.left_child = new_node
同样,如果当前节点没有left child,我们就创建一个新节点并将其设置为当前节点的left_child。否则,我们创建一个新节点并将其放置在当前left child的位置。将 this 分配left child node给新节点的left child。
我们做同样的事情来插入一个right child node。
def insert_right(self, value):
    if self.right_child == None:
        self.right_child = BinaryTree(value)
    else:
        new_node = BinaryTree(value)
        new_node.right_child = self.right_child
        self.right_child = new_node
完毕。 :)
但还不完全。我们还需要测试。
让我们构建以下内容tree:
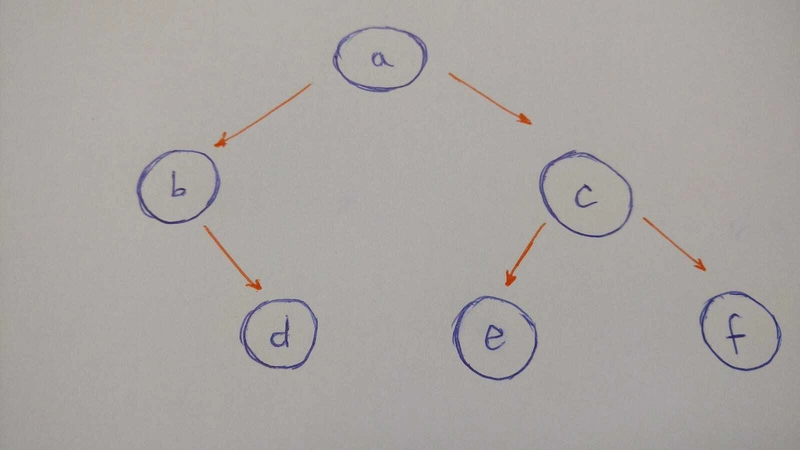
总结一下这棵树的图示:
-
anode将是root我们的binary Tree -
aleft child是bnode -
aright child是cnode -
bright child是dnode(bnode没有left child) -
cleft child是enode -
cright child是fnode -
并且
e没有fnodes孩子
以下是代码tree:
a_node = BinaryTree('a')
a_node.insert_left('b')
a_node.insert_right('c')

b_node = a_node.left_child
b_node.insert_right('d')

c_node = a_node.right_child
c_node.insert_left('e')
c_node.insert_right('f')

d_node = b_node.right_child
e_node = c_node.left_child
f_node = c_node.right_child

print(a_node.value) # a
print(b_node.value) # b
print(c_node.value) # c
print(d_node.value) # d
print(e_node.value) # e
print(f_node.value) # f
插入已完成。
现在我们必须考虑tree遍历。
这里我们有两个选择:深度优先搜索(DFS)和广度优先搜索(BFS)。
那么让我们深入研究每种树遍历类型。
深度优先搜索(DFS)
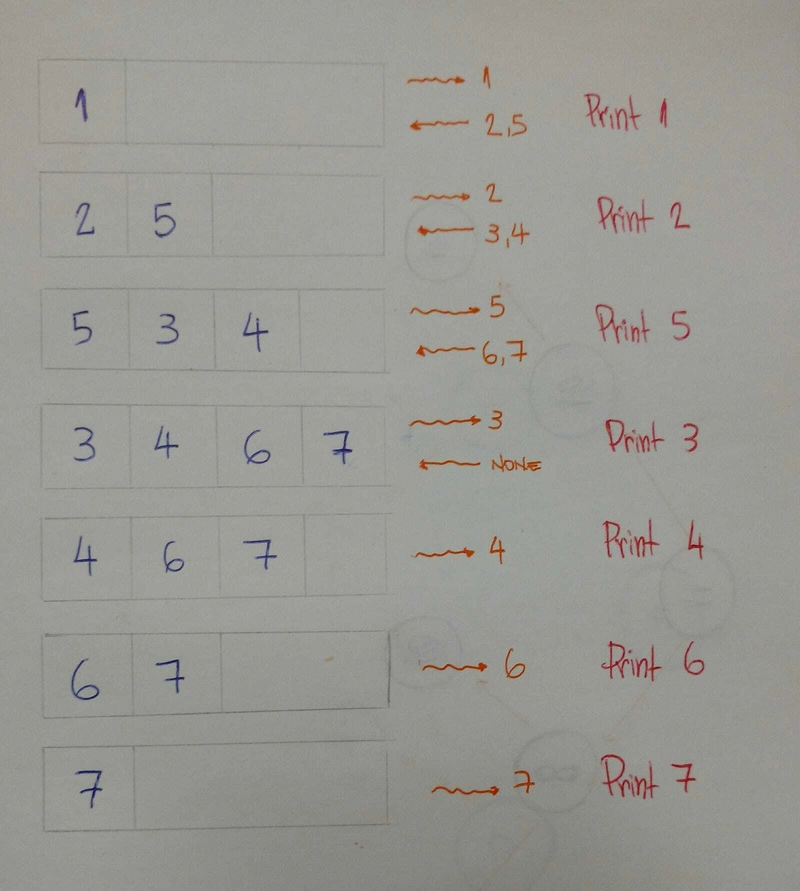
DFS会先探索一条到达叶子节点的路径,然后再回溯探索另一条路径。我们来看一个这种遍历的例子。
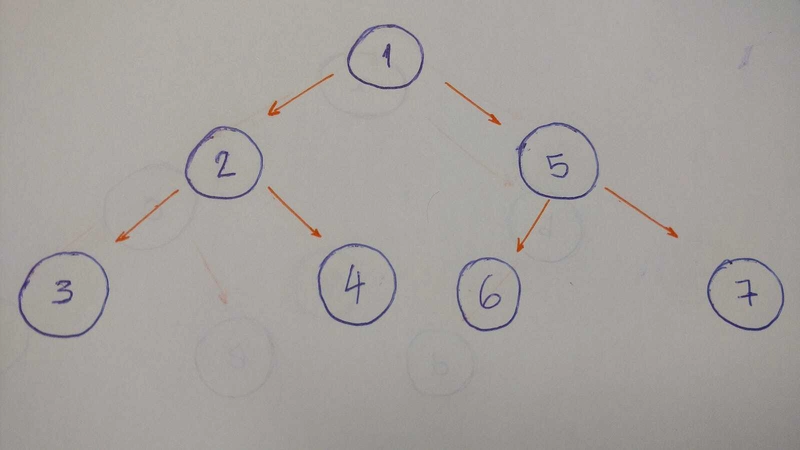
该算法的结果将是 1–2–3–4–5–6–7。
为什么?
让我们来分析一下。
-
转到
left child(2)。 打印。 -
然后转到
left child(3)。打印它。(此操作node没有子操作) -
回溯到
right child(4)。打印它。(这里node没有任何子元素) -
回溯
rootnode到right child(5)。打印它。 -
转到
left child(6)。打印它。(此处node没有子元素) -
回溯到
right child(7)。打印它。(这里node没有任何子元素) -
完毕。
当我们深入到叶子并回溯时,这称为DFS算法。
现在我们已经熟悉了这种遍历算法,我们将讨论DFS的类型:pre-order、in-order和post-order。
预购
这正是我们在上面的例子中所做的。
def pre_order(self):
    print(self.value)

    if self.left_child:
        self.left_child.pre_order()

    if self.right_child:
        self.right_child.pre_order()
为了
本例的按序算法的结果tree是 3–2–4–1–6–5–7。
先左边,其次是中间,最后是右边。
现在让我们编写代码。
def in_order(self):
    if self.left_child:
        self.left_child.in_order()

    print(self.value)

    if self.right_child:
        self.right_child.in_order()
后序
post order本例算法的结果tree是 3–4–2–6–7–5–1。
先左边,其次是右边,最后是中间。
让我们编写代码。
def post_order(self):
    if self.left_child:
        self.left_child.post_order()

    if self.right_child:
        self.right_child.post_order()

    print(self.value)
广度优先搜索(BFS)
BFS算法tree是逐级、逐深度地遍历。
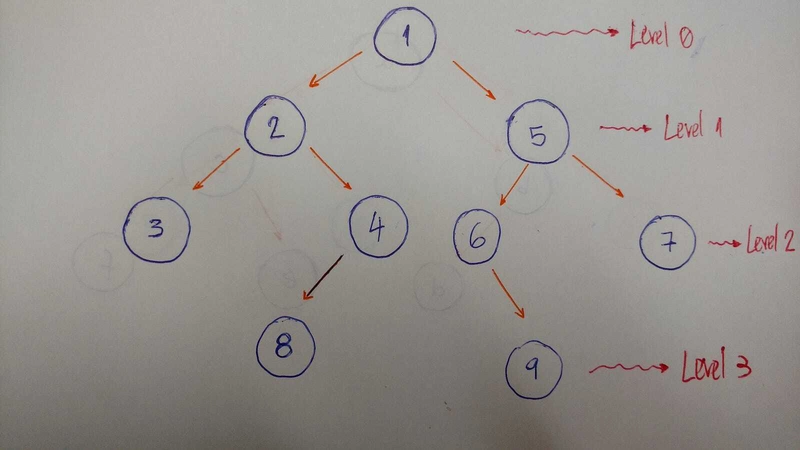
下面是一个有助于更好地解释该算法的示例:
因此我们逐级遍历。在这个例子中,结果是 1-2-5-3-4-6-7。
-
级别/深度 0:仅
node具有值 1 -
级别/深度 1:
nodes值为 2 和 5 -
级别/深度 2:
nodes值为 3、4、6 和 7
现在让我们编写代码。
def bfs(self):
    queue = Queue()
    queue.put(self)

    while not queue.empty():
        current_node = queue.get()
        print(current_node.value)

        if current_node.left_child:
            queue.put(current_node.left_child)

        if current_node.right_child:
            queue.put(current_node.right_child)
为了实现BFS算法,我们利用queue数据结构来帮忙。
它是如何工作的?
以下是解释。
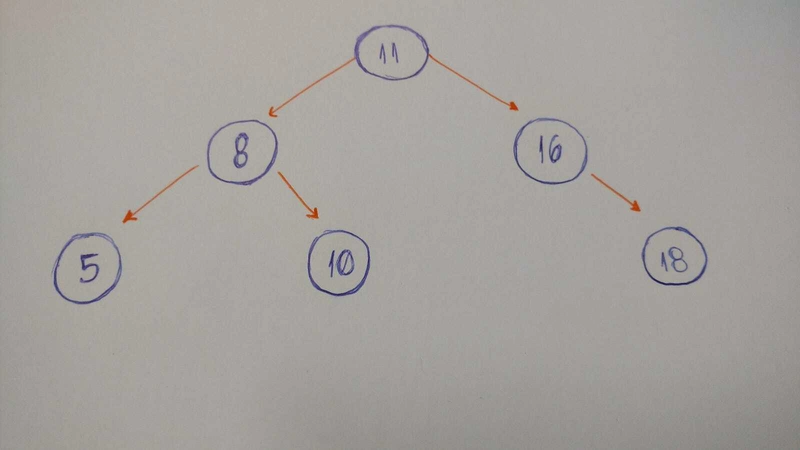
二叉搜索树
二叉搜索树有时也称为有序二叉树,它按排序顺序保存其值,以便查找和其他操作可以使用二叉搜索的原理。——维基百科
a 的一个重要性质Binary Search Tree是,a 的值Binary Search Tree node大于其后代的值left child,但小于其后代的值right child.。

以下是上述插图的细分:
-
**A**是倒置的。7-5-8-6
subtree需要在右侧,而subtree2-1-3 需要在左侧。 -
**B**是唯一正确的选项。它满足该
Binary Search Tree属性。 -
**C** 有一个问题:
node值为 4。它需要位于 的左侧,root因为它小于 5。
让我们编写一个二叉搜索树!
现在该编码了!
我们会看到什么?我们将插入新节点、搜索值、删除节点以及平衡tree。
我们开始吧。
插入:向树中添加新节点
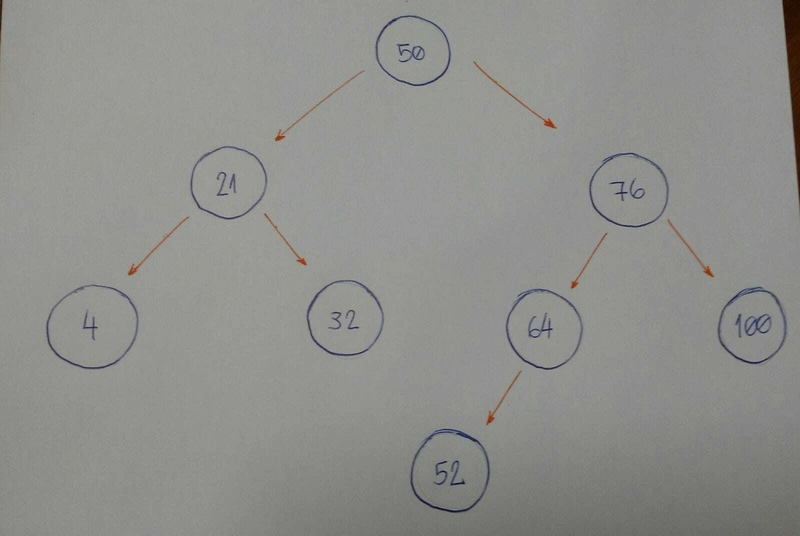
假设我们有一个空的tree,我们想按以下顺序添加新的nodes值:50、76、21、4、32、100、64、52。
我们首先需要知道的是 50 是否是root我们的树。
现在我们可以开始插入node了node。
-
76 大于 50,因此在右侧插入 76。
-
21 小于 50,因此在左侧插入 21。
-
4 小于 50。
Node值为 50 的数为left child21。由于 4 小于 21,因此将其插入到该数的左侧node。 -
32 小于 50。
Node值为 50 的数为left child21。由于 32 大于 21,因此将 32 插入到该数的右侧node。 -
100 大于 50。
Node值为 50 的值为right child76。由于 100 大于 76,因此将 100 插入到此值的右侧node。 -
64 大于 50。
Node值为 50 的数为right child76。由于 64 小于 76,因此将 64 插入到该数的左侧node。 -
52 大于 50。
Node值为 50 的数为right child76。由于 52 小于 76,node值为 76 的数为left child64。52 小于 64,因此将 54 插入到该数的左侧node。
你注意到这里有一个模式吗?
让我们来分析一下。
现在让我们编写代码。
class BinarySearchTree:
    def __init__(self, value):
        self.value = value
        self.left_child = None
        self.right_child = None

    def insert_node(self, value):
        if value <= self.value and self.left_child:
            self.left_child.insert_node(value)
        elif value <= self.value:
            self.left_child = BinarySearchTree(value)
        elif value > self.value and self.right_child:
            self.right_child.insert_node(value)
        else:
            self.right_child = BinarySearchTree(value)
看起来很简单。
该算法最强大的部分是递归部分,分别位于第 9 行和第 13 行。这两行代码都调用了insert_node,并将其分别用于left和right children。第11和15行分别对每个 执行插入操作child。
让我们搜索节点值...或者不...
我们现在要构建的算法是关于搜索的。对于给定的值(整数),我们将判断我们的Binary Search Tree值是否包含该值。
需要注意的一点是我们如何定义树的插入算法。首先我们有root node。所有左边的subtree nodes值都小于root node。所有右边的subtree nodes值都大于root node。
我们来看一个例子。
想象一下我们有这个tree。
现在我们想知道是否有一个基于值 52 的节点。
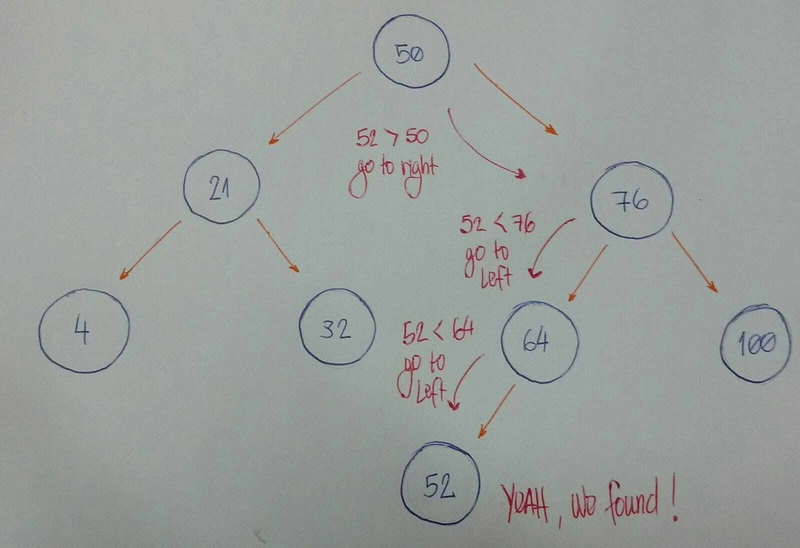
让我们来分析一下。
现在让我们编写代码。
class BinarySearchTree:
    def __init__(self, value):
        self.value = value
        self.left_child = None
        self.right_child = None

    def find_node(self, value):
        if value < self.value and self.left_child:
            return self.left_child.find_node(value)
        if value > self.value and self.right_child:
            return self.right_child.find_node(value)

        return value == self.value
让我们分析一下代码:
-
第 8 行和第 9 行符合规则 #1。
-
第 10 行和第 11 行符合规则 #2。
-
第 13 行符合规则#3。
我们如何测试它?
让我们通过用值 15Binary Search Tree初始化来创建我们的。root node
bst = BinarySearchTree(15)
现在我们将插入许多新的nodes。
bst.insert_node(10)
bst.insert_node(8)
bst.insert_node(12)
bst.insert_node(20)
bst.insert_node(17)
bst.insert_node(25)
bst.insert_node(19)
对于每个插入的node ,我们将测试我们的find_node方法是否真的有效。
print(bst.find_node(15)) # True
print(bst.find_node(10)) # True
print(bst.find_node(8)) # True
print(bst.find_node(12)) # True
print(bst.find_node(20)) # True
print(bst.find_node(17)) # True
print(bst.find_node(25)) # True
print(bst.find_node(19)) # True
是的,它对这些给定的值有效!让我们测试一下我们代码中不存在的值Binary Search Tree。
print(bst.find_node(0)) # False
哦,是的。
我们的搜索已经完成。
删除:移除和组织
删除算法更复杂,因为我们需要处理不同的情况。对于给定值,我们需要删除node包含该值的 。设想以下场景node :没有children,只有一个child,或者有两个children。
- 场景 #1:A
node没有children(leafnode)。
#        |50|                              |50|
#      /      \                           /    \
#    |30|     |70|   (DELETE 20) --->   |30|   |70|
#   /    \                                \
# |20|   |40|                             |40|
如果node要删除的 没有子节点,则直接删除。算法无需重新组织tree。
- 场景#2:
node只有一个孩子(left或right孩子)。
#        |50|                              |50|
#      /      \                           /    \
#    |30|     |70|   (DELETE 30) --->   |20|   |70|
#   /
# |20|
在这种情况下,我们的算法需要将 设为node点的父节点child。如果node是,我们将 设为点left child的父节点。如果是其父节点的 ,我们将设为 点的父节点。left childchildnoderight childright childchild
- 场景#3:A
node有两个孩子。
#        |50|                              |50|
#      /      \                           /    \
#    |30|     |70|   (DELETE 30) --->   |40|   |70|
#   /    \                             /
# |20|   |40|                        |20|
当 有两个子元素时node,我们需要node从 开始,找到值最小的node。right child我们将这个最小值元素放在我们要移除node的位置。node
现在是编码的时间了。
def remove_node(self, value, parent):
    if value < self.value and self.left_child:
        return self.left_child.remove_node(value, self)
    elif value < self.value:
        return False
    elif value > self.value and self.right_child:
        return self.right_child.remove_node(value, self)
    elif value > self.value:
        return False
    else:
        if self.left_child is None and self.right_child is None and self == parent.left_child:
            parent.left_child = None
            self.clear_node()
        elif self.left_child is None and self.right_child is None and self == parent.right_child:
            parent.right_child = None
            self.clear_node()
        elif self.left_child and self.right_child is None and self == parent.left_child:
            parent.left_child = self.left_child
            self.clear_node()
        elif self.left_child and self.right_child is None and self == parent.right_child:
            parent.right_child = self.left_child
            self.clear_node()
        elif self.right_child and self.left_child is None and self == parent.left_child:
            parent.left_child = self.right_child
            self.clear_node()
        elif self.right_child and self.left_child is None and self == parent.right_child:
            parent.right_child = self.right_child
            self.clear_node()
        else:
            self.value = self.right_child.find_minimum_value()
            self.right_child.remove_node(self.value, self)

        return True
- 要使用此
clear_node方法:将None值设置为所有三个属性 — (value、left_child和right_child)
def clear_node(self):
    self.value = None
    self.left_child = None
    self.right_child = None
- 使用
find_minimum_value方法:一直往左走。如果找不到其他节点,就找到最小的那个。
def find_minimum_value(self):
    if self.left_child:
        return self.left_child.find_minimum_value()
    else:
        return self.value
现在让我们测试一下。
我们将用它tree来测试我们的remove_node算法。
#        |15|
#      /      \
#    |10|     |20|
#   /    \    /    \
# |8|   |12| |17| |25|
#              \
#              |19|
让我们去掉node带有value8 的。它是一个node没有孩子的。
print(bst.remove_node(8, None)) # True
bst.pre_order_traversal()

#     |15|
#   /      \
# |10|     |20|
#    \    /    \
#   |12| |17| |25|
#          \
#          |19|
现在让我们删除node带有value17 的。它node只有一个孩子。
print(bst.remove_node(17, None)) # True
bst.pre_order_traversal()

#        |15|
#      /      \
#    |10|     |20|
#       \    /    \
#      |12| |19| |25|
最后,我们将删除node带有两个子项的。这是root我们的tree。
print(bst.remove_node(15, None)) # True
bst.pre_order_traversal()

#        |19|
#      /      \
#    |10|     |20|
#        \        \
#        |12|     |25|
测试现已完成。:)
目前就这些!
我们在这里学到了很多东西。
恭喜你完成了这篇内容丰富的文章。理解一个我们不知道的概念真的很难。但你做到了。:)
这是我学习和掌握算法与数据结构的旅程中迈出的又一步。你可以在我的《Renaissance Developer》出版物上查看我的完整旅程记录。
玩得开心,继续学习和编码。
这是我的Medium、Twitter、GitHub和LinkedIn帐户。☺