React 自定义 Hooks 与辅助函数 - 何时同时使用
作为一名开发人员,日常工作中接触各种技术和用例是很常见的。React 自定义 Hooks 和辅助函数是两个流行的概念。辅助函数的概念已经存在很长时间了,而 React 自定义 Hooks 则相对新颖。这两个概念都允许开发人员以不同的方式抽象和重用他们编写的代码,尽管它们的用例略有不同。
今天,我们将看看两者之间的相似之处,并得出何时才是使用它们的正确时机。
让我们首先了解一下什么是 React Custom Hooks。
什么是 React 自定义 Hooks?
React 自定义 Hooks 是 JavaScript 函数,它使你能够在整个 React 代码库中复用状态逻辑。使用自定义 Hooks 时,我们可以利用 React Hooks API,以遵循 React 函数组件流程的方式管理状态及其副作用。
自定义 Hooks 的独特特性之一是能够利用状态管理,这意味着我们可以访问 React 内置 Hooks,例如useState、 和useEffect。另一个独特之处在于,我们必须遵循 React 自定义 Hooks 的命名约定,因为我们必须在 Hooks 的开头添加前缀 ,use后跟其名称,例如useFetch。
当我们使用自定义钩子时,它们可以访问和改变组件状态以及生命周期方法,因为它们与 React 组件的逻辑紧密相连。
我们可以在此代码示例中看到 React Custom Hook 的示例:
import { useState, useEffect } from 'react';

export function useFetch(url) {
  const [data, setData] = useState([]);
  const [error, setError] = useState(null);
  const [isLoading, setIsLoading] = useState(null);

  useEffect(() => {
    const fetchData = async () => {
      try {
        const json = await fetch(url).then((r) => r.json());
        setIsLoading(false);
        setData(json);
      } catch (error) {
        setError(error);
        setIsLoading(false);
      }
    };

    fetchData();

  return { data, error, isLoading };
}
此自定义钩子被调用useFetch,并具有可重用的逻辑,用于从 API 获取数据。它可以管理加载和错误状态,并且可以导入到多个组件中。
现在我们已经对 React Custom Hooks 有了基本的了解,让我们看看它们与辅助函数相比如何。
什么是辅助函数?
辅助函数本质上是独立的函数,用于执行不同的计算或任务。这类函数可以在应用程序内部的任何地方使用,因为它们不属于 React 组件或状态管理系统。另一个关键区别是,它们可以在多种编程语言中使用,并且不受任何生态系统的约束。它们是一个可以在任何地方使用的概念。
与 React 自定义函数不同,辅助函数执行与给定输入相关的计算和任务。它们不能与副作用或组件状态交互。它们也不需要预定义的命名约定,use而应该根据您指定的任务来命名。
看一下此示例中的辅助函数:
import dayjs from 'dayjs';

function formatDate(date) {
  return dayjs(date).format('MM/DD/YYYY');
}

export default formatDate;
在此代码片段中,我们使用 Javascript 日期库Day.js来解析和格式化日期,这为我们提供了一种更强大的日期格式化方法。
好了,我们已经对 React 自定义 Hooks 和辅助函数有了更深入的理解,现在是时候看看如何将它们整合到一个简单的应用程序中了。在下一节中,我们将构建一个同时使用它们的应用程序。
构建使用自定义钩子和辅助函数的应用程序
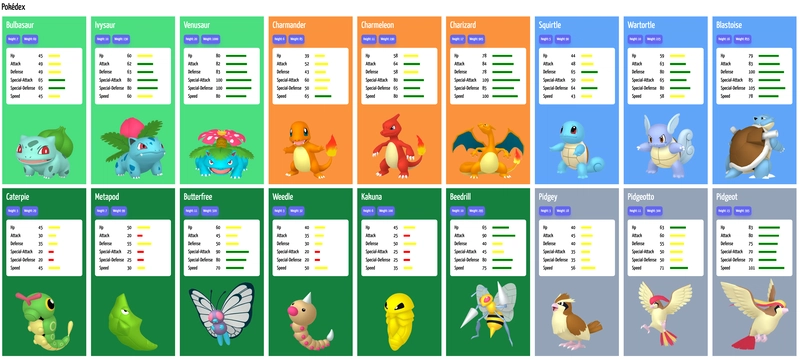
我们将要构建的应用程序是一个简单的 Pokémon Pokédex 应用程序,您可以在这张图片中看到。
我们从Pokémon API获取 Pokemon 数据和信息,然后使用这些数据构建我们的应用程序,并使用 Tailwind CSS 进行样式设置。讲解完毕后,就可以开始构建我们的应用程序了。
您可以在 GitHub 上在线找到代码库https://github.com/andrewbaisden/pokemon-pokedex-app
我们要做的第一件事是设置我们的项目结构,因此请在计算机上为项目找到一个位置,例如桌面,然后运行这些命令来创建 Next.js 项目。
在 Next.js 设置屏幕上,确保为 Tailwind CSS 和 App Router 选择“是”,以便我们的项目具有相同的设置。在这个项目中,我们将使用 JavaScript,其他设置使用默认设置即可。
npx create-next-app pokemon-pokedex-app
cd pokemon-pokedex-app
我们现在应该有一个 Next.js 项目,并且应该位于pokemon-pokedex-app文件夹中,所以下一步是安装此应用程序所需的 JavaScript 包。我们必须安装这些包dayjs来计算时间和日期,并uuid为我们的 Pokémon 创建唯一的 ID。
使用以下命令安装这两个包:
npm i dayjs uuid
现在我们的软件包已经安装完毕,接下来我们将为我们的项目创建所有的文件和文件夹。
运行以下命令来创建我们的项目架构:
cd src/app
mkdir components hooks utils
mkdir components/Header components/Pokemon components/PokemonDetails
touch components/Header/Header.js components/Pokemon/Pokemon.js components/PokemonDetails/PokemonDetails.js
touch hooks/usePokemon.js
touch utils/dateUtils.js utils/fetchUtils.js
cd ../..
通过这个命令我们可以:
- 为我们的 Header、Pokemon 和 PokemonDetails 组件创建一个组件文件夹
- 为我们的钩子创建一个 hooks 文件夹
usePokemon,用于从 Pokemon API 获取数据 utils为我们的获取和日期实用程序函数创建一个文件夹
好的,在接下来的步骤中,我们将代码添加到我们的文件中,然后我们的项目就完成了,所以请在代码编辑器中打开该项目。
首先是我们next.config.mjs的根文件夹中的文件。
将该文件中的所有代码替换为此处的新代码:
/** @type {import('next').NextConfig} */
const nextConfig = {
  images: {
    remotePatterns: [
      {
        protocol: 'https',
        hostname: 'raw.githubusercontent.com',
      },
    ],
  },
};

export default nextConfig;
我们在这个文件中所做的就是为 GitHub 添加一个图片模式,这样我们就可以在应用程序中访问 Pokémon 图片而不会出现错误。我们必须定义该路由,以便它能够被批准。
现在让我们来处理layout.js文件,用下面的代码替换所有代码:
import { Yanone_Kaffeesatz } from 'next/font/google';
import './globals.css';

const yanone = Yanone_Kaffeesatz({ subsets: ['latin'] });

export const metadata = {
  title: 'Create Next App',
  description: 'Generated by create next app',
};

export default function RootLayout({ children }) {
  return (
    <html lang="en">
      <body className={yanone.className}>{children}</body>
    </html>
  );
}
该文件的主要变化是使用Yanone_KaffeesatzGoogle 字体来替换我们应用程序中的默认Inter字体。
该globals.css文件是我们列表中的下一个文件,我们只需要做一些代码清理。
像以前一样用以下代码片段替换代码:
@tailwind base;
@tailwind components;
@tailwind utilities;

body {
  font-size: 20px;
}
我们清理了一些代码,并将应用程序的默认字体大小设为 20px。
这处理了我们的初始配置文件,我们只需要添加我们的组件、钩子、实用程序和主页的代码,我们的应用程序就可以准备就绪了。
从顶部开始让我们Header.js在里面做我们的组件Header/Header.js。
将此代码添加到我们的文件中:
import { useState, useEffect } from 'react';
import { getLiveDateTime } from '../../utils/dateUtils';

export default function Header() {
  const [dateTime, setDateTime] = useState(getLiveDateTime());

  useEffect(() => {
    const interval = setInterval(() => {
      setDateTime(getLiveDateTime());
    }, 1000);

    return () => clearInterval(interval);
  }, []);
  return (
    <>
      <header className="flex row justify-between items-center bg-slate-900 text-white p-4 rounded-lg">
        <div>
          <h1 className="text-5xl uppercase">Pokémon</h1>
        </div>
        <div>
          <p>Date: {dateTime.date}</p>
          <p>Time: {dateTime.time}</p>
        </div>
      </header>
    </>
  );
}
这个组件主要用来显示我们应用的标题“Pokémon”,以及实时日期和时间。这是通过导入一个utils/dateUtils.js使用dayjsJavaScript 库计算时间和日期的辅助函数来实现的。
下一个要处理的文件将是文件夹Pokemon.js中的文件Pokemon。
以下是我们的文件的代码:
import { useState, useEffect } from 'react';
import usePokemon from '../../hooks/usePokemon';
import { fetchPokemon } from '../../utils/fetchUtils';
import PokemonDetails from '../PokemonDetails/PokemonDetails';

export default function Pokemon() {
  const { data, isLoading, error } = usePokemon(
    'https://pokeapi.co/api/v2/pokemon'
  );

  const [pokemonDetails, setPokemonDetails] = useState([]);

  useEffect(() => {
    const fetchPokemonDetails = async () => {
      if (data && data.results) {
        const details = await Promise.all(
          data.results.map(async (pokemon) => {
            const pokemonData = await fetchPokemon(pokemon.url);
            return pokemonData;
          })
        );
        setPokemonDetails(details);
      }
    };

    fetchPokemonDetails();
  }, [data]);

  if (isLoading) {
    return <div>Loading...</div>;
  }

  if (error) {
    return <div>Error: {error.message}</div>;
  }

  return (
    <>
      <div className="flex row flex-wrap gap-4 justify-evenly">
        <PokemonDetails pokemonDetails={pokemonDetails} />
      </div>
    </>
  );
}
这是我们主要的 Pokémon 组件文件,它使用我们的usePokemon.js钩子从 Pokémon API 获取数据。它与我们用于fetchUtils.js获取数据的实用程序文件协同工作。我们设置了一个用于获取数据的错误处理机制,并将状态数据传递到PokemonDetails.js渲染用户界面的组件中。
PokemonDetails.js好的,我们现在应该在文件夹中添加我们的文件的代码PokemonDetails。
将此代码放入文件中:
import Image from 'next/image';
import { v4 as uuidv4 } from 'uuid';

export default function PokemonDetails({ pokemonDetails }) {
  return (
    <>
      {pokemonDetails.map((pokemon) => (
        <div
          key={pokemon.id}
          className={
            pokemon.types[0].type.name === 'fire'
              ? 'bg-orange-400'
              : pokemon.types[0].type.name === 'water'
              ? 'bg-blue-400'
              : pokemon.types[0].type.name === 'grass'
              ? 'bg-green-400'
              : pokemon.types[0].type.name === 'bug'
              ? 'bg-green-700'
              : pokemon.types[0].type.name === 'normal'
              ? 'bg-slate-400'
              : ''
          }
        >
          <div className="text-white p-4">
            <div className="capitalize">
              <h1 className="text-4xl">{pokemon.name}</h1>
            </div>
            <div className="flex row gap-2 mt-4 mb-4">
              <div className="bg-indigo-500 shadow-lg shadow-indigo-500/50 p-2 rounded-lg text-sm">
                Height: {pokemon.height}
              </div>
              <div className="bg-indigo-500 shadow-lg shadow-indigo-500/50 p-2 rounded-lg text-sm">
                Weight: {pokemon.weight}
              </div>
            </div>
            <div className="bg-white text-black rounded-lg p-4">
              {pokemon.stats.map((stat) => (
                <div key={uuidv4()}>
                  <div className="capitalize flex row items-center gap-2">
                    <table>
                      <tr>
                        <td width={110}>{stat.stat.name}</td>
                        <td width={40}>{stat.base_stat}</td>
                        <td width={40}>
                          <div
                            style={{
                              width: `${stat.base_stat}px`,
                              height: '0.5rem',
                              backgroundColor: `${
                                stat.base_stat <= 29
                                  ? 'red'
                                  : stat.base_stat <= 60
                                  ? 'yellow'
                                  : 'green'
                              }`,
                            }}
                          ></div>
                        </td>
                      </tr>
                    </table>
                  </div>
                </div>
              ))}
            </div>
            <div>
              <Image
                priority
                alt={pokemon.name}
                height={300}
                width={300}
                src={pokemon.sprites.other.home.front_default}
              />
            </div>
          </div>
        </div>
      ))}
    </>
  );
}
此文件中的几乎所有代码都用于创建我们的 Pokémon 应用程序的界面。样式使用 Tailwind CSS 完成。
在项目完成之前,还有几个文件需要处理。下一个要处理的文件是usePokemon.js我们hooks文件夹中的文件。
我们的文件需要此代码,因此现在添加它:
import { useState, useEffect } from 'react';
import { fetchPokemon } from '../utils/fetchUtils';

const usePokemon = (initialUrl) => {
  const [data, setData] = useState(null);
  const [isLoading, setIsLoading] = useState(true);
  const [error, setError] = useState(null);

  useEffect(() => {
    const fetchData = async () => {
      try {
        const pokemonData = await fetchPokemon(initialUrl);
        setData(pokemonData);
      } catch (error) {
        setError(error);
      } finally {
        setIsLoading(false);
      }
    };
    fetchData();
  }, [initialUrl]);
  return { data, isLoading, error };
};

export default usePokemon;
此自定义钩子用于从 API 获取数据,在我们的例子中它将用于 Pokémon API。
现在我们将使用以下代码完成文件夹dateUtils.js中的文件:utils
import dayjs from 'dayjs';

export const getLiveDateTime = () => {
  const now = dayjs();
  return {
    date: now.format('MMMM D, YYYY'),
    time: now.format('h:mm:ss A'),
  };
};
通过此实用程序文件,我们使用dayjsJavaScript 库来计算导入的任何文件中的日期和时间。
好的,现在对于我们的第二个实用程序文件,fetchUtils.js将此代码添加到文件中:
export const fetchPokemon = async (url) => {
  try {
    const response = await fetch(url);
    const data = await response.json();
    console.log(data);
    return data;
  } catch (error) {
    console.error('Error fetching Pokemon:', error);
    throw error;
  }
};
该实用程序文件与我们的usePokemon.js钩子一起从 API 获取数据。
最后,让我们通过替换和添加代码到page.js根文件夹中的主文件来完成我们的项目。
这是该文件所需的代码:
'use client';
import Header from './components/Header/Header';
import Pokemon from './components/Pokemon/Pokemon';

export default function PokemonList() {
  return (
    <div className="p-5">
      <Header />
      <h1 className="text-4xl mt-4 mb-4">Pokédex</h1>
      <Pokemon />
    </div>
  );
}
我们的page.js文件是所有组件的主要入口点,有了这个代码,我们的项目就完成了。
使用通常的 Next.js 运行脚本运行您的项目,如下所示,您应该在浏览器中看到 Pokémon Pokédex 应用程序:
npm run dev
结论
今天我们学习了,如果你想开发出井井有条、简洁易管理的代码,了解辅助函数和 React Custom 之间的区别至关重要。在 React 中,由于状态逻辑复用,建议使用自定义钩子,因为辅助函数最适合无状态的通用任务。通过判断何时使用两者,可以增强代码库的模块化和可复用性。
链接钩钩钩钩 https://dev.to/andrewbaisden/react-custom-hooks-vs-helper-functions-when-to-use-both-2587 后端开发教程 - Java、Spring Boot 实战 - msg200.com
