🦄 使用 NextJS 构建定价页面 🤯 🤯
TL;DR
TL;DR
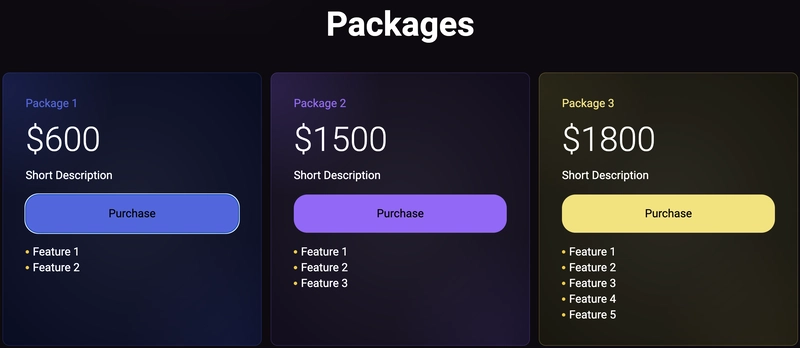
在本文中,我们将构建一个包含多个定价等级的页面。
访客可以点击“购买”按钮,然后进入结账页面。
一旦完成后,我们将把客户发送到成功页面并将其保存到我们的数据库中。
此用例有助于:
- 购买课程
- 购买订阅
- 购买实物
- 捐款
- 请你喝杯咖啡
还有更多。
你能帮我吗?❤️
我喜欢制作开源项目并与大家分享。
如果您能帮助我并启动该项目,我将非常非常感激!
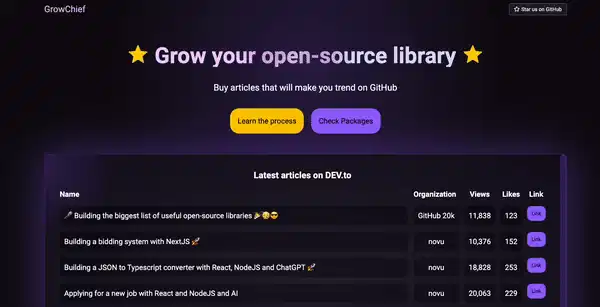
(这也是本教程的源代码)
https://github.com/github-20k/growchief
让我们开始吧🔥
让我们首先创建一个新的 NextJS 项目:
npx create-next-app@latest
只需多次按下 Enter 键即可创建项目。
我不太喜欢 Next.JS 的新 App 路由器,所以我会使用旧pages文件夹,但您可以随意选择。
让我们继续添加定价包。
新建一个名为 components 的文件夹,并添加我们的定价组件。
mkdir components
cd components
touch pricing.component.tsx
并添加如下内容:
export const PackagesComponent = () => {
  return (
    <div className="mt-28">
      <h1 className="text-center text-6xl max-sm:text-5xl font-bold">
        Packages
      </h1>
      <div className="flex sm:space-x-4 max-sm:space-y-4 max-sm:flex-col">
        <div className="flex-1 text-xl mt-14 rounded-xl border border-[#4E67E5]/25 bg-[#080C23] p-10 w-full">
          <div className="text-[#4d66e5]">Package one</div>
          <div className="text-6xl my-5 font-light">$600</div>
          <div>
            Short description
          </div>
          <button
            className="my-5 w-full text-black p-5 max-sm:p-2 rounded-3xl bg-[#4E67E5] text-xl max-sm:text-lg hover:bg-[#8a9dfc] transition-all"
          >
            Purchase
          </button>
          <ul>
            <li>First feature</li>
            <li>Second feature</li>
          </ul>
        </div>
        <div
          className="flex-1 text-xl mt-14 rounded-xl border border-[#9966FF]/25 bg-[#120d1d] p-10 w-full"
        >
          <div className="text-[#9967FF]">Package 2</div>
          <div className="text-6xl my-5 font-light">$1500</div>
          <div>
            Short Description
          </div>
          <button
            className="my-5 w-full text-black p-5 max-sm:p-2 rounded-3xl bg-[#9966FF] text-xl max-sm:text-lg hover:bg-[#BB99FF] transition-all"
          >
            Purchase
          </button>
          <ul>
            <li>First Feature</li>
            <li>Second Feature</li>
            <li>Thired Feature</li>
          </ul>
        </div>
        <div
          className="flex-1 text-xl mt-14 rounded-xl border border-[#F7E16F]/25 bg-[#19170d] p-10 w-full"
        >
          <div className="text-[#F7E16F]">Package 3</div>
          <div className="text-6xl my-5 font-light">$1800</div>
          <div>
            Short Description
          </div>
          <button
            className="my-5 w-full text-black p-5 max-sm:p-2 rounded-3xl bg-[#F7E16F] text-xl max-sm:text-lg hover:bg-[#fdf2bb] transition-all"
          >
            Purchase
          </button>
          <ul>
            <li>First Feature</li>
            <li>Second Feature</li>
            <li>Thired Feature</li>
            <li>Fourth Feature</li>
            <li>Fifth Feature</li>
          </ul>
        </div>
      </div>
    </div>
  );
};
这是一个非常简单的组件,使用 Tailwind(CSS)来显示三种套餐类型(600 美元、1500 美元和 1800 美元)。点击任意套餐后,我们会将访客引导至购买页面,方便他们购买。
转到根目录并创建一个新的索引页(如果不存在)
cd pages
touch index.tsx
将以下代码添加到文件:
import React from 'react';
import {PackagesComponent} from '../components/pricing.component';

const Index = () => {
   return (
   <>
     <PackagesComponent />
   </>
   )
}
设置您的支付提供商🤑💰
大多数支付提供商的工作方式相同。
-
向支付提供商发送 API 调用,其中包含您要收取的金额以及付款后发送给用户的成功页面。
-
您将从 API 调用中获得一个 URL,其中包含指向结帐页面的链接并重定向用户(离开您网站的用户)。
-
购买完成后,它会将用户重定向到成功页面。
-
支付提供商将向您选择的特定路线发送 API 调用,以通知您购买已完成(异步)
我使用 Stripe - 它基本上可以在任何地方访问,但您可以随意使用您的支付提供商。
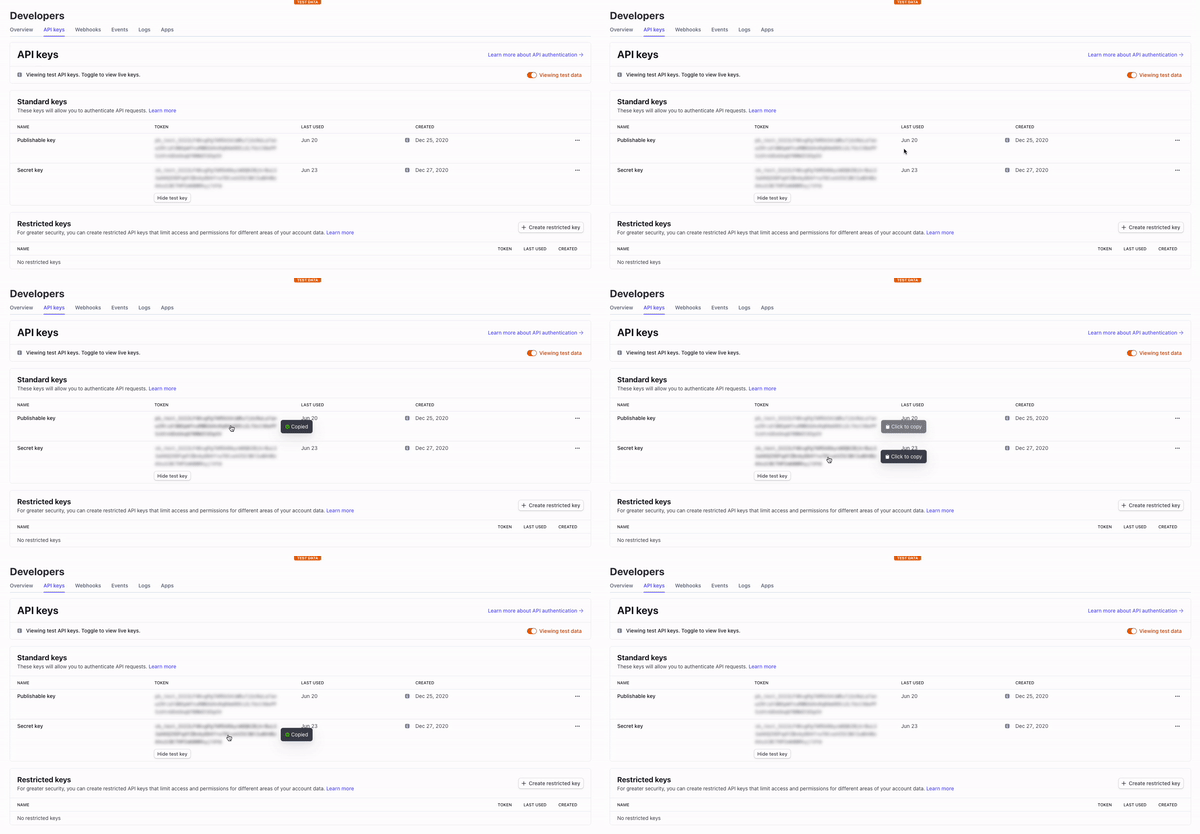
前往 Stripe,单击开发人员选项卡,移动到“API 密钥”,然后从开发人员部分复制公钥和密钥。
转到项目的根目录并创建一个名为的新文件,.env然后粘贴两个键,如下所示:
PAYMENT_PUBLIC_KEY=pk_test_....
PAYMENT_SECRET_KEY=sk_test_....
还记得我们说过 Stripe 稍后会通过 HTTP 请求通知我们付款成功吗?
嗯...我们需要
- 设置从支付获取请求的路线
- 使用密钥保护此路线
因此,在 Stripe 仪表板中,前往“Webhooks”并创建一个新的 webhook。
您必须添加“端点 URL”。由于我们在本地运行项目,因此只有当我们创建本地监听器或使用 ngrok 将网站暴露到网络上时,Stripe 才能向我们发送请求。
我更喜欢 ngrok 选项,因为出于某种原因,本地监听器并不总是适合我(有时发送事件,有时不发送)。
因此,当您的 Next.JS 项目运行时,只需运行以下命令。
npm install -g ngrok
ngrok http 3000
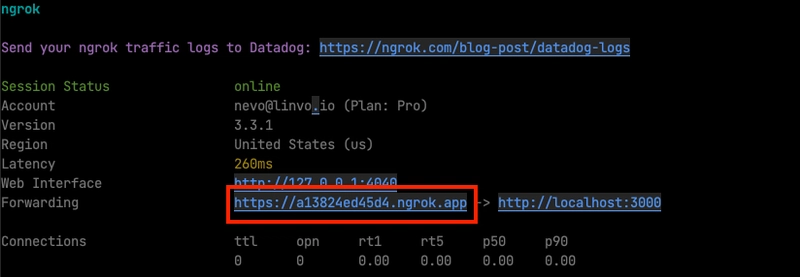
然后你就会看到 Ngrok 在他们的域名上为你的网站提供服务。只需复制它即可。
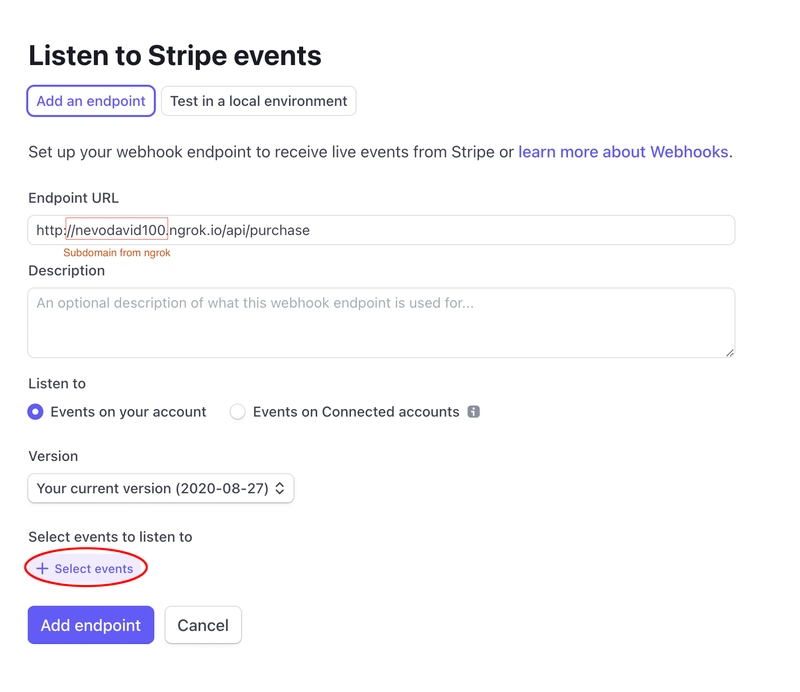
并将其粘贴到 Stripe webhook“Endpoint URL”中,同时添加完成购买的路径/api/purchase
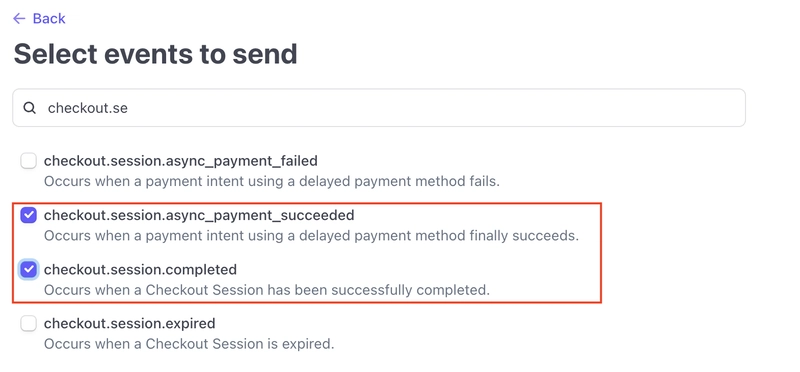
然后点击“选择事件”。
选择“checkout.session.async_payment_succeeded”和“checkout.session.completed”。
单击“添加事件”,然后单击“添加端点”。
点击创建的事件
点击“签名密钥”上的“显示”,
复制并打开.env,然后添加
PAYMENT_SIGNING_SECRET=key
将用户引导至结帐页面🚀
让我们首先安装 Stripe 和一些类型(因为我使用的是 typescript)
npm install stripe --save
npm install -D stripe-event-types
让我们创建一个新的 API 路由,根据价格为我们的用户创建结帐 URL 链接。
cd pages/api
touch prepare.tsx
以下是该文件的内容:
import type { NextApiRequest, NextApiResponse } from 'next'
const stripe = new Stripe(process.env.PAYMENT_SECRET_KEY!, {} as any);

export default async function handler(
    req: NextApiRequest,
    res: NextApiResponse
) {
    if (req.method !== 'GET') {
        return res.status(405).json({error: "Method not allowed"});
    }

    if (!req.query.price || +req.query.price <= 0) {
        return res.status(400).json({error: "Please enter a valid price"});
    }

    const { url } = await stripe.checkout.sessions.create({
    payment_method_types: ["card"],
      line_items: [
        {
        price_data: {
          currency: "USD",
          product_data: {
            name: "GrowChief",
            description: `Charging you`,
          },
          unit_amount: 100 * +req.query.price,
        },
        quantity: 1,
      },
    ],
    mode: "payment",
    success_url: "http://localhost:3000/success?session_id={CHECKOUT_SESSION_ID}",
    cancel_url: "http://localhost:3000",
  });

  return req.json({url});
}
以下是这里发生的事情:
- 我们使用文件中的 SECRET 密钥设置一个新的 Stripe 实例
.env。 - 我们确保
METHOD路线是GET. price我们检查是否获得了大于 0的查询字符串。- 我们调用 Stripe 来创建一个 Stripe 结账 URL。我们购买了 1 件商品;您可能看到金额
unit_amount乘以了 100。如果我们发送 1,则金额为 0.01 美元;乘以 100,则金额为 1 美元。 - 我们将它
URL发回给客户。
让我们打开我们的packages.component.tsx组件并添加 api 调用。
const purchase = useCallback(async (price: number) => {
   const {url} = await (await fetch(`http://localhost:3000/api/prepare?price=${price}`)).json();

   window.location.href = url;
}, []);
以及页面的完整代码
export const PackagesComponent = () => {
  const purchase = useCallback(async (price: number) => {
     const {url} = await (await fetch(`http://localhost:3000/api/prepare?price=${price}`)).json();

     window.location.href = url;
  }, []);

  return (
    <div className="mt-28">
      <h1 className="text-center text-6xl max-sm:text-5xl font-bold">
        Packages
      </h1>
      <div className="flex sm:space-x-4 max-sm:space-y-4 max-sm:flex-col">
        <div className="flex-1 text-xl mt-14 rounded-xl border border-[#4E67E5]/25 bg-[#080C23] p-10 w-full">
          <div className="text-[#4d66e5]">Package one</div>
          <div className="text-6xl my-5 font-light">$600</div>
          <div>
            Short description
          </div>
          <button onClick={() => purchase(600)}
            className="my-5 w-full text-black p-5 max-sm:p-2 rounded-3xl bg-[#4E67E5] text-xl max-sm:text-lg hover:bg-[#8a9dfc] transition-all"
          >
            Purchase
          </button>
          <ul>
            <li>First feature</li>
            <li>Second feature</li>
          </ul>
        </div>
        <div
          className="flex-1 text-xl mt-14 rounded-xl border border-[#9966FF]/25 bg-[#120d1d] p-10 w-full"
        >
          <div className="text-[#9967FF]">Package 2</div>
          <div className="text-6xl my-5 font-light">$1500</div>
          <div>
            Short Description
          </div>
          <button onClick={() => purchase(1200)}
            className="my-5 w-full text-black p-5 max-sm:p-2 rounded-3xl bg-[#9966FF] text-xl max-sm:text-lg hover:bg-[#BB99FF] transition-all"
          >
            Purchase
          </button>
          <ul>
            <li>First Feature</li>
            <li>Second Feature</li>
            <li>Thired Feature</li>
          </ul>
        </div>
        <div
          className="flex-1 text-xl mt-14 rounded-xl border border-[#F7E16F]/25 bg-[#19170d] p-10 w-full"
        >
          <div className="text-[#F7E16F]">Package 3</div>
          <div className="text-6xl my-5 font-light">$1800</div>
          <div>
            Short Description
          </div>
          <button onClick={() => purchase(1800)}
            className="my-5 w-full text-black p-5 max-sm:p-2 rounded-3xl bg-[#F7E16F] text-xl max-sm:text-lg hover:bg-[#fdf2bb] transition-all"
          >
            Purchase
          </button>
          <ul>
            <li>First Feature</li>
            <li>Second Feature</li>
            <li>Thired Feature</li>
            <li>Fourth Feature</li>
            <li>Fifth Feature</li>
          </ul>
        </div>
      </div>
    </div>
  );
};
onClick我们在页面的每个按钮上添加了合适的价格来创建结帐页面。
这个主意让我大吃一惊🤯
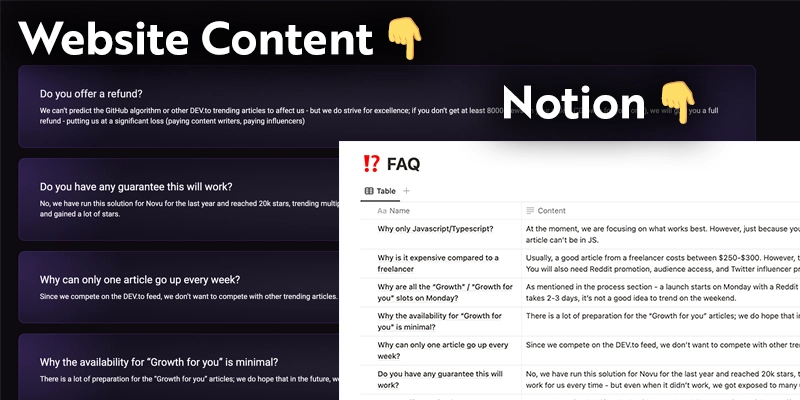
Notion 是一款出色的知识和文档工具。
我已经在Novu工作了一年多,并且主要在我们的团队中使用 Notion。
如果您曾经使用过 Notion,您可能已经注意到他们有一个流畅的编辑器 - 这是我玩过的最好的编辑器之一(至少对我来说)。
我意识到您可以将 NOTION CONTENT 与 API 一起使用。
我开设了一个免费帐户并出去查看他们的定价 - 我确信他们不会为他们的免费套餐提供 API;但我错了,他们确实提供了,而且速度非常快。
它们最大的限制是每秒最多允许你发出 3 个请求 - 但如果你缓存了你的网站,那么这不是什么大问题 - 又名getStaticProps.
处理购买请求并将潜在客户添加到 Notion 🙋🏻♂️
还记得我们为 Stripe 设置了一个 webhook,以便在付款完成后向我们发送请求吗?
让我们构建这个请求,验证它,并将客户添加到 Notion。
由于该请求不是用户旅程的一部分并且位于不同的路线上,因此它会向公众公开。
这意味着我们必须保护这条路线——Stripe 提供了一种使用 Express 验证它的好方法,但由于我们使用的是 NextJS,所以我们需要对其进行一些修改,所以让我们从安装 Micro 开始。
npm install micro@^10.0.1
并开辟新的购买途径:
cd pages
touch purchase.tsx
打开它并添加以下代码:
/// <reference types="stripe-event-types" />

import Stripe from "stripe";
import { buffer } from "micro";
import type { NextApiRequest, NextApiResponse } from "next";

const stripe = new Stripe(process.env.PAYMENT_SECRET_KEY!, {} as any);

export const config = { api: { bodyParser: false } };

export default async function handler(
  req: NextApiRequest,
  res: NextApiResponse
) {
    const signature = req.headers["stripe-signature"] as string;
    const reqBuffer = await buffer(req);
    const event = stripe.webhooks.constructEvent(
      reqBuffer,
      signature,
      process.env.PAYMENT_SIGNING_SECRET!
    ) as Stripe.DiscriminatedEvent;

    if (
      event.type !== "checkout.session.async_payment_succeeded" &&
      event.type !== "checkout.session.completed"
    ) {
      res.json({invalid: true});
      return;
    }

    if (event?.data?.object?.payment_status !== "paid") {
      res.json({invalid: true});
      return;
    }

    /// request is valid, let's add it to notion
}
这是验证请求的代码;让我们看看这里发生了什么:
- 我们首先导入类型(记住我们
stripe-event-types之前安装过)。 - 我们用我们的密钥设置了一个新的 Stripe 实例。
- 我们告诉路由不要将其解析为 JSON,因为 Stripe 以不同的格式向我们发送请求。
stripe-signature我们从标题中提取并使用该constructEvent函数来验证请求并告诉我们 Stripe 发送给我们的事件。- 我们检查是否收到了该事件
checkout.session.async_payment_succeeded;如果收到了其他事件,我们将忽略该请求。 - 如果我们成功了,但客户没有付款,我们也会忽略该请求。
- 我们有一个地方来写购买的逻辑。
在此部分之后,您可以添加自定义逻辑;它可以是以下任何一种:
- 将用户注册为新闻通讯
- 将用户注册到数据库
- 激活用户订阅
- 向用户发送包含课程 URL 的链接
还有更多。
对于我们的情况,我们将把用户添加到 Notion。
设置概念✍🏻
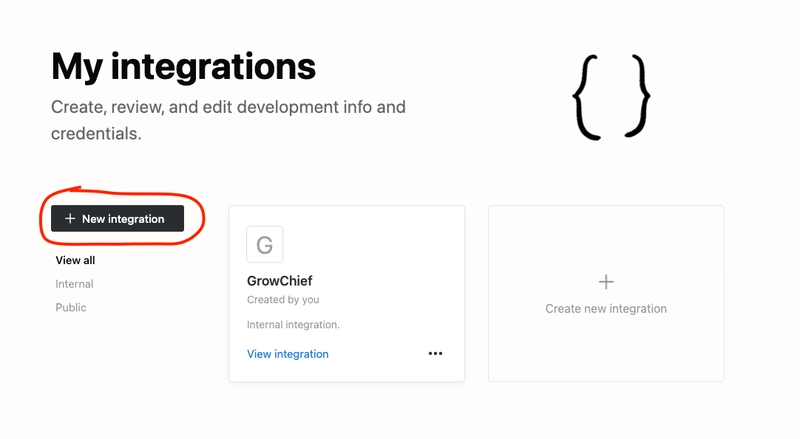
在使用 Notion 之前,让我们先创建一个新的 Notion 集成。
前往“我的集成”。https
://www.notion.so/my-integrations
然后点击“新建集成”
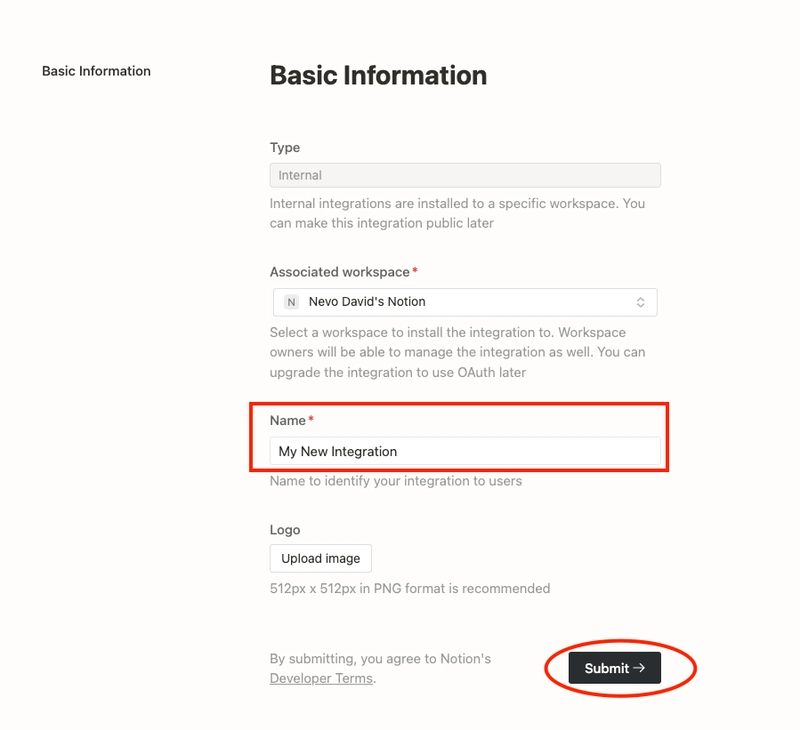
之后只需添加任意名称并单击“提交”
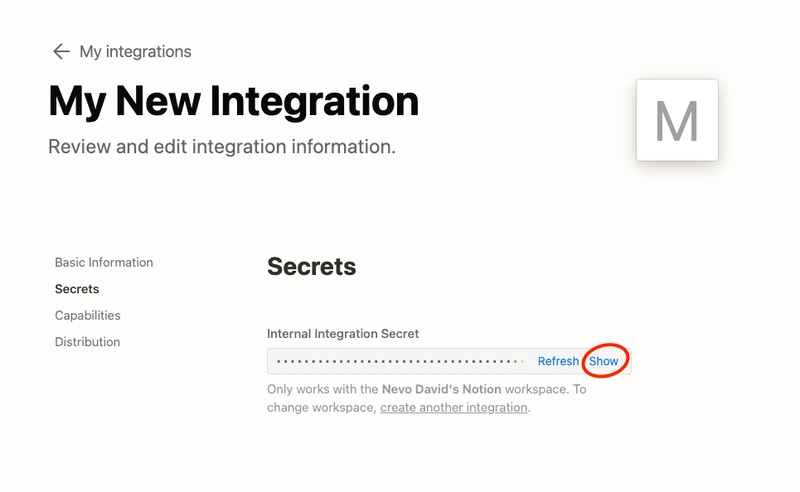
单击“显示”并复制密钥
转到你的 .env 文件并添加新密钥
NOTION_KEY=secret_...
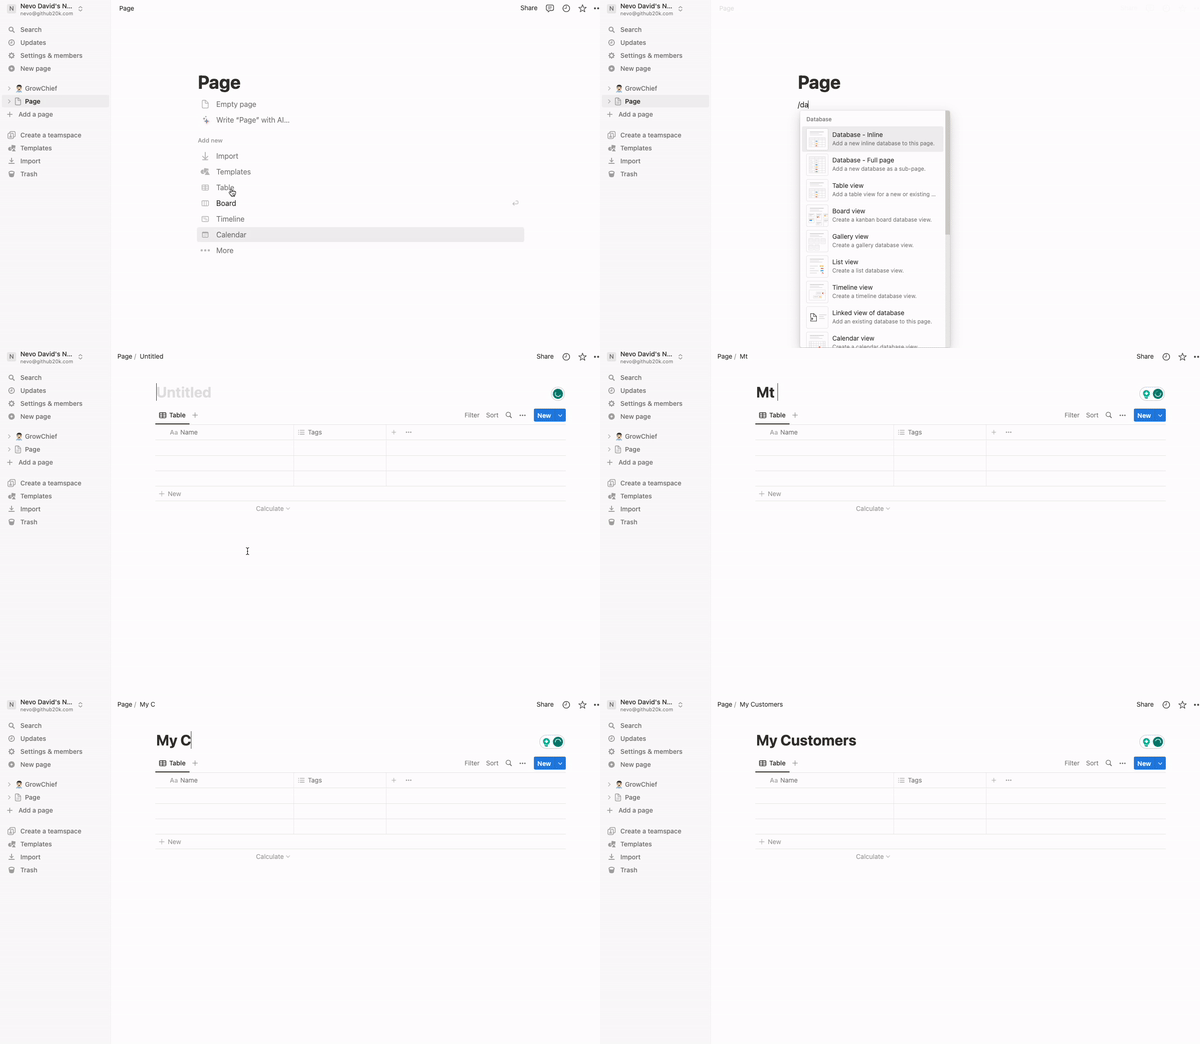
让我们转到概念并创建一个新的数据库
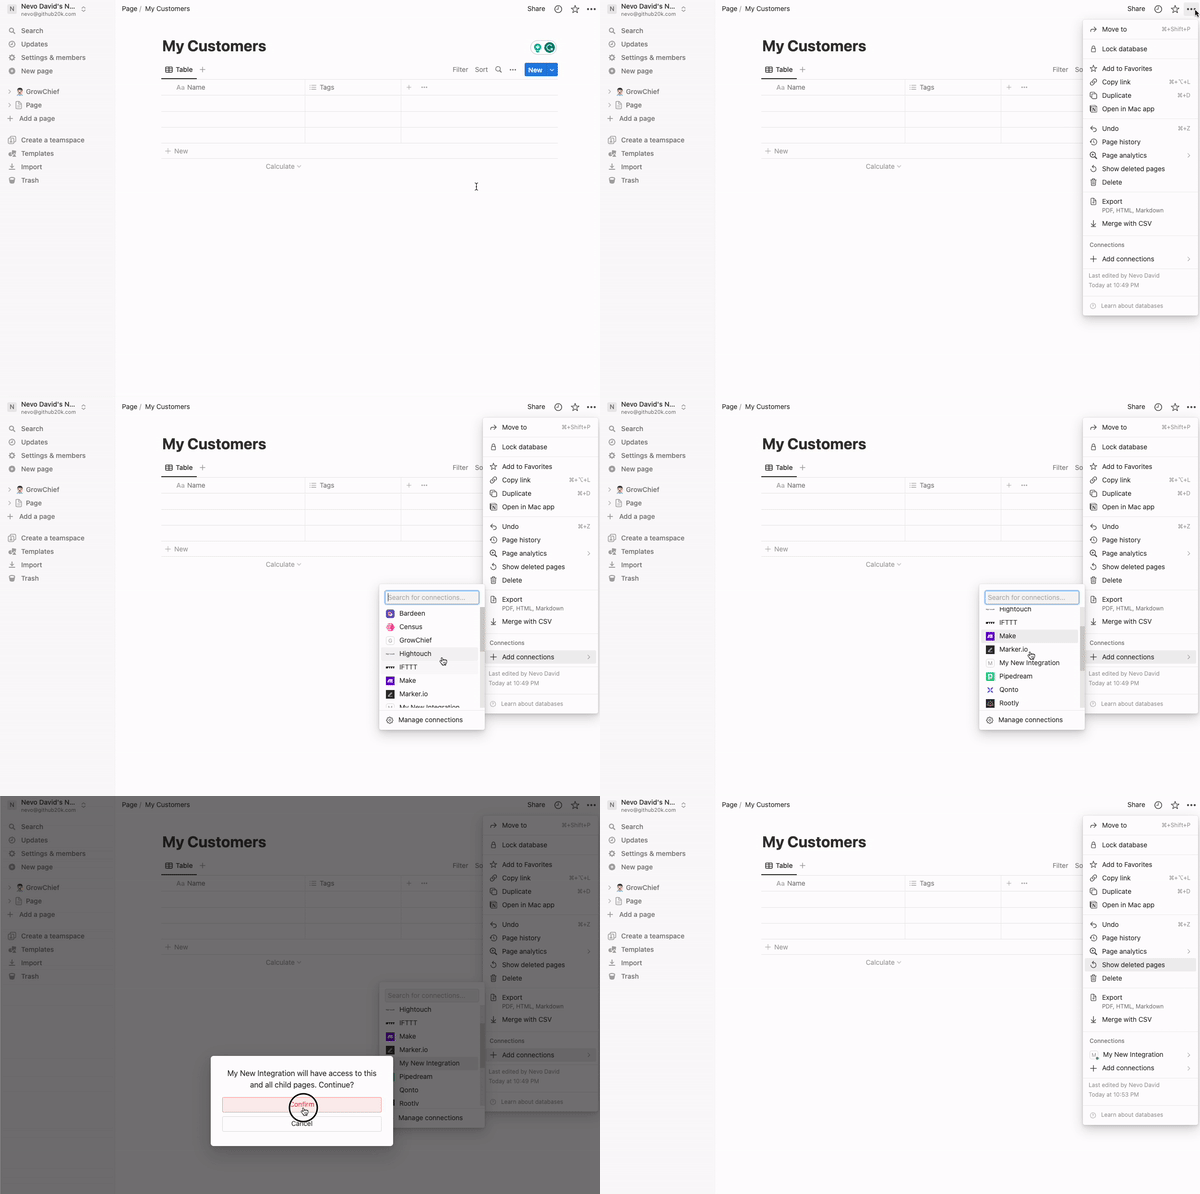
除非我们指定,否则该数据库不会暴露给 API,因此请单击“...”,然后单击“添加连接”并单击新创建的集成。
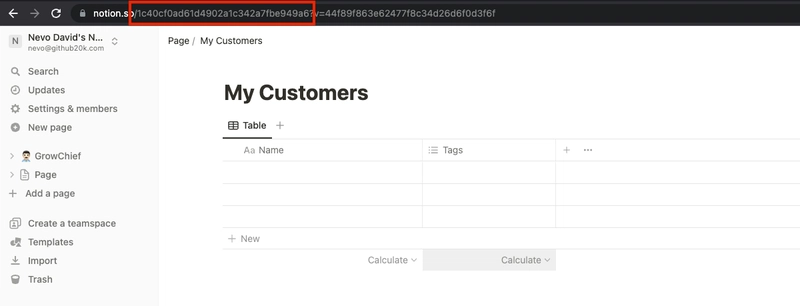
完成后,复制数据库的 ID 并将其添加到您的.env文件中。
NOTION_CUSTOMERS_DB=your_id
现在您可以按照自己想要的方式操作数据库中的字段。
我将坚持使用“姓名”字段并添加来自 Stripe 购买的客户姓名。
让我们通过运行来安装 Notion 客户端
npm install @notionhq/client --save
让我们编写逻辑将客户的姓名添加到我们的数据库中。
import { Client } from "@notionhq/client";

const notion = new Client({
  auth: process.env.NOTION_KEY,
});

await notion.pages.create({
   parent: {
      database_id: process.env.NOTION_CUSTOMERS_DB!,
   },
   properties: {
      Name: {
         title: [
            {
               text: {
                  content: event?.data?.object?.customer_details?.name,
               },
            },
         ],
      },
   },
});
这段代码非常简单。
我们使用 Notion 密钥设置一个新的 Notion 实例,然后在数据库中创建一个包含潜在客户姓名的新行。
完整购买代码:
/// <reference types="stripe-event-types" />

import Stripe from "stripe";
import { buffer } from "micro";
import type { NextApiRequest, NextApiResponse } from "next";
import { Client } from "@notionhq/client";

const notion = new Client({
  auth: process.env.NOTION_KEY,
});

const stripe = new Stripe(process.env.PAYMENT_SECRET_KEY!, {} as any);

export const config = { api: { bodyParser: false } };

export default async function handler(
  req: NextApiRequest,
  res: NextApiResponse
) {
    const signature = req.headers["stripe-signature"] as string;
    const reqBuffer = await buffer(req);
    const event = stripe.webhooks.constructEvent(
      reqBuffer,
      signature,
      process.env.PAYMENT_SIGNING_SECRET!
    ) as Stripe.DiscriminatedEvent;

    if (
      event.type !== "checkout.session.async_payment_succeeded" &&
      event.type !== "checkout.session.completed"
    ) {
      res.json({invalid: true});
      return;
    }

    if (event?.data?.object?.payment_status !== "paid") {
      res.json({invalid: true});
      return;
    }

    await notion.pages.create({
        parent: {
          database_id: process.env.NOTION_CUSTOMERS_DB!,
        },
        properties: {
          Name: {
            title: [
              {
                text: {
                  content: event?.data?.object?.customer_details?.name,
                },
              },
            ],
          },
        },
      });

    res.json({success: true});
  }
你应该有类似这样的内容:
你成功了🚀
就这样。
你可以在这里找到完整的源代码:
https://github.com/github-20k/growchief
你会在那里找到更多的东西,例如
- 显示 DEV.TO 分析
- 从 Notion 收集信息并将其显示在网站上(CMS 风格)
- 整个购买流程
你能帮我吗?❤️
我希望本教程对你有所帮助🚀
你给我的任何星星都会对我有很大帮助
https://github.com/github-20k/growchief
 后端开发教程 - Java、Spring Boot 实战 - msg200.com


