使用 Socket.io 和 React 构建类似 Notion 的系统
这篇文章是关于什么的?
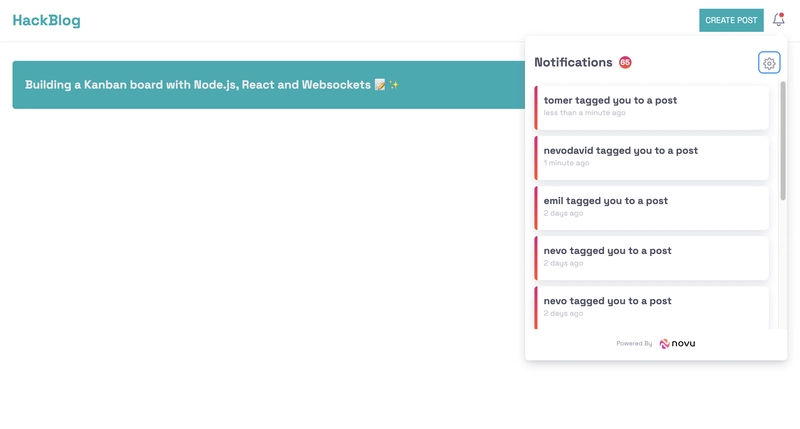
我们将构建一个类似 Click-Up 和 Notion 的知识系统。您将能够添加帖子、发表评论、标记其他用户并将其显示在他们的通知中。
在 Notion 中,用户可以实时查看其他用户的活动,而无需刷新页面。这就是我们将使用 Socket.io 的原因。下一篇文章我将介绍 SSE(服务器发送事件)。
什么是 WebSocket?
WebSocket 是一个内置的 Node.js 模块,它使我们能够在客户端和服务器之间建立实时连接,从而允许它们双向发送数据。然而,WebSocket 是底层的,不提供构建复杂的实时应用程序所需的功能;这就是 Socket.io 存在的原因。
Socket.io 是一个流行的 JavaScript 库,它允许我们在软件应用程序和 Node.js 服务器之间创建实时双向通信。它经过优化,能够以最小的延迟处理大量数据,并提供更强大的功能,例如回退到 HTTP 长轮询或自动重新连接。
Novu——第一个开源通知基础设施
简单介绍一下我们。Novu 是第一个开源通知基础设施。我们主要负责管理所有产品通知。通知可以是应用内通知(类似于开发者社区的Websockets中的铃铛图标)、电子邮件、短信等等。
如果您能通过为该库加注星标来帮助我们,我将不胜感激🤩
https://github.com/novuhq/novu
如何使用 React 和 Socket.io 创建实时连接
在这里,我们将为 Notion 应用设置项目环境。您还将学习如何将 Socket.io 添加到 React 和 Node.js 应用程序中,以及如何通过Socket.io连接两个开发服务器进行实时通信。
创建包含两个名为客户端和服务器的子文件夹的项目文件夹。
mkdir notion-platform
cd notion-platform
mkdir client server
通过终端导航到客户端文件夹并创建一个新的 React.js 项目。
cd client
npx create-react-app ./
安装 Socket.io 客户端 API 和 React Router。React Router是一个 JavaScript 库,它使我们能够在 React 应用程序中的页面之间导航。
npm install socket.io-client react-router-dom
从 React 应用中删除多余的文件(例如徽标和测试文件),并更新 App.js 文件以显示如下所示的 Hello World。
function App() {
    return (
        <div>
            <p>Hello World!</p>
        </div>
    );
}
export default App;
将 Socket.io 客户端 API 添加到 React 应用程序,如下所示:
import { io } from "socket.io-client";

//👇🏻 http://localhost:4000 is where the server host URL.
const socket = io.connect("http://localhost:4000");

function App() {
    return (
        <div>
            <p>Hello World!</p>
        </div>
    );
}
export default App;
导航到服务器文件夹并创建一个 package.json 文件。
cd server & npm init -y
安装 Express.js、CORS、Nodemon 和 Socket.io 服务器 API。
npm install express cors nodemon socket.io
Express.js 是一个快速、简约的框架,它提供了多种用于在 Node.js 中构建 Web 应用程序的功能。CORS 是一个 Node.js包 ,允许不同域之间进行通信。
Nodemon 是一个 Node.js 工具,它在检测到文件更改后会自动重启服务器,而 Socket.io 允许我们在服务器上配置实时连接。
创建一个 index.js 文件 - Web 服务器的入口点。
touch index.js
使用 Express.js 设置 Node.js 服务器。当您 http://localhost:4000/api 在浏览器中访问时,下面的代码片段会返回一个 JSON 对象。
//👇🏻index.js
const express = require("express");
const app = express();
const PORT = 4000;

app.use(express.urlencoded({ extended: true }));
app.use(express.json());

app.get("/api", (req, res) => {
    res.json({
        message: "Hello world",
    });
});

app.listen(PORT, () => {
    console.log(`Server listening on ${PORT}`);
});
导入 HTTP 和 CORS 库以允许客户端和服务器域之间进行数据传输。
const express = require("express");
const app = express();
const PORT = 4000;

//👇🏻 New imports
const http = require("http").Server(app);
const cors = require("cors");

app.use(express.urlencoded({ extended: true }));
app.use(express.json());
app.use(cors());

app.get("/api", (req, res) => {
    res.json({
        message: "Hello world",
    });
});

http.listen(PORT, () => {
    console.log(`Server listening on ${PORT}`);
});
接下来,将 Socket.io 添加到项目中,以创建实时连接。在 app.get() 代码块之前,复制以下代码。
//👇🏻 New imports
.....
const socketIO = require('socket.io')(http, {
    cors: {
        origin: "http://localhost:3000"
    }
});

//👇🏻 Add this before the app.get() block
socketIO.on('connection', (socket) => {
    console.log(`⚡: ${socket.id} user just connected!`);

    socket.on('disconnect', () => {
      socket.disconnect()
      console.log('🔥: A user disconnected');
    });
});
从上面的代码片段中,该 socket.io("connection") 函数与 React 应用程序建立连接,然后为每个套接字创建一个唯一的 ID,并在用户访问网页时将该 ID 记录到控制台。
当您刷新或关闭网页时,套接字会触发断开事件,表明用户已与套接字断开连接。
通过将启动命令添加到 package.json 文件中的脚本列表中来配置 Nodemon。下面的代码片段使用 Nodemon 启动服务器。
//👇🏻 In server/package.json"
"scripts": {
    "test": "echo \"Error: no test specified\" && exit 1",
    "start": "nodemon index.js"
}
您现在可以使用以下命令通过 Nodemon 运行服务器。
npm start
构建用户界面
在这里,我们将为概念应用程序创建用户界面,以使用户能够登录、撰写帖子、添加评论和标记其他用户。
导航到client/src文件夹并创建一个包含Login.js、、和文件的组件文件夹Home.js。CreatePost.jsNotionPost.js
cd client
mkdir components
cd components
touch Login.js Home.js CreatePost.js NotionPost.js
更新 App.js 文件以通过 React Router 在不同的路由上呈现新创建的组件,如下所示:
import { BrowserRouter, Routes, Route } from "react-router-dom";
import NotionPost from "./components/NotionPost";
import CreatePost from "./components/CreatePost";
import Home from "./components/Home";
import Login from "./components/Login";
import { io } from "socket.io-client";

const socket = io.connect("http://localhost:4000");

function App() {
    return (
        <BrowserRouter>
            <Routes>
                <Route path='/' element={<Login socket={socket} />} />
                <Route path='/dashboard' element={<Home socket={socket} />} />
                <Route path='/post/create' element={<CreatePost socket={socket} />} />
                <Route path='/post/:id' element={<NotionPost socket={socket} />} />
            </Routes>
        </BrowserRouter>
    );
}

export default App;
导航到 src/index.css 文件并复制以下代码。它包含设计此项目所需的所有 CSS。
@import url("https://fonts.googleapis.com/css2?family=Space+Grotesk:wght@300;400;500;600;700&display=swap");
* {
    box-sizing: border-box;
    padding: 0;
    margin: 0;
    font-family: "Space Grotesk", sans-serif;
}
body {
    padding: 0;
}
.login {
    width: 100%;
    min-height: 100vh;
    display: flex;
    flex-direction: column;
    align-items: center;
    justify-content: center;
}
.login > h2 {
    color: #00abb3;
    margin-bottom: 30px;
}
.loginForm {
    width: 70%;
    display: flex;
    flex-direction: column;
}
.loginForm > input {
    margin: 10px 0;
    padding: 10px 15px;
}
.home__navbar {
    width: 100%;
    height: 10vh;
    padding: 20px;
    display: flex;
    align-items: center;
    justify-content: space-between;
    border-bottom: 1px solid #eaeaea;
}
.home__navbar > h2 {
    color: #00abb3;
}
.home__buttons {
    display: flex;
    align-items: center;
    justify-content: baseline;
}
.home__createBtn {
    padding: 10px;
    cursor: pointer;
    margin-right: 10px;
    background-color: #00abb3;
    border: none;
    outline: none;
    color: #fff;
}
.home__createBtn:hover,
.createForm__button:hover {
    background-color: #02595e;
}
.home__notifyBtn {
    padding: 10px;
    cursor: pointer;
    color: #00abb3;
    background-color: #fff;
    border: 1px solid #3c4048;
    outline: none;
    width: 100px;
}
.posts__container {
    width: 100%;
    min-height: 90vh;
    padding: 30px 20px;
}
.post {
    width: 100%;
    min-height: 8vh;
    background-color: #00abb3;
    border-radius: 5px;
    padding: 20px;
    display: flex;
    color: #eaeaea;
    align-items: center;
    justify-content: space-between;
    margin-bottom: 15px;
}
.post__cta {
    padding: 10px;
    background-color: #fff;
    cursor: pointer;
    outline: none;
    border: none;
    border-radius: 2px;
}
.createPost {
    min-height: 100vh;
    width: 100%;
    padding: 30px 20px;
}
.createPost > h2 {
    text-align: center;
    color: #00abb3;
}
.createForm {
    width: 100%;
    min-height: 80vh;
    padding: 20px;
    display: flex;
    flex-direction: column;
}
.createForm__title {
    padding: 10px;
    height: 45px;
    margin-bottom: 10px;
    text-transform: capitalize;
    border: 1px solid #3c4048;
}
.createForm__content {
    padding: 15px;
    margin-bottom: 15px;
    border: 1px solid #3c4048;
}
.createForm__button {
    width: 200px;
    padding: 10px;
    height: 45px;
    background-color: #00abb3;
    color: #fff;
    outline: none;
    border: none;
    cursor: pointer;
    border-radius: 5px;
}
.notionPost {
    width: 100%;
    min-height: 100vh;
    background-color: #eaeaea;
    display: flex;
    flex-direction: column;
    padding: 30px 50px;
}
.notionPost__container {
    width: 90%;
    min-height: 70vh;
    margin-bottom: 30px;
}
.notionPost__author {
    color: #00abb3;
}
.notionPost__date {
    opacity: 0.4;
    font-size: 12px;
}
.notionPost__content {
    padding-top: 30px;
    line-height: 200%;
}
.comments__container {
    min-height: 70vh;
    border: 1px solid #3c4048;
    padding: 30px;
    box-shadow: 0 0 0 1px rgba(0, 0, 0, 0.05), 2px 2px 3px 1px rgba(208, 213, 219, 0.28);
    border-radius: 3px;
}
.comments__inputContainer {
    display: flex;
    align-items: center;
    margin: 30px 0;
}
.comments__input {
    width: 50%;
    padding: 15px;
    margin-right: 15px;
}
.comments__cta,
.login__cta {
    padding: 15px;
    width: 200px;
    cursor: pointer;
    outline: none;
    border: none;
    background-color: #00abb3;
    color: #fff;
}
.comment {
    margin-bottom: 15px;
}
登录页面
在这里,应用程序接受用户名并将其保存在本地存储中以进行用户识别。将以下代码复制到登录组件中。
import React, { useState } from "react";
import { useNavigate } from "react-router-dom";

const Login = () => {
    const [username, setUsername] = useState("");
    const navigate = useNavigate();

    const handleLogin = (e) => {
        e.preventDefault();
        //The username 👉🏻 console.log({ username });
        localStorage.setItem("username", username);
        navigate("/dashboard");
    };
    return (
        <div className='login'>
            <h2>Sign in to HackNotion</h2>
            <form className='loginForm' onSubmit={handleLogin}>
                <label htmlFor='username'>Enter your username</label>
                <input
                    name='username'
                    id='username'
                    type='text'
                    value={username}
                    required
                    onChange={(e) => setUsername(e.target.value)}
                />
                <button className='login__cta'>LOG IN</button>
            </form>
        </div>
    );
};

export default Login;
主页
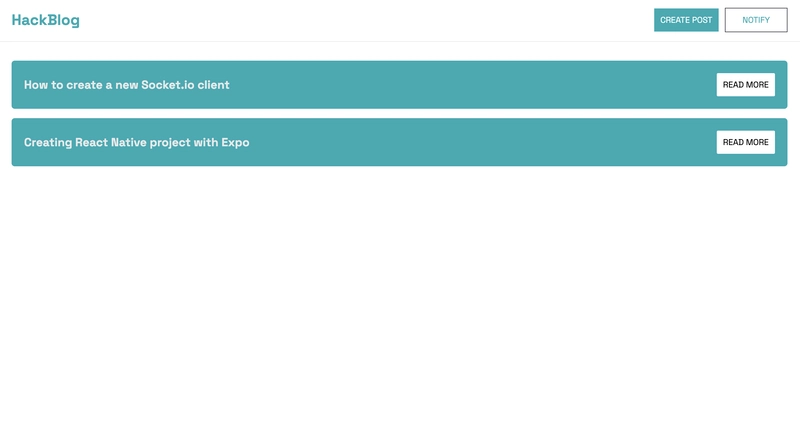
将以下代码复制到 Home.js 文件中。它代表应用程序的主布局。
import React from "react";
import { useNavigate } from "react-router-dom";

const Home = () => {
    const navigate = useNavigate();

    const createPostBtn = () => navigate("/post/create");
    const readMoreBtn = () => navigate("/post/:id");

    return (
        <div className='home'>
            <nav className='home__navbar'>
                <h2>HackNotion</h2>
                <div className='home__buttons'>
                    <button className='home__createBtn' onClick={createPostBtn}>
                        CREATE POST
                    </button>
                    <button className='home__notifyBtn'>NOTIFY</button>
                </div>
            </nav>

            <div className='posts__container'>
                <div className='post'>
                    <h3>How to create a new Socket.io client</h3>
                    <button className='post__cta' onClick={readMoreBtn}>
                        READ MORE
                    </button>
                </div>

                <div className='post'>
                    <h3>Creating React Native project with Expo</h3>
                    <button className='post__cta' onClick={readMoreBtn}>
                        READ MORE
                    </button>
                </div>
            </div>
        </div>
    );
};

export default Home;
NotionPost 页面
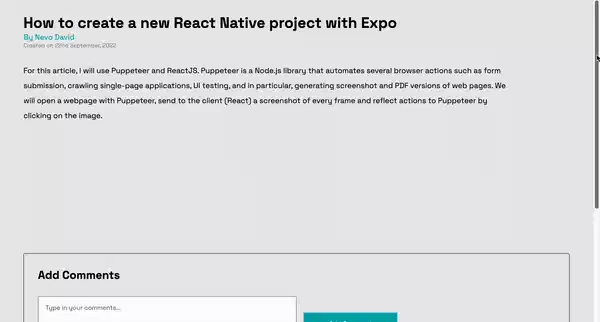
此页面是动态的,通过传入 URL 的 ID 显示每篇帖子的内容。用户可以在这里阅读帖子并添加评论。
将以下代码复制到NotionPost.js文件中:
import React, { useState } from "react";

const NotionPost = () => {
    const [comment, setComment] = useState("");

    const handleAddComment = (e) => {
        e.preventDefault();
        console.log({ comment });
        setComment("");
    };

    return (
        <div className='notionPost'>
            <div className='notionPost__container'>
                <h1>How to create a new React Native project with Expo</h1>
                <div className='notionPost__meta'>
                    <p className='notionPost__author'>By Nevo David</p>
                    <p className='notionPost__date'>Created on 22nd September, 2022</p>
                </div>

                <div className='notionPost__content'>
                    For this article, I will use Puppeteer and ReactJS. Puppeteer is a
                    Node.js library that automates several browser actions such as form
                    submission.
                </div>
            </div>

            <div className='comments__container'>
                <h2>Add Comments</h2>
                <form className='comments__inputContainer' onSubmit={handleAddComment}>
                    <textarea
                        placeholder='Type in your comments...'
                        rows={5}
                        className='comments__input'
                        value={comment}
                        required
                        onChange={(e) => setComment(e.target.value)}
                    />
                    <button className='comments__cta'>Add Comment</button>
                </form>

                <div>
                    <p className='comment'>
                        <span style={{ fontWeight: "bold" }}>Scopsy Dima</span> - Nice post
                        fam!❤️
                    </p>
                </div>
            </div>
        </div>
    );
};

export default NotionPost;
创建帖子页面
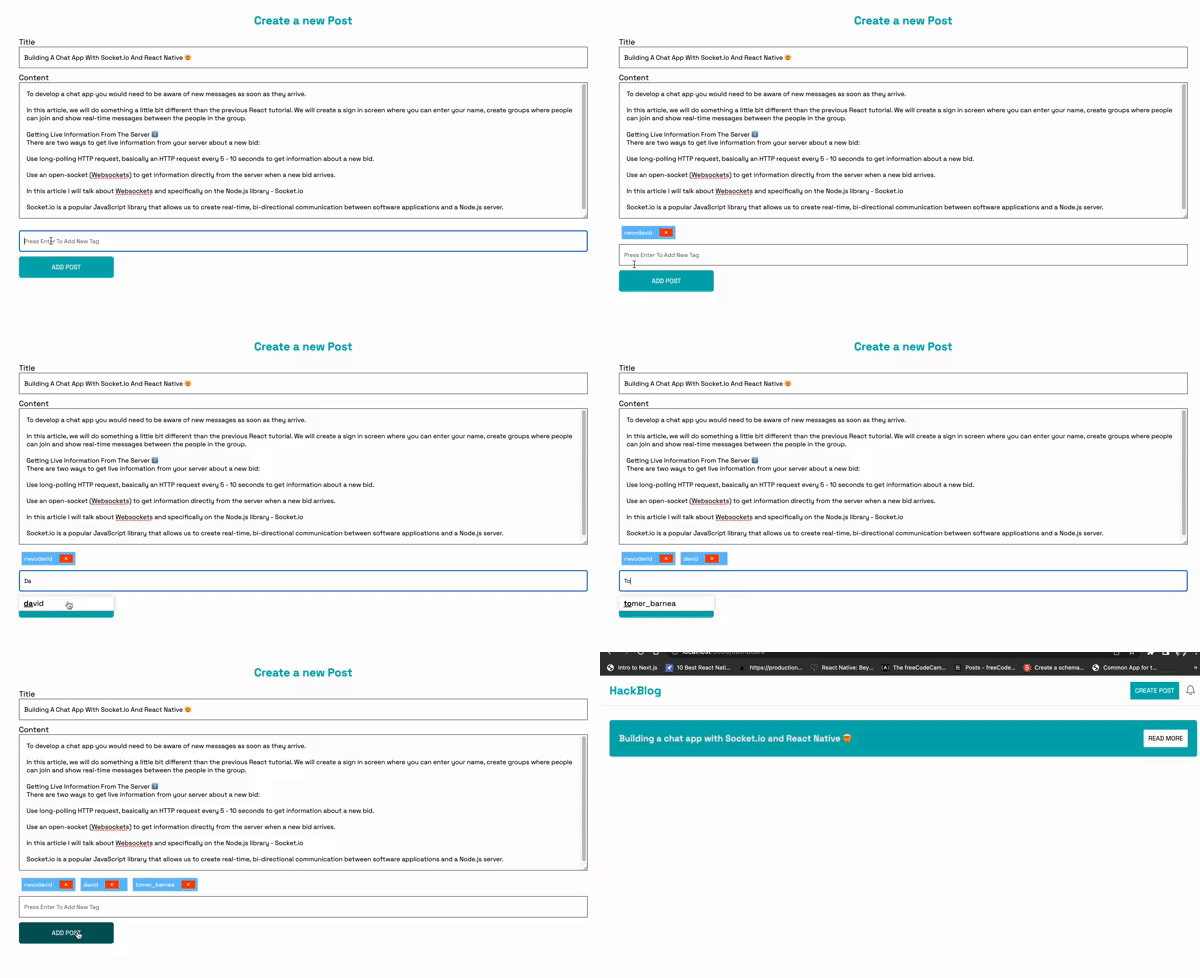
在这里,我们将创建一个简单的布局,允许用户通过添加标题和内容来创建帖子。用户还可以使用 React Tag标记其他用户。
React Tag 是一个库,允许我们通过单个组件轻松创建标签。它提供了许多功能,例如基于建议列表的自动完成、使用拖放重新排序等等。*
将下面的代码复制到CreatePost.js文件中。
import React, { useState } from "react";
import { useNavigate } from "react-router-dom";

const CreatePost = () => {
    const navigate = useNavigate();

    const [postTitle, setPostTitle] = useState("");
    const [postContent, setPostContent] = useState("");

    //...gets the publish date for the post
    const currentDate = () => {
        const d = new Date();
        return `${d.getDate()}-${d.getMonth() + 1}-${d.getFullYear()}`;
    };

    //...logs the post details to the console
    const addPost = (e) => {
        e.preventDefault();
        console.log({
            postTitle,
            postContent,
            username: localStorage.getItem("username"),
            timestamp: currentDate(),
        });
        navigate("/dashboard");
    };

    return (
        <>
            <div className='createPost'>
                <h2>Create a new Post</h2>
                <form className='createForm' onSubmit={addPost}>
                    <label htmlFor='title'> Title</label>
                    <input
                        type='text'
                        required
                        value={postTitle}
                        onChange={(e) => setPostTitle(e.target.value)}
                        className='createForm__title'
                    />

                    <label htmlFor='title'> Content</label>
                    <textarea
                        required
                        rows={15}
                        value={postContent}
                        onChange={(e) => setPostContent(e.target.value)}
                        className='createForm__content'
                    />

                    <button className='createForm__button'>ADD POST</button>
                </form>
            </div>
        </>
    );
};

export default CreatePost;
将 React Tags 导入到 CreatePost.js 文件中:
import { WithContext as ReactTags } from "react-tag-input";
更新 CreatePost 组件以包含下面的代码片段,用于使用 React Tags 创建标签。
//👇🏻 The suggestion list for autocomplete
const suggestions = ["Tomer", "David", "Nevo"].map((name) => {
    return {
        id: name,
        text: name,
    };
});

const KeyCodes = {
    comma: 188,
    enter: 13,
};
//👇🏻 The comma and enter keys are used to separate each tags
const delimiters = [KeyCodes.comma, KeyCodes.enter];

//...The React component
const CreatePost = () => {
    //👇🏻 An array containing the tags
    const [tags, setTags] = useState([]);

    //...deleting tags
    const handleDelete = (i) => {
        setTags(tags.filter((tag, index) => index !== i));
    };

    //...adding new tags
    const handleAddition = (tag) => {
        setTags([...tags, tag]);
    };

    //...runs when you click on a tag
    const handleTagClick = (index) => {
        console.log("The tag at index " + index + " was clicked");
    };

    return (
        <div className='createPost'>
            <form>
                {/**...below the input fields---*/}
                <ReactTags
                    tags={tags}
                    suggestions={suggestions}
                    delimiters={delimiters}
                    handleDelete={handleDelete}
                    handleAddition={handleAddition}
                    handleTagClick={handleTagClick}
                    inputFieldPosition='bottom'
                    autocomplete
                />
                <button className='createForm__button'>ADD POST</button>
            </form>
        </div>
    );
};

export default CreatePost;
React Tags 还允许我们自定义其元素。将以下代码添加到src/index.css文件:
/*
You can learn how it's styled here:
https://stackblitz.com/edit/react-tag-input-1nelrc
*/
.ReactTags__tags react-tags-wrapper,
.ReactTags__tagInput {
    width: 100%;
}
.ReactTags__selected span.ReactTags__tag {
    border: 1px solid #ddd;
    background: #00abb3;
    color: white;
    font-size: 12px;
    display: inline-block;
    padding: 5px;
    margin: 0 5px;
    border-radius: 2px;
    min-width: 100px;
}

.ReactTags__selected button.ReactTags__remove {
    color: #fff;
    margin-left: 15px;
    cursor: pointer;
    background-color: orangered;
    padding: 0 10px;
    border: none;
    outline: none;
}

.ReactTags__tagInput input.ReactTags__tagInputField,
.ReactTags__tagInput input.ReactTags__tagInputField:focus {
    margin: 10px 0;
    font-size: 12px;
    width: 100%;
    padding: 10px;
    height: 45px;
    text-transform: capitalize;
    border: 1px solid #3c4048;
}

.ReactTags__selected span.ReactTags__tag {
    border: 1px solid #ddd;
    background: #63bcfd;
    color: white;
    font-size: 12px;
    display: inline-block;
    padding: 5px;
    margin: 0 5px;
    border-radius: 2px;
}
.ReactTags__selected a.ReactTags__remove {
    color: #aaa;
    margin-left: 5px;
    cursor: pointer;
}

/* Styles for suggestions */
.ReactTags__suggestions {
    position: absolute;
}
.ReactTags__suggestions ul {
    list-style-type: none;
    box-shadow: 0.05em 0.01em 0.5em rgba(0, 0, 0, 0.2);
    background: white;
    width: 200px;
}
.ReactTags__suggestions li {
    border-bottom: 1px solid #ddd;
    padding: 5px 10px;
    margin: 0;
}
.ReactTags__suggestions li mark {
    text-decoration: underline;
    background: none;
    font-weight: 600;
}
.ReactTags__suggestions ul li.ReactTags__activeSuggestion {
    background: #fff;
    cursor: pointer;
}

.ReactTags__remove {
    border: none;
    cursor: pointer;
    background: none;
    color: white;
}
恭喜!我们已经完成了 Notion 应用程序的布局。接下来,让我们学习如何使用 Socket.io Node.js 服务器添加所有必要的功能。
使用 Socket.io 创建新帖子
在本节中,我将指导您如何使用 Socket.io 创建新帖子并在 React 应用程序上显示它们。
通过 Socket.io 将新创建的帖子发送到服务器来更新组件addPost内的功能。CreatePost
//👇🏻 Socket.io was passed from the App.js file
const CreatePost = ({ socket }) => {
    //...other functions

    const addPost = (e) => {
        e.preventDefault();

        //👇🏻 sends all the post details to the server
        socket.emit("createPost", {
            postTitle,
            postContent,
            username: localStorage.getItem("username"),
            timestamp: currentDate(),
            tags,
        });
        navigate("/dashboard");
    };

    return <div className='createPost'>...</div>;
};
在服务器上创建该事件的监听器。
socketIO.on("connection", (socket) => {
    console.log(`⚡: ${socket.id} user just connected!`);

    socket.on("createPost", (data) => {
        /*👇🏻 data - contains all the post details
             from the React app
        */
        console.log(data);
    });

    socket.on("disconnect", () => {
        socket.disconnect();
        console.log("🔥: A user disconnected");
    });
});
在后端服务器上创建一个包含所有帖子的数组,并将新帖子添加到列表中。
//👇🏻 generates a random ID
const fetchID = () => Math.random().toString(36).substring(2, 10);

let notionPosts = [];

socket.on("createPost", (data) => {
    const { postTitle, postContent, username, timestamp, tags } = data;
    notionPosts.unshift({
        id: fetchID(),
        title: postTitle,
        author: username,
        createdAt: timestamp,
        content: postContent,
        comments: [],
    });
    //👉🏻 We'll use the tags later for sending notifications

    //👇🏻 The notionposts are sent back to the React app via another event
    socket.emit("updatePosts", notionPosts);
});
通过复制以下代码,通过 useEffect 钩子向 React 应用程序上的概念帖子添加一个监听器:
//👇🏻 Within Home.js file

useEffect(() => {
    socket.on("updatePosts", (posts) => console.log(posts));
}, [socket]);
显示帖子
将帖子保存为状态并按如下所示进行呈现:
import React, { useEffect, useState } from "react";
import { useNavigate } from "react-router-dom";

const Home = ({ socket }) => {
    const navigate = useNavigate();
    const [posts, setPosts] = useState([]);

    //👇🏻 Saves the posts into the "posts" state
    useEffect(() => {
        socket.on("updatePosts", (posts) => setPosts(posts));
    }, [socket]);

    const createPostBtn = () => navigate("/post/create");

    //👇🏻 Navigates to the NotionPost page to view
    //   all the post contents
    const readMoreBtn = (postID) => {
        navigate(`/post/${postID}`);
    };

    return (
        <div className='home'>
            <nav className='home__navbar'>
                <h2>HackNotion</h2>
                <div className='home__buttons'>
                    <button className='home__createBtn' onClick={createPostBtn}>
                        CREATE POST
                    </button>
                    <button className='home__notifyBtn'>NOTIFY</button>
                </div>
            </nav>

            <div className='posts__container'>
                {posts?.map((post) => (
                    <div className='post' key={post.id}>
                        <h3>{post.title}</h3>
                        <button className='post__cta' onClick={() => readMoreBtn(post.id)}>
                            READ MORE
                        </button>
                    </div>
                ))}
            </div>
        </div>
    );
};

export default Home;
到目前为止,我们只能在添加帖子时查看帖子。接下来,让我们能够在加载页面时显示帖子。
在服务器上创建返回概念帖子的路由。
app.get("/api", (req, res) => {
    res.json(notionPosts);
});
更新Home.js文件,获取概念帖子并监听来自服务器的新帖子。
useEffect(() => {
    function fetchPosts() {
        fetch("http://localhost:4000/api")
            .then((res) => res.json())
            .then((data) => setPosts(data))
            .catch((err) => console.error(err));
    }
    fetchPosts();
}, []);

useEffect(() => {
    socket.on("updatePosts", (posts) => setPosts(posts));
}, [socket]);
完成 Notion Post 组件
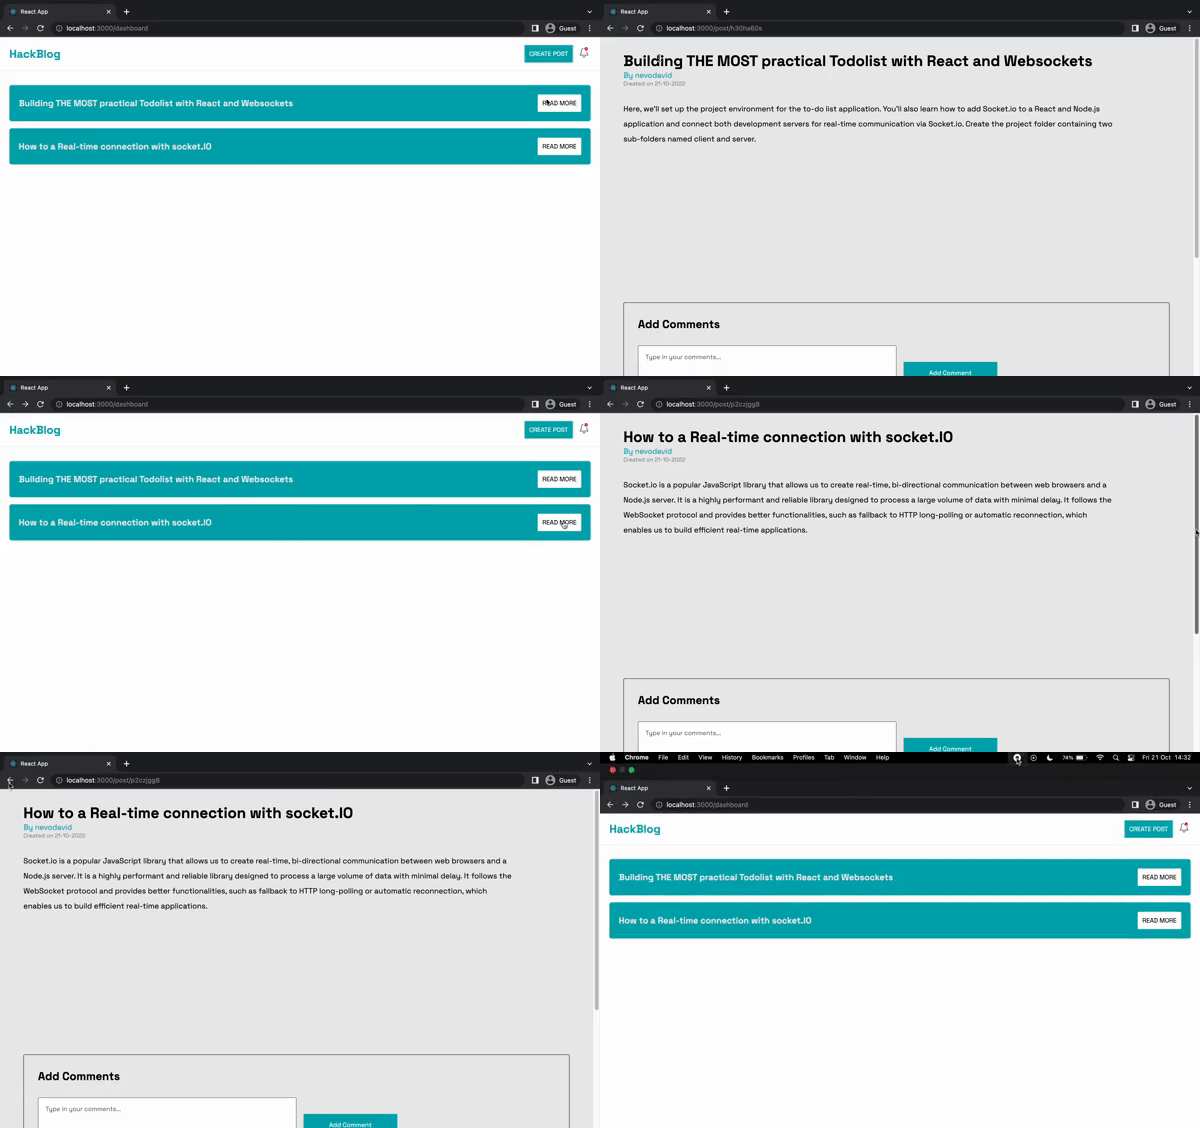
在上一节中,您学习了如何创建并向用户显示 Notion 帖子。在这里,您将学习如何在点击“阅读更多”按钮时显示每篇 Notion 帖子的内容。
更新 文件readMoreBtn 中的函数 Home.js 如下:
const readMoreBtn = (postID) => {
    socket.emit("findPost", postID);
//👇🏻 navigates to the Notionpost routenavigate(`/post/${postID}`);
};
上面的代码片段获取所选帖子的 ID,并在重定向到帖子路由之前将包含帖子 ID 的 Socket.io 事件发送到服务器。
创建一个 findPost 事件监听器并通过另一个 Socket.io 事件返回帖子详细信息。
socket.on("findPost", (postID) => {

  //👇🏻 Filter the notion post via the post ID
  let result = notionPosts.filter((post) => post.id === postID);

  //👇🏻 Returns a new event containing the post details
    socket.emit("postDetails", result[0]);
});
postDetails 使用 组件监听事件 NotionPost 并渲染帖子详情如下:
import React, { useState, useEffect } from "react";
import { useParams } from "react-router-dom";

const NotionPost = ({ socket }) => {
    //👇🏻 gets the Post ID from its URL
    const { id } = useParams();

    const [comment, setComment] = useState("");
    const [post, setPost] = useState({});

    //👇🏻loading state for async request
    const [loading, setLoading] = useState(true);

    //👇🏻 Gets the post details from the server for display
    useEffect(() => {
        socket.on("postDetails", (data) => {
            setPost(data);
            setLoading(false);
        });
    }, [socket]);

    //👇🏻 Function for creating new comments
    const handleAddComment = (e) => {
        e.preventDefault();
        console.log("newComment", {
            comment,
            user: localStorage.getItem("username"),
            postID: id,
        });
        setComment("");
    };

    if (loading) {
        return <h2>Loading... Please wait</h2>;
    }

    return (
        <div className='notionPost'>
            <div className='notionPost__container'>
                <h1>{post.title}</h1>
                <div className='notionPost__meta'>
                    <p className='notionPost__author'>By {post.author}</p>
                    <p className='notionPost__date'>Created on {post.createdAt}</p>
                </div>

                <div className='notionPost__content'>{post.content}</div>
            </div>

            <div className='comments__container'>
                <h2>Add Comments</h2>
                <form className='comments__inputContainer' onSubmit={handleAddComment}>
                    <textarea
                        placeholder='Type in your comments...'
                        rows={5}
                        className='comments__input'
                        value={comment}
                        required
                        onChange={(e) => setComment(e.target.value)}
                    />
                    <button className='comments__cta'>Add Comment</button>
                </form>

                <div>
                    <p className='comment'>
                        <span style={{ fontWeight: "bold" }}>Scopsy Dima</span> - Nice post
                        fam!❤️
                    </p>
                </div>
            </div>
        </div>
    );
};

export default NotionPost;
评论部分
在这里,我将指导您向每个概念帖子添加评论并实时显示它们。
更新 组件handleAddComment 内的功能 NotionPost ,将新的评论详情发送到服务器。
const handleAddComment = (e) => {
    e.preventDefault();
    socket.emit("newComment", {
        comment,
        user: localStorage.getItem("username"),
        postID: id,
    });
    setComment("");
};
创建一个监听器来监听服务器上的事件,将评论添加到评论列表中。
socket.on("newComment", (data) => {
    const { postID, user, comment } = data;

//👇🏻 filters the notion post via its ID
let result = notionPosts.filter((post) => post.id === postID);

//👇🏻 Adds the comment to the comments list
    result[0].comments.unshift({
        id: fetchID(),
        user,
        message: comment,
    });
//👇🏻 sends the updated details to the React app
    socket.emit("postDetails", result[0]);
});
更新 NotionPost.js 文件以显示任何现有评论。
return (
    <div className='notionPost'>
        <div className='notionPost__container'>
            <h1>{post.title}</h1>
            <div className='notionPost__meta'>
                <p className='notionPost__author'>By {post.author}</p>
                <p className='notionPost__date'>Created on {post.createdAt}</p>
            </div>

            <div className='notionPost__content'>{post.content}</div>
        </div>

        <div className='comments__container'>
            <h2>Add Comments</h2>
            <form className='comments__inputContainer' onSubmit={handleAddComment}>
                <textarea
                    placeholder='Type in your comments...'
                    rows={5}
                    className='comments__input'
                    value={comment}
                    required
                    onChange={(e) => setComment(e.target.value)}
                />
                <button className='comments__cta'>Add Comment</button>
            </form>

            {/** Displays existing comments to the user */}
            <div>
                {post.comments.map((item) => (
                    <p className='comment' key={item.id}>
                        <span style={{ fontWeight: "bold", marginRight: "15px" }}>
                            {item.user}
                        </span>
                        {item.message}
                    </p>
                ))}
            </div>
        </div>
    </div>
);
恭喜!🎊 您现在可以使用 Socket.io 创建帖子并添加评论了。在本教程的剩余部分,我将指导您如何使用 Novu 向帖子中标记的每个用户发送通知。
如何将 Novu 添加到 React 和 Node.js 应用程序
Novu 允许您添加各种通知类型,例如电子邮件、短信和应用内通知。在本教程中,您将学习如何创建 Novu 项目、如何将 Novu 添加到您的 React 和 Node.js 项目中,以及如何使用 Novu 发送应用内通知。
在服务器上安装 Novu Node.js SDK,并在 React 应用程序中安装通知中心。
👇🏻 Install on the client
npm install @novu/notification-center

👇🏻 Install on the server
npm install @novu/node
运行以下代码创建一个 Novu 项目。您可以使用个性化仪表板。
👇🏻 Run on the client
npx novu init
在创建 Novu 项目之前,您需要使用 Github 登录。以下代码片段包含运行后应遵循的步骤 npx novu init
Now let's setup your account and send your first notification
❓ What is your application name? Notionging-Platform
❓ Now lets setup your environment. How would you like to proceed?
   > Create a free cloud account (Recommended)
❓ Create your account with:
   > Sign-in with GitHub
❓ I accept the Terms and Condidtions (https://novu.co/terms) and have read the Privacy Policy (https://novu.co/privacy)
    > Yes
✔️ Create your account successfully.

We've created a demo web page for you to see novu notifications in action.
Visit: http://localhost:57807/demo to continue
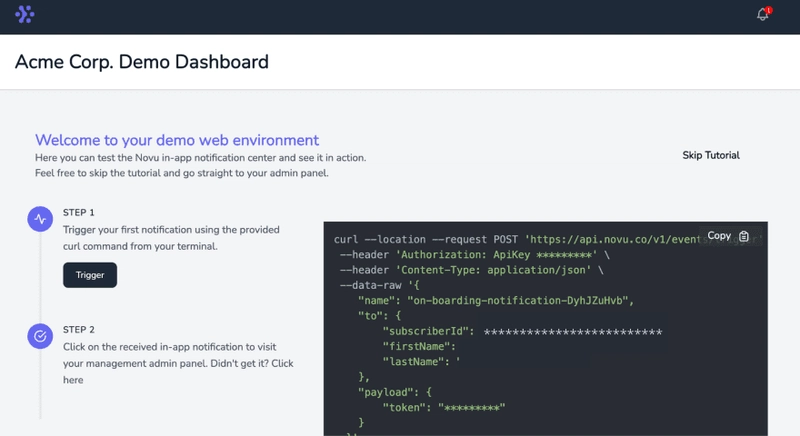
访问演示网页 http://localhost:57807/demo,复制您的订阅者 ID,然后点击“跳过教程”按钮。我们将在本教程的后续部分使用它。
恭喜!🎊 您已成功将 Novu 添加到您的 React 和 Node.js 项目中。接下来,让我们学习如何在 Notionging 应用程序中添加应用内通知,以便在我们将用户添加到帖子时通知他们。
使用 Novu 添加应用内通知
在文件夹中创建一个Notify.js文件src/components,并将以下代码复制到该文件中。它包含文档中应用内通知所需的 元素。
import React from "react";
import {
    NovuProvider,
    PopoverNotificationCenter,
    NotificationBell,
} from "@novu/notification-center";
import { useNavigate } from "react-router-dom";

const Notify = () => {
    const navigate = useNavigate();

    const onNotificationClick = (notification) =>
        navigate(notification.cta.data.url);

    return (
        <div>
            <NovuProvider
                subscriberId='<YOUR_SUBSCRIBER_ID>'
                applicationIdentifier='<YOUR_APP_ID>'
            >
                <PopoverNotificationCenter
                    onNotificationClick={onNotificationClick}
                    colorScheme='light'
                >
                    {({ unseenCount }) => <NotificationBell unseenCount={unseenCount} />}
                </PopoverNotificationCenter>
            </NovuProvider>
        </div>
    );
};

export default Notify;
上面的代码片段将 Novu 通知铃铛图标添加到 Notify 组件,使我们能够查看应用程序内的所有通知。
该
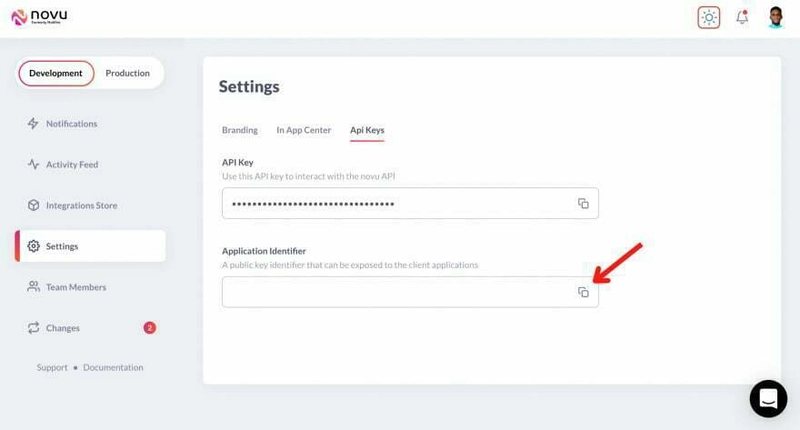
NovuProvider组件需要您先前复制的订户 ID 以及Novu 管理平台http://localhost:57807/demoAPI 密钥下的设置部分中提供的应用程序 ID 。
将Notify组件导入到Home.js文件中,并显示铃铛图标如下:
return (
        <div className='home'>
            <nav className='home__navbar'>
                <h2>HackNotion</h2>
                <div className='home__buttons'>
                    <button className='home__createBtn' onClick={createPostBtn}>
                        CREATE POST
                    </button>
                    <Notify />
                </div>
            </nav>
    </div>
)
接下来,为应用程序创建工作流,它描述您想要添加到应用程序的功能。
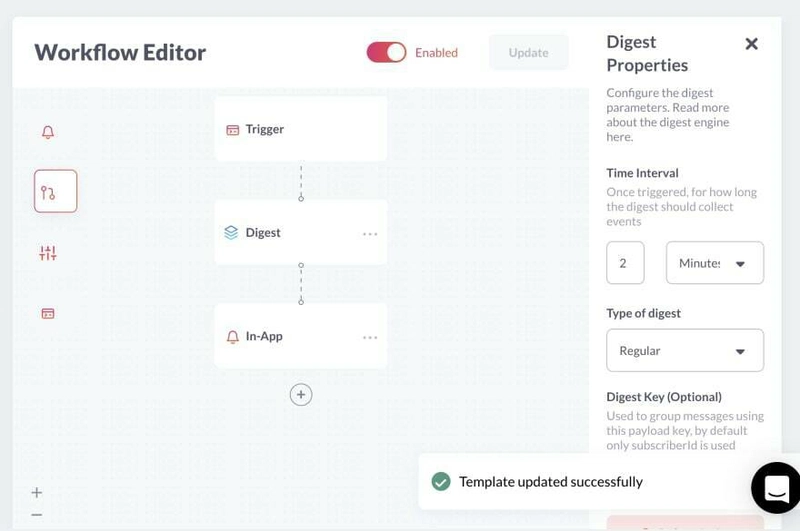
从“开发”侧边栏中选择“通知”,然后创建一个通知模板。点击新创建的模板,然后点击“工作流编辑器”,并确保工作流如下:
从上图可以看出,Novu 在发送应用内通知之前会触发摘要引擎。
Novu Digest 允许我们控制应用程序内通知的发送方式。它会收集多个触发事件,并将它们作为一条消息发送。上图显示每 2 分钟发送一次通知,当您拥有大量用户且更新频繁时,这种方法非常有效。
单击 In-App上图中的步骤并编辑通知模板以包含以下内容。
{{sender}} tagged you to a post
Novu 允许您使用Handlebars 模板引擎向模板添加动态内容或数据 。变量的数据
sender将作为来自应用内请求的有效负载插入到模板中。
单击按钮保存模板 Update并返回代码编辑器。
使用 Novu 发送通知
由于我们希望在将用户标记到帖子时向他们发送通知,因此我们必须将每个用户名存储在服务器上,在 React Tags 提供的建议列表中显示它们,并通过 Novu 向他们发送通知。
更新文件handleLogin中的功能Login.js,以便在登录时将用户名发送到服务器。
const handleLogin = (e) => {
    e.preventDefault();
    //👇🏻 sends the username to the server
    socket.emit("addUser", username);
    localStorage.setItem("username", username);
    navigate("/dashboard");
};
监听事件并将用户名存储在服务器上的数组中。
let allUsers = [];

socket.on("addUser", (user) => {
    allUsers.push(user);
});
另外,通过服务器上的另一条路线呈现用户列表。
app.get("/users", (req, res) => {
    res.json(allUsers);
});
要在 React 标签建议列表中显示用户,您需要向 API 路由发送请求,获取用户列表并将其传递到列表中。
更新CreatePost函数以获取用户列表,并在导航post/create路由之前将其保存在本地存储中。
const createPostBtn = () => {
    fetchUser();
    navigate("/post/create");
};

const fetchUser = () => {
    fetch("http://localhost:4000/users")
        .then((res) => res.json())
        .then((data) => {
            //👇🏻 converts the array to a string
            const stringData = data.toString();
            //👇🏻 saved the data to local storage
            localStorage.setItem("users", stringData);
        })
        .catch((err) => console.error(err));
};
接下来,从本地存储中检索所有用户,并将它们传递到 React Tags 提供的建议列表中,以便在CreatePost组件内显示。
const [users, setUsers] = useState([]);

useEffect(() => {
    function getUsers() {
        const storedUsers = localStorage.getItem("users").split(",");
        setUsers(storedUsers);
    }
    getUsers();
}, []);

const suggestions = users.map((name) => {
    return {
        id: name,
        text: name,
    };
});
要通知每个标记的用户,请创建一个循环遍历服务器上的用户并通过 Novu 向他们发送通知的函数。
在服务器上导入并启动 Novu。
const { Novu } = require("@novu/node");
const novu = new Novu("<YOUR_API_KEY>")
更新createPost后端的监听器,向所有标记的用户发送通知。
//👇🏻 Loops through the tagged users and sends a notification to each one of them
const sendUsersNotification = (users, sender) => {
    users.forEach(function (user) {
        novuNotify(user, sender);
    });
};

//👇🏻 sends a notification via Novu
const novuNotify = async (user, sender) => {
    try {
        await novu
            .trigger("<TEMPLATE_ID>", {
                to: {
                    subscriberId: user.id,
                    firstName: user.text,
                },
                payload: {
                    sender: sender,
                },
            })
            .then((res) => console.log("Response >>", res));
    } catch (err) {
        console.error("Error >>>>", { err });
    }
};

socket.on("createPost", (data) => {
    const { postTitle, postContent, username, timestamp, tags } = data;
    notionPosts.unshift({
        id: fetchID(),
        title: postTitle,
        author: username,
        createdAt: timestamp,
        content: postContent,
        comments: [],
    });
    //👇🏻 Calls the function to send a notification to all tagged users
    sendUsersNotification(tags, username);

    socket.emit("updatePosts", notionPosts);
});
恭喜!💃🏻 我们已经完成了这个项目的代码。
结论
到目前为止,您已经学习了如何在 React 和 Node.js 应用程序中设置 Socket.io、如何在客户端和 Node.js 服务器之间发送消息、如何在 React 和 Node.js 应用程序中添加 Novu 以及如何使用 Novu 发送通知。
本教程演示了如何使用 Socket.io 和 Novu 构建项目。您可以随意改进项目,例如添加身份验证库,并将博客文章保存到支持实时通信的数据库。
本教程的完整代码可以在这里找到:https://github.com/novuhq/blog/tree/main/blogging-platform-with-react-socketIO
感谢您的阅读!
PS:如果您能通过 star 来帮助我们,我将非常感激 🤩
https://github.com/novuhq/novu
 后端开发教程 - Java、Spring Boot 实战 - msg200.com


