如何将 React 应用连接到 Notion 数据库
本教程中的所有代码作为完整包均可在此存储库中找到。
如果您觉得本教程有用,请与您的朋友和同事分享!想了解更多类似内容,您可以在YouTube上订阅我或在Twitter上关注我。
如果您喜欢这种格式,本教程可以作为视频课程提供:
目录
Notion 是什么?
在我们开始之前,我想快速解释一下Notion是什么。
它本质上是一个在云中运行并支持同时多个用户协作的组织工具。
它可用于组织日常任务、跟踪学校日程安排、管理大型企业项目文档等任何事情。
基本上,如果您想“组织”任何类型的信息,Notion 是一个很好的工具。
您可能熟悉的类似产品包括 Confluence、Evernote 或 OneNote。
介绍
最近我发现 Notion 提供了一个 API 来读取和修改 Notion 工作区上的数据。
他们还对简单数据库(甚至是关系数据库)提供了出色的支持,所以我认为尝试一个可以使用 Notion 作为快速而粗糙的 CMS 的小应用程序会很有趣,而且我做这件事很开心,所以我想我会写一个小教程来与其他人分享这个过程。
我想明确表示,我绝对不主张将 Notion 用作生产应用程序的真实数据库。
我对任何规模的查询的实际速度和性能一无所知,并且我也不会相信任何未专门设计用于提供可靠性保证的服务上的关键数据。
然而,对于有趣的小项目,我认为这是一个很好的选择,特别是对于那些对数据库没有太多现有知识并且只是想尝试一下的前端开发人员来说。
这也是与技术水平较低的人员合作的好方法,让他们能够灵活地利用 Notion 提供的内容创建功能,并让开发人员能够直接在代码中引用该内容。
所以不要再拖延了,让我们开始尝试一下吧。
项目设置
我们的项目结构如下:
React App -> Node 服务器 -> Notion 数据库
我们需要 Node 服务器的原因是,如果直接从 React 应用进行查询,就必须公开 Notion 帐户凭证和 secret/数据库 ID。客户端的任何内容对用户始终可见。
通过在服务器上查询,我们可以将凭据保存在那里,使其远离前端,并且只向前端提供数据库表数据本身。
我们将从创建项目目录和 React 应用开始。我们在这里使用Create React App,因为它仍然是以最小复杂度快速启动并运行 React 项目的最简单方法:
mkdir react-node-notion
cd react-node-notion
npx create-react-app@latest sample-app --template typescript
cd sample-app
npm run start
在继续之前,请确保您能够在http://localhost:3000/上看到示例 React 应用程序。
创建概念数据库
接下来我们将创建我们的 Notion 工作区和数据库。
导航至:
您可以创建一个帐户,也可以使用现有的 Google 或 Apple 帐户登录。Notion 对个人用户免费。

接下来,我们将创建一个用于存放数据库的页面。这个数据库将帮助我追踪 2022 年想要学习的内容。
点击“我的酷炫项目”页面的任意位置,然后输入/page。您将看到创建新页面的选项。创建一个新页面并为其添加图标。

打开新页面。您可以在顶部添加封面图片。点击空白页的任意位置,然后输入/database。选择“表格数据库 - 内联”。
第一列应为唯一值(我们的主键)。我将其命名为key。第二列命名为label,第三列命名为url。键列title默认为 类型,但您需要将标签列设置为 ,text并将 url 列设置为url:
我特意将列标题设为小写,因为我们在查询时将使用 Javascript 属性引用它们(传统上是小写的)。

我将使用这个数据库来记录我想学习的内容,并创建一个指向学习资源的 URL 链接。这非常简单,但你可以想出任何你想要的复杂方法。我们主要只是在这里提供一个示例,说明如何查询这些数据并将其显示在应用程序中(或者任何你喜欢的地方)。
使用最适合你的数据填充数据库。这是我的:

创建服务器
接下来我们将启动一个非常简单的 Node 服务器来提供数据。我们只需要模块http和 NPM 中的 Notion 客户端库。
让我们从服务器开始,并确认在添加 Notion 集成之前我们可以查询数据:
运行以下命令之前返回根目录react-node-notion:
mkdir server
cd server
npm init -y
npm install -D typescript @types/node
npx tsc --init
mkdir src
touch src/server.ts
如果您不是从命令行创建文件,上述说明将安装必要的软件包,并创建一个server目录以及一个src包含server.ts文件的目录。整个项目的完整目录结构应如下所示:
.
├── sample-app
│   └── (React app files)
└── server
    ├── src
    │   └── server.ts
    ├── tsconfig.json
    ├── package-lock.json
    └── package.json
您的server.ts文件将如下所示:
server/src/server.ts
import http from "http";

const host = "localhost";
const port = 8000;

const server = http.createServer((req, res) => {
  // Avoid CORS errors
  res.setHeader("Access-Control-Allow-Origin", "*");
  res.setHeader("Content-Type", "application/json");
  switch (req.url) {
    // Will respond to queries to the domain root (like http://localhost/)
    case "/":
      res.writeHead(200);
      res.end(JSON.stringify({ data: "success" }));
      break;

    // Only supports the / route
    default:
      res.writeHead(404);
      res.end(JSON.stringify({ error: "Resource not found" }));
  }
});

server.listen(port, host, () => {
  console.log(`Server is running on http://${host}:${port}`);
});
你的npx tsc --init命令将会创建一个tsconfig.json文件。所有默认值都可以,你只需要添加一个值:
tsconfig.json
{
  ...
  "outDir": "./dist"
}
这会将命令的结果输出tsc到dist包含可运行的 JS 文件的文件夹中。
运行以下程序尝试一下:
npx tsc && node dist/server.js`
```
That says "run typescript and then use Node to run the resulting Javascript file it creates in the output folder".
## Querying the Server
Navigate back to the `sample-app` directory and open the `src` directory. We can delete `App.css` and the `logo.svg` file.
We'll update the `index.css` with some super simple CSS based off [this minimalist style](https://www.swyx.io/css-100-bytes/).
`sample-app/src/index.css`
```css
html {
max-width: 70ch;
padding: 3em 1em;
margin: auto;
line-height: 1.75;
font-size: 1.25em;
}
h1,h2,h3,h4,h5,h6 {
margin: 3em 0 1em;
}
p,ul,ol {
margin-bottom: 2em;
color: #1d1d1d;
font-family: sans-serif;
}
```
Now we update the contents of `App.tsx`. Remove all the default content inside the file (including the imports) and replace it with the following:
`sample-app/src/App.tsx`
```tsx
function App() {
return (
<div>
<h1>Things to Learn</h1>
<button
type="button"
onClick={() => {
fetch("http://localhost:8000/")
.then((response) => response.json())
.then((payload) => {
console.log(payload)
});
}}
>
Fetch List
</button>
</div>
);
}
export default App;
```
We use the [Fetch API](https://developer.mozilla.org/en-US/docs/Web/API/Fetch_API) to query the simple server we just wrote that we made listen on port 8000 and respond on the root domain route `/`.
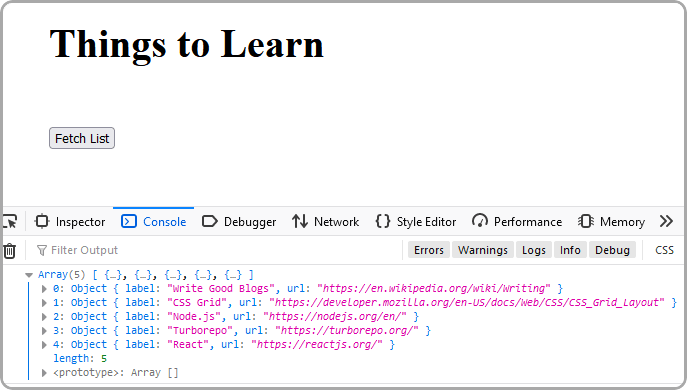
So that means to reach that endpoint we need to query `http://localhost:8000/`. Save and run your app, then press the "Fetch List" button. Open the dev console with F12 and you will see:
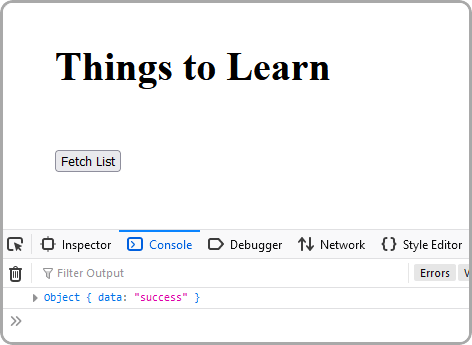
Notice the `{ data: "success" }` response there in the console. Great!
Our React app is connected to our server and we can query basic data. Let's get Notion hooked up.
## Creating a Notion Integration
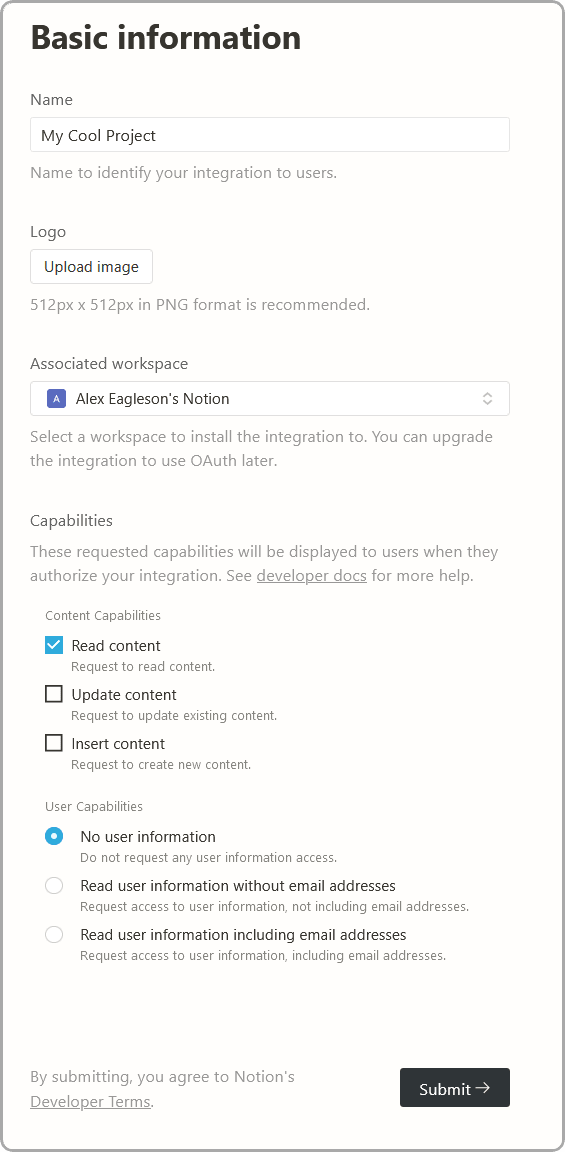
Before you can query data from your Notion account you need to create an _integration_ that has the necessary permissions. You can configure integrations to have different permissions like read/write/insert depending on who you are sharing the integration secret with.
Go to the following URL:
[https://www.notion.so/my-integrations]()
And click the big **[+ New Integration]** button on the left.
You can configure and name your integration how you like. For mine I only want to be able to read content from my database, so I am only giving it read permissions and no access to user data:
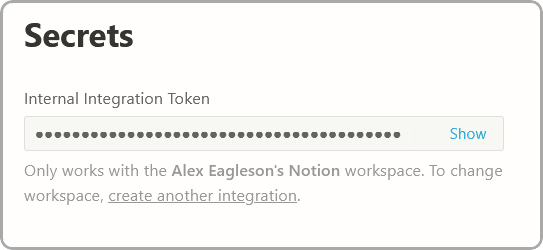
After you have created the integration you will be provided with a "secret" that gives access to your integration. Keep this handy as we will need it soon:
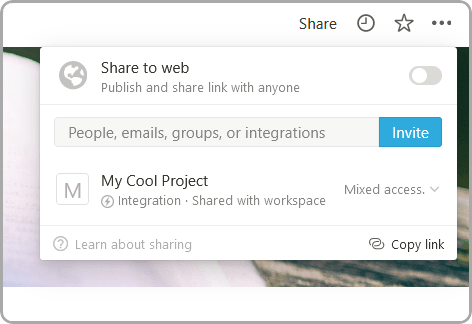
In addition to the secret, we also need to configure the database itself to be allowed to be read. Go back to your "Things to Learn" database (or whatever you wrote).
At the upper right corner of your database page is a "Share" button. Click it and then click the "Invite" button. You will have the ability to invite your new integration that you created to have access to this database. It will still be private and hidden from the general public.
The two values you need to query this database from your Node app are the Notion secret (which you already have) and the database ID. The database ID you can get from the URL when you are looking at your database. The URL will look something like this:
```
https://www.notion.so/aaaaaaaaaaaaaaaaaaaaaaaaaa?v=bbbbbbbbbbbbbbbbbbbbbbbbbbb
```
In the above example your `database id` is the `aaaaaaaaaaaaaaaaaaaaaa` part before the question mark.
You now have everything you need to query the data. Back to the Node server.
## Querying the Database
We are going to need a secure place to store our Notion secret and database ID. If we put them in our code they will become visible to anyone who checks the source when we push to a remote repository. To get around this we will store our credentials in a `.env.` file.
Inside your `server` directory create two new files (note that both of them are hidden files that are prefix with a `.` before the filename):
`server/.env`
```
NOTION_SECRET="secret_xxxxxxxxxxxxxxxxxxxxxx"
NOTION_DATABASE_ID="aaaaaaaaaaaaaaaaaaaaaaaaaaaaaaa"
```
Where the dummy values above are replaced by the values you took from Notion. Remember your secret key does need the `secret_` prefix in front of it.
We also want to create a `.gitignore` file:
`server/.gitignore`
```
.env
dist
node_modules
```
This will tell `git` not to push your secret `.env` file our your automatically generated `dist` folder when you commit.
While we're at it let's add a start script for our server that does the `tsc` build and runs the JS output:
`server/package.json`
```json
{
...
"scripts": {
"start": "tsc && node dist/server.js"
},
}
```
Alright! Now that that is taken care of we just need two packages. One is the official Notion client for Node, and the other is `dotenv` library that will made it super simple to read your secret and database id values from that `.env` file:
```
npm install @notionhq/client@0.4.9 dotenv
```
Note that I have locked Notion client to `0.4.9` as the API may change since this is a relatively new product and I would like this tutorial to work for anyone who uses it in the future. You can try running the latest build however you may need to refer to their documentation and make corrections if anything has changed.
Now we're going to update our `server.ts` file. We'll do it all at once but I'll add lots of comments to explain everything:
`server/src/server.ts`
```ts
require("dotenv").config();
import http from "http";
import { Client } from "@notionhq/client";
// This is Typescript interface for the shape of the object we will
// create based on our database to send to the React app
// When the data is queried it will come back in a much more complicated shape, so our goal is to
// simplify it to make it easy to work with on the front end
interface ThingToLearn {
label: string;
url: string;
}
// The dotenv library will read from your .env file into these values on `process.env`
const notionDatabaseId = process.env.NOTION_DATABASE_ID;
const notionSecret = process.env.NOTION_SECRET;
// Will provide an error to users who forget to create the .env file
// with their Notion data in it
if (!notionDatabaseId || !notionSecret) {
throw Error("Must define NOTION_SECRET and NOTION_DATABASE_ID in env");
}
// Initializing the Notion client with your secret
const notion = new Client({
auth: notionSecret,
});
const host = "localhost";
const port = 8000;
// Require an async function here to support await with the DB query
const server = http.createServer(async (req, res) => {
res.setHeader("Access-Control-Allow-Origin", "*");
switch (req.url) {
case "/":
// Query the database and wait for the result
const query = await notion.databases.query({
database_id: notionDatabaseId,
});
// We map over the complex shape of the results and return a nice clean array of
// objects in the shape of our `ThingToLearn` interface
const list: ThingToLearn[] = query.results.map((row) => {
// row represents a row in our database and the name of the column is the
// way to reference the data in that column
const labelCell = row.properties.label;
const urlCell = row.properties.url;
// Depending on the column "type" we selected in Notion there will be different
// data available to us (URL vs Date vs text for example) so in order for Typescript
// to safely infer we have to check the `type` value. We had one text and one url column.
const isLabel = labelCell.type === "rich_text";
const isUrl = urlCell.type === "url";
// Verify the types are correct
if (isLabel && isUrl) {
// Pull the string values of the cells off the column data
const label = labelCell.rich_text?.[0].plain_text;
const url = urlCell.url ?? "";
// Return it in our `ThingToLearn` shape
return { label, url };
}
// If a row is found that does not match the rules we checked it will still return in the
// the expected shape but with a NOT_FOUND label
return { label: "NOT_FOUND", url: "" };
});
res.setHeader("Content-Type", "application/json");
res.writeHead(200);
res.end(JSON.stringify(list));
break;
default:
res.setHeader("Content-Type", "application/json");
res.writeHead(404);
res.end(JSON.stringify({ error: "Resource not found" }));
}
});
server.listen(port, host, () => {
console.log(`Server is running on http://${host}:${port}`);
});
```
Should be good! We'll start the server with the new script we made in `package.json`:
```
npm run start
```
## Connecting the App
A quick jump back into the React app and hit that "Fetch Data" button again. If everything went well you will be greeted with the content of your database in your browser console:
You've now got the data in your React app, you can do whatever you want with it! We could probably wrap up the tutorial here, but let's make one final step of turning the data into an actual list of links:
`sample-app/src/App.tsx`
```tsx
import { useState } from "react";
// Copy the payload shape interface from our server
// We want to copy (rather than import) since we we won't necessarily deploy our
// front end and back end to the same place
interface ThingToLearn {
label: string;
url: string;
}
function App() {
// A state value will store the current state of the array of data which can be updated
// by editing your database in Notion and then pressing the fetch button again
const [thingsToLearn, setThingsToLearn] = useState<ThingToLearn[]>([]);
return (
<div>
<h1>Things to Learn</h1>
<button
type="button"
onClick={() => {
fetch("http://localhost:8000/")
.then((response) => response.json())
.then((payload) => {
// Set the React state with the array response
setThingsToLearn(payload);
});
}}
>
Fetch List
</button>
{/* Map the resulting object array into an ordered HTML list with anchor links */}
{/* Using index as key is harmless since we will only ever be replacing the full list */}
<ol>
{thingsToLearn.map((thing, idx) => {
return (
<li key={idx}>
<a href={thing.url} target="_blank" rel="noopener noreferrer">
{thing.label}
</a>
</li>
);
})}
</ol>
</div>
);
}
export default App;
```
And with that, a click of the fetch button and we get a nice list of things to do which reflects the state of our Notion database and creates links to the relevant pages.
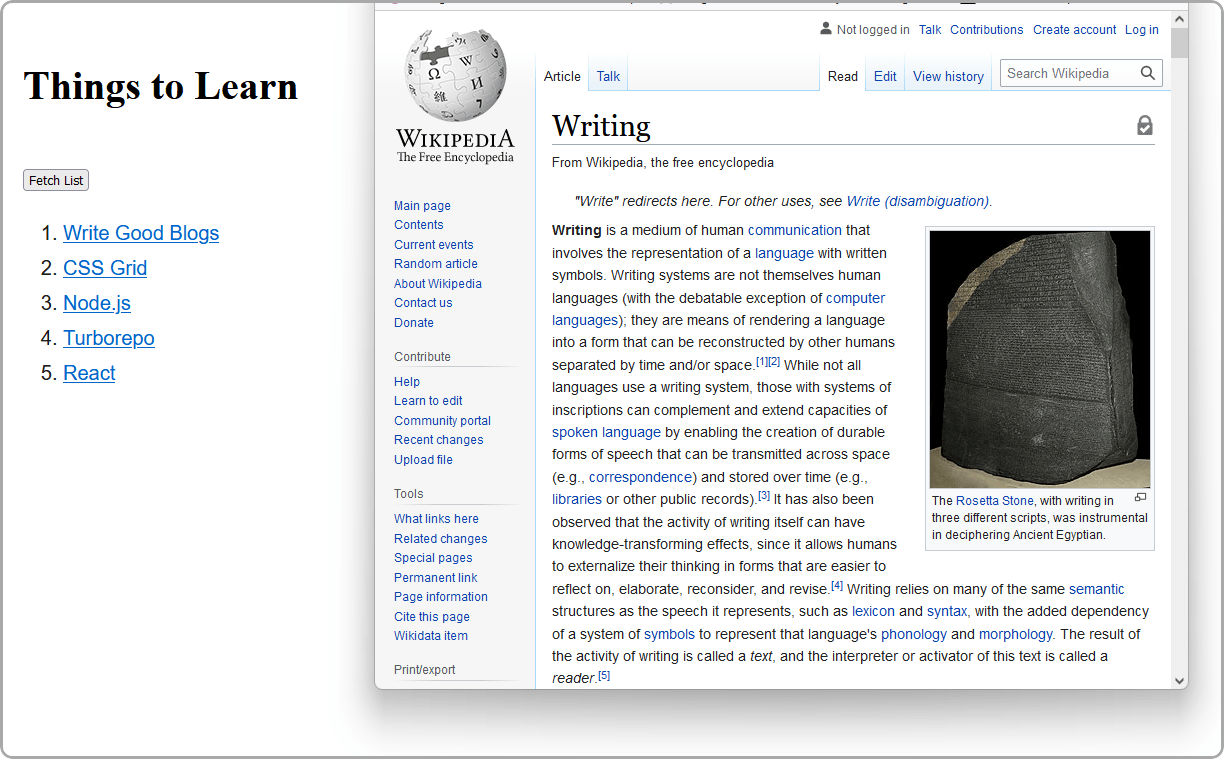
Go ahead, try changing some text in your DB and hitting the button again.
## Wrapping Up
Well that's pretty neat! Now that you know how to do this, what cool projects can you think to build?
Remember that all code from this tutorial as a complete package is available in [this repository](https://github.com/alexeagleson/react-node-notion).
Please check some of my other learning tutorials. Feel free to leave a comment or question and share with others if you find any of them helpful:
- [How to use Node.js to backup your personal files](https://dev.to/alexeagleson/how-to-use-nodejs-to-backup-your-personal-files-and-learn-some-webdev-skills-along-the-way-541a)
- [Introduction to Docker for Javascript Developers](https://dev.to/alexeagleson/docker-for-javascript-developers-41me)
- [Learnings from React Conf 2021](https://dev.to/alexeagleson/learnings-from-react-conf-2021-17lg)
- [How to Create a Dark Mode Component in React](https://dev.to/alexeagleson/how-to-create-a-dark-mode-component-in-react-3ibg)
- [How to Analyze and Improve your 'Create React App' Production Build ](https://dev.to/alexeagleson/how-to-analyze-and-improve-your-create-react-app-production-build-4f34)
- [How to Create and Publish a React Component Library](https://dev.to/alexeagleson/how-to-create-and-publish-a-react-component-library-2oe)
- [How to use IndexedDB to Store Local Data for your Web App ](https://dev.to/alexeagleson/how-to-use-indexeddb-to-store-data-for-your-web-application-in-the-browser-1o90)
- [Running a Local Web Server](https://dev.to/alexeagleson/understanding-the-modern-web-stack-running-a-local-web-server-4d8g)
- [ESLint](https://dev.to/alexeagleson/understanding-the-modern-web-stack-linters-eslint-59pm)
- [Prettier](https://dev.to/alexeagleson/understanding-the-modern-web-stack-prettier-214j)
- [Babel](https://dev.to/alexeagleson/building-a-modern-web-stack-babel-3hfp)
- [React & JSX](https://dev.to/alexeagleson/understanding-the-modern-web-stack-react-with-and-without-jsx-31c7)
- [Webpack: The Basics](https://dev.to/alexeagleson/understanding-the-modern-web-stack-webpack-part-1-2mn1)
- [Webpack: Loaders, Optimizations & Bundle Analysis](https://dev.to/alexeagleson/understanding-the-modern-web-stack-webpack-part-2-49bj)
---
If you find this tutorial helpful, please share it with your friends and colleagues! For more like it you can subscribe on [Youtube](https://www.youtube.com/channel/UCV5YqK3AaInd3lYFQqlp7Lw) or follow me on [Twitter](https://twitter.com/eagleson_alex).