天气应用:使用 Vue 和 Axios
我花了不少时间写这篇教程,主要是为了确保自己学到的东西正确。这篇来自我个人博客的转帖,希望你喜欢这篇教程,也期待收到你的反馈!
Freecodecamp 上的挑战之一是开发一款天气应用。想法很简单:从提供的 API 获取天气数据,编写一个函数将温度从摄氏度转换为华氏度,并显示当前天气。
在本文中,我不会写有关如何完全解决这一挑战的演练,但如果您不知道该怎么做,这可能是一个很好的开始。
我将向您展示如何使用 Vue 和 Axios 连接到OpenWeatherMap Api,获取城镇(伦敦)的天气数据并显示它。
OpenWeatherMap API
为了连接到 API,您需要一个 API 密钥,否则服务器将拒绝您的连接尝试。
您可以通过点击此页面subscribe中当前天气数据下的按钮获取免费的 API 密钥。
API 将以 JSON 格式返回数据,但您需要提供一些东西才能获取它:
- 终点
- API 密钥
- 获取数据的单位(摄氏度、华氏度)- 默认为英制
- 城市名称、坐标、邮政编码或城市 ID
您可以从文档页面检查 API 期望您传递的参数以获取正确的 JSON 数据。
在本文中,我声明单位为公制(摄氏度) ,城市名称为伦敦。因此 API 链接将如下所示:
http://api.openweathermap.org/data/2.5/weather+ ?q=London+ &?units=metric+&APPID={API KEY}
我已经分割了链接,因此您可以看到如何向 API 端点添加参数以获取所需的数据。
API 链接如下所示:
http://api.openweathermap.org/data/2.5/weather?q=London&?units=metric&APPID={API KEY}
如果你在链接末尾添加你的 API 密钥并将其粘贴到浏览器中,你就能获得所需的所有数据。现在,我们要做的就是将这些数据导入 Vue。
使用 Axios 获取天气数据
在 JavaScript 中,您可以使用不同的工具从 API 获取数据。在本文中,我使用 axios。从 API 获取数据的方式实际上并没有太大变化。如果您使用其他工具,应该不会遇到任何问题。
要使用 axios,您可以执行npm install axios或将 CDN 链接添加<script src="https://unpkg.com/axios/dist/axios.min.js"></script>到您的页面。
在本文中,我使用来自 CDN 链接的 axios。
你需要编写的代码非常简单。首先,我们调用 axios,然后从 URL 发出一个 get 请求,然后获取响应,或者如果返回错误则捕获它。
代码如下:
axios
  .get(url)
  .then(response => {
    console.log(response.data);
})
  .catch(error => {
    console.log(error);
});
如果你好奇为什么我们得到的response.data不仅仅是响应,原因很简单。它response不仅会返回数据,还会返回状态码、标头和发出的请求类型。
使用 openweathermap URL 并添加另一个,console.log(response);然后查看运行代码时得到的内容。
创建 Vue 应用
我不会深入讲解VueJs或如何用它创建应用。但最基本的一点是,你可以通过将 Vue 对象触发到 div id 来创建应用。
Vue 应用程序如下所示:
let weather = new Vue ({
  el: "#app",
  data: {

  },
  methods: {

  }
})
参数el是id你的 div 的 id html。这个 div 通常被称为 id app,但你可以随意命名,只需确保el在 Vue 对象内部进行更改即可。
该data参数包含应用程序可能需要的所有数据,通常,您可以在此处创建变量,然后使用或修改它们。VueJs 也会尝试获取变量名称来翻译{{name}}HTML 中的标签。
该methods参数是您指定使用应用程序时可能想要调用的所有功能的地方。
为了使用 VueJs,您必须使用命令安装它,或者在您的页面上npm install vue添加 CDN 链接。<script src="https://cdn.jsdelivr.net/npm/vue@2.5.17/dist/vue.js"></script>
如果您对 Vue 框架不了解的话,我希望这个非常快速和简短的介绍能够帮助您理解 Vue。
构建天气应用程序
现在我们已经掌握了如何连接 OpenWeatherMap API、如何使用 axios 以及如何创建 Vue 应用程序的基本知识,我将向您展示如何创建天气应用程序。
HTML 和 CSS
该应用的 HTML 代码非常简单。页面会包含一个背景和一个中心 div,id="app"Vue 会用到它。这个 div 还会有一张简单的背景图片,让它看起来更美观。
那么,让我们从创建 HTML 代码开始。我们将导入css和js文件以创建一个可运行的网页,还将导入 VueJs、axios 以及我们将在应用中使用的两种字体。
<!doctype html>
<html>
  <head>
    <meta charset="utf-8">
    <meta http-equiv="x-ua-compatible" content="ie=edge">
    <title>Weather App</title>
    <meta name="viewport" content="width=device-width, initial-scale=1">
    <link rel="stylesheet" type="text/css" media="screen" href="main.css" />
    <link href="https://fonts.googleapis.com/css?family=Montserrat:extra-light|Vast+Shadow" rel="stylesheet">
  </head>

  <body>
    <div id="app">
    </div>
    <script src="https://unpkg.com/axios/dist/axios.min.js"></script>
    <script src="https://cdn.jsdelivr.net/npm/vue/dist/vue.js"></script>
    <script src="main.js"></script>
  </body>

</html>
现在所有需要的文件都已导入,页面也已经有了标题,我们将创建 div 的框架。为了显示数据,您将使用 格式{{ variableName }},这variableName将是我们 Vuejs 应用中 Vue 中使用的名称data。
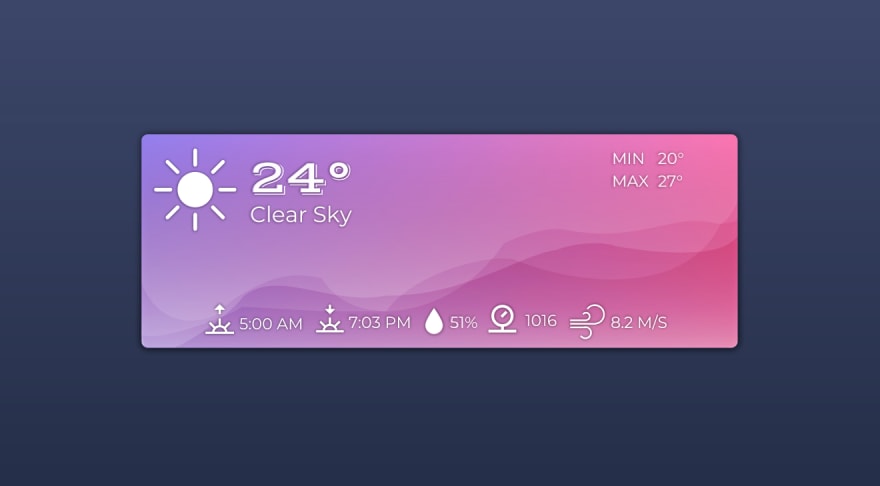
HTML 代码将分为三部分。左上部分显示图标、当前天气和天气描述。右上部分显示当天的最低和最高温度。最后,下部分将显示其他信息,例如湿度、气压、日出/日落时间和风速。
其<div id="app">内容如下:
<div id="app">
  <div id="weather">
    <img src="images/sunny.svg"> {{overcast}}
    <span class="temperature">{{currentTemp}}°</span><br>
    <span id="temp-values">Min {{minTemp}}° <br> Max {{maxTemp}}°</span>
  </div>
  <div id="info">
    <img class="icon" :src=icon> {{sunrise}}
    <img class="icon" src="images/sunset.svg"> {{sunset}}
    <img class="icon" src="images/humidity.svg"> {{humidity}}
    <img class="icon" src="images/pressure.svg"> {{pressure}}
    <img class="icon" src="images/wind.svg"> {{wind}}
  </div>
现在页面的骨架已经完成,我们需要更新main.css文件以使页面看起来更好一些。
注意:我这里要展示的代码不是响应式的,而且有点 hack 风格。我相信肯定有更好的方法,但就本教程而言,这样就足够了。
main.css文件
body {
  background: #3d4869; /* Old browsers */
  background: -moz-linear-gradient(#3d4869, #263048) fixed; /* FF3.6-15 */
  background: -webkit-linear-gradient(#3d4869,#263048) fixed; /* Chrome10-25,Safari5.1-6 */
  background: linear-gradient(#3d4869,#263048) fixed; /* W3C, IE10+, FF16+, Chrome26+, Opera12+, Safari7+ */
  background-repeat: no-repeat;

  font-family: 'Montserrat', sans-serif;
  font-weight: 100;
  text-shadow: 0px 0px 2px #000000;
  color: #ffffff;
}

#app {
  background: url(images/waves.svg) no-repeat;

  width:    520px;
  height:   170px;

  position: absolute;
  top:      35%;
  left:     35%;
}

#weather {
  padding: 15px;
  vertical-align: middle;
}

.temperature {
  font-family: 'Vast Shadow', cursive;
  font-size: 40px;
  vertical-align: top;
  position: absolute;
  left: 80px;
}

#temp-values {
  text-align: right;
  text-justify: distribute;
  display: block;
  position: relative;
  top: -60px;
}

#info {
  padding-left: 20px;
  position: relative;
  top: -20px;
}

.icon {
  position: inherit;
  top: 2px;
  padding-left: 8px;
}
index.html 文件
<!doctype html>
<html>
  <head>
    <meta charset="utf-8">
    <meta http-equiv="x-ua-compatible" content="ie=edge">
    <title>Weather App</title>
    <meta name="viewport" content="width=device-width, initial-scale=1">
    <link rel="stylesheet" type="text/css" media="screen" href="main.css" />
    <link href="https://fonts.googleapis.com/css?family=Montserrat:extra-light|Vast+Shadow" rel="stylesheet">
  </head>

  <body>
    <div id="app">
      <div id="weather">
        <img src="images/sunny.svg"> {{overcast}}
        <span class="temperature">{{currentTemp}}°</span><br>
        <span id="temp-values">Min {{minTemp}}° <br> Max {{maxTemp}}°</span>
      </div>
      <div id="info">
        <img class="icon" :src=icon> {{sunrise}}
        <img class="icon" src="images/sunset.svg"> {{sunset}}
        <img class="icon" src="images/humidity.svg"> {{humidity}}
        <img class="icon" src="images/pressure.svg"> {{pressure}}
        <img class="icon" src="images/wind.svg"> {{wind}}
      </div>
    </div>
    <script src="https://unpkg.com/axios/dist/axios.min.js"></script>
    <script src="https://cdn.jsdelivr.net/npm/vue/dist/vue.js"></script>
    <script src="main.js"></script>
  </body>
</html>
如果你尝试打开页面,你会发现应用目前看起来不太好,这是因为我们没有 Vue 来帮我们做繁重的工作。让我们继续解决这个问题。
注意:我使用 SVG 文件作为天气应用程序的背景和图标,您可以在此处获取文件。
Vue
Vue 和 axios 已经通过位于我们的 html 代码中的脚本标签导入,这意味着我们已经准备好开始塑造我们的应用程序了。
let weatherApp = new Vue ({
  el: '#app',
  data: {

  },
  methods: {
    getWeather() {
    },
  }
  beforeMount() {
    this.getWeather();
    }
});
代码非常简单,我们启动一个新的 Vue 应用,并将其附加到带有 id 的 div 上app。在 Vue 应用内部,我们在对象内部声明所有需要的变量data,这些变量将用于填充通过 API 获取的信息。
另外,我们声明了一个名为的方法getWeather,该方法将使用 axios 从 OpenWeatherMap API 获取我们需要的所有信息。
我们希望天气应用显示当前天气和其他天气信息,例如:
- 当日最低气温
- 当日最高气温
- 日落时间
- 日出时间
- 风速
- 压力
- 湿度百分比
API 会返回所有这些详细信息,因此我们无需做太多操作。在 Vue 对象内部,我们将声明所有需要的变量{{variableName}},以便在连接到 API 并获取所需数据后更新 HTML 中的标签 ( )。
我们的 VueJs 内部的数据对象将如下所示:
data: {
  currentTemp: '',
  minTemp: '',
  maxTemp:'',
  sunrise: '',
  sunset: '',
  pressure: '',
  humidity: '',
  wind: '',
  overcast: '',
  icon: ''
  },
使用 Axios 获取 API 数据
Openwethermap API 返回如下所示的 JSON 响应:
{
    "coord": {
        "lon": -0.13,
        "lat": 51.51
    },
    "weather": [
        {
            "id": 803,
            "main": "Clouds",
            "description": "broken clouds",
            "icon": "04d"
        }
    ],
    "base": "stations",
    "main": {
        "temp": 24.82,
        "pressure": 1016,
        "humidity": 51,
        "temp_min": 23,
        "temp_max": 27
    },
    "visibility": 10000,
    "wind": {
        "speed": 8.2,
        "deg": 270
    },
    "clouds": {
        "all": 75
    },
    "dt": 1534695600,
    "sys": {
        "type": 1,
        "id": 5091,
        "message": 0.003,
        "country": "GB",
        "sunrise": 1534654394,
        "sunset": 1534706018
    },
    "id": 2643743,
    "name": "London",
    "cod": 200
}
我们将使用之前的axios示例来构建getWeatherVue 应用的方法。该方法如下所示:
getWeather() {
  let url = "http://api.openweathermap.org/data/2.5/weather?q=London&?units=metric&APPID={API KEY}";
  axios
    .get(url)
    .then(response => {
          this.currentTemp = response.data.main.temp;
          this.minTemp = response.data.main.temp_min;
          this.maxTemp = response.data.main.temp_max;
          this.pressure = response.data.main.pressure;
          this.humidity = response.data.main.humidity + '%';
          this.wind = response.data.wind.speed + 'm/s';
          this.overcast = response.data.weather[0].description;
          this.icon = "images/" + response.data.weather[0].icon.slice(0, 2) + ".svg";
          this.sunrise = new Date(response.data.sys.sunrise*1000).toLocaleTimeString("en-GB").slice(0,4);
          this.sunset = new Date(response.data.sys.sunset*1000).toLocaleTimeString("en-GB").slice(0,4);
  })
  .catch(error => {
    console.log(error);
  })
}
从我们从 API 获得的 JSON 响应中可以看出,上面的代码只是将从 API 检索到的每一位数据分配给dataVue 中对象声明的变量,这将允许我们在应用程序的任何地方使用这些数据。
请注意,我们正在向一些变量添加一些内容。
在变量中,icon我们添加了图像文件夹的路径、文件名和文件扩展名。当 Vue 运行时,它会将src图像的 更改为变量中的值icon。
对于文件名,我们将对从 API 获取的字符串进行切片,从索引 0 处的字符到索引 2 处的字符 - 这是因为 openweathermap 会根据白天还是夜晚更改图标名称。
和时间以 Unix 纪元时间给出,因此我们只需将时间转换为人类可读的格式sunrise,sunset然后切分字符串即可获得小时和分钟。
您的main.js文件和 Vue 应用程序现在应如下所示:
let weatherApp = new Vue({
  el: '#app',
  data: {
    currentTemp: '',
    minTemp: '',
    maxTemp:'',
    sunrise: '',
    sunset: '',
    pressure: '',
    humidity: '',
    wind: '',
    overcast: '',
    icon: ''
  },
  methods: {
    getWeather() {
      let url = "http://api.openweathermap.org/data/2.5/weather?q=London&units=metric&APPID={Your API Key}";
      axios
        .get(url)
        .then(response => {
          this.currentTemp = response.data.main.temp;
          this.minTemp = response.data.main.temp_min;
          this.maxTemp = response.data.main.temp_max;
          this.pressure = response.data.main.pressure;
          this.humidity = response.data.main.humidity + '%';
          this.wind = response.data.wind.speed + 'm/s';
          this.overcast = response.data.weather[0].description;
          this.icon = "images/" + response.data.weather[0].icon.slice(0, 2) + ".svg";
          this.sunrise = new Date(response.data.sys.sunrise*1000).toLocaleTimeString("en-GB").slice(0,4);
          this.sunset = new Date(response.data.sys.sunset*1000).toLocaleTimeString("en-GB").slice(0,4);
      })
      .catch(error => {
        console.log(error);
      });
    },
  },
  beforeMount() {
    this.getWeather();
  },
});
用您从 openweathermap 获取的 API 密钥替换{Your API Key}并重新加载页面,您现在应该会看到包含当前天气数据的应用程序。
结论
这篇文章很长,首先感谢你的坚持。希望你学会了如何结合使用 axios 和 Vue 从 API 获取数据。现在我想问问你,是想让我更清楚地解释一下,还是想解释一下其他内容。
最后,您使用 API 创建的第一件东西是什么?
文章来源:https://dev.to/fabiorosado/weather-app-using-vue-and-axios-4ia6