停止使用 Swagger-UI 和 MSW,改用 SDK
概括
如果您是前端开发人员,请停止使用swagger-ui和msw。
相反,您可以自动构建 SDK(软件开发工具包)。
- SDK包含哪些功能?
fetch函数集合- 使用 TypeScript 编写的 DTO 结构
- 用于测试的模型模拟器
- Github 仓库:https://github.com/samchon/nestia
- 相关手册:https://nestia.io/docs/migrate
有了 SDK,您无需msw再忍受 Swagger 文档的读取和模拟,只需专注于业务逻辑,更快速、更安全地构建您的前端应用。
传统方式 -swagger-ui
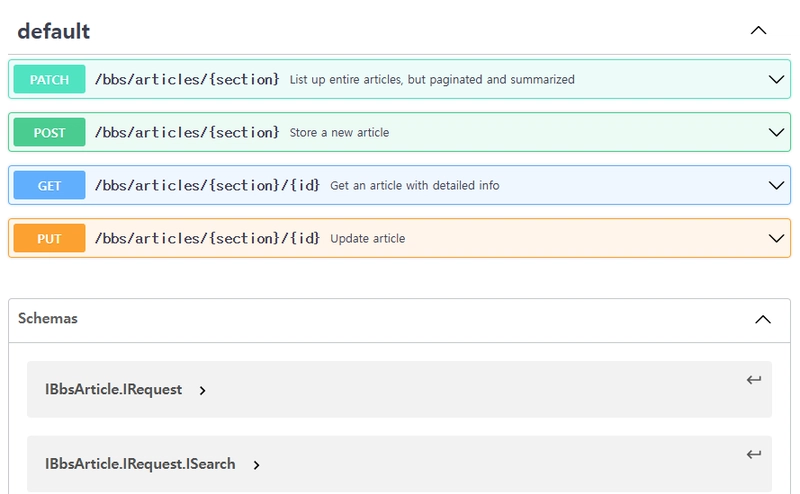
如果您是前端开发人员,并且已收到swagger来自后端的文档,您可以在上打开它swagger-ui。
从读取swagger文档后,您可以使用或函数swagger-ui实现与后端服务器的交互代码。您还需要根据 JSON 模式定义编写 DTO(数据传输对象)结构。一些专业的前端开发人员甚至会构建一个模拟后端服务器进行测试。axiosfetchmsw
在上述过程中,您可能会犯一些错误,例如误读 API 规范或错误编写 DTO 结构。此外,使用 模拟后端服务器时msw,您可能会误解真实后端服务器的 API 规范。只要前端开发人员是人,而不是机器人,这些都是我们身边常见的错误。
顺便说一句,这类常见错误在现实世界中有时会造成严重的问题。至少,这类错误永远不会被编译器捕获,而只能在运行时捕获。我们犯的错误越多,捕获和调试就越困难。当然,即使没有错误,msw手动实现冗余的 DTO 或 fetch 函数以及模拟代码也是非常费力且繁琐的工作。
- 手写
- 获取函数
- DTO 结构
msw模拟代码
- 重复且费力的工作
- 编译时无法捕获错误
新时代-软件开发工具包
npm install -g @nestia/migrate
npx @nestia/migrate swagger.json outputDirectory
顺便问一下,如果这样的过程可以完全自动化,那会怎么样?
设置@nestia/migrate并运行上述构建命令。然后它@nestia/migrate会分析目标swagger.json文件,并代替你编写 TypeScript 代码。自动生成的 TypeScript 代码将包含以下所有功能,我称之为 SDK(软件开发工具包)。
fetch函数- DTO 结构
- 用于测试的模型模拟器
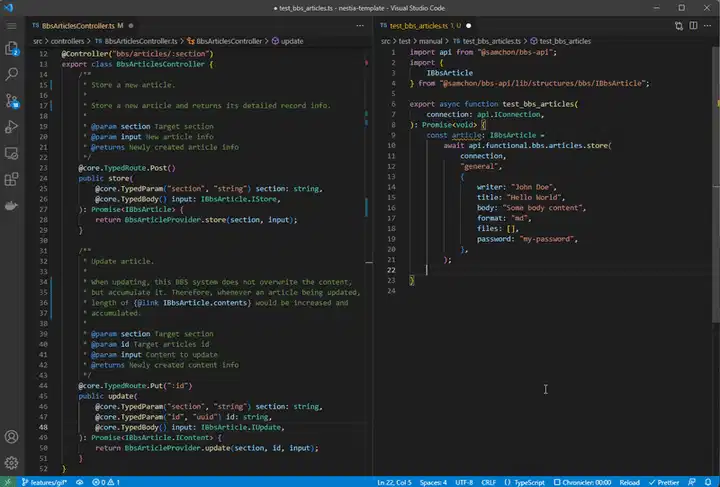
浏览一下新构建的 SDK 文件,你会发现fetch函数被集中到src/api/functional目录中,转换后的 DTO 类型也存储在src/structures目录中。打开其中一个文件,你就能明白 SDK 是什么样子的了。
右侧是利用 SDK 的客户端(前端)代码
作为参考,左边是迁移后的NestJS 服务器代码
示范
让我们通过演示项目看看 SDK 是什么样子的。
您可以通过输入以下命令重复相同的 SDK 生成过程。
git clone https://github.com/samchon/nestia-template

cd nestia-template
npm install
npm run build:swagger

npm install -g @nestia/migrate
npx @nestia/migrate packages/api/swagger.json ../bbs
- 目标
swagger.json文件:在 Swagger-UI 中查看 - 生成的 SDK:samchon/nestia-migrate-examples/bbs/src/api
src/api/structures/IBbsArticle.ts
将自动生成的 TypeScript DTO 结构类型与原始swagger.json文件的 JSON 模式定义进行比较,可以发现转换过程非常完美。它成功还原了每个属性名称和类型,甚至包括format注释标签。
export type IBbsArticle = {
    /**
     * Primary Key.
     *
     * @format uuid
     */
    id: string;
    /**
     * Section code.
     *
     */
    section: string;
    /**
     * Name of nickname of writer.
     *
     */
    writer: string;
    /**
     * List of snapshot contents.
     *
     * Whenever updating an article, its contents would be accumulated.
     *
     */
    snapshots: Array<IBbsArticle.ISnapshot>;
    /**
     * Creation time of the article.
     *
     * @format date-time
     */
    created_at: string;
}
src/api/functional/bbs/articles/index.ts
自动生成fetch功能也很完善。
/**
 * Update article.
 *
 * When updating, this BBS system does not overwrite the content, but accumulate it.
 * Therefore, whenever an article being updated, length of {@link IBbsArticle.snapshots}
 * would be increased and accumulated.
 *
 * @param section Target section
 * @param id Target articles id
 * @param input Content to update
 * @returns Newly created content info
 *
 * @controller BbsArticlesController.putById()
 * @path PUT /bbs/articles/:section/:id
 * @nestia Generated by Nestia - https://github.com/samchon/nestia
 */
export async function putById(
    connection: IConnection,
    section: string,
    id: string,
    body: IBbsArticle.IUpdate,
): Promise<putById.Output> {
    return !!connection.simulate
        ? putById.simulate(
              connection,
              section,
              id,
              body,
          )
        : Fetcher.fetch(
              connection,
              putById.ENCRYPTED,
              putById.METHOD,
              putById.path(section, id),
              body,
          );
}
export namespace putById {
    export type Input = IBbsArticle.IUpdate;
    export type Output = IBbsArticle.ISnapshot;

    export const METHOD = "PUT" as const;
    export const PATH: string = "/bbs/articles/:section/:id";
    export const ENCRYPTED: Fetcher.IEncrypted = {
        request: false,
        response: false,
    };

    export const path = (section: string, id: string): string => {
        return `/bbs/articles/${encodeURIComponent(section ?? "null")}/${encodeURIComponent(id ?? "null")}`;
    }
    export const random = (g?: Partial<typia.IRandomGenerator>): Output =>
        typia.random<Output>(g);
    export const simulate = async (
        connection: IConnection,
        section: string,
        id: string,
        body: putById.Input,
    ): Promise<Output> => {
        const assert = NestiaSimulator.assert({
            method: METHOD,
            host: connection.host,
            path: path(section, id)
        });
        assert.param("section")("string")(() => typia.assert(section));
        assert.param("id")("string")(() => typia.assert(id));
        assert.body(() => typia.assert(body));
        return random(
            typeof connection.simulate === 'object' &&
                connection.simulate !== null
                ? connection.simulate
                : undefined
        );
    }
}
另外,再次详细查看上述fetch函数,您可能会发现 SDK 函数正在嵌入模型模拟器代码。
当connection.simulate配置属性时,putById.simulate()会调用内部函数,通过typia.assert<T>()函数校验输入的参数,校验通过后,putById.simulate()通过函数返回一个随机值typia.random<T>()。
这就是我所说的模型模拟器。它只是简单地使用typia.random<T>()函数来组合模型数据,并能够分析目标类型T并生成类型匹配的随机数据。
当然,如果你不想要随机的模型数据,而是想自己编写,那就这样做吧。
@nestia/migrate
实际上,我已经开发了@nestia/migrate从其他语言(或其他框架)迁移到 的工具NestJS。由于我是 的忠实粉丝NestJS,希望更多的后端开发人员在他们的后端项目中使用NestJS,所以我构建了这样一个转换工具。
此外,我还开发了另一个方便前端开发者使用的工具,可以生成SDK和原型模拟器。顺便说一句,我突然意识到它们可以结合在一起。虽然这些 SDK 生成器和迁移工具的开发目的不同,但如果将它们结合起来,它们可以成为前端开发者的理想工具,即使它们最初的用途是后端开发。
所以,我把它们整合在一起,并在本文中进行介绍。前端开发者们,别再用swagger-ui和 了msw。让我们用@nestia/migrate命令来构建 SDK。这样,你的前端开发就会更轻松、更快捷、更安全。
我认为@nestia/migrate这可能是一种高效前端开发的新解决方案。你同意我的观点吗?
 后端开发教程 - Java、Spring Boot 实战 - msg200.com

